Wednesday, July 31, 2019

You Blow My Mind!


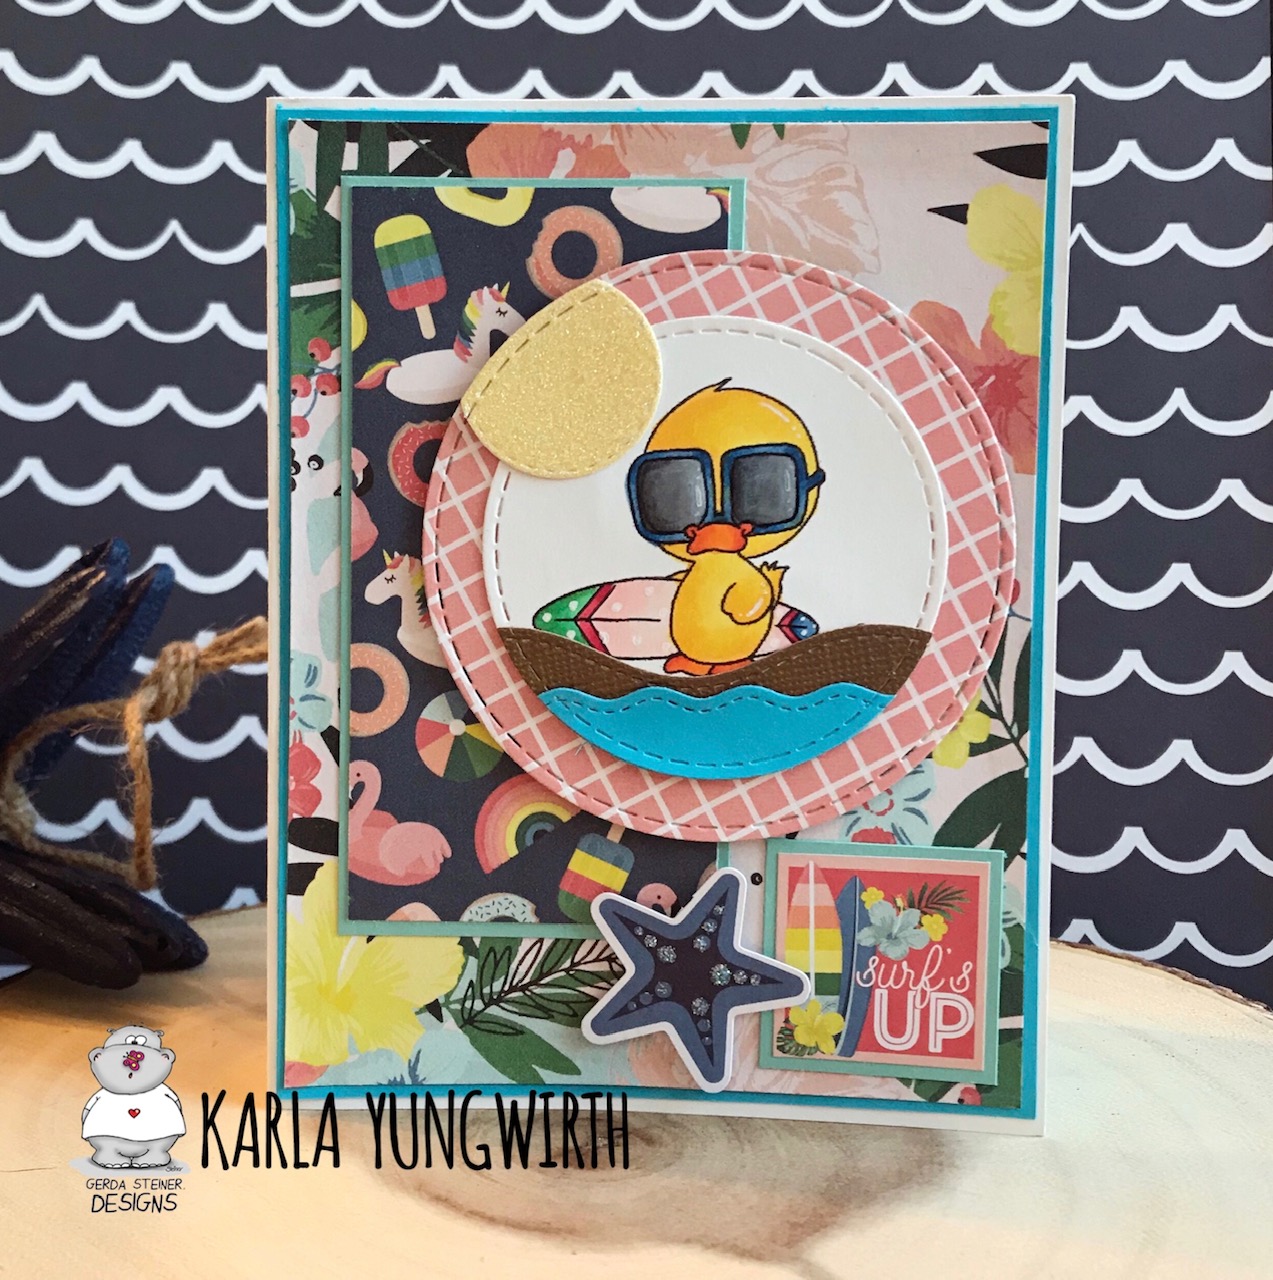
Hi everyone! Cathy here sharing another card using the super cute Big Bite stamp set!

I just love this pufferfish, so he got his own card this time.


I started by die-cutting a panel of watercolor cardstock and I painted a splashy background with Dr. Ph Martin's liquid radiant watercolors in Turquoise Blue, Norway Blue and Calypso Green.

I then painted another piece of watercolor cardstock with Chartreuse and die-cut it using a "Loopy Rings" die from Memory Box.

I adhered the background panel to my card base and added the die-cuts.

I colored the images from this set with Copics and fussy cut them out. There are also coordinating dies to these stamps available HERE.


To finish it off, I heat embossed the sentiment from this set on black cardstock using detail white embossing powder, die-cut the sentiment and adhered it and the stamped images to the card front.

Pretty easy and I really love how he steals the show on this!

Hope everyone's enjoying a relaxing Summer and having lots of crafty time!

See you again soon!


Ha-bee birthday! - Larissa (Digital stamp)


Hi everyone, I am Larissa from Car-d-elicious and today I am posting a new card on the blog from Gerda Steiner designs.


This time I have made a card with the digital stamp Ha-bee birthday from Gerda Steiner designs. I have coloured the image with my Polychromos pencils and the Clear Spectrum noir sparkle glitter pen. Then I have fussy cut the image. I added masking tape on the front of a white card and then I coloured the card with Tumbled glass and Broken china distress oxide ink. From white cardstock I have die-cut a couple of clouds with the Cute cloud outline die from My favorite things and I glued those on the blue part of the card. The image is glued on the card with foamtape.


*********************************************************************************
STAMP: Ha-bee birthday from Gerda Steiner designs
COLORING MEDIUM: Polychromos pencils, Distress oxide inks
PAPER: White cs
INK: Tumbled glass and Broken china distress oxide ink
DIES: Cute cloud outline die from My favorite things
ACCESSORIES: Masking tape, Clear Spectrum noir glitter sparkle pen

Tuesday, July 30, 2019

You are mermazing

Hi there,

it's Tanja here and I created this lovely Mermaid Card using the Gerda Steiner Designs Mermaid Digital Stamp:

  • color the Gerda Steiner Designs Mermaid with ZIG Clean Color Real Brush Pens
  • add Stickles Glitter Glue Unicorn to her tail
  • create a background on Yupo using Alcohol Inks (Aqua, Turquoise, Silver Mixative)
  • cut out a My Favorite Things Stitched Mini Scallop Square STAX out of the Yupo
  • apply some Distress Ink Picket Fence through the Clearly Besotted Stamps Sunny Day stencil
  • cut out a hill shape from kraft cardstock and add splatters with watered-down Distress Ink Ground Espresso and white acrylic paint
  • cut out a rock and a coral from the My Favorite Things Under the Sea die set and color them with ZIG Clean Color Real Brush Pens as well
  • cut out a stitched rectangle from Neenah Desert Storm kraft cardstock
  • the sentiment from the My Favorite Things Mermazing set is heat-embossed with WOW! Bright White Super Fine embossing powder onto a strip of Neenah Desert Storm kraft cardstock


Have a wonderful day.

Hugs,


Monday, July 29, 2019

Surf's Up Summer Card by Karla


Hello friends! Karla back today with a super cool card using the Gerda Steiner Designs Surfing Duck digital stamp. This little guy is having such a blast with his awesome surf board! I'm sure he's going to put a smile on anyone's face. You can even find this cutie with a few extra images as a clear stamp Catch A Wave 3x4 Stamp in the shop now!


I found the perfect paper using the Simple Stories Sunshine & Blue Skies collection and used one of the stickers as my sentiment. I popped up a cute little blue starfish and added some fun Stickles for glittery shine. I diecut a sunshine, waves and sand to complete the little beach scene. 


I used a Smash pen to draw in some details on his surf board and coloured him in with Copics. A bit of Glossy Accents on his sunglasses complete the card!


Thanks so much for stopping by today! Be sure to head over to the Gerda Steiner Designs Shop to see what catches your eye today. Have an awesome week my friends!

Hugs,
Karla 

Sunday, July 28, 2019

Make a Wish Mouse

Hi Everyone, Melissa here.


For today's inspiration I have used the 'Make a Wish Mouse' Digital Stamp.
  • This is a single layered card.
  • Print image onto Copic X-Press It Blending card and colour with Copic Markers.
  • Print another image onto Eclipse Masking Tape and fussy cut.  Layer this onto the Mouse and Cupcake.
  • Using a Blending Brush or Foam colour the background with Distress Oxide Inks.  I used Peacock Feathers and Salty Ocean. When finished, remove the masking tape.
  • Print sentiment onto black card stock using a Laser printer and foil with white Decofoil.  Trim to size and adhere to card.
  • Apply Nuvo Shimmer Pen to the Cupcake and flame of candle.
  • Apply Glossy Accents to the Cupcake, Flame and Hat.

I hope you have a great day
xxx

The journey is the destination

Hi, Margreet here.
I created another card with the sweet digital stamp Snailmail from Gerda Steiner Designs
I first made a background with Various Ink (refills of Copics). Attached it with foamtape on purple cardstock.
This time I changed the image in Word in various heights. Colored them with copics matching the background and fussy cut them.
I made another background strip in 2 yellow colors and die cut it with a Joy!crafts border die.
The 3 snails are attached with foamtape.
The sentiment is from Quotations of Tim Holtz.
Hope that I have given you some inspiration with this cute snail.
xxx Margreet


Saturday, July 27, 2019

You blow my mind by Noga Shefer


Hi crafty friends,  Noga here and I am so happy to share with you another project for Gerda Steiner Designs today.


My card featuring the brand new adorable  Big Bite 4x6 Clear Stamp Set and  Big Bite 4x6 Die Set.

To make this card I took an A2 panel of Bristol smooth cardstock. The background sand was created with hills die and scattered straw distress oxide ink. The sea was created by blending tumbled glass distress oxide ink.

I also splattered scattered straw distress oxide ink on the sand.

Next I colored this adorable  image using copic markers. I glued all the images to my panel with foam tape for dimension.

Next I stamped a greeting from this stamp set using white embossing powder, I want that the sentence will be like a part from the sea background.

To finish off, I added 3 clear hearts for decoration.


I hope you enjoy the card I created and feel inspired to create!

Thanks for stopping by,


Friday, July 26, 2019

Friends forever....!!

Hey everyone....

Ashlee here with you today with a new post sharing a card I made using the super cute set "Wheek, wheek, wheek".... (co-ordinating dies also available)

I made this card a fun shaker filled with pretty sequins and popped all the fun coloured cuties over the top...


I finished off the card with a sweet sentiment "Lettuce be friends forever!" and a touch of clear sparkle sequins!!


The guinea pigs are coloured with Copic sketch markers...
E0000, E40, E33, E15, E18, R20

I hope you feel inspired to create a fun Gerda Steiner shaker card and that you enjoyed seeing this one....

Happy crafting everyone, Hugs Ashlee. 

Thursday, July 25, 2019

Paper Tole Puppy

Happy Thursday everyone!  I’m Allison Cope and I’m here to share a fun tutorial on how to create a 3-dimensional paper tole image.

Here are the tools that you will need for the technique:
- cardstock
- fun stamps
- a coloring medium
- scissors, exacto knife
- 3D adhesive (I used Olba Glue)

So come and join me in my craftroom for some coloring and creating today.  I’m using the adorable digital image “Dog on Scooter Vrooming By”.

https://www.youtube.com/watch?v=y3WRVdPmADc&feature=youtu.be

Here is a close up the card I created for my little doggy to ride on.  I kept the back ground, created by Copic Markers, very soft and blurry to indicate movement.

I also added some fun shimmer to the puppy’s scooter and helmet too!


Thanks for joining me today!  I’d love to hear what you think about my card today.  Is this a technique you have tried before?

Now go get crafty!

~ Ally ~

Wednesday, July 24, 2019

The NEW Big Bite Stamp Set will Blow your Mind!!


Hello and Happy Wednesday Crafty Friends!  Tina here from Cards & Coffee Time, today we are taking a Big Bite of cardmaking fun!!  I am sharing a puffer fish card with the BRAND NEW Big Bite stamp set available right now over at the Gerda Steiner Designs Shop ,the Coordinating Dies are available too!! 


Okay.....cuteness alert!!! I think the images in this stamp set are soooo stinkin fun and I especially loved the puffer fish!! I used a circle stencil and oxide inks to fill my background with bubbles and bright alcohol markers to color in the the sweet puffer fish images and love how it turned out, I hope you do too!!


You can check out how I created this card down below or over on my YouTube Channel, Just Click Here🙂  Thanks so much for visiting!  Have a wonderful day!!  Sending you Crafty Hugs, Tina

Snail mail - Larissa


Hi everyone, I am Larissa from Car-d-elicious and today I am posting a new card on the blog from Gerda Steiner designs. I have made a card with the digital stamp Snail mail from Gerda Steiner designs. I have coloured the image with my Polychromos pencils, the black glaze pen and a white gelpen. I have fussy cut the image.


On a white card I made a background for the image with Broken china distress ink. I have die-cut 3 clouds from white cardstock with the Cute cloud outlines from My favorite things and glued those on the card. With the Fresh cut grass die-namics from My favorite things I have die-cut a grass border and coloured it with Mowed lawn distress ink. I have glued the snail and the grass on my card. Next to the image I have stamped a sentiment from the set Mouse mail from Reverse confetti.


*********************************************************************************
STAMP: Snail mail from Gerda Steiner designs, Mouse mail from Reverse confetti
COLORING MEDIUM: Polychromos pencils, Distress inks
PAPER: White cs
INK: Versafine clair nocturne, Mowed lawn and Broken china distress ink
DIES: Fresh cut grass die-namics and Cute cloud outlines from My favorite things
ACCESSORIES: Black glaze pen, white gelpen, Clear Spectrum noir glitter sparkle pen

Tuesday, July 23, 2019

Sea you soon

Hi there,

I created this underwater card for Gerda Steiner Designs:

  • stamp some of the images and the sentiment from the Gerda Steiner Designs Deeply set with Versafine Clair Nocturne
  • mask off the images with Masking Fluid
  • create an underwater background with Distress Ink (Mermaid Lagoon, Chipped Sapphire) and water droplets
  • remove the masking
  • color the images with watercolor pencils
  • cover a cardbase with patterned paper before adhering the panel


Have a wonderful day.

Hugs,


Sunday, July 21, 2019

Snail Mail

Hi Everyone, Melissa here.


For today's inspiration I have used the 'Snail Mail' Digital Stamp.
  • Card Base: 10.5x14cm White cardstock.
  • From a piece of white card, cut frame using die.  Lightly trace this frame onto card base using a pencil.  this is a guide for where your design will be. Set aside frame for later use.
  • Tape the outside of the drawn frame with post-it notes to protect the card base.  Using Catherine Pooler Ink (It's a Boy), colour the rectangle.
  • From a piece of white card, cut the grass and colour using Catherine Pooler Ink (Lime Rickey).Cut to side and adhere to bottom of the coloured rectangle on the base card.
  • From a piece of white card, cut the cloud twice using the die.  I used the smallest one.  Adhere the 'outline' of the clouds to vellum and trim.  Adhere these to the base card.
  • Print the image onto Copic X-press Blending Card and colour with Copic Markers.  Fussy cut the image leaving a small white border.  Adhere to base card as shown.
  • Adhere cut frame to base card.
  • Stamp sentiment using black ink.

I hope you have a great day
xxx

Snail mail

Hi, Margreet here.
I created a birthday card with the sweet digital stamp Snailmail from Gerda Steiner Designs
I started with embossing of the base kraft card with a Swiss dot embossing folder.
Printed and colored the image with copics, and die cut. Another die cut in blue to mat the snail image.
The sentiment is stamped on a tiny die cut and I attached it with foam.
I glued 2 stripes of Grey Stones Ribbon from Crafty Ribbons beneath the cute snail image.
 
Hope you like my Snailmail.
xxx Margreet


Saturday, July 20, 2019

See You Soon

Hi everyone! It’s Jeannie (InsideoutJeans) on the blog today to share a card I created using Gerda Steiner Designs’ stamp set named, Deeply. I really love any type of underwater stamp set that can create an awesome scene and this is definitely one of them.

I stamped out all the images from this set. They go together well and I knew it'd create a great scene. I wanted to make this submarine the focal point of the card and include the little bear inside. Even though I planned to have a scene filled with all the stamp set's images, I wanted to make it a little extra special with an interactive element.


For the background, I masked off the submarine and I used distress inks so there was a variation of blues.


The interactive element is a simple slider. The only tricky part is to mask off the porthole so it's just the bear being stamped. That is the element that will move in and out of the porthole.


I colored all the stamped images and fussy cut them out. I arranged them everyone on the card and used the blacked out fish images to fill up any empty space. I really love how this turned out and I hope you did too. 


Thanks for stopping by! Come back soon! 


Snail Mail by Karla

Hello! It’s Karla back today with a heart shaped card featuring the adorable Snail Mail Digital Stamp. Seriously, who would be able to resist smiling when they opened up this happy mail!


I coloured this cutie up with Copic Markers and used some embroidery floss to stitch around the edges of my diecuts, which I cut with Sizzix pierced heart dies. I even used the largest heart to diecut a folded card base for a heart shaped card. A couple folded envelopes cut with a Tim Holtz die and some pretty sequins finish off the card.


Thanks so much for stopping by today! Be sure to head over to the Gerda Designs Shop to see what inspires you to create something fun today! 

Hugs,
Karla