Tuesday, January 30, 2024

Stay Positivi-Tea


Hello lovelies!

Today I have the pleasure of showing you an new card of mine here on the blog again.

And of course I send you greetings from Germany.

If you follow me on Instagram, you've probably already noticed that I'm totally addicted to the postcard style.  And you can try out so many beautiful stamp sets with them. 

The Positivi-Tea set has been on my wish list for a long long time and now I've finally treated myself to it and used it straight away, of course. The designs are all so adorable, aren't they? 

I used my favorite colors pink and turquoise. 

I colored the motifs with Copic markers.  The background is wiped with Distress Oxide Broken China. First completely and then again with a stencil. 

Since I also like to send cards just like that, without any special reason, the greeting was just a simple "hello". But a hello often opens many doors. 

I hope you like my card and I wish you a wonderful creative day. 

Yours, Nicole

You can also check me out on Instagram. I would be very happy. 

https://www.instagram.com/kimbaslydog/


Monday, January 29, 2024

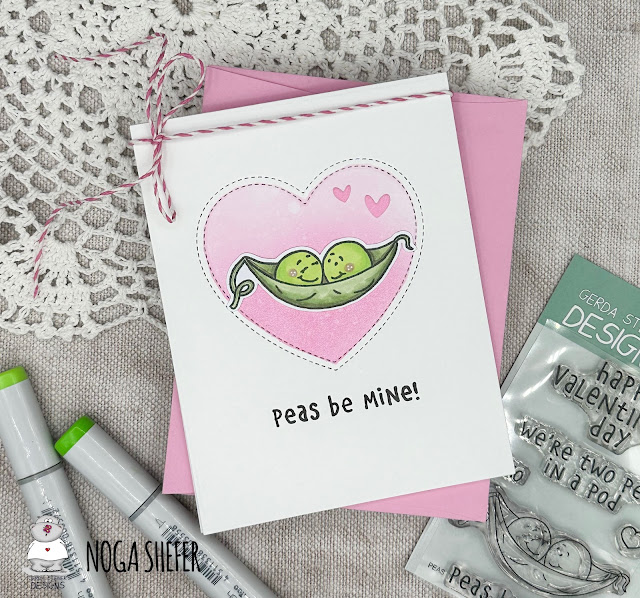
Peas be mine! by Noga Shafer


Hi crafty friends,  Noga here and I am so happy to share with you another Valentine's Day card for 2024.

My card featuring the adorable Peas be Mine 3x4 Clear Stamp Set.

To make this card I took an A2 panel of Bristol smooth cardstock and die cut an stitched heart on it.

The background was created by blended kitsch flamingo distress oxide ink using masking.

Next I colored the sweet image using copic markers: G85, BG96, YG13, YG07, YG03. G82, RV32, RV52, VO1 and glued it to my panel.

Next I stamped a greeting from the stamp set using black ink.

To finish off, I added two little hearts for decoration and a baker twine.

I hope you enjoy the card I created and feel inspired to create!

Thanks for stopping by,


Saturday, January 27, 2024

Hi creative minds

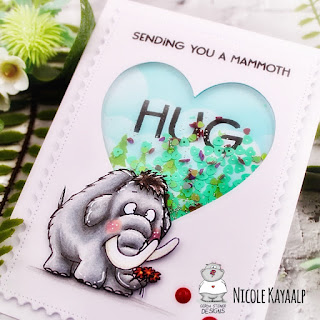
today I am a guest designer on the blog and I am working with the new stamp set BIG GUY.


I opted for a Shaker card that I put together using the die-cutting templates from Create a Smile -postal stamp- and Simple Lettering -hearts-.

I also created a background with DistressOxideInks and a stencil from MFT (MyFavoriteThings), as you can see in the small illustrated tutorial.


I colored with the markers from Ohuhu Art and I always find few color combinations, so I always try to give them to you.

I myself spent a day trying to find the right combinations for me.
I like to use a gray polychromatic pencil for shading and a UNI POSCA pencil in white for light accents.


The sentiment on the card is stamped with a black ink pad and I embossed the HUG to make it look nicer and more dominant in the shaker element.


If you have any questions or suggestions, please leave a comment. I look forward to hearing from you.

I hope you like the Mammoth Shaker card with the great stamp set BIG GUY .

Creative greetings
Nicole alias Stempelfiziert


Wednesday, January 24, 2024

I Heart U!

 Greetings everyone! It's me again, Jessie Scott (@chevy.scott on IG), Guest Designing for Gerda Steiner Designs!

Today I have another fun collaboration with Pear Blossom Press products to share. It's almost Valentine's Day so what better than to use the adorable Penguin with Heart stamp! 


For this design I used my OLO Markers to color a couple Penguins (I always worry I'll mess up :-D). 
I ink blended a Lawn Fawn heart stencil with Distress Oxides (Squeezed Lemonade, Mustard Seed, Kitsch Flamingo, Picked Raspberry) on Kraft and cut it out with a Lawn Fawn heart die.


I added an "I" and "U" from Mama Elephant's alphas and cut out a panel of white and gold decorative paper to mount on a purple card base.

Here's the finished project!


If you want more details on other products used and how to make this fun light up, visit my blog today for the companion post!


See you again soon!

Monday, January 22, 2024

Happy Valentine's Day by Noga Shefer


Hi crafty friends,  Noga  here and I am so happy to share with you another project for Gerda Steiner Designs today.

My card featuring the brand new adorable  Li'l Hedgie 2x3 Clear Stamp Set .
This set is must have!!

To make this card I die cut a scallop frame die out of Bristol smooth cardstock. 
I ink blended the background using lumberjack plaid distress oxide ink  and splashed it with water.

Next I colored the sweet image using copic markers: E77, E74, E71, E00, E0000, RV02, RV00, R59 and R56.
glued it to my panel with foam tape for dimension and stamped a greeting from Valentine Cats 4x6 Clear Stamp Set - GSD716 using black ink.

For a final touch, I added tiny hearts.

I hope you enjoy the card I created and feel inspired to create!

Thanks for stopping by,

Saturday, January 20, 2024

Sending you a mammoth hug


Hi everyone!  I'm here today to share another card using the new releases Woolly Big Love and Big Guy.  These mammoths are adorable and I love that Woolly Big Love has a mountain stamp (I'm a big fan of the mountains).

For this card, I started by stamping out a 'mountain scene', keeping larger trees near the bottom (closer to me) and smaller ones towards the mountains (farther away).  Then I put it aside for a week or two.  I wasn't too sure about the layout I picked and almost didn't finish the card, but finally decided to give it a shot (and I'm glad I did).

I colored in the scene using Derwent Inktense pencils and a water brush.  These are my favorite way to color an image.  I usually start by lightly coloring (dry) along the edges of an image.  Once I'm done, I use a water brush to first wet the open non-colored area, then work towards the colored edge and pull the color back towards the middle.  Inktense pencils are ink based and 'set' or become permanent fairly quickly.  Once they set, you will not be able to go back over the area to try to move the color anymore.  Large open areas are usually harder to color because of how quick you need to work with them.  For this card though, it seemed to work to my advantage and gave the grass some texture.  After I had the whole card colored, I went over the card again and added some shading (by touching the water brush directly to the pencil tip, then applying to the card). 

Lastly, I stamped the sentiment on the card and on a lighter grey cardstock.  I cut the word mammoth from the grey cardstock, inked the edges, and glued it in place on the main card.  I used Gina K's master layouts 1 to cut the image and a grey matt and glued the card together.

This card was a great reminder to keep going and not give up on a project.  I love the way the card turned out in the end.  Thank you for reading about my creative journey.  I hope you have fun creating your own mountain scenes.
 

Friday, January 19, 2024

Woolly Mammoth Hug Card


Hello again everyone, it's Karen and I'm guest designing for Gerda Steiner Designs again today and I've got another mammoth card to share with you. 

Supplies Used: Gerda Steiner Designs "Big Guy" stamp set GSD845, and "Woolly Big Love" GSD846. Vellum, Copic markers, Cosmic Shimmer Embossing Sprinkles in Snow Storm, Momenta letter dies and Cosmic Shimmer Luna Paste in Moonlight Pearl ( just on the mountain tops), Cosmic Shimmer Colour Cloud ink in Clear Day.

My card measures 5 1/2" x 5 1/2" and I started off by colouring in the mammoths with a combination of Copic markers and finished off with pencil crayons to create a woolly look.  I fussy cut them out, being careful to also cut around their horns. Next, I stamped a line of mountains across the upper portion of my card and coloured them in with Copic markers.  I'm sorry I don't remember which markers I used, but it was a combination of Blue Violets and Cool Greys.  Then I coloured in the sky by blending a little of the Clear Day ink with a sponge applicator, and leaving some white areas for clouds. I added a few streaks to the ice at the bottom of the card with Copic markers in Blue Green shades, just to give a hint of colour to the ice.  I then covered the ice portion of the card with a piece of heavyweight vellum, folding the edges over to the back of the card front and adhering them with double sided adhesive tape to the back of the card front. I applied a little glue on the front along the bottom edge of the mountains and sprinkled on the embossing sprinkles.  These are large chunks of embossing powder, and need to be heated from beneath or they will just blow away.  But they give a fun, snowy texture to the card.  After heat setting them, I added the small shadow mammoth in the background.  I die cut the hug letters and coloured them in with Copic markers, again using the Blue Green shades as I wanted them to look icy.  I attached them to each of the mammoths, and then glued the mammoths to the card front.  I added a little more glue and embossing sprinkles on the ice and around their feet and heat set them.  The sentiment was combined from both stamp sets, and I clear heat embossed it.  Finally, I added some of the Luna Paste to the tops of the mountains.

Thank you so much for stopping by and I hope you're having a great day!

Wednesday, January 17, 2024

'Valentine Penguins' Acetate Card


Hello to everyone!  Bev Gerard here to share a fun way to use the adorable Valentine Penguins stamp set from Gerda Steiner Designs!  Seriously, it's so easy to color these sweeties you can quickly create lots of valentines in little time.
 
The penguin pair was stamped with Memento Tuxedo Black then colored with Copics C7, C5, C3, C1 & C0, YR14, YR23, R30 & R32 with touches of a white gen pen.  Penguins are lifted up on foam tape and placed atop layered red & white heart shapes.  


Taking advantage of the acetate layer, the inside sentiment is atop smaller heart layers that are placed directly behind the front hearts.   This is fun to create and fun to receive!

Basic A2 Card style recipe:
Base card stock = 4.25" x 8".  Score at 5.5" on the long side.  Use any border die to create interest on the remaining 3" flap.   I layered a matching-cut piece of scrapbook paper atop the flap.

Acetate layer = 4.25" x 5.5".   Adhere this beneath the border cut flap.  Strips of dbl.-sided adhesive work well here.


Thanks for visiting today!

Bev Gerard

Beverly on Instagram:  texasgrammy
Beverly's SCS Gallery:  TexasGrammy at Splitcoaststampers


Sunday, January 14, 2024

Valentine’s Day card by Noga Shefer


Hi crafty friends,  Noga here and I am so happy to share with you my first Valentine's Day card for 2024.

My card featuring the brand new adorable Big Guy Mammoth 4x6 Clear Stamp Set - GSD845 and Big Guy Die Mammoth - GSD845DIE.

To make this card I took an A2 panel of Bristol smooth cardstock and die cut herats background.

The background was created by blending victorian velvet distress oxide ink and splattering some faded jeans distress oxide ink with water on it.

Than I colored the sweet image using copic markers: T4, T3, T2, T1, T0, W00, RV02, RV00 and glued it to my panel using foam tape.

Next I stamped a greeting from this set using white powder and heat embossed it on black banner.

For a final touch, I added a baker twin.

I hope you enjoy the card I created and feel inspired to create!

Thanks for stopping by,

You are stronger than you think- night sky


Hi Everyone!  This is my first time posting here and I'm excited to share how I made this peaceful mountain scene.

When I saw this mountain stamp from Woolly Big Love, I immediately thought of a starry night over the mountains (can you tell seeing this is on my bucket list?).

For the sky, I started with a piece of Tim Holtz Distress watercolor paper.  I sprayed the paper first with water, then sprayed with several Tim Holtz Distress Stain sprays, including tree lot Mica Stain which added a bit of glimmer.  Next, I lightly "sprinkled" PaperArtsy Infusions in Black Knight (this is a powdered watercolor) around the edges (mostly to areas I wanted to be the darkest).  I sprayed the paper again with water, adding a little extra water where I wanted the color to "move" more.  At this point I had a lot of water on the paper and I tilted the paper back and forth until the color flowed to where I wanted it.  I let this dry overnight.  This sky didn't have as much green and purple as I wanted, so once it was dry I used a blending brush and Distress inks in twisted citron and wilted violet to add more color to the already tinted areas.  Lastly, I used a white wash (watered down white paint) on a fan brush to add splatters to the sky (by running the edge of the brush along the edge of scrap cardstock about 6 inches above the paper).  I used a toothpick on the larger splatters to pull out the edges outward, creating 'stars'.  

This process kind of has a mind of it's own, which is why I usually make several skies at a time in case one doesn't turn out.  It's also very messy, so I did all of this in an old cardboard box.

 
For the mountains, I stamped the image on a piece of white cardstock and used Derwent Inktense pencils (neutral grey and charcoal grey) and a waterbrush to color them in.  Then I stamped the sentiment from "Big Guy" and fussy cut the mountains out.  

Finally, I used the two larger dies from Gina K's master layouts 1 to cut a black matt for the backing (larger rectangle) and the sky and mountains from the slightly smaller rectangle.  I cut the sky first, then estimated how high I wanted the mountains to be in order to judge where to cut the piece of white cardstock .  Lastly, I attached the sky to the black cardstock, then the mountain piece to this and attached the whole piece to a 4.25" x 5.5" white card base.

This card was so much fun to make and you really never know what you're going to get until it's dry.  Thanks for reading and I hope you have some fun creating your own peaceful sky.


Friday, January 12, 2024

YOU ARE SO AWESOME

Hello dear creative minds.
I am Nicole Kayaalp from Hamburg/Germany and I am very happy to be able to contribute to the blog.

           Today I have the pleasure of presenting you a card with the Hippo and his friend the butterfly.


The two are so familiar that the Hippo's heart lights up immediately.
In the following pictures I show my applied DistressOxides and combinations of Ohuhu markers.


I used a stencil from MFT for the clouds. (Rolling Clouds ST143).


I always prime with the lightest color first and continue shading with the darker colors. Finally, I blend with the lightest color.


       I used a system from Pear Blossom Press to make the heart shine. These are very easy to work with.


                                          All in all a beautiful, simple card with a nice effect.

                     I hope you enjoyed my first blog post and that you have a nice creative time.


                                                                    Best regards 

                                                    Nicole Kayaalp alias Stempelfiziert


Thursday, January 11, 2024

Woolly Mammoth Birthday Box Card


Hello everyone, it's Karen here today and I'm so happy to be guest designing for Gerda Steiner Designs latest collection!  This is such a fun collection, full of big, funny, woolly mammoths!  I've got a full size box card for you today and here's a look at it...


Supplies Used:  Gerda Steiner Designs "Big Guy" GSD845, and "Woolly Big Love" GSD846. Background paper inside - Craft Consortium "In the Forest"; Lawn Fawn - Stitched Hillside Border dies

This card measures 4 3/4" wide by 5" tall, and is 2 1/4" deep when opened.  It will fold down flat and fit into an A7 (5 1/4" x 7 1/4") envelope, and there's lots of room to write a message on the back.   I didn't make a video for this particular card because I have done several of those previously, and I will link to those videos down below in case you're interested in giving this a try.  

For this card, I started by using my copic markers to colour in the mammoths, and then used pencil crayons to add some furry lines.  I used a black glaze pen to add in the eyes, and then fussy cut the mammoths out. 

For the box card, I used Distress Inks on the outside and blended from green to a light blue sky, leaving a few areas  blank in the sky to look like clouds. The center round opening was cut out using a 4" circle die, and all this is explained in the video.  The inside background is one of the papers from the "In the Forest" collection and just seemed well suited to the mammoths.  I cut some hilly grassy sections for the cross pieces from some Distress Ink blended cardstock, and added some flowers to those.  I die cut some white clouds and then stamped and heat embossed the sentiment which came from the "Big Guy" stamp set.  For a full explanation of how to put together this box card (and it's very easy to do!), please head over to watch the video.  

Here are links to two videos I've previously created showing you how to make these full size box cards, and I hope you'll come join me to see how it's done.  

PLEASE CLICK HERE for Sandy Paws Box Card

PLEASE CLICK HERE for Bee Happy Gnome Box Card

Thank you for stopping by and I hope you're having a great day!


Wednesday, January 10, 2024

Mammoth Hug Sneak Peek!

Hi, it's Danielle Dunlop here with you today! I created a card combining the two new mammoth stamp sets: Woolly Big Love and Big Guy.
I wanted to create a partial Clean & Simple card, so I stamped the images and the big sentiment on a 3.75 by 5 inch piece of card stock and I didn't add any more color to it besides the mammoths. To make the mammoths a little more interesting, I colored them in a purple-grey color with BV23 and BV31. Because I like to have at least a little teal in every one of my cards, I decided they would have teal hair.
With the Clean & Simple image area, I could go a little more colorful with the background. I used a hearts stencil with Distress Inks and created an ombre effect with Kitsch Flamingo and Picked Raspberry.