Showing posts with label birthday card. Show all posts

Wednesday, December 28, 2022

Penguin Birthday Shaker Card

Hello everyone, it's Karen here today and I hope you had a good Christmas holiday! I've got a shaker birthday card for you today with some happy, little penguins.

I've used the Penguin Cake - 4x6 Clear Stamp - GSD799, to create the cake and penguins.  I masked the two front penguins after stamping them on some Neenah Solar Crest card, and then stamped the cake and the middle penguin afterwards.  I used Copic markers to colour everything in, and then attached the image to the front of an A2 sized card.  I added some Distress Oxide Shaded Lilac ink around the outside of the penguins in a circular shape.

The paper for the card front is from the Grunge Light collection by Craft Consortium, and I cut out a circle that was big enough to allow the penguins to show through.  The sentiment is from the same stamp set, and I just used Versamark ink and white embossing powder and heat set it.  On the back of the card front,  I placed double sided adhesive tape around the opening, removed the backing paper, and then attached a piece of acetate that was big enough to cover the opening.  Next, I placed two layers of foam tape all around the opening and over the rest of the back of the card front.  I added some shaker bits over the penguins, before removing the backing of the foam tape and adhering the card front to the base. 

I used the Memory Box Bubble Circles die to cut the rings out from white cardstock - I cut two of these.  I actually cut the circles from scraps of inked up card I already had, but I think it would be even easier to just use markers or pencil crayons to colour in the circles.  I added Stickles Glitter Glue over top of the circles and let it dry before attaching the rings to the card front with glue.  And then all that's left, is to give the card a good shake!

Thank you so much for stopping by!

Sunday, October 23, 2022

Penguin Birthday Cake

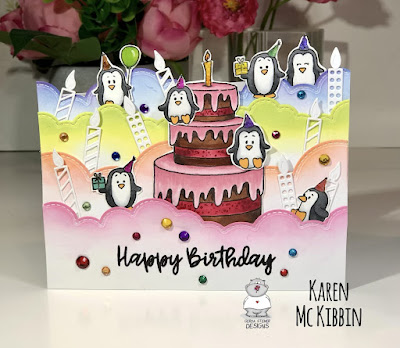
Hello and welcome back everyone, it’s Karen here today. I’ve got a birthday card for you that was created from a brand new stamp set from Gerda Steiner Designs. It’s the new Penguin Cake stamp set and it’s absolutely adorable! 


Aren’t those penguins just the sweetest?! I wanted some of the penguins and the cake to extend off the top of my card, so I cut my card base down to be 5 1/2” wide by 3 3/4” tall. I then used some cloud dies to create layers of clouds. I ink blended the tops of these in rainbow colours using Distress Oxide inks (I used Picked Raspberry, Saltwater Taffy, Ripe Persimmon, Carved Pumpkin, Squeezed Lemonade, Twisted Citron, Prize Ribbon and Seedless Preserves).  I stamped and clear embossed the sentiment on the bottom layer of clouds. Next, I layered the clouds up on the card front and tucked the cake and penguins in between layers. It’s really hard to see in the picture, but I used a tacky glue on the hats, and when it had dried, I used a little laminating foil to “colour” in the hats. The foil I used is DecoFoil Rainbow Shattered Glass and it’s got lots of different colours in it. I die cut some candles from white cardstock and also put those between the clouds to add some interest. Finally, I added a few gemstones for even more interest. Thanks for stopping by and I hope you’re having a great day! 

Tuesday, September 6, 2022

Scary Birthday Card

Hello crafty friends, it's Karen here today and I've got a fun birthday card today for someone with an October or fall birthday. It's an interactive card as the ghosts are all on swing mechanisms and move when the card is shaken.


I've used the "Ghosts" stamp set from Gerda Steiner Designs for this one.  My card is 5 1/2 " x 5 1/2" square, so slightly bigger than normal.  I started by creating the background.  I used Cosmic Shimmer Pixie Sparkles Powder in Wild Plum, Pumpkin Patch and Cut Grass.  These are those fun shimmer powders that you sprinkle on, mist with water and wait to see what happens.  It's a lot like alcohol inks - no two pieces turn out the same.  Once I had the colour that I wanted, I set it aside to dry.

I used some Copic markers in BV23, CO and C1 to colour in the ghosts, and then fussy cut them out.  The cemetary is from a "Graveyard" die set from Creative Expressions and I cut it from black cardstock.  I also cut a few clouds from white cardstock as they were needed to hide the swing mechanisms.  Once the background was dry, I glued the cemetary in place, and white heat embossed the sentiment which is from the Ghost stamp set. 

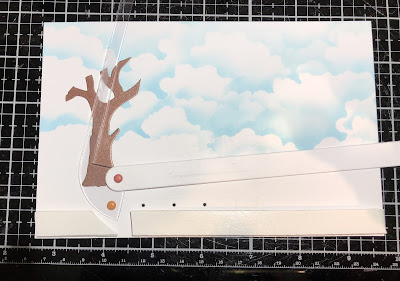
The swing mechanisms are easy to make and no special dies are required.  I used a piece of packaging acetate from a die set.  Using a regular paper punch, I punched a hole near the top left corner of the acetate.  I then cut a strip of the acetate just slightly wider than the hole, and just rounded the outside top edges around the hole.  The picture may help explain this better.


I then doubled up some foam tape, and used the same hole punch to punch out a piece of the tape. This foam tape fits inside the circle on the acetate, so if it feels too tight, you can use the paper punch to slightly enlarge the hole.  The acetate needs to be able to swing freely.  Next, I decided where I wanted my ghosts to go on the card front, and placed the acetate strips there.  I removed the backing paper from the circle pieces of foam tape, and placed them inside the acetate circles.  Then I used double sided tape to adhere the ghosts where I wanted them to go on the acetate strips, and trimmed the long side of the strips so they didn't stick out from behind the ghost.  If you want your ghosts to have a lot of movement, you can attach a penny to the back of the ghost which gives it more weight (I used regular cellophane tape to attach mine).  To prevent the strips from falling off the card, I attached the clouds over the foam circles and added a little more doubled up foam tape above the swing mechanisms to help support the clouds.  You want to be careful where you put the foam tape as you don't want to impede the acetate from swinging.  That being said, if the ghosts swing too much, you may want to put a little piece of doubled foam tape under the cloud to block some of the movement. Just play around with it until you have them moving the way you want them to.  It's not hard, I promise you, but it is a lot of fun.  
 
Before attaching the card front, I stamped the inside sentiment and added the extra two ghosts.  Finally, I glued the card front to the base and then played with the swinging ghosts.  I hope you'll give this a try as it's a lot of fun!  Thank you so much for stopping by.


Tuesday, May 17, 2022

Pigeon Acetate Bendy Card with *Video*

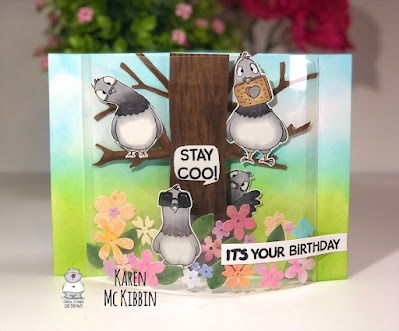
Hello everyone, it's Karen here again today.   I’ve got a fun new card fold idea for you today, using the adorable “Pigeons” stamp set from Gerda Steiner Designs. This is a 5” x 7” card that folds flat, but pops out to create a 3D card when it comes out of the envelope. There’s room on the back of the card to write a message and to decorate if you want. I have to give a shoutout to Sam Calcott of Mixed Up Craft who I first saw make this style of card.  I've got a link in the video description to her video which is well worth seeing.  Here’s a look at my card. 


Back of the card

Bottom view of the card showing dimension
 
I’ve made a video for you to show how this card was made. There are no special dies required, and it’s really not a difficult card to make. But it does have lots of dimension and a little bit of movement of the pigeons. So if you would like to see the video, please CLICK HERE

Thank you so much for stopping by and I hope you’re having a fun, creative day!


Wednesday, February 9, 2022

Fun Fold Meerkat Birthday Card

Hello everyone, it's Karen here again.  Today I thought I would share an easy fun fold card with you. It’s really just a trifold card with a bit of die cutting on the front flap. But it means there is extra room inside to add some more images so you can have a fun surprise for the recipient. I chose to use the “Meerkats on the Lookout” stamp set from Gerda Steiner Designs, because they are just so fun and there are quite a few images in the collection. Here’s a look at my card. 


Aren’t those meerkats just the cutest?!  The final size of this card is 5” x 3 5/8” so it’s similar to a mini slimline card. This really is a simple card fold and I’ve made a video for you showing you how I’ve made this one. If you would like to see how to make it, PLEASE CLICK HERE.

The tree die I used is from Elizabeth Craft and is just called “Tree”.   Here’s a list of the Copic markers I used for my colouring. 

Meerkats - W2, E53, E40, C2, C0, E27
Rocks - N6, N4 and W7, W5, W4

Thank you so much for stopping by and I hope you’re having a great day!


Tuesday, October 5, 2021

Squirrels and Gourds Birthday Card

Hello, it’s Karen here again today. I have another interactive card today that uses the Lawn Fawn Swish ‘N Pop pull tab die and I’ve paired it with the new “Gourds” and the “Happy Fall” stamp sets from Gerda Steiner Designs.  The gourds just make me smile and the squirrels are so cute, so I hope you don’t mind me doing a similar card again.  Here’s a look at the card before pulling the pull tab and after pulling it.


I really wanted the squirrel on the log to disappear as if he was scared by the talking gourds and then reappear hanging upside down in the tree, but I just couldn’t figure out how to make that happen.  So instead, the second squirrel appears from the tree. 

I coloured all the images in with copic markers and cut them out. The trunk of the tree is from an Elizabeth Craft die set just called “Tree”. The leaf canopy was made by adding some Pixie Sparkles (in Copper Splash and Red Oxide) from Cosmic Shimmer, to a piece of white cardstock, and lightly spritzing with water to activate the powder. After it was dry, I added a little Distress Oxide ink in Mustard Seed to get a deeper yellow colour. I freestyle cut out the leafy shape. 

The grass was made by ink blending with Distress Oxide inks in Mowed Lawn and Peeled Paint and then I die cut it with a grassy border that is in the same Tree die set used for the tree. For the sky background, I used the Cloud Edger stencil from A Colorful Life Designs and some Colour Cloud ink in Clear Day from Cosmic Shimmer. 

My card is actually a 5 x 7” card, so to use the Swish ‘N Pop die, I had to extend the pull tab by doing some partial die cutting on the pull tab. I also modified the assembly in order to make the hanging squirrel appear from the left. Here’s how that looks:


Basically, I’ve reversed which hole the pull tab is attached to, in order to make it swing up from the left. I’ve added double layers of foam tape along the bottom, and wherever else I could to anchor the grassy border without interfering with the mechanism. Once I had the mechanism in place and adjusted to allow the second squirrel to hang down, I attached the grassy border and then the tree and remaining images. 

I stamped and heat embossed the sentiment on a speech strip and adhered it above the gourds. I also stamped the inside sentiment which is from the Gourds stamp set. And then of course, I had to play with the card and watch the second squirrel come out! 

Thank you so much for stopping by and I hope you’re having a great day! 

Tuesday, September 21, 2021

Oh My Gourd Birthday Card

Hello, it’s Karen here again and thank you for stopping by. I’ve got a fun, interactive card today that features a new stamp set from Gerda Steiner Designs called Gourds.  I would like to point out that I made my card say “It’s Your Birthday” on the inside, but it could just as easily have said “It’s Halloween”, as that sentiment is also in the set. Here’s a look at the card:


I started by stamping and copic colouring the adorable gourds and some of the ghosts from the Ghosts stamp set. I love that with both of these sets, there are so many images with different expressions to choose from.  I meant to write down the copic markers that I used but I think I was too excited to colour the images and forgot, so I do apologize. 

I started by stamping the inside sentiment onto my card base, as I usually forget to do this while it’s easy to do.  On the front of the card, I used a piece of cardstock from the Happy Haunting collection from Craft Consortium for the background, but you could just as easily create an ink blended background.  I added a little Nuvo shimmer pen to the moon and stars. The next step was to use the Swish ‘n Pop Pull Tab die set from Lawn Fawn to add the interactive element on this card. I used the die as instructed by Lawn Fawn with the one exception that I modified it to allow me to have two ghosts swing up. To do that, I added a small strip of packaging acetate with double sided tape, to the long die cut arm. Here’s a picture of what that looked like to help make it clearer. 


I played around a little with the placement of this second ghost to be sure he would start by being hidden behind the tree and end up above the gourds. It really just meant I needed to add some bulk to the tree so it would hide the second ghost. The tree is from an Elizabeth Craft Tree die set and I used a cloud die I had to cut out some of the bushy leaves. I also stamped and cut out a few extra ghost faces to have them hiding in the tree. 

To cover the interactive mechanism, I used a border die to cut out a black foreground for the gourds to sit on.  I stamped the sentiment along the bottom and white heat embossed it. Next, I used a double layer of foam tape to pop up this layer onto the card front, and was careful to make sure I didn’t interfere with the movement of the mechanism. Finally, I attached the tree, again making sure the ghosts were hidden in the starting position. I was able to add some double layers of foam tape in the top right hand corner to help support the tree without disrupting the mechanism. Then I glued the gourds in place. Finally, I die cut the pull tab cover from a scrap of the background cardstock and adhered it with glue to the pull tab.  Then all that was left to do was to play with the pull tab and watch the ghosts come out! 

Thank you so much for stopping by and I hope you’re having a happy, creative day! 

Wednesday, August 11, 2021

Ha-bee birthday - Larissa


Today I am posting a new card on the blog from Gerda Steiner designs. This time I have made a birthday card with the digital stamp Birthday bee from Gerda Steiner designs. I have coloured the image with my Polychromos pencils and a white gelpen. I coloured the wings with the Clear Spectrum noir sparkle glitter pen. I have fussy cut the image. 

With the Crea-nest-lies XXL 33 from Crealies I have cut 3 circles from red patterned paper from the Striped silly paper pack from Sunny studio. I glued those circles with foamtape on a white card. The I glued the image with foamtape on the card. With a black fineliner I have drawn lines on the edges of my card. I have cut a couple of stars from blue cardstock with the Star confetti die from Alexandra Renke and I glued those on the card. 


*********************************************************************************
STAMP: Birthday bee from Gerda Steiner designs
COLORING MEDIUM: Polychromos pencils
PAPER: White and blue cs, Striped silly paper pack from Sunny studio
DIES: Crea-nest-lies XXL 33 from Crealies, Star confetti die from Alexandra Renke
ACCESSORIES: Black glaze pen, Clear Spectrum noir glitter sparkle pen, Black fineliner

I am a participant in the Gerda Steiner designs Affiliate Programme. This means that if you click on one of my links and subsequently make a purchase, I will receive a small commission of store credit, at no extra cost to you.

Tuesday, August 10, 2021

Have a Bee-autiful Day

Hello again and welcome, it’s Karen here today. I’ve got a card today that’s fun for summer. I’ve used the “Happy Bee-Day” stamp set from Gerda Steiner Designs for this one and kept it quite simple. 


I stamped the images with copic friendly ink onto some Neenah Solar Crest cardstock and then coloured them in with copic markers. I wanted the bee to hold the poppy, so I used a baby wipe to carefully remove the ink from the sign he was holding, before stamping the image. After colouring, I fussy cut the images out and also cut the lower part of the bees’ hand so he could hold the poppy  

Next, I used a honeycomb stencil and some Distress Oxide ink in Wild Honey to create the background as well as the sentiment strip.  My stencil is an older one, I think from Faber Castell, and had two sizes of honeycomb.  I went over some of the stencilling with Moda Scrap gelly paste, as well as over the bees’ wings. This just added some shine to the card, but any clear paste would likely work. The sentiment is from the same stamp set and I just stamped and clear embossed it onto the strip I had created. 

To assemble the card, I mounted the sentiment and bee on foam tape. I also put foam tape behind some of the flowers to add dimension. I glued the poppy onto the bee and then arranged everything onto the card front. So it really was a quick and simple card, but I do love how happy that bee is!  

Thank you for stopping by and I hope you’re having a great day! 

Tuesday, July 27, 2021

Hello sunshine - Larissa


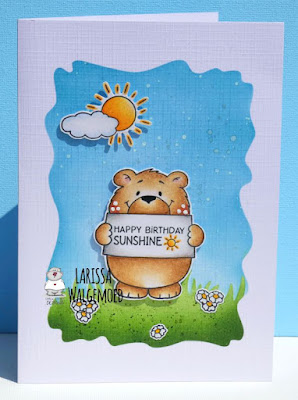
Hi everyone, I am Larissa from Car-d-elicious and today I am posting a new card on the blog from Gerda Steiner designs and this time I have made a card with the clear stamp set Hello sunshine from Gerda Steiner designs. For my card I have stamped the images of the bear and the sun and cloud and then I coloured them with my Polychromos pencils, the black glaze pen and a white gelpen. I have coloured both suns with the Clear Spectrum noir sparkle glitter pen. I have fussy cut both of the images. 

On a white card I made a background for my images with the Watercolor wash rectangle stencil from My favorite things. The sky is made with Tumbled glass and Broken china Distress ink. I used white acrylic paint and Frost white all-purpose ink from Tsukineko to add some tiny paint splatters. For the grass I have used the Grassy hillside stencils from Lawn fawn and Mowed lawn and Rustic wilderness Distress ink. I have added paint splatters with the Rustic wilderness Distress ink. I glued the images with foamtape on the card. I stamped a little flower from the set Hello spring from Gerda Steiner designs a couple of times and also added those on the card in the grass.


*********************************************************************************
STAMP: Hello sunshine and Hello spring from Gerda Steiner designs 
COLORING MEDIUM: Polychromos pencils, Distress inks
PAPER: White cs
INK: Versafine clair nocturne, Tumbled glass, Broken china, Mowed lawn and Rustic wilderness Distress ink
ACCESSORIES: Black glaze pen, White gelpen, Clear Spectrum noir glitter sparkle pen, Watercolor wash rectangle stencil from My favorite things, Grassy hillside stencil from Lawn fawn, White acrylic paint, Frost white all-purpose ink from Tsukineko. 

I am a participant in the Gerda Steiner designs Affiliate Programme. This means that if you click on one of my links and subsequently make a purchase, I will receive a small commission of store credit, at no extra cost to you.

Tuesday, June 29, 2021

Elephant and bird - Larissa


Hi everyone, I am Larissa from Car-d-elicious and today it is my turn to post something on the blog from Gerda Steiner designs. This time I have made a  card with the digital stamp Elephant and bird from Gerda Steiner designs. I have coloured the image with my Polychromos pencils, the black glaze pen and a white gelpen. I have fussy cut the image.

With the Crea-nest-lies XXL 43 from Crealies I have cut an oval from red patterned paper from the Surprise party paper pack from Sunny studio. I have cut a rectangle with the Crea-nest-lies XXL 52 from Crealies from paper from the same paper pack. I used the Crea-nest-lies XXL 56 from Crealies to cut a scalloped rectangle from the red patterned paper. I have glued all the parts on a white card. I have added the image on the card with foamtape. With white sticker letters I have added a sentiment (congratulations) on the oval. 


*********************************************************************************
STAMP: Elephant and bird from Gerda Steiner designs
COLORING MEDIUM: Polychromos pencils
PAPER: White cs, Surprise party paper pack from Sunny studio
DIES: Crea-nest-lies XXL 43, 52 and 56 from Crealies
ACCESSORIES: Black glaze pen, White gelpen, White sticker letters

I am a participant in the Gerda Steiner designs Affiliate Programme. This means that if you click on one of my links and subsequently make a purchase, I will receive a small commission of store credit, at no extra cost to you.

Tuesday, June 15, 2021

Interactive Birthday Frogs *Video*

Hi and welcome back, it's Karen here today. I'm really excited to share a new inexpensive, interactive die that I've just added to my collection.  It's the Lawn Fawn Swish 'N Pop Pull Tab die and I love how it adds such a fun interactive element to cards. Paired up with all the cute stamps from Gerda Steiner Designs, I see a lot of fun cards in my future 😁 !   I've made a frog themed card for today and here's a look at it.


You can see that when you pull the tab, the frog with the confetti leaps up from behind the frog on the lily pad.  How much fun is that!! Plus, it's really easy to make.  

I've made a video for you on how to create this card, so if you would like more details, PLEASE CLICK HERE.  There's also a second card that I share in the video, again made with Gerda Steiner Designs stamps, so check it out.  

Thanks for stopping by and I hope you're having a great day!


Tuesday, April 20, 2021

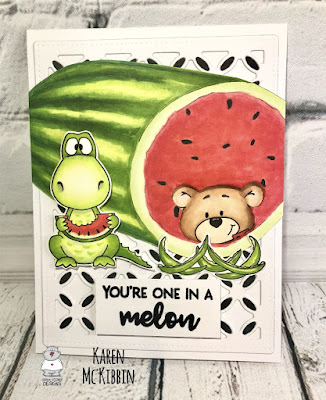
One in a Melon

Hi and happy Wednesday everyone.  It’s Karen here today and I want to share a card made with a brand new stamp set from Gerda Steiner Designs called Melon Friends. This is such a cute stamp set as you can see from the little critters on my card and it will be available in the Gerda Steiner Designs shop tomorrow! 


To make this card, I drew a rough watermelon (just an oval with a round end), and when I had it looking the way I wanted it, I went over my pencil lines with a copic marker. After colouring it in with copic markers, I fussy cut it out right against the coloured line.  I stamped and copic coloured almost all the images in the stamp set and cut them out.

Next, I diecut a lattice background frame from white and black cardstock.  I paper pieced the black pieces into the small oval shapes, gluing them in place. Any cover die would work here or just leave the card as it is - the die is hardly noticeable.  I then glued the lattice frame down to my card base.  I had made a mask of the little bear image, and I placed this where I wanted it to go on the watermelon.  I was hoping it would look like he was inside the watermelon to match the sentiment, but I was also conscious that inside the card, his body would have to be able to fit towards the bottom of the card.   Now here’s the scary part - I fussy cut out the bear image through all the layers of cardstock.  If you have the dies, this would be much easier! I started in the middle of the bear’s head and cut out to the edge. It got a little dicey around the ears, but I was fairly happy in the end.  I went around the cut edge with the same red copic marker I had used for the watermelon to give it a smoother look.  Now, the easier way to have done this, would be to stamp, colour and cut out a second bear head and then just glue that to the front of the card.  But that’s hindsight at work ...! :)

I spread glue across the back of my coloured bear image, held him up to the inside of the card, and once I had his head lined up with the opening in the watermelon, I carefully pressed him down to the inside of the card so he was positioned correctly.  I added the watermelon border just underneath him on the inside.  On the front of the card, I attached the dinosaur with foam tape and glued the rinds just under the bear.  The sentiment is stamped and embossed in black, and popped up on foam tape. 

Thanks so much for stopping by and I hope you’re having a great day!


Frogs clear stamps - Hoera - Larissa


Hi everyone, I am Larissa from Car-d-elicious and today it is my turn again to post a card on the blog from Gerda Steiner designs. I have made a card with the one of the sweet frogs from the set Frogs clear stamps from Gerda Steiner designs. I have stamped the image with Versafine clair nocturne inkt on Aquarelpapier smooth Wit 200g A6 from Vaessen creative and then I embossed the image with clear embossingpowder. I have coloured the image with my Derwent inktense pencils and then I have fussy cut the image. 

On a white card I have made paint splatters with the black Posca pen and then I doodled lines around the edges of the card with a black fineliner. With the Crea-nest-lies XXL 33 from Crealies I have die-cut a circle from orange patterned paper from the Take note paperpad from Doodlebug. I used the Crea-nest-lies XXL 92 from Crealies to cut a larger circle from black cardstock and then I glued the orange circle on top of it and then I glued them both on the card. With the Stitched alphabet die-namics from My favorite things I have die-cut the word Hoera (hurray) three times from black cardstock. I glued all the letters on top of each other and then I glued the word on the circle. I used foamtape to glue the image on the card. I have stamped a sentiment (congrats) from the set Stempels "Grote teksten 4" from Carlijn design under the word hoera. I have cut a couple of stars from black cardstock with the Star confetti die from Alexandra Renke and I added those on the card. 


*********************************************************************************
STAMP: Frogs clear stamps from Gerda Steiner designs, Stempels "Grote teksten 4" from Carlijn design
COLORING MEDIUM: Derwent inktense pencils
PAPER: White and black cs, Take note paperpad from Doodlebug, Aquarelpapier smooth Wit 200g A6 from Vaessen creative
INK: Versafine clair nocturne
DIES: Crea-nest-lies XXL 33 & 92 from Crealies, Stitched alphabet die-namics from My favorite things, Star confetti die from Alexandra Renke
ACCESSORIES: Clear embossingpowder, Black fineliner, Black Posca pen

I am a participant in the Gerda Steiner designs Affiliate Programme. This means that if you click on one of my links and subsequently make a purchase, I will receive a small commission of store credit, at no extra cost to you.

Sunday, February 21, 2021

Hello Sunshine

Hi everyone! It’s Jeannie (InsideoutJeans) on the blog today with Gerda Steiner Design’s stamp set named, Hello Sunshine

I love that this little bear is carrying a sign so I wanted to use him to create a full sentiment. To optimize the size, I opted for a slimline panel. By using a longer card size, I was able to fit five of these cuties to create the word "HAPPY". 


By coloring them up in rainbow colors, it brings such a happy vibe to this card. I used a few alphabet dies to create my custom sentiment as well as adding some strips of black cardstock for interest. 


Thanks for stopping by today and I hope you get inspired to create. Come back again soon for more inspiration and ideas! Happy Crafting! 


x


Tuesday, January 26, 2021

Elephant and bird - Larissa


Hi everyone, I am Larissa from Car-d-elicious and today I am posting a new card on the blog from Gerda Steiner designs. This time I have made a birthday card with the digital stamp Elephant and bird from Gerda Steiner designs. I have coloured the image with my Polychromos pencils, the black glaze pen and a white gelpen. I have fussy cut the image. I have coloured the balloon with the Clear Spectrum noir sparkle glitter pen and then I applied Glossy accents on it. With the Crea-nest-lies XXL 34 from Crealies I have die-cut a square from purple patterned paper from the Birthday brights paperpad from My favorite things. I have glued the square on a scalloped square that I have die-cut with the Crea-nest-lies XXL 54 from Crealies from white cardstock. I have glued both squares on a white card and then I glued the image with foamtape on the card. I didn't add a sentiment, because it is already on the patterned paper. 


*********************************************************************************
STAMP: Elephant and bird from Gerda Steiner designs
COLORING MEDIUM: Polychromos pencils
PAPER: White cs, Birthday brights paperpad from My favorite things
DIES: Crea-nest-lies XXL 34 and 54 from Crealies  
ACCESSORIES: Black glaze pen, white gelpen, Clear Spectrum noir glitter sparkle pen, Glossy accents

I am a participant in the Gerda Steiner designs Affiliate Programme. This means that if you click on one of my links and subsequently make a purchase, I will receive a small commission of store credit, at no extra cost to you.

Tuesday, January 19, 2021

Mouse blowing out birthday cake - Larissa


Hi everyone, I am Larissa from Car-d-elicious and today it is my turn again to post a card on the blog from Gerda Steiner designs. This time I have made a birthday card with the digital stamp Make a wish Mouse blowing out birthday cake from Gerda Steiner designs. I have coloured the image with my Polychromos pencils, the black glaze pen and a white gelpen. I have fussy cut the image. 

On white cardstock I have made a background for the image with the help of the Tear away stencil from Clearly besotted stamps and Card deco essentials dye ink Light blue & Olive green. With a black fineliner I doodled a line around the edges of the white cardstock. With a die from the Border 2 dies (retired) from Paper smooches I have die-cut a scalloped border from black cardstock and I glued it under the white cardstock. On a white card I glued rainbow sriped patterned paper from the Really rainbow petite paper pack from Lawn fawn. The sentiment from the set Scribble it (retired) from Clearly besotted stamps is stamped on a strip of white cardstock and then I glued it on the card. 


*********************************************************************************
STAMP: Make a wish Mouse blowing out birthday cake from Gerda Steiner designs, Scribble it (retired) from Clearly besotted stamps
COLORING MEDIUM: Polychromos pencils
PAPER: White and black cs, Really rainbow petite paper pack from Lawn fawn
INK: Versafine clair nocturne, Card deco essentials dye ink Light blue & Olive green
DIES: Border 2 dies (retired) from Paper smooches
ACCESSORIES: Black glaze pen, Witte gelpen, Tear away stencil from Clearly besotted stamps, Black fineliner

I am a participant in the Gerda Steiner designs Affiliate Programme. This means that if you click on one of my links and subsequently make a purchase, I will receive a small commission of store credit, at no extra cost to you.

Wednesday, October 7, 2020

Go Wild!


 Hi Friends! Cathy here today from "Inkredible Adventures"sharing a fun birthday card using the Party Animals and Go Wild! clear stamp sets. These are two of my favorites and they just never get old!

For the background of this card, I've die-cut an animal print cover plate die from Momenta out of black cardstock and glued it to the card base. I then cut a 3" x 4" piece of white cardstock and inked it with Old Paper distress ink. I die-cut the top edge of the cardstock piece with a stitched rolling hills die and glued it to the bottom of the card front.

For a little African savanna scene, I die-cut a circle from white cardstock and inked the top portion with Ripe Persimmon and Scattered Straw distress ink. I die-cut the circle again from black cardstock and used a safari skyline die from Club La-La Land Crafts across the center of the die-cut circle and then glued the circle die-cuts together.

I colored all of the critters and the jeep with Copics, fussy cut them out and glued them to the card front as shown. Since they're driving a little wild, I dabbed a little white gouache around the tires with a paint brush to indicate a little dust and movement.

Hope you've enjoyed and have a great crafty week!

Tuesday, September 22, 2020

Theater Fold Meerkat Birthday Card with Video

 Hello and welcome! It’s Karen here and today I’ve made a theater fold style card featuring Meerkats on the Lookout from Gerda Steiner Designs.  I don’t usually make Halloween cards but wanted to do a fall colours card so this is what I came up with.  


I’ve made a video of how to construct this card and it’s probably the easiest way to figure it out.  If you would like to see the video in HD, PLEASE CLICK HERE.


Here’s a list of the pieces of cardstock used and a diagram of where to crease the curtains.

I started by assembling the front first.  I die cut a rectangle from two of the white 4 1/4 x 5 1/2” pieces of cardstock as well as a black piece and then glued these together.  I cut a notch out of the side edges, using a small circle die and partial cutting.  I white heat embossed the sentiment and added the three dots with a white gel pen.  I folded and creased the two sleeve pieces so they fit along the side edges and glued them in place on the back, making sure they weren’t too tight.  I trimmed the sleeves around the notches so it would be easier to grasp the curtains.

For the back and curtains, I ink blended using Distress Oxide inks in Mustard Seed, Spiced Marmalade, Ripe Persimmon, and Candied Apple.  I used a die from Find IT Media called Amy Designs Wild Animals Outback, and partially die cut this from black cardstock to fit along the lengths of all 3 pieces of cardstock.  

I trimmed the two curtains just slightly along the 5 1/2” edge so they would slide more easily through the sleeves on the front.  Then I creased and folded the curtains at 2 3/4” and 4 1/8” for the left curtain, and at 1 3/8” and 2 3/4” for the right one.  Finally, I glued the black die-cut silhouette pieces to the curtains and back and creased along the fold lines.  

I used glue to attach the curtains to the back piece, being careful to only apply glue to the first folded area on the curtains and to try to keep the center fold of the curtains together. Really, the glued area of the curtains should line up along the side edges of the back with the ink blended sides together, but I found it more important for the folded curtains to match in the center. 


I cut a second platform piece from black cardstock and glued the two pieces together.  I cut slits in both curtains at the same distance, wide enough for the platform piece to pull through.  I made stoppers by using pieces of narrow scrap cardstock and gluing these to the ends of the platform so it couldn’t pull through.  Next, I stamped the inside sentiment and clear heat embossed it.

To assemble the card, slide the left curtain through the sleeve on the back of the front piece, and the right curtain through the other sleeve.  I added pull tabs to the curtains by folding a small strip of black cardstock and used the same circle die to cut them out.  Now all that’s left is to just add your images.  Oh, and to play repeatedly with opening and closing the curtains!  Thanks for stopping by and I hope you’re having a great day!


Wednesday, September 2, 2020

Ha-bee birthday! - Larissa


Hi everyone, I am Larissa from Car-d-elicious and today I am making a card for the blog from Gerda Steiner designs.


I have made a card with the digital stamp Birthday bee from Gerda Steiner designs. I have coloured the image with my Polychromos pencils and the white gelpen. I have coloured the wings from the bee with the Clear Spectrum noir sparkle glitter pen. I have applied Glossy accents on the antennae and the feet from the bee. With the Crea-nest-lies XXL 36 from Crealies I have die-cut a rectangle from black and white dotted patterned paper from the Kraft in color - color paperpad from Doodlebug. I have die-cut a scalloped rectancgle from yellow cardstock with the Crea-nest-lies XXL 56 from Crealies and then I coloured it with Spiced marmelade Distress ink to make it a better match for my image. I glued the rectangles on top of each other and then I tied white embroidery thread around them and then I glued them on a white card. I have glued the bee with foamtape on my card. I have decorated the card with red and yellow enamel dots.


*********************************************************************************
STAMP: Birthday bee from Gerda Steiner designs
COLORING MEDIUM: Polychromos pencils
PAPER: White and yellow cs, Kraft in color - color paperpad from Doodlebug
INK: Spiced marmelade Distress ink
DIES: Crea-nest-lies XXL 36 and 56 from Crealies
ACCESSORIES: White gelpen, Clear Spectrum noir sparkle glitter pen, White embroidery thread, red and yellow enamel dots, Glossy accents

I am a participant in the Gerda Steiner designs Affiliate Programme. This means that if you click on one of my links and subsequently make a purchase, I will receive a small commission of store credit, at no extra cost to you.