Wednesday, February 28, 2018

Lettuce be friends forever! - Larissa


Goodmorning, I am Larissa from Car-d-elicious and  today I am posting a card made with a new stampset from Gerda Steiner designs.


For all Guinea pig lovers Gerda has drawn the stampset Wheek, wheek, wheek.... Guinea pig from Gerda Steiner designs. I stamped 2 guinea pigs and some lettuce leaves and a tomato. I have coloured all images with my Polychromos pencils, the black glaze pen and a white gelpen. I have fussy cut all the images. I added a little cut under the paws from the guinea pig, so he can really hold the lettuce in his paws. On a white card I adhered a strip red striped design paper from the Really rainbow petite paper pack from Lawn fawn on the bottom of the card. On a piece of white cardstock I made a background for the images with Brushed corduroy and Tumbled glass distress ink. I added lines on the card with a 8 mm fineliner. I adhered the white cardstock with foamtape on the card and then I rounded the bottom corners of the card with the corner chomper. The sentiment is also from the stampset Wheek, wheek, wheek.... Guinea pig from Gerda Steiner designs. I adhered it with foamtape on the red design paper.


*********************************************************************************
STAMP: Wheek, wheek, wheek.... Guinea pig from Gerda Steiner designs
COLORING MEDIUM: Polychromos pencils.
PAPER: White cardstock, Really rainbow petite paper pack from Lawn fawn
INK: Versafine onyx black, Brushed corduroy and Tumbled glass distress ink
ACCESSORIES: Black glaze pen, white gelpen, Corner chomper, 8 mm black fineliner, Black hotfix gems

Tuesday, February 27, 2018

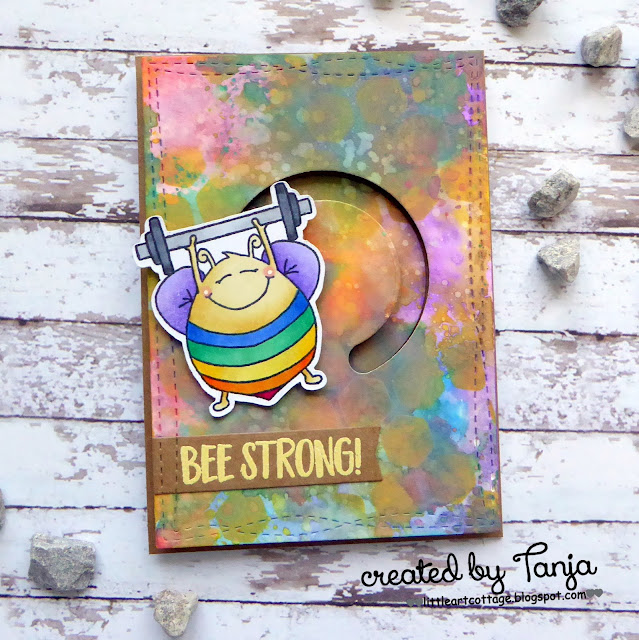
Bee strong!

Hi there,

it's Tanja her and ever since I saw that cute little bee from the Gerda Steiner Designs Bee strong set I wanted to color her with rainbow colors:

  • stamp the little bee from the Gerda Steiner Designs Bee strong set with Memento Tuxedo Black and color her with Delta, Copic and Touch Twin Brush Markers and add extra shading with Faber-Castell Polychromos pencils
  • add highlights with a white gel pen and sparkle with Wink of Stella Clear Glitter
  • cut out a stitched panel from Bristol Smooth cardstock and create a background with Distress Oxide Inks (Abandoned Coral, Wild Honey, Salty Ocean, Lucky Clover, Wilted Violet)
  • apply some more Distress Oxide Ink Wild Honey through the ARTplorations Honeycomb Delight Mini stencil
  • cut out a spinner channel with the help of one of the My Favorite Things Circle Spinner Channels and complete the interactive set up with two layers of foam tape
  • stamp the sentiment from the Gerda Steiner Designs Bee strong set with Versamark and heat-emboss it with ZING Butter embossing powder


I hope you got inspired.

Yours,


Monday, February 26, 2018

Wheek Wheek Wheek! Release Day! - Jeannie Lieu (InsideoutJeans)

Wheek Wheek Wheek! It's Monday and the new Gerda Steiner Design's stamp sets will be released soon.

I, more or less, made the same noises when I saw her post a sneak of this cutie pie on her Instagram awhile back. It's adorable and I'm so excited that she created a full set with them.

Today, I'm sharing a card I made using this stamp set. I'm loving the punny sentiments and just had to use "Lettuce Be Friends Forever".

I chose to use Kraft cardstock for my background so I use colored pencils. I stamped the two lettuce images onto the background in no particular pattern using white pigment ink. From experience, I learned to use lighter colors for the edges of an image so there's more of a contrast of colors against the background. It does make the lettuce pop, doesn't it?

I fussy cut the main guinea pig image that I loved so much from the sneak peek and wanted him to stand on the sentiment, which I heat embossed in white on a piece of vellum. I chose to add vellum because I have such a busy background, I didn't want him to get lost in front of it. It helps spotlight him so your eyes first go to him.

Here's my finished card.


I hope you like it as much as I do. I adore this set! Check out the new release, Wheek Wheek Wheek and Easter Friends. I'll be back at the end of the week to share a card using Easter Friends so come back soon!

Wednesday, February 21, 2018

Oh manatee - Larissa


Goodmorning, I am Larissa from Car-d-elicious and today I am posting a new card on the blog from Gerda Steiner designs.


This week I have made a card with the stampset Oh manatee from Gerda Steiner designs. I have stamped a couple of images and then I coloured them with my Polychromos pencils. I have fussy cut the images. I have cut a rectangle from white cardstock with the Crea-nest-lies XXL 52 from Crealies. Then I have cut a circle out of it with the Crea-nest-lies XXL 49 from Crealies. I have made a a background for the images on a piece of watercolor paper with Ultra marine and Emerald green Brusho. Then I made some paint splatters on the background with green paint from the Pearlescent colours palette from Finetec. I adhered the background on a blue card and adhered the white rectangle with foamtape on the card. I placed all the images inside the circle. I have used Crystal glaze from Nuvo to make a couple of little drops on the background. I have stamped a sentiment from the set Oh manatee from Gerda Steiner designs on white cardstock and then on blue cardstock and then I adhered them on the card.


*********************************************************************************
STAMP: Oh manatee from Gerda Steiner designs
COLORING MEDIUM: Polychromos pencils, Brusho, Finetec pearlescent paint
PAPER: White and blue cs, watercolor paper
INK: Versafine onyx black
DIES: Crea-nest-lies XXL 49 and 52 from Crealies
ACCESSORIES: Crystal glaze from Nuvo

Thursday, February 15, 2018

Hidden Bookmark Card - Hoppiness - Jeannie Lieu (InsideoutJeans)

Hi everyone! It's Jeannie back again to share a card using the Hoppiness set. This set totally reminds me of spring! I can't wait for the warm weather and longer days!

This card contains a bookmark for the recipient to use for a book they might be enjoying. You can remove it from the card and leave the card intact as well so it doesn't look like anything is missing. I do this by creating two identical version of this scene. For the front panel, I used foam tape to pop it up so the bookmark is snug. The sentiment in front helps make sure this bookmark doesn't fall out. Isn't this super cute? That bunny just tugs at my heart!


If you want more details, check out how I created it at my YouTube: Video Tutorial


Wednesday, February 14, 2018

Happy hoppy - You are simply.... - Larissa


Helly everyone! I am Larissa from Car-d-elicious and today I am posting 2 new cards on the blog from Gerda Steiner designs. I have made 2 sort of valentines cards that are not super valentine themed. Both cards are made with stamps from the stampset Happy hoppy from Gerda Steiner designs.


I have stamped the bunny and the heart balloon from the set Happy hoppy from Gerda Steiner designs and then I coloured them with my Polychromos pencils and the black glaze pen and then I have fussy cut the images. On a white card I made a background with the Mini cloud edges stencil from My favorite things and Tumbled glass distress ink. I stamped a sentiment from the stampset on it and then I adhered the bunny with foamtape on the card. I gave him black embroidery thread in his little paw and the other end I attached to the heart balloon and then I adhered the balloon on the card. I made a little bow from the black embroidery thread and adhered it on the balloon. With a black pen I doodled some lines on the card. Finally I coloured the balloon with the Clear Spectrum noir sparkle pen.


The second card is also made with a bunny from the stampset Happy hoppy from Gerda Steiner designs. This bunny is also coloured with my Polychromos pencils and the black glaze pen. I have fussy cut the image. On a white card I made a background for the image with the Drifts & hills stencil van My favorite things and Tumbled glass and Mowed lawn distress ink. I have stamped a sentiment on the card and then I adhered the bunny with foamtape on the card. I used a black pen to doodle lines on the card. 


I stamped a couple of little hearts around the bunny and after I coloured them with my pencils, I also coloured them with the Clear Spectrum noir sparkle pen. 


*********************************************************************************
STAMP: Happy hoppy from Gerda Steiner designs
COLORING MEDIUM: Polychromos pencils, Distress inks
PAPER: White cs
INK: Versafine onyx black, Tumbled glass and Mowed lawn distress ink
ACCESSORIES: Black glaze pen, Clear Specrum noir sparkle pen, black thread, black pen, Mini cloud edges and Drifts & hills stencil from My favorite things


Tuesday, February 13, 2018

You are so loved

Hi there,

it's Tanja here and today I would like to share this Valentine's Day card with you:

  • stamp one of the adorable Gerda Steiner Designs Valentine Penguins with Memento Tuxedo Black and color the image with Delta, Touch Twin Brush and Copic Markers
  • add highlights with a white gel pen and extra shine and dimension with Glossy Accents
  • cut out the Neat & Tangled Heart of Gold from watercolor paper and add color with Distress Inks (Spun Sugar, Worn Lipstick, Picked Raspberry)
  • stamp the sentiment from the same set with Versafine Onyx Black 
  • add clouds directly to the cardbase with the help of the My Favorite Things Cloud stencil and Distress Ink Tumbled Glass
  • add faux stitching to the bottom of the cardbase using one of the My Favorite Things Homespun Stitch Lines

I hope you got inspired.

Yours,


Thursday, February 8, 2018

Guest Design - Love Manatee by Australe Créations

Hello Everyone !

It's Céline from Australe Créations, I am pleased to be here to present you a new card made with the Oh Manatee 4x6 clear stamp set.

I wanted to make a love card ♥


for details : 
Coloring with Copic markers
Paperpad Happy watercolor
Black borders sewn by hand
Heart transparency and coral
Some rhinestone


I hope you like it :)
                                                                                       
See you soon


Wednesday, February 7, 2018

Gerda Steiner designs - More Spring bunny friends - Larissa


Goodmorning everyone, I am Larissa from Car-d-elicious and I have a new post for you. Today I am posting a tag that I made for the Monthly challenge from Gerda Steiner designs. This month you have to make a card with the image Spring bunny friends from Gerda Steiner designs. If you buy this image and enter a card in the challenge, you automatically get next months image emailed to you.


I have coloured the image Spring bunny friends from Gerda Steiner designs with my Polychromos pencils, the black glaze pen and a white gelpen. Then I have fussy cut the image. With the Large labels from Leane creatief I have die-cut 2 labels from pink and white cardstock. On the white tag I made a background for the image with the Drifts & hills stencil from My favorite things and Mowed lawn distress ink. I added clouds with the Mini cloud edges stencil from My favorite things and Tumbled glass distress ink. Then I adhered the bunnies with foamtape on the tag. I stamped a sentiment from the stampset Hoppiness from Gerda Steiner designs above the image. I stamped a little butterfly from the stampset Hello spring from Gerda Steiner designs, coloured it and then I fussy cut it. I have adhered it with foamtape above the sentiment. I used a hole punch to make a little hole in the tag and then I tied white ribbon through it.


*********************************************************************************
STAMP: Spring bunny friends from Gerda Steiner designs, Hoppiness and Hello spring from Gerda Steiner designs
COLORING MEDIUM: Polychromos pencils, Distress inks 
PAPER: White and pink cs
INK: Versafine onyx black, Tumbled glass and mowed lawn distress ink
DIES: Large labels from Leane creatief
ACCESSORIES: Black glaze pen, white gelpen, Mini cloud edges and Drifts & hills stencil from My favorite things, white ribbon, hole punch

Sunday, February 4, 2018

Stamp of the month - Spring bunny friends - Larissa


Hi everyone, I am Larissa from Car-d-elicious and today I am posting a card for the Monthly challenge from Gerda Steiner designs. This month you have to make a card with the image Spring bunny friends from Gerda Steiner designs. If you buy this image and enter a card in the challenge, you automatically get next months image emailed to you.


I have coloured the image Spring bunny friends from Gerda Steiner designs with my Polychromos pencils, the black glaze pen and a white gelpen. Then I have fussy cut the image. With the Crea-nest-lies XXL 52 from Crealies I have die-cut a rectangle from yellow dotted design paper from the Party patterns paperpad from My favorite things. I tied white ribbon around it and then I adhered it on a white card. From white cardstock I have die-cut an oval with the Crea-nest-lies XXL 51 from Crealies. I made cloudybackground on it with the Mini cloud edges stencil from My favorite things and Tumbled glass distress ink. From another oval I have die-cut 2 grass borders with a Grass die and I coloured those with Mowed lawn distress ink. One border is adhered on the oval with double sided tape. Then I adhered the bunny image with foamtape and then I added the last grass border with foamtape. I have die-cut a scalloped oval from white cardstock with the Crea-nest-lies XXL 55 from Crealies and I adhered the oval with the image on top of it. I adhered both ovals on the card and then I added a little bow from white ribbon.


On the front of the card was no space left for the sentiment, so I stamped it on the inside. I used a sentiment from the set Hoppiness from Gerda Steiner designs for it.


*********************************************************************************
STAMP: Spring bunny friends from Gerda Steiner designs, Hoppiness from Gerda Steiner designs
COLORING MEDIUM: Polychromos pencils, Distress ink
PAPER: White cs, Party patterns paperpad from My favorite things
INK: Versafine onyx black, Tumbled glass and Mowed lawn distress ink
DIES: Crea-nest-lies XXL 51, 52 and 55 from Crealies, Grass die
ACCESSORIES: Black glaze pen, white gelpen, white ribbon, Mini cloud edges stencil from My favorite things

Thursday, February 1, 2018

Guest Design - Hello Manatee by Australe Créations

Hello Everyone !

It's Céline from Australe Créations, I'm so happy to find you today with the lovely Oh Manatee 4x6 clear stamp set.

I made a shaker card with the small fish from the set.


for details : 
Coloring with Copic markers
Digital paper blue with small waves
Silver borders sewn by hand
some clear droplets


I hope you like it !
                                                                                       
See you soon