Sunday, June 30, 2019

Crossing Guard


Hi Everyone, Melissa here.

For today's inspiration I have used the 'Crossing Guard' Digital Stamp.

The base card is white card stock 14x10cm.

The image has been printed onto Copic X-Press It Blending card and coloured with Copic Markers.  Fussy Cut and set aside.

Cut a piece of black card 14x9cm and adhere to base card.

Cut 5 strips of white card 1x9cm (one of these strips will be the sentiment).  Adhere to base card leaving a 1cm space between each.

Adhere coloured image to base card using foam tape.

I hope you have a great day xxx

Saturday, June 29, 2019

Crossing Guard Thank You's by Karla


Hello friends, Karla here today with two adorable cards as special thank you's for the Crossing Guards at our school. We are so thankful for them, keeping our kids safe every day, and the FREEBIE Crossing Guard Digital Stamp from the Gerda Steiner Designs Shop was the perfect image! When you download this image you also get a printable with a perfectly sized image for the outside of your card along with a sentiment for the inside. I printed two of these out on one sheet of 8 1/2" x 11" cardstock.


I coloured this image with Copic Markers and added white gel pen for highlights. Paper from Shimelle's Sparkle City collection was a great background for both cards, and a few stars cut from glitter cardstock adds just a touch of bling!


Inside, I used the pre-printed sentiment from this digi set and added another little star.


The second card uses a different background paper, and I actually coloured it with the Paint program on my computer. This would be a great way to pre-colour and make several cards quickly and easily! I took a few Copic Markers to add a tiny bit of shading around the edges and added a few white gel pen highlights.


Thanks so much for stopping by! Be sure to head over to the Gerda Steiner Designs Shop to see what fun things you can find today!!

Hugs, Karla

Sea you soon by Noga Shefer


Hi crafty friends,  Noga here and I am so happy to share with you another project for Gerda Steiner Designs today.


I would like to make a fun card with those adorable critters.


To make this card I took an A2 panel of Bristol smooth cardstock. The background sky was 
created with rays stencil and tumbled glass, salty ocean and faded jeans distress oxide inks.


I spired some water onto it and soaked it up with paper towel and
splattered perfect pearl with water on it.


Next I colored the images using copic markers. 
I glued them to my panel with foam tape for dimension. 

Next I stamped a greeting from the stamp set using black ink.


I hope you enjoy the project I created and feel inspired to create!

Have a wonderful weekand! Noga


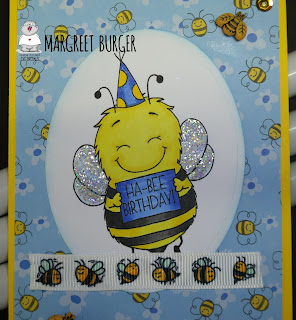
Ha-Bee Birthday!

Hi, Margreet here.
I created a card with the sweet digital stamp Ha-bee Birthday! from Gerda Steiner Designs

I started with coloring the bee with copics and put some Stickles on its wings. Then I die cut with an oval die from Nestabilities. I edged with blue Memento ink.
I took some bees papers from my stash and mounted it on yellow cardstock. 

Finished with some Gnome Ribbon - Bees from Crafty Ribbons
In 2 corners I attached a small bee (button) and some sequins. 
Hope I have inspired you with my card.
xxx Margreet