Showing posts with label birthday. Show all posts

Wednesday, April 24, 2024

You Light Me Up, Piggie!

 Greetings everyone! It's me again, Jessie Scott (@chevy.scott on IG), Guest Designing for Gerda Steiner Designs!

Today I have another fun collaboration with Pear Blossom Press products to share. What's better than a Flying Pig? One coming to bring you the best birthday wishes! Check out this fun birthday card using You Lift Me Up.  


I colored this fun piggie with my Olo Markers and used some black and white baker's twine to add some texture to the string look wrapped around his middle and attaching to the balloon. (I also want him to actually swing in the air!) The stars are actually a small punch I used to make holes for my light up part.

I made a fun pastel cloud background with stencils and Distress Ink. Gold splatter was added for more interest. 

So, with the magic of the internet haha I printed out the sentiment I needed for a fun birthday card. (I had forgotten to print it first before cutting the panel and ink blending so the background above actually ended up getting used on another card haha and I made a new one.)


To learn how I lit up this card so easily, venture over to my blog today for the companion post with Pear Blossom Press!

Even without the light effect, this baby swings! I adhered the balloon to the card and left the piggie to swing freely on the card.


Here's the finished project!


See you again soon!

Saturday, December 16, 2023

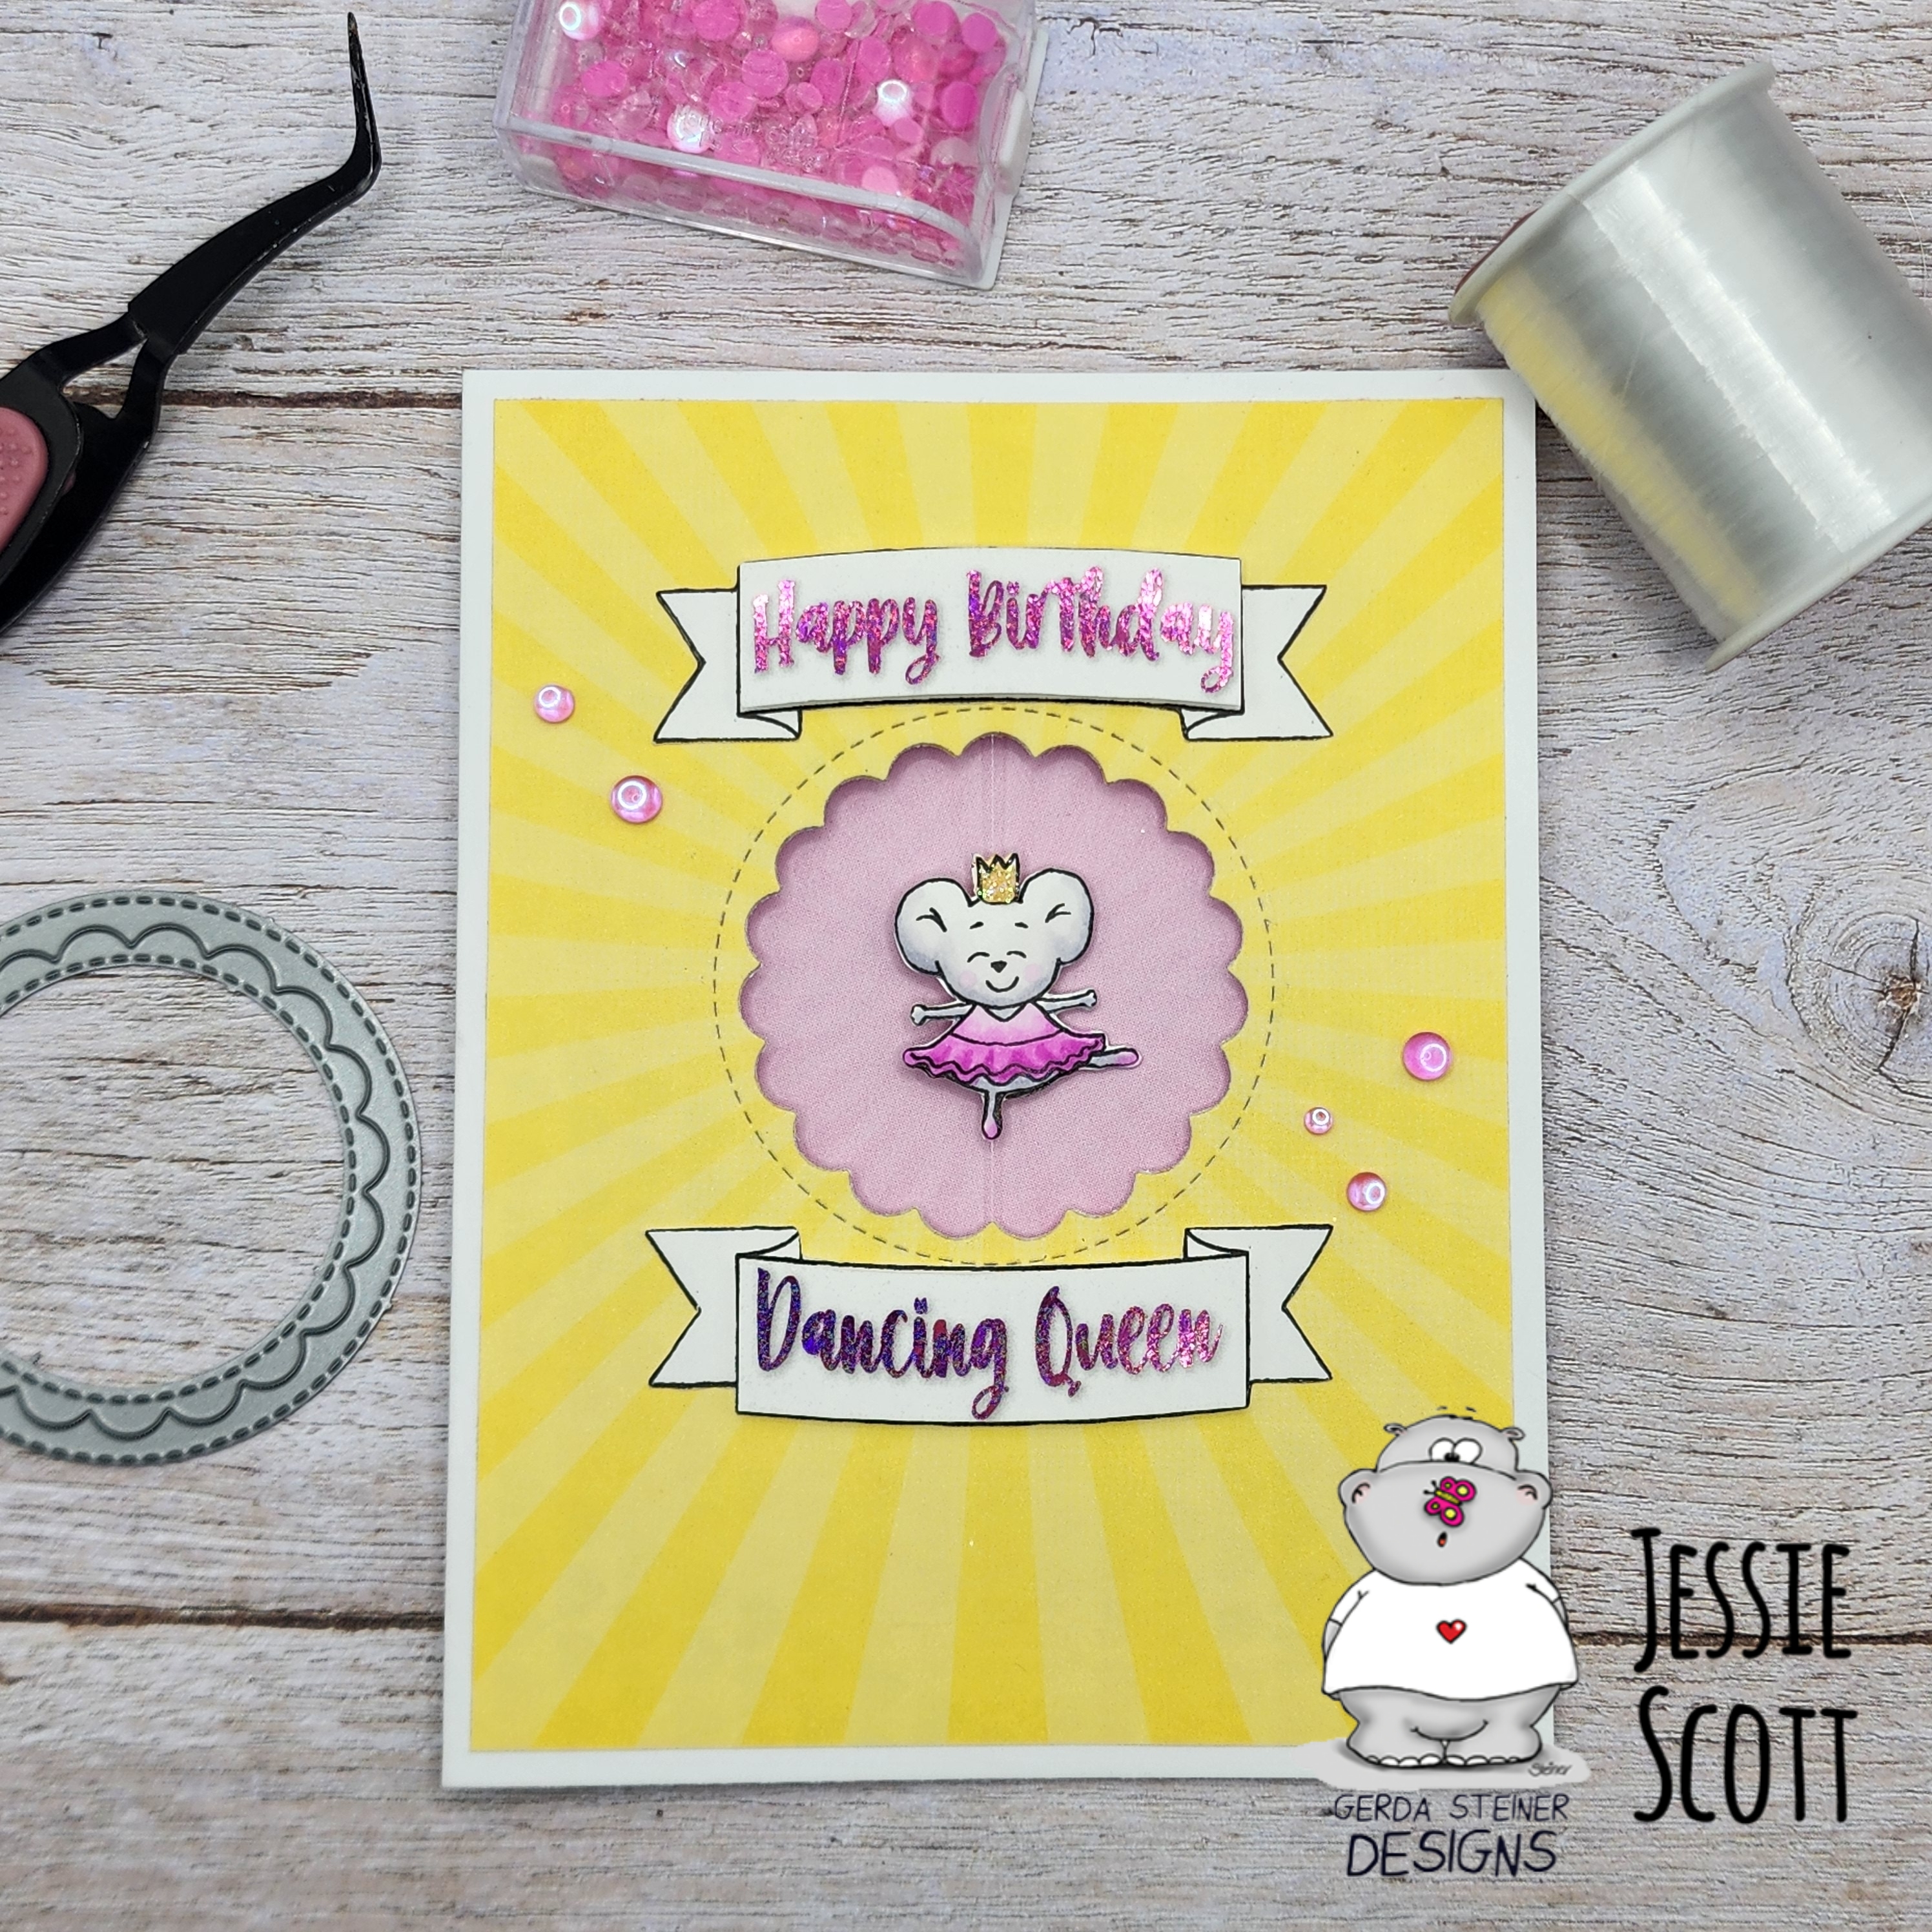
Spinner Card Dancing Queen

 Greetings everyone! It's me again, Jessie Scott (@chevy.scott on IG), Guest Designing for Gerda Steiner Designs!


Today I'm sharing a hand-made easy interactive card using The Nutcracker set. This one is a birthday card! I have a niece that is taking ballet and I thought she would love getting this card.


To make this interactive card, I used some nylon thread, a die cut window (this one is 
Lawn Fawn "Outside In Stitched Scalloped Circle Stackables" in Sunny Studio "Spring Sunburst" 6x6 paper), and a perfectly mirrored stamp image. 


Did you notice that there is a matching FRONT and BACK to one of the cute mice in The Nutcracker set?

This is what gave me this idea!  (you don't HAVE to have a symmetrical stamp set to do this, you can just stamp on both sides of a circle or other symmetrical shape and follow along as well!)
Let's start with the video so you know what we're trying to make it do! I also have a tutorial download for a generic spinner card on my blog here.


You may have noticed  The Nutcracker set does not have a "Happy Birthday" or "Dancing Queen" sentiment.

If you have another set, you can curve the photopolymer stamp to fit the banner that comes with it. 

OR... if you have a printer, you can do what I did and print one to fit! 

I stepped it up a little further with a LASER printer and then I toner-foiled the sentiment. One card uses pink glitter stars and the second is gold glitter circles.


I wanted a 3D effect with the banner, so I trimmed out the printed sentiment and popped it up on foam tape to mount on the banner.


Following my directions from my blog, I cut out the window in the top designer paper and the card base top. Flip over the designer paper and tape on the nylon thread (I flipped my thread end back over the edge of the tape and taped again to hold down the thread) 

 
I glued down the top designer paper down to the card base (so the thread is sandwiched between the layers). I placed the image of the back of the mouse UNDER the thread, inside the card. I lined it up with glue dots with the thread down the center and added glue to the edges.

 
 Then I topped with the front of the mouse! I thought a "queen" still needed a crown and there wasn't one on this character. So I trimmed off one from another stamped image from the set. I covered with glue and dipped in my fine glitter. I added two, one front and back, sandwiching the thread as well.


Once of the cards I placed another piece of starburst paper, but for the other one I thought I would reuse one of the cut centers and have a fun sunburst on the inside.


If these photos weren't enough, I also have a tutorial download for a generic spinner card on my blog here.

Hope you enjoyed this fun interactive! So much fun and easy to make!

See you again soon!

Tuesday, April 19, 2022

A Toast to You

Hello and welcome, it’s Karen here today.  I’ve got another pigeon card today featuring the new Pigeons stamp set from Gerda Steiner Designs. Here’s a look at my card and since it’s an interactive one, there’s a shot of before, and after, you pull the tab (this is a 5 1/2” square card).


To create the card, I started by colouring in the pigeons with Copic markers and fussy cutting them out. For the background, I used a stencil from TCW called Aspen Trees, and added some Distress Oxide shading in Evergreen Bough, Twisted Citron and Tumbled Glass. I then added a little shading to the trees with a C0 Copic marker as they looked a little stark. I cut the hilly foreground from some green cardstock, and added some Copic marker dots under the pigeons feet.  The sentiment is actually from another new stamp set by Gerda Steiner Designs called “Toast to You”, and I stamped it in black Versafine ink and then clear heat set it. The tree was made from a set of cloud dies for the leafy parts cut out of green cardstock scraps, and the trunk and branch were cut from brown cardstock using a Bigz die from Sizzix by Tim Holtz called “Branches”.  I used the “Swish ‘n Pop Pull Tab” die set from Lawn Fawn for the interactive mechanism, but I modified it to have the pigeon appear from the left hand side. I’ve done a previous video showing how to modify it, so if you’re interested, you can find it here.  The branch and pigeon with the toast are actually attached to the clear, acetate arm of the interactive mechanism, so are separate from the tree. I used foam tape in a double layer to pop up the hilly foreground and tree in order to hide the mechanism, and to allow the swing arm to move. 

Thank you so much for stopping by and I hope you’re having a great, crafty day! 

Wednesday, January 26, 2022

Rockin’ Birthday Card

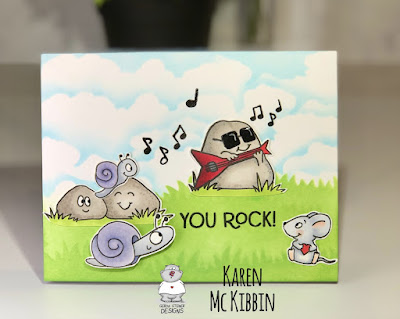
Hello again and welcome, it’s Karen here today.  There’s a new release at Gerda Steiner Designs and I’ve chosen the You Rock stamp set to use on my card today. This is such a fun set to use for those younger people in our lives … oh, who am I kidding? It’s good for those older people too! So here’s the card I came up with. 


It’s almost a one layer card too!  I popped the snail in the front up on foam tape, so I think that means it doesn’t qualify as a true one layer card.  I created the background by stencilling on my card front. I used the  MFT Grassy Edges stencil and some Mowed Lawn Distress Oxide ink for the grassy section.  I created a little hill for the main rock to sit on as well.  For the sky, I used the Cloud Edger stencil from A Colorful Life Designs and some Cosmic Shimmer Colour Cloud ink in the Clear Day shade.  

I used my Copic markers to colour in the images, and have listed them below if you’re interested.  After fussy cutting everything out, I added some Glossy Accents to the sunglasses.  I positioned all the characters on the front to determine my layout and where I wanted the music symbols to go.  I then stamped on and clear heat embossed, the music symbols ( I did add some more music symbols from the Carol Kittens stamp set).  Finally, I glued the characters down and popped the front snail up on foam tape before adhering him down.  On the inside, I stamped the sentiment “Hope Your Birthday Rocks”.  So another quick and easy card! Thank you so much for stopping by and I hope you are having a great day! 


Copic Markers used:

Rocks - W2, W3, W4, W5

Snails - BV23, BV34, V20

Mouse - C3, C2, C1, C0, R00

Guitar - R39, R29, R35


Wednesday, August 11, 2021

Ha-bee birthday - Larissa


Today I am posting a new card on the blog from Gerda Steiner designs. This time I have made a birthday card with the digital stamp Birthday bee from Gerda Steiner designs. I have coloured the image with my Polychromos pencils and a white gelpen. I coloured the wings with the Clear Spectrum noir sparkle glitter pen. I have fussy cut the image. 

With the Crea-nest-lies XXL 33 from Crealies I have cut 3 circles from red patterned paper from the Striped silly paper pack from Sunny studio. I glued those circles with foamtape on a white card. The I glued the image with foamtape on the card. With a black fineliner I have drawn lines on the edges of my card. I have cut a couple of stars from blue cardstock with the Star confetti die from Alexandra Renke and I glued those on the card. 


*********************************************************************************
STAMP: Birthday bee from Gerda Steiner designs
COLORING MEDIUM: Polychromos pencils
PAPER: White and blue cs, Striped silly paper pack from Sunny studio
DIES: Crea-nest-lies XXL 33 from Crealies, Star confetti die from Alexandra Renke
ACCESSORIES: Black glaze pen, Clear Spectrum noir glitter sparkle pen, Black fineliner

I am a participant in the Gerda Steiner designs Affiliate Programme. This means that if you click on one of my links and subsequently make a purchase, I will receive a small commission of store credit, at no extra cost to you.

Tuesday, July 27, 2021

Hello sunshine - Larissa


Hi everyone, I am Larissa from Car-d-elicious and today I am posting a new card on the blog from Gerda Steiner designs and this time I have made a card with the clear stamp set Hello sunshine from Gerda Steiner designs. For my card I have stamped the images of the bear and the sun and cloud and then I coloured them with my Polychromos pencils, the black glaze pen and a white gelpen. I have coloured both suns with the Clear Spectrum noir sparkle glitter pen. I have fussy cut both of the images. 

On a white card I made a background for my images with the Watercolor wash rectangle stencil from My favorite things. The sky is made with Tumbled glass and Broken china Distress ink. I used white acrylic paint and Frost white all-purpose ink from Tsukineko to add some tiny paint splatters. For the grass I have used the Grassy hillside stencils from Lawn fawn and Mowed lawn and Rustic wilderness Distress ink. I have added paint splatters with the Rustic wilderness Distress ink. I glued the images with foamtape on the card. I stamped a little flower from the set Hello spring from Gerda Steiner designs a couple of times and also added those on the card in the grass.


*********************************************************************************
STAMP: Hello sunshine and Hello spring from Gerda Steiner designs 
COLORING MEDIUM: Polychromos pencils, Distress inks
PAPER: White cs
INK: Versafine clair nocturne, Tumbled glass, Broken china, Mowed lawn and Rustic wilderness Distress ink
ACCESSORIES: Black glaze pen, White gelpen, Clear Spectrum noir glitter sparkle pen, Watercolor wash rectangle stencil from My favorite things, Grassy hillside stencil from Lawn fawn, White acrylic paint, Frost white all-purpose ink from Tsukineko. 

I am a participant in the Gerda Steiner designs Affiliate Programme. This means that if you click on one of my links and subsequently make a purchase, I will receive a small commission of store credit, at no extra cost to you.

Tuesday, June 29, 2021

Unicorn Birthday Greetings

Hello, it’s Karen here again! I hope everyone is having a great summer and the weather is good where you are. I’m finding it hard to be indoors at the moment as we are in the middle of a record breaking heat wave and it’s so nice to be outside. So the card I’m sharing today was really quite a quick and easy one but with lots of attitude because of these super fun Moody Unicorns from Gerda Steiner Designs. 


My card is a 3 3/4” x 8 1/2” slimline card.  I die cut three 2 3/4” circles from white cardstock as well as a frame for them, which I stacked two layers high. I used the Paper Rose Layering Rainbow stencil to add the rainbow, clouds and sun inside the circles, using Distress Oxide inks in Blueprint Sketch, Mermaid Lagoon, Cracked Pistachio, Squeezed Lemonade, Spiced Marmalade and Picked Raspberry. Tonic Moonstone Glimmer paste added that extra sparkle to some of the elements. I also die cut some extra ink blended clouds to add around the circles. 


After stamping out the unicorn images, I coloured them in with copic markers (RV04, Y38, Y08, YG01, BG02, B66, V05, C2, C1, C0, N6, N4, R20, R00). I also stamped and clear heat embossed the sentiments and then either die cut them out or fussy cut them. I love how sassy these unicorns are, and I’ve used those sentiments on lots of other cards. 

Finally, I glued the circles to my card base, popped the unicorns and sentiments up on foam tape and added them along with the few extra clouds I had die cut. 

Thank you so much for stopping by and I do hope you’re having a great day! 

Elephant and bird - Larissa


Hi everyone, I am Larissa from Car-d-elicious and today it is my turn to post something on the blog from Gerda Steiner designs. This time I have made a  card with the digital stamp Elephant and bird from Gerda Steiner designs. I have coloured the image with my Polychromos pencils, the black glaze pen and a white gelpen. I have fussy cut the image.

With the Crea-nest-lies XXL 43 from Crealies I have cut an oval from red patterned paper from the Surprise party paper pack from Sunny studio. I have cut a rectangle with the Crea-nest-lies XXL 52 from Crealies from paper from the same paper pack. I used the Crea-nest-lies XXL 56 from Crealies to cut a scalloped rectangle from the red patterned paper. I have glued all the parts on a white card. I have added the image on the card with foamtape. With white sticker letters I have added a sentiment (congratulations) on the oval. 


*********************************************************************************
STAMP: Elephant and bird from Gerda Steiner designs
COLORING MEDIUM: Polychromos pencils
PAPER: White cs, Surprise party paper pack from Sunny studio
DIES: Crea-nest-lies XXL 43, 52 and 56 from Crealies
ACCESSORIES: Black glaze pen, White gelpen, White sticker letters

I am a participant in the Gerda Steiner designs Affiliate Programme. This means that if you click on one of my links and subsequently make a purchase, I will receive a small commission of store credit, at no extra cost to you.

Tuesday, April 20, 2021

Frogs clear stamps - Hoera - Larissa


Hi everyone, I am Larissa from Car-d-elicious and today it is my turn again to post a card on the blog from Gerda Steiner designs. I have made a card with the one of the sweet frogs from the set Frogs clear stamps from Gerda Steiner designs. I have stamped the image with Versafine clair nocturne inkt on Aquarelpapier smooth Wit 200g A6 from Vaessen creative and then I embossed the image with clear embossingpowder. I have coloured the image with my Derwent inktense pencils and then I have fussy cut the image. 

On a white card I have made paint splatters with the black Posca pen and then I doodled lines around the edges of the card with a black fineliner. With the Crea-nest-lies XXL 33 from Crealies I have die-cut a circle from orange patterned paper from the Take note paperpad from Doodlebug. I used the Crea-nest-lies XXL 92 from Crealies to cut a larger circle from black cardstock and then I glued the orange circle on top of it and then I glued them both on the card. With the Stitched alphabet die-namics from My favorite things I have die-cut the word Hoera (hurray) three times from black cardstock. I glued all the letters on top of each other and then I glued the word on the circle. I used foamtape to glue the image on the card. I have stamped a sentiment (congrats) from the set Stempels "Grote teksten 4" from Carlijn design under the word hoera. I have cut a couple of stars from black cardstock with the Star confetti die from Alexandra Renke and I added those on the card. 


*********************************************************************************
STAMP: Frogs clear stamps from Gerda Steiner designs, Stempels "Grote teksten 4" from Carlijn design
COLORING MEDIUM: Derwent inktense pencils
PAPER: White and black cs, Take note paperpad from Doodlebug, Aquarelpapier smooth Wit 200g A6 from Vaessen creative
INK: Versafine clair nocturne
DIES: Crea-nest-lies XXL 33 & 92 from Crealies, Stitched alphabet die-namics from My favorite things, Star confetti die from Alexandra Renke
ACCESSORIES: Clear embossingpowder, Black fineliner, Black Posca pen

I am a participant in the Gerda Steiner designs Affiliate Programme. This means that if you click on one of my links and subsequently make a purchase, I will receive a small commission of store credit, at no extra cost to you.

Tuesday, February 23, 2021

Sunshine Bear Mini Flip Slider Card

Hi there! It’s Karen here today and I’ve got a birthday card that features the sweetest, little bear from the brand new “Hello Sunshine” stamp set from Gerda Steiner Designs. I chose to make this into a birthday card, but there are some really nice sentiments in the set that would make it suitable for a “hello” card as well. My card also has what I’m calling a mini flip slider mechanism which is quite simple to make, and there are no dies required. I had the thought - “What’s better than one smiling bear on a card?” Well, that would be four smiling bears on a card!! And so the mini flip slider came into play.  :)  

I’ve got a video for you of how I made the flip slider so if you would like to see how I created it, PLEASE CLICK HERE.


I borrowed that little bunny and his presents from the GSD “Birthday Bear” stamp set as I thought he would go so well with this bear.  The banner is from Whimsy Stamps and is called the Slimline Bunting Banner die set. I’ve listed the copic markers I used down below. Thank you so much for joining me, and I hope you’re having a great day! 

Copic markers used:

Light Brown Bear - E35, E34, E53, E51  Sign - BV04, BV02, BV01

Dark Brown Bear - E59, E57, E23, E31 Sign - G94, G82, G20

Black Bear - N6, N4, N2, N0 Sign - BG 72, B52, BG000

Grey Bear - W7, W5, W3, W1 Sign - YR21, YR31, YR20

Bunny - W1, W2, W3, E40, R00, R20


Tuesday, January 26, 2021

Elephant and bird - Larissa


Hi everyone, I am Larissa from Car-d-elicious and today I am posting a new card on the blog from Gerda Steiner designs. This time I have made a birthday card with the digital stamp Elephant and bird from Gerda Steiner designs. I have coloured the image with my Polychromos pencils, the black glaze pen and a white gelpen. I have fussy cut the image. I have coloured the balloon with the Clear Spectrum noir sparkle glitter pen and then I applied Glossy accents on it. With the Crea-nest-lies XXL 34 from Crealies I have die-cut a square from purple patterned paper from the Birthday brights paperpad from My favorite things. I have glued the square on a scalloped square that I have die-cut with the Crea-nest-lies XXL 54 from Crealies from white cardstock. I have glued both squares on a white card and then I glued the image with foamtape on the card. I didn't add a sentiment, because it is already on the patterned paper. 


*********************************************************************************
STAMP: Elephant and bird from Gerda Steiner designs
COLORING MEDIUM: Polychromos pencils
PAPER: White cs, Birthday brights paperpad from My favorite things
DIES: Crea-nest-lies XXL 34 and 54 from Crealies  
ACCESSORIES: Black glaze pen, white gelpen, Clear Spectrum noir glitter sparkle pen, Glossy accents

I am a participant in the Gerda Steiner designs Affiliate Programme. This means that if you click on one of my links and subsequently make a purchase, I will receive a small commission of store credit, at no extra cost to you.

Tuesday, January 19, 2021

Mouse blowing out birthday cake - Larissa


Hi everyone, I am Larissa from Car-d-elicious and today it is my turn again to post a card on the blog from Gerda Steiner designs. This time I have made a birthday card with the digital stamp Make a wish Mouse blowing out birthday cake from Gerda Steiner designs. I have coloured the image with my Polychromos pencils, the black glaze pen and a white gelpen. I have fussy cut the image. 

On white cardstock I have made a background for the image with the help of the Tear away stencil from Clearly besotted stamps and Card deco essentials dye ink Light blue & Olive green. With a black fineliner I doodled a line around the edges of the white cardstock. With a die from the Border 2 dies (retired) from Paper smooches I have die-cut a scalloped border from black cardstock and I glued it under the white cardstock. On a white card I glued rainbow sriped patterned paper from the Really rainbow petite paper pack from Lawn fawn. The sentiment from the set Scribble it (retired) from Clearly besotted stamps is stamped on a strip of white cardstock and then I glued it on the card. 


*********************************************************************************
STAMP: Make a wish Mouse blowing out birthday cake from Gerda Steiner designs, Scribble it (retired) from Clearly besotted stamps
COLORING MEDIUM: Polychromos pencils
PAPER: White and black cs, Really rainbow petite paper pack from Lawn fawn
INK: Versafine clair nocturne, Card deco essentials dye ink Light blue & Olive green
DIES: Border 2 dies (retired) from Paper smooches
ACCESSORIES: Black glaze pen, Witte gelpen, Tear away stencil from Clearly besotted stamps, Black fineliner

I am a participant in the Gerda Steiner designs Affiliate Programme. This means that if you click on one of my links and subsequently make a purchase, I will receive a small commission of store credit, at no extra cost to you.