Showing posts with label snail mail. Show all posts

Friday, August 30, 2019

You've Got Mail!

Happy Friday all!  I'm Allison Cope and today we're going to play with a few different digital stamps.  I wanted to use the adorable "Snailmail" digi but I wanted my little snail to have some adorable companions so I found I few other digital images that had envelopes in their hands.  I found the owl with the letter in the "December/January 2016-2017 Digital Bundle" and also the cute "Monster Holding Letter".

I also wanted to share a bit about how I created my image in my editing software.  I use a very old version of PhotoShop, CS3.  If you are not familiar with it or it's out of your price range, try downloading and use the "GIMP" program.  There are tons of YouTube videos to help you learn all about the program plus it's FREE!

Now, come and join me in my craftroom and learn all about how I made this card!

Here's another look at the final card!


Aren't my little letter carriers adorable?

Now, go and visit the Gerda Steiner Designs shop!  There's a sale going on right now too... TODAY's the final day to take advantage of it!
Happy shopping and creating!

~ Ally ~

Wednesday, August 21, 2019

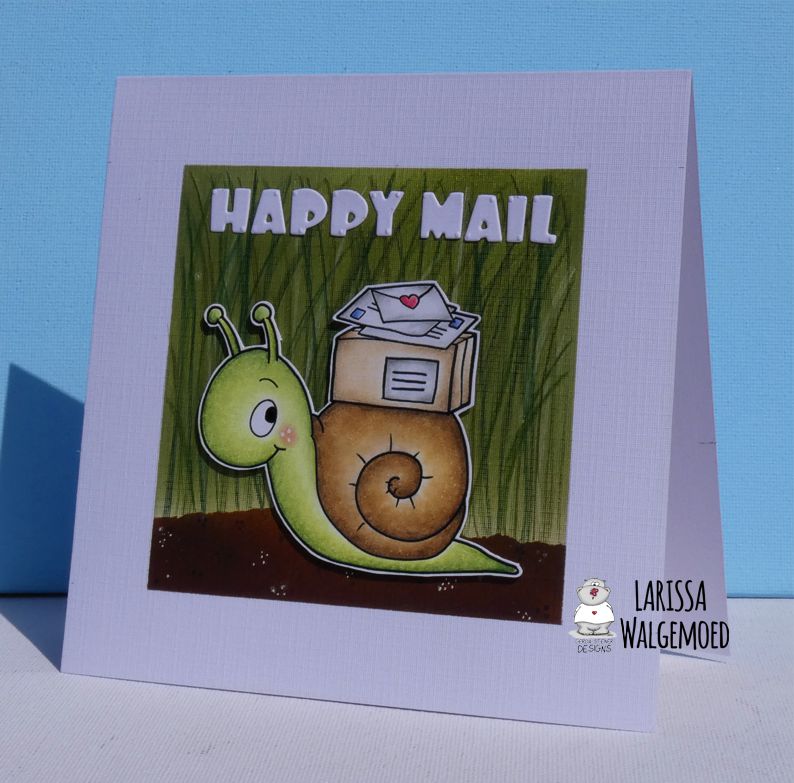
Happy mail - Larissa


Hi everyone, I am Larissa from Car-d-elicious and today I am posting a new card here on the blog from Gerda Steiner designs.


I have made a card with the digital stamp Snail mail from Gerda Steiner designs. I have coloured the image with my Polychromos pencils, the black glaze pen and a white gelpen. On a white card I used masking tape to create a square. I coloured inside the square with Bundled sage, Peeled paint, Vintage photo and Ground espresso Distress ink. I made a stencil from the masking paper for the ground. When all the ink was totally dry, I have drawn grass inside the square with my Polychromos pencils. With a white gelpen and a black pen I added some dots on the brown parts for some extra texture. I glued the image with foamtape on the card. I have die-cut the words Happy mail from white cardstock with the Cutter dies mini alpha and numbers from CC designs (retired) and I glued those above the sentiment.


*********************************************************************************
STAMP: Snail mail from Gerda Steiner designs
COLORING MEDIUM: Polychromos pencils, Distress inks
PAPER: White cs
INK: Bundled sage, Peeled paint, Vintage photo and Ground espresso Distress ink
DIES: Cutter dies mini alpha and numbers from CC designs (retired)
ACCESSORIES: Black glaze pen, white gelpen, black fineliner, masking tape

Sunday, July 28, 2019

The journey is the destination

Hi, Margreet here.
I created another card with the sweet digital stamp Snailmail from Gerda Steiner Designs
I first made a background with Various Ink (refills of Copics). Attached it with foamtape on purple cardstock.
This time I changed the image in Word in various heights. Colored them with copics matching the background and fussy cut them.
I made another background strip in 2 yellow colors and die cut it with a Joy!crafts border die.
The 3 snails are attached with foamtape.
The sentiment is from Quotations of Tim Holtz.
Hope that I have given you some inspiration with this cute snail.
xxx Margreet


Wednesday, July 24, 2019

Snail mail - Larissa


Hi everyone, I am Larissa from Car-d-elicious and today I am posting a new card on the blog from Gerda Steiner designs. I have made a card with the digital stamp Snail mail from Gerda Steiner designs. I have coloured the image with my Polychromos pencils, the black glaze pen and a white gelpen. I have fussy cut the image.


On a white card I made a background for the image with Broken china distress ink. I have die-cut 3 clouds from white cardstock with the Cute cloud outlines from My favorite things and glued those on the card. With the Fresh cut grass die-namics from My favorite things I have die-cut a grass border and coloured it with Mowed lawn distress ink. I have glued the snail and the grass on my card. Next to the image I have stamped a sentiment from the set Mouse mail from Reverse confetti.


*********************************************************************************
STAMP: Snail mail from Gerda Steiner designs, Mouse mail from Reverse confetti
COLORING MEDIUM: Polychromos pencils, Distress inks
PAPER: White cs
INK: Versafine clair nocturne, Mowed lawn and Broken china distress ink
DIES: Fresh cut grass die-namics and Cute cloud outlines from My favorite things
ACCESSORIES: Black glaze pen, white gelpen, Clear Spectrum noir glitter sparkle pen

Sunday, July 21, 2019

Snail Mail

Hi Everyone, Melissa here.


For today's inspiration I have used the 'Snail Mail' Digital Stamp.
  • Card Base: 10.5x14cm White cardstock.
  • From a piece of white card, cut frame using die.  Lightly trace this frame onto card base using a pencil.  this is a guide for where your design will be. Set aside frame for later use.
  • Tape the outside of the drawn frame with post-it notes to protect the card base.  Using Catherine Pooler Ink (It's a Boy), colour the rectangle.
  • From a piece of white card, cut the grass and colour using Catherine Pooler Ink (Lime Rickey).Cut to side and adhere to bottom of the coloured rectangle on the base card.
  • From a piece of white card, cut the cloud twice using the die.  I used the smallest one.  Adhere the 'outline' of the clouds to vellum and trim.  Adhere these to the base card.
  • Print the image onto Copic X-press Blending Card and colour with Copic Markers.  Fussy cut the image leaving a small white border.  Adhere to base card as shown.
  • Adhere cut frame to base card.
  • Stamp sentiment using black ink.

I hope you have a great day
xxx

Snail mail

Hi, Margreet here.
I created a birthday card with the sweet digital stamp Snailmail from Gerda Steiner Designs
I started with embossing of the base kraft card with a Swiss dot embossing folder.
Printed and colored the image with copics, and die cut. Another die cut in blue to mat the snail image.
The sentiment is stamped on a tiny die cut and I attached it with foam.
I glued 2 stripes of Grey Stones Ribbon from Crafty Ribbons beneath the cute snail image.
 
Hope you like my Snailmail.
xxx Margreet


Saturday, July 20, 2019

Snail Mail by Karla

Hello! It’s Karla back today with a heart shaped card featuring the adorable Snail Mail Digital Stamp. Seriously, who would be able to resist smiling when they opened up this happy mail!


I coloured this cutie up with Copic Markers and used some embroidery floss to stitch around the edges of my diecuts, which I cut with Sizzix pierced heart dies. I even used the largest heart to diecut a folded card base for a heart shaped card. A couple folded envelopes cut with a Tim Holtz die and some pretty sequins finish off the card.


Thanks so much for stopping by today! Be sure to head over to the Gerda Designs Shop to see what inspires you to create something fun today! 

Hugs,
Karla

Sunday, July 14, 2019

Snail Mail

Hi Everyone, Melissa here.


For today's inspiration I have used the 'Snail Mail' Digital Stamp.
  • The image has been printed onto Copic X-Press It Blending Card and coloured with Copic Markers.  I have cut this image out using scissors on the black line and set aside.
  • Base Card: 10x14cm white card.
  • Using a Blending Brush, stencil the clouds onto the base card.
  • Cut the 2 x Grass die from white card stock and colour using Catherine Pooler Ink (Lime Rickey).
  • Layer the 2 grass dies together and adhere to base card.
  • Adhere sentiment to card, slightly overlapping the grass.
  • Adhere coloured image to base card.  Apply Nuvo Shimmer Pen & Glossy Accents to the shell of the snail.


I hope you have a great day xxx

Wednesday, September 7, 2016

Snail Mail...

Hi there!

It's Yolanda here, from Scraping Time! Today I come to the blog with a different project!!

I don't know there but here in Spain many people is in love to snail mail. I have no time to have penpals at this moment but I decided to make my first one with Gerda Steiner Designs' new Autumn Stamps and this is the result.


I decided to use these colours since they remind me to the start of the season.

Once I coloured the stamps, I used Spectrum Noir Sparkle to give them some shine. That's why you can see some "strange" reflects in this picture ;) I fussy cut them and add them to my pannel with foam.

I did paper piecing in the umbrella with a MFT decorated paper and I heat embossed the sentiment wishing some fun to the recipient!!


If you are like me and you never did this before, I will show a simple way to make this snail mail in some days in my blog, as soon as I know that this arrives to its new home!! ;)

I hope you have enjoyed and see you soon!