Wednesday, December 28, 2022

Penguin Birthday Shaker Card

Hello everyone, it's Karen here today and I hope you had a good Christmas holiday! I've got a shaker birthday card for you today with some happy, little penguins.

I've used the Penguin Cake - 4x6 Clear Stamp - GSD799, to create the cake and penguins.  I masked the two front penguins after stamping them on some Neenah Solar Crest card, and then stamped the cake and the middle penguin afterwards.  I used Copic markers to colour everything in, and then attached the image to the front of an A2 sized card.  I added some Distress Oxide Shaded Lilac ink around the outside of the penguins in a circular shape.

The paper for the card front is from the Grunge Light collection by Craft Consortium, and I cut out a circle that was big enough to allow the penguins to show through.  The sentiment is from the same stamp set, and I just used Versamark ink and white embossing powder and heat set it.  On the back of the card front,  I placed double sided adhesive tape around the opening, removed the backing paper, and then attached a piece of acetate that was big enough to cover the opening.  Next, I placed two layers of foam tape all around the opening and over the rest of the back of the card front.  I added some shaker bits over the penguins, before removing the backing of the foam tape and adhering the card front to the base. 

I used the Memory Box Bubble Circles die to cut the rings out from white cardstock - I cut two of these.  I actually cut the circles from scraps of inked up card I already had, but I think it would be even easier to just use markers or pencil crayons to colour in the circles.  I added Stickles Glitter Glue over top of the circles and let it dry before attaching the rings to the card front with glue.  And then all that's left, is to give the card a good shake!

Thank you so much for stopping by!

Thursday, December 22, 2022

Get well soon by Noga Shefer

 Hi crafty friends, Noga  here and I am so happy to share with you another project for Gerda Steiner Designs today.


My card featuring the adorable Positivi-Tea 4x6 Clear Stamp Set stamp set.
This is perfect for "get well soon" cards.

To make this card I took an A2 panel of Bristol smooth cardstock and cut it with circle die.
For the background, I die cut the scallop frame die out of white cardstock. 
I ink blended a background using Distress Oxide in spun sugar and glued it on plaid cardstock.
Next I colored the sweet image using copic markers. I glued it to my panel with foam tape for dimension.

Next I stamped a greeting from Under The Weather 3x4 Clear Stamp Set using black ink.

For a final touch, I added some seqins.

I hope you enjoy the card I created and feel inspired to create!

Thanks for stopping by,

Tuesday, December 20, 2022

Merry little Christmas

Hi there,

it's Tanja here and I created this sweet infinity shaker card using the Gerda Steiner Designs Little Reindeer stamp set:

  • stamp the Gerda Steiner Designs Little Reindeer with Lawn Fawn Jet Black
  • color the image with Spectrum Noir Triblend Markers, add extra shading with Faber-Castell Polychromos pencils and highlights with a white gel pen
  • stamp the sentiment from the same set with Versafine Clair Nocturne
  • wrap acetate around the panel and fill it with star-shaped sequins
  • adhere the shaker panel to a cardbase colored with Distress Ink Peacock Feathers and splattered with water droplets and white gouache


The sentiment says it all: Have yourself a Merry little Christmas

Hugs,


Tuesday, December 6, 2022

Christmas Puppy

Hi there,

it's Tanja here and I created this cute Christmas Card using one of the dogs from the Gerda Steiner Designs Christmas Puppies stamp set:

  • stamp one of the adorable little dogs and the bone from the Gerda Steiner Designs Christmas Puppies set and the speech bubble from the Lawn Fawn Happy Hugs set with Lawn Fawn Jet Black
  • color the images with Spectrum Noir Triblend Markers, add extra shading with Faber-Castell Polychromos pencils and highlights with a white gel pen
  • ink up the edges of the panel with Distress Ink Dusty Concord
  • add a layer of dark kraft cardstock underneath
  • emboss a panel of Neenah Desert Storm kraft cardstock with the Sizzix Winter Foliage embossing folder, ink up the edges with Distress Ink Gathered Twigs before adhering all those layers to a cardbase


Thanks for stopping by.

Hugs,


Tuesday, November 29, 2022

A Merry Christmas Day

Hi there,

it's Tanja here and for this Christmas Card I used one of my all-time favorites - the Gerda Steiner Designs Snowman Friends stamp set:

  • stamp two of the snowmen from the Gerda Steiner Designs Snowman Friends set with Distress Ink Iced Spruce - use the masking technique
  • color the images and the background with watercolors
  • add little white dots with white gouache
  • add a sticker from the Tim Holtz Clippings Christmas set
  • before adhering the watercolor panel to a cardbase add strips of patterned paper to the top and bottom


I hope you got inspired.

Hugs,


Monday, November 28, 2022

Meowy Christmas by Noga Shefer


 Hi crafty friends,  Noga  here and I am so happy to share with you another project for Gerda Steiner Designs today.


My tag featuring the adorable Christmas Kitten 4x6 Clear Stamp Set.
How cute is this set??

To make this tag I took a piece of Bristol smooth cardstock and cut a tag die.

The background was created by blending spun sugar distress oxide ink,I spired some water onto it and soaked it up with paper towel.
I also added some snowflakes using stencil and a paper glaze.

Than I colored the sweet critter using copic markers and glued it to my panel using  foam tape.

Next I stamped a greeting from this set using black ink.

I hope you enjoy the tag I created and feel inspired to create!

Tuesday, November 22, 2022

Little Snowman Shaker

Hi there,

it's Tanja here and I created this sweet snowman shaker tag using the Gerda Steiner Designs Little Snowman Stamp set:

  • cut out a tag from smooth white cardstock using the My Favorite Things Tag Builder Blueprints 6 die set 
  • stamp the sweet snowman from the Gerda Steiner Designs Little Snowman set with Lawn Fawn Jellyfish
  • color the image with Spectrum Noir Triblend Markers, add extra shading with Faber-Castell Polychromos pencils and highlights with a white gel pen
  • mask the image and add color to the background using Distress Ink Uncharted Mariner
  • build a shaker element using the My Favorite Things Tag Builder Blueprints 6 die set, acetate, double-sided foam adhesive, patterned paper and sequins
  • add two strands of twine through the hole of the tag


I hope you got inspired.

Hugs,


Tuesday, November 15, 2022

Feline the Holiday Spirit, yet?

Hi there,

it's Tanja here and I created this sweet Christmas Card using the brand new Gerda Steiner Designs Furry & Bright stamp set:

  • stamp the image from the Gerda Steiner Designs Furry & Bright set with Lawn Fawn Jet Black
  • color the image with Spectrum Noir Triblend Markers, add extra shading with Faber-Castell Polychromos pencils and highlights with a white gel pen
  • run a background panel through your Big Shot in the We R Memory Keepers Spotted embossing folder
  • stamp the sentiment from the same set with Versamark and heat-emboss it with WOW! Metallic Silver embossing powder
  • ink up the edges of the panel with Distress Ink (Chipped Sapphire, Black Soot) and splatter it with watered-down white gouache
  • add a strip of kraft cardstock and the image on top


Thanks for stopping by.


Hugs,


Sunday, November 13, 2022

Feline Christmas Card

Hello everyone, it's Karen here today.   I've got a Christmas card to share with you using the new "Furry and Bright" stamp set from Gerda Steiner Designs.


I stamped the Furry and Bright cat image first onto Neenah Solar Crest 80# cardstock and then masked the two lights that are on the right side. Then I positioned and stamped the cat from the "All Cats" stamp set just to the right of the first cat.  I used Copic markers to colour them in and then fussy cut them out, and mounted them on double sided foam tape.  The sentiment was stamped and clear heat embossed onto white cardstock, and after trimming the sentiment down, I cut the tail ends at an angle.  I also mounted the sentiment onto foam tape. 

The background was created with the Detail Bohemian Plate die from Simon Says Stamp. After die cutting it out, I adhered it with glue to the card base.  I then positioned the cats and sentiment on the card, and finally, added a few sequin stars (from a dollar store mix), and also some Glossy Accents on the lights.  I'm pretty sure those cats look like my husband and I every year when we go to put up the lights!

Thanks for stopping by and I hope you're having a great day!


Tuesday, November 8, 2022

Coffee Hedgehog Tag

Hi there,

it's Tanja here and I created this sweet hedgehog tag using the Gerda Steiner Designs Coffee Hedgehog stamp set:

  • cut out a Clearly Besotted Stamps Rounded Tag from smooth white cardstock
  • add a strip of washi tape to the bottom of the tag
  • stamp the hedgehog and the coffee mug from the Gerda Steiner Designs Coffee Hedgehog set with Lawn Fawn Crunchy Leaf - use the masking technique
  • color the image with Spectrum Noir Triblend Markers, add extra shading with Faber-Castell Polychromos pencils and highlights with a white gel pen
  • ink up the edges of the tag with some orange ink left in your blending brush and thread two strands of twine through the hole of the tag


Thanks for stopping by.


Hugs,


Tuesday, November 1, 2022

Happy Fall

Hi there,

it's Tanja here and I created this Fall Wreath Card using one of my all-time favorites - the Gerda Steiner Designs Foxes stamp set:

  • stamp one of the adorable little foxes from the Gerda Steiner Designs Foxes set with Lawn Fawn Jet Black
  • color the image with Spectrum Noir Triblend Markers, add extra shading with Faber-Castell Polychromos pencils and highlights with a white gel pen
  • ink up the edges of an off-white cardbase using Distress Ink Gathered Twigs and add some splatters with that same watered-down ink
  • create a wreath using die-cuts from the Spellbinders Mini Fall Blooms set cut out from colored cardstock
  • add a sentiment using the Dymo Label Maker 


Have a wonderful day.

Hugs,


Tuesday, October 25, 2022

Want to Hang Out?

Hi there,

it's Tanja here and I created this Halloween Peek-a-Boo Pop-up Card using the Gerda Steiner Designs Bats and the Gerda Steiner Designs Pumpkin Bear stamp sets:


  • stamp the bats and the spider from the Gerda Steiner Designs Bats set and the pumpkins from the Gerda Steiner Designs Pumpkin Bear set with Lawn Fawn Jet Black
  • color the images with Spectrum Noir Triblend Markers and add extra shading with Faber-Castell Polychromos pencils
  • cut out the parts needed from the Lawn Fawn Pee-a-Boo Pop-up die set
  • add a moon mask and color the background with Distress Inks (Black Soot, Villainous Purple) and the moon with Finetec Mica Watercolor in Moon Gold
  • stamp the spider web from the same set with white pigment ink and heat-emboss it with WOW! Clear Sparkle embossing powder
  • stamp the sentiment with Versamark and heat-emboss it with WOW! Bright White Super Fine embossing powder
  • the other sentiment is from the Lawn Fawn Fangtastic Friends set and also stamped with Versamark and heat-embossed with WOW! Bright White Super Fine embossing powder


I hope you got inspired.

Hugs,


Sunday, October 23, 2022

Penguin Birthday Cake

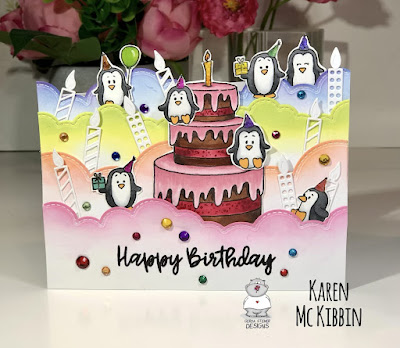
Hello and welcome back everyone, it’s Karen here today. I’ve got a birthday card for you that was created from a brand new stamp set from Gerda Steiner Designs. It’s the new Penguin Cake stamp set and it’s absolutely adorable! 


Aren’t those penguins just the sweetest?! I wanted some of the penguins and the cake to extend off the top of my card, so I cut my card base down to be 5 1/2” wide by 3 3/4” tall. I then used some cloud dies to create layers of clouds. I ink blended the tops of these in rainbow colours using Distress Oxide inks (I used Picked Raspberry, Saltwater Taffy, Ripe Persimmon, Carved Pumpkin, Squeezed Lemonade, Twisted Citron, Prize Ribbon and Seedless Preserves).  I stamped and clear embossed the sentiment on the bottom layer of clouds. Next, I layered the clouds up on the card front and tucked the cake and penguins in between layers. It’s really hard to see in the picture, but I used a tacky glue on the hats, and when it had dried, I used a little laminating foil to “colour” in the hats. The foil I used is DecoFoil Rainbow Shattered Glass and it’s got lots of different colours in it. I die cut some candles from white cardstock and also put those between the clouds to add some interest. Finally, I added a few gemstones for even more interest. Thanks for stopping by and I hope you’re having a great day! 

Tuesday, October 18, 2022

Happy Birthday Penguins

Hi there,

it's Tanja here and I created this sweet and colorful Birthday Card using the fabulous Gerda Steiner Designs Penguin Cake stamp set:

  • stamp two penguins from the Gerda Steiner Designs Penguin Cake set with Lawn Fawn Jet Black
  • color the images with Spectrum Noir Triblend Markers, add extra shading with Faber-Castell Polychromos pencils and highlights with a white gel pen
  • the two penguins will serve as the "As" in the "Happy Birthday"
  • cut out the rest of the letters from colored cardstock using the Spellbinders Be Bold Uppercase and Lowercase Alphabet die sets - add a little shading to the bottom part of each letter
  • create a background using Distress Oxide Inks (Peacock Feathers, Shaded Lilac, Picked Raspberry) - add water droplets for more texture
  • stamp the second part of the sentiment with Versamark onto a strip of black cardstock using the same stamp set and heat-emboss it with WOW! Bright White Super Fine embossing powder


Have a colorful day.

Hugs,


Friday, October 14, 2022

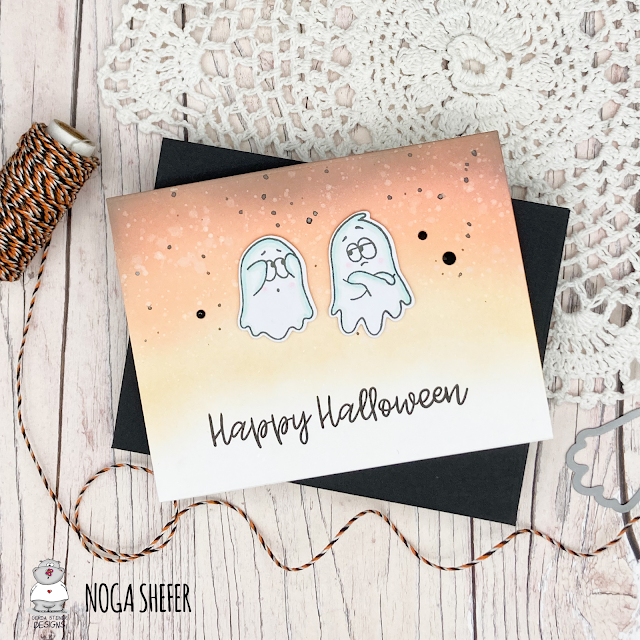
Happy Halloween by Noga Shefer


Hi crafty friends,  Noga here and I am so happy to share with you another project for GSD today.


My card featuring the adorable Ghosts Stamp Set  and Ghosts Die Set.

To make this card I took an A2 panel of Bristol smooth cardstock.

I ink blended a background using black soot, ripe persimmon and dried marigold distress oxide inks, splashed it with water and black paint on it.

Next I colored the images using copic markers and glued them to my panel with foam tape for dimension.

Next I stamped a greeting from Where is the Candy? 4x6 Clear Stamp Set using black ink.

For a final touch, I added a some black dots.

I hope you enjoy the card I created and feel inspired to create!

Thanks for stopping by,