Sunday, January 30, 2022

Sorry to bug you....!!

Hello my crafty friends...

I'm back with my second sneakie snoo using an upcoming set for Gerda Steiner Designs...


For this one I made a super easy but cute little notecard....

You could easily re-create a card like this if you need multiple notecards for many occasions!!

To make this I started with a small white cardstock base and then matt it with black cardstock. I then added a sweet sentiment to the bottom part of the panel using Memento tuxedo black ink. I coloured up the buggies with Parkoo markers and fussy cut them before adhering to the card with foam tape to add dimension. It was then finished off by adding three pretty sequins!!

Thanks for stopping by and keep an eye out for this awesome new set...
Happy crafting, hugs Ashlee

Saturday, January 29, 2022

Hard to find....!!

 Hey friends...

I've been getting crafty with a super cute new set that will be coming soon to Gerda Steiner Designs so my posts this month will be little sneaky snoo's.... 

To create this card I started with a black cardstock piece and die the Half circle cover plate die from Catherine Pooler Designs. I then die cut it again from a panel that I had covered with an ink blend and made sure to keep all the pieces because I wanted to use these ones to fill in all the die cut holes from the black one I cut earlier. 

I added in all the ink blended pieces by adhering with foam tape because this then added a fun popped up layer to the card!!

The images were all coloured with Parkoo markers and fussy cut before adhering to the card with foam tape. A touch of pretty sequins and a sentiment finished the card off....

I hope you like this card and also the stamp set sneakie!!

Happy crafting and see you all again soon with another little card featuring this new set.
Hugs Ashlee 

Thursday, January 27, 2022

Happy Valentine's Day by Noga Shefer


 Hi crafty friends,  Noga  here and I am so happy to share with you another project for Gerda Steiner Designs today.

My project featuring the brand new adorable Be mine Monster 3x4 Clear Stamp Set
I took a panel of white cardsrock and die cut it using the Reverse Confetti Along The Dotted Lines Cover Panel Confetti Cuts.

Next I colored the sweet image using copic markers. I glued it to my panel with foam tape for dimension.
                       
Next I stamped a greeting from this stamp set using black ink.
For a final touch, I added some pink hearts.

I hope you enjoyed the card I created and feel inspired to create!

Thanks for stopping by,

Wednesday, January 26, 2022

Rockin’ Birthday Card

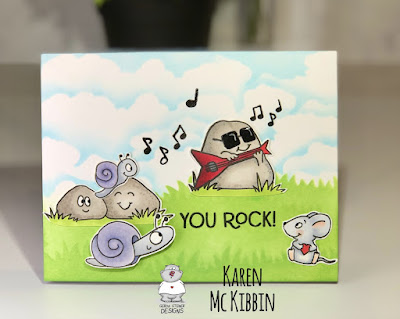
Hello again and welcome, it’s Karen here today.  There’s a new release at Gerda Steiner Designs and I’ve chosen the You Rock stamp set to use on my card today. This is such a fun set to use for those younger people in our lives … oh, who am I kidding? It’s good for those older people too! So here’s the card I came up with. 


It’s almost a one layer card too!  I popped the snail in the front up on foam tape, so I think that means it doesn’t qualify as a true one layer card.  I created the background by stencilling on my card front. I used the  MFT Grassy Edges stencil and some Mowed Lawn Distress Oxide ink for the grassy section.  I created a little hill for the main rock to sit on as well.  For the sky, I used the Cloud Edger stencil from A Colorful Life Designs and some Cosmic Shimmer Colour Cloud ink in the Clear Day shade.  

I used my Copic markers to colour in the images, and have listed them below if you’re interested.  After fussy cutting everything out, I added some Glossy Accents to the sunglasses.  I positioned all the characters on the front to determine my layout and where I wanted the music symbols to go.  I then stamped on and clear heat embossed, the music symbols ( I did add some more music symbols from the Carol Kittens stamp set).  Finally, I glued the characters down and popped the front snail up on foam tape before adhering him down.  On the inside, I stamped the sentiment “Hope Your Birthday Rocks”.  So another quick and easy card! Thank you so much for stopping by and I hope you are having a great day! 


Copic Markers used:

Rocks - W2, W3, W4, W5

Snails - BV23, BV34, V20

Mouse - C3, C2, C1, C0, R00

Guitar - R39, R29, R35


Tuesday, January 25, 2022

You're so Talented

Hi there,

it's Tanja here and I created this sweet Shaker Card using the Gerda Steiner Designs Happy Hoppy stamp set:

  • stamp one of the adorable bunnies and some balloons from the Gerda Steiner Designs Happy Hoppy set with Lawn Fawn Jet Black - use the masking technique
  • color the image with Spectrum Noir Triblend Markers and add extra shading with Faber-Castell Polychromos Pencils and highlights with a white gel pen
  • draw the balloon strings with a black fineliner
  • cut out a cloud border using one of the dies from the Hero Arts Cloudy Sky Scene set and a corner from white cardstock
  • create a shaker element using those borders, some acetate, double-sided foam adhesive and sequins
  • create a background on a piece of watercolor paper, using a piece of acetate, Distress Ink (Spun Sugar, Picked Raspberry) and a Mini Mister
  • assemble the shaker card and adhere the bunny on top
  • stamp the sentiment from the Altenew Crafty Friends set with Versafine Onyx Black
  • add some tiny stars as final embellishments


See you next week. 

Hugs,


Sunday, January 23, 2022

Be Mine Monster

Hi everyone! It’s Jeannie (InsideoutJeans) on the blog today with Gerda Steiner Design’s stamp set named, Be Mine Monster. This little monster is so adorable -- I just had to use him right away.


I stamped him out using Fadeout Ink and colored him using copic markers. I used Fadeout Ink because when I first saw him, I imagined him to be furry so I wanted to create that texture without a dark outline. The no line coloring ink helps to support the texture. He's definitely the focus of the image. This little stamp set has coordinating sentiments that fit perfectly in the heart he's holding.


For the background, I wanted to go with something colorful and lovey. I pulled out a heart die cover plate and die cut out a watercolor panel I had. It was a bit colorful, so I did die cut out a piece of vellum to soften the background so the little monster could stand out.  


Thanks for stopping by today and I hope you get inspired to create. Come back again soon for more inspiration and ideas! Happy Crafting! 


Thursday, January 13, 2022

You've got happy mail by Noga Shefer


Hi crafty friends,  Noga  
here and I am so happy to share with you another project for Gerda Steiner Designs today.

My card featuring the brandnew adorable  Owl my Love 3x4 Clear Stamp Set This set is must have!!

To make this card I die cut a scallop frame die out of Bristol smooth cardstock. 
I ink blended the background  using savaged patina distress oxide ink  and splashed it with water.

Next I colored the sweet image using copic markers and  glued it to my panel with foam tape for dimension.
Next I stamped a greeting from this stamp set using black ink.


For a final touch, I added a tiny heart.

I hope you enjoy the card I created and feel inspired to create!

Thanks for stopping by,

Wednesday, January 12, 2022

Monster Love Valentines Day Card

Hello and welcome, it’s Karen here today. I’m sure you already know that there’s a fun, new release in the Gerda Steiner Designs shop.  I just couldn’t decide which new stamp set to play with for this post, but in the end, I decided that since it was coming up to Valentines Day, I would go with the “Be Mine Monster” stamp set.   Who could say no to this cute little guy? 


I used copic markers to colour him in (listed below). I then stamped and heat embossed the sentiment in black, onto the heart. I added some Glossy Accents onto his teeth and eyes, and then fussy cut him out. 

For the background, I used the “Conversation Hearts” embossing folder from Taylored Expressions to emboss the card front. Using a small circular brush, I added in some Distress Oxide ink to the hearts in Spun Sugar, Tumbled Glass, Shaded Lilac, and Squeezed Lemonade.  Finally, I popped the monster up on foam tape and placed him on the card front in the lower right corner. Just a super quick and easy card to make. Thank you for stopping by and I hope you’re having a great day! 

Copic markers used:

BV02, 04, 13, 23

RV17, 06, 04, 02

V15, B02

Heart - RV29, 25, 23


Sunday, January 9, 2022

Valentine Penguins - Ink Blending Sky

Hi everyone! It’s Jeannie (InsideoutJeans) on the blog today with Gerda Steiner Design’s stamp set named, Valentine Penguins. Yes, it's January but I didn't intend to make a valentine's card at all. I actually don't like the commercial aspect behind the holiday and firmly believe that you should always show people you care about them year round.


For this card, I'm using some atelier inks to do ink blending. They blend so smoothly and I wanted a non-traditional colored sky (mainly because one of my goals for the year is to go outside my comfort zone). I used Bee Sting Yellow, Sweet Petunia Pink and Peacock Blue with a splatter of water and Perfect Pearls all over. Also, I wanted to add an element of the sky, so I used the clouds border die, cutting pieces of white cardstock and vellum to give it a bit of interest.


I colored up the two penguins with copic markers and fussy cut them out. I tend to really like the no white outline look but you definitely can use the dies or cut with an outline too. They are pretty simple images to cut (one of the reasons why I love to mask and fussy cut with Gerda Steiner sets).

The card came together really nicely and I am so happy with how it turned out since, it's not specifically a valentine's day card but a card to tell someone they are loved.


Thanks for stopping by today and I hope you get inspired to create. Come back again soon for more inspiration and ideas! Happy Crafting!