Friday, December 31, 2021

Happy New Year by Noga Shefer


Hi crafty friends,  Noga  here and I am so happy to share with you another project for Gerda Steiner Designs today.

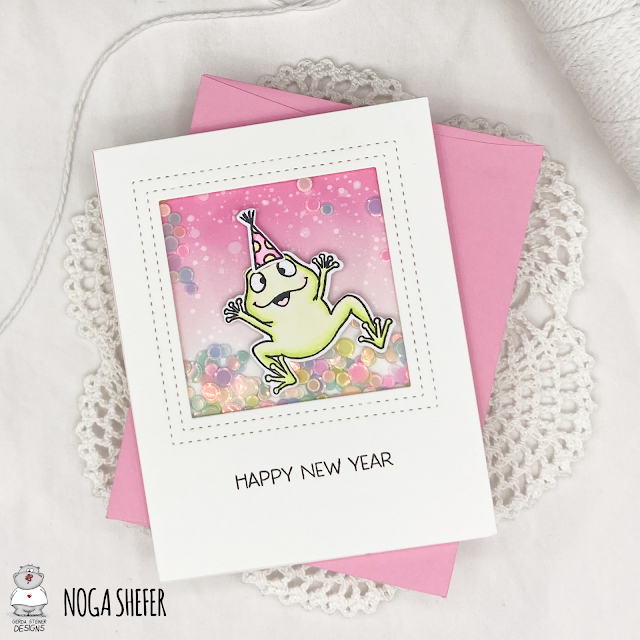
 My card featuring the adorable brand new  Frogs 4x6 Clear Stamp Set  and  Frogs - Froesche - Sapos 4x6 Die Set .
This set available also in German and Spanish version!! This is so amazing!!

To make this card I took an A2 panel of Bristol smooth cardstock. 
For the background, I die cut the double stitch window die out of white cardstock. 
Behind it, I ink blended a background using distress oxide in kitsch flamingo, splashed it with water and clear shimmer spray  and glued it behind the window cover panel with foam tape.

than I created a shaker  and filled it with sequins.

Next I colored the adorable image using copic markers and glued it to my panel.

To finish of  I stamped a greeting from Holiday Snail 3x4 Clear Stamp Set  using black ink.

I hope you enjoy the card I created and feel inspired to create!

Happy New Year to all of you!

Noga.

Wednesday, December 29, 2021

You rock....!!

 Hey everyone...

Ash here and I'm stopping in with my last card for 2021, I hope you all have an amazing new year coming up!!

Today I'm using a stamp set that will be coming out in an upcoming release at Gerda Steiner designs and it is oh so cool, here's a sneaky peek at it....


I created a fun inked background using Catherine Pooler inks on a teal/blue coloured cardstock base and splattered with Canary watercolour from Shimmer drops paint....


I then created a scene by adding some die cut grass and adding all the images that I coloured in with alcohol markers with different levels of foam tape for dimension....

The card was finished off with a "YOU ROCK" sentiment which is perfect for those cute images!!

I hope you enjoy this rockin card, I just love this new stamp set and I'm sure you will too so keep your eye out for its arrival here - GSD

Happy new year everyone, hugs Ashlee

Tuesday, December 28, 2021

Penguins 2022 - Larissa


Goodmorning, today I am posting a new card on the blog from Gerda Steiner designs. This will be my last card for Gerda Steiner designs, because earlier this month I told Gerda that I wanted to end my time as a designer for Gerda Steiner designs. I am thanking Gerda for everything. I have made a card with the digital stamp Penguins 2022 from Gerda Steiner designs. I have coloured the image with my Polychromos pencils, the black glaze pen and a white gelpen. I have fussy cut the image.

On a white card I have made a background for my card with Tumbled glass Distress ink. With the Snijmallen Slimline randen 4 bergen & water (CDSN-0099) from Carlijn design I have cut a row of mountains and also an snowlayer from white cardstock. I have coloured the edges of those with Peacock feathers Distress ink and then I glued them on the card. I have glued the image with foamtape on the card. I have stamped a sentiment from the set Christmas handletter Prettige feestdagen (SL-ES-stamp87) from Studio light on white cardstock. I have cut the sentiment into a banner shape with a die from the set Snijmallen Verticale banners stitching (CDSN-0090) from Carlijn design. I have glued the banner with foamtape on the card. I was missing something on my card, so I decided to draw fireworks with a glitterpen. I glued 2 red hotfix gems on the banner with the sentiment. 


*********************************************************************************
STAMP: Penguins 2022 from Gerda Steiner designs, Christmas handletter Prettige feestdagen (SL-ES-stamp87) from Studio light
COLORING MEDIUM: Polychromos pencils
PAPER: White cs
INK: Versafine clear nocturne, Tumbled glass and Peacock feathers Distress ink
DIES: Snijmallen Slimline randen 4 bergen & water (CDSN-0099) and Snijmallen Verticale banners stitching (CDSN-0090) from Carlijn design
ACCESSORIES: Black glace pen, White gelpen, Clear Spectrum noir sparkle glitter pen, Silver glitter pen, Red hotfix gems. 

I am a participant in the Gerda Steiner designs Affiliate Programme. This means that if you click on one of my links and subsequently make a purchase, I will receive a small commission of store credit, at no extra cost to you.

Happy New Year 2022

Hi there,

it's Tanja here again. Gerda released this lovely Freebie in the Advent Calendar and today I would like to show you step-by-step how I created this project:

  • color the Gerda Steiner Designs 2022 digital stamp with Spectrum Noir Triblend Markers and Prismacolor Colored Pencils
  • add highlights with a white gel pen
  • add Nuvo Midas Touch Glitter Gloss to the stars
  • ink up the edges of the panel with Distress Ink Dusty Concord
  • add a strips of Distress Cardstock Dusty Concord and of patterned paper from the Memory Box Madras Plaid Blue and Violet to the top and bottom of the panel before adhering it to a cardbase
  • stamp the sentiment from the Karten-Kunst Feuerwerk set with Distress Oxide Ink Dusty Purple
  • embellish the card with some sequins and add Nuvo Glitter Drops White Blizzard to their centers


Have a wonderful New Year 2022.

Hugs,


Monday, December 27, 2021

Happy Holidays

Hi there,


I created this adorable Holiday Card using the Gerda Steiner Designs Santa with Letters stamp set:

  • stamp the Santa and the letters from the Gerda Steiner Designs Santa with Letters set with Lawn Fawn Jet Black
  • color the image with Spectrum Noir Triblend Markers and add extra-shading with Faber-Castell Polychromos
  • create a backdrop on a white cardbase using patterned papers and the Little Fox Flocons Nordiques
  • stamp the sentiment from the same set with Versafine Clair Nocturne


Have a wonderful Christmas Time.

Hugs,


Sunday, December 26, 2021

Thinking of you this Christmas....!!

 Hey everyone....

Ashlee here with you today, I hope you have all been having a wonderful Christmas!!

I can't believe celebrations are done and we are heading very soon into a new year, the time just goes way too quickly!!

Keeping with the festive season I am sharing a mini slimline card I made featuring the gorgeous angel from the Holiday friends stamp set....


I used a die cut set from Pinkfresh studio to do all of the mini slimline card base and added a little yellow ink to create a nice glow for the angel....

I coloured in the angel using Parkoo shop alcohol markers and fussy cut her out before propping her in the middle of the die cut circle with some foam tape to add extra dimension before finishing off the entire card with a touch of shiny sequins!!

I hope you enjoy this mini card as much as I enjoy creating them...

Merry Christmas and hugs Ashlee

Wednesday, December 22, 2021

Have a Cracking Good Holiday Season

Hi there,

it's Tanja here again and I created this sweet Christmas Card using the Gerda Steiner Designs The Nutcracker stamp set:

  • stamp the nutcracker, a mouse and the walnuts from the Gerda Steiner Designs The Nutcracker set with Lawn Fawn Jet Black
  • color the images with Spectrum Noir Triblend Markers, add extra-shading with Faber-Castell Polychromos pencils and highlights with a white gel pen
  • create a background on a piece of kraft cardstock by applying Distress Ink (Candied Apple, Pine Needles, Gathered Twigs) through the Festive Tim Holtz Layering stencil 
  • stamp the sentiment from the same stamp set with Versafine Clair Pinecone
  • add strips of kraft cardstock and of patterned paper to the left and right side of the panel before adhering it to a cardbase


I hope you got inspired.

Hugs,


Tuesday, December 21, 2021

Joy to the World

Hi there,

it's Tanja here and I created this adorable Christmas Card using the Gerda Steiner Designs Cat Lovers Must-Have Carol Kitten stamp set:

  • stamp one of the adorable little cats from the Gerda Steiner Designs Carol Kitten set with Lawn Fawn Jet Black
  • color the image with Spectrum Noir Triblend Markers and add extra shading with Faber-Castell Polychromos pencils
  • add highlights with a white gel pen
  • stamp the sentiment from the same set with Versafine Clair Glamorous
  • add green foiled cardstock and patterned paper to the left and right side of the panel before adhering it to a cardbase


Wishing you and your family a wonderful Christmas Season.

Hugs,


Tuesday, December 14, 2021

Little Snowman Tag

Hi there,

it's Tanja here and I created this adorable Christmas Tag using the Gerda Steiner Designs Little Snowman stamp set:


  • cut out the Clearly Besotted Stamps Rounded Tag from smooth white cardstock
  • stamp the cute snowman from the Gerda Steiner Designs Little Snowman set with Lawn Fawn Jet Black
  • add some snowflakes from the same set with Altenew Crisp Ink Sea Glass
  • color the image with Spectrum Noir Triblend Markers and add extra shading with Faber-Castell Polychromos pencils
  • add highlights with a white gel pen
  • ink up the edges with Distress Ink Victorian Velvet and a blending brush
  • dye a piece of torn seam binding with Distress Ink Peacock Feathers and thread it through the hole of the tag


Thanks for stopping by,


Hugs,


Friday, December 10, 2021

Happy 2022

Hi, Margreet here.

I have worked with the Freebie which was behind Door 1 of Gerda's Advent calendar.
Here you can still grab it.
Every day a door will be opened and there are great prizes to be won.

I printed out the digi in a rather large size to fit the slimline die.
Then I coloured with copics.
I cut a dark red background with a slimline die from Carlijn Design.
For the second die with curves I used DP with little stars in various colours.
I glued all layers.
At the fur parts of the hats I put some Snow Effect. At the stars of the garland I glued 'golden' sequins.
The letters Happy are made with Typewriter Keys stamps and I coloured them in the same colours.
I hope that I have given you some inspiration to create with this cute digi.
xxx Margreet


Wednesday, December 8, 2021

Against Holiday Stress

Hi there,

it's Tanja here and I created this tag duo using the adorable Gerda Steiner Designs Namasleigh stamp set:

  • stamp the reindeer and the snowman from the Gerda Steiner Designs Namasleigh set with Lawn Fawn Jet Black
  • color the images with Spectrum Noir Triblend Markers 
  • cut two Clearly Besotted Stamps Rounded Tags from smooth white cardstock and create a background with Distress Ink (Tumbled Glass, Spun Sugar, Scattered Straw), the My Favorite Things Micro Cloud Edges stencil and Blending Brushes
  • cut out the Clearly Besotted On the Line tress and add color with Alcohol Markers as well
  • stamp the sentiment from the Create a Smile Stamps Kleine Weihnachtsgrüße set with Versafine Clair Nocturne 
  • thread twine through the holes of the tags


I hope you got inspired.

Hugs,


Tuesday, December 7, 2021

Missing you this Holiday Season

Hi there,

it's Tanja here and I created this sweet Christmas Card using the Gerda Steiner Designs Christmas Puppies stamp set:

  • stamp one of the adorable little dogs from the Gerda Steiner Designs Christmas Puppies set with Lawn Fawn Jet Black
  • color the image with Spectrum Noir Triblend Markers and add extra shading with Faber-Castell Polychromos pencils
  • add highlights with a white gel pen
  • stamp the sentiment from the same set with Versafine Clair Nocturne
  • add pink glitter cardstock to the left and pink glitter cardstock with a decorative edge cut with one of the CUTplorations Lacy Edges and Borders to the right side of the panel before adhering it to a cardbase


have a wonderful Christmas Time.

Hugs,


Tuesday, November 30, 2021

Howly jowly.....!!

 Hey friends....

I've got some howly jowly inspiration for you today using the cute doggies from Gerda Steiner designs....

The other day I shared some tags using Carol kitten so I thought I better not leave the doggies out and used the Carol puppies!!


I created a simple base for this one by just adding a strip of designer cardstock behind the white base and then added the Christmas sentiment with black ink....

I then stamped, coloured and fussy cut two of the Carol puppies. These were coloured up using Parkoo shop alcohol markers and then added to the base with some foam tape for dimension!!

To complete the card I added a touch of red sequins....

I hope you enjoyed this sweet but simple card ready for the festive season!!
Happy crafting, hugs Ashlee 

No Peeking!

Hi there,

it's Tanja here and I created this sweet Christmas Tag using the Gerda Steiner Designs Peeking Friends stamp set:


  • cut out the Clearly Besotted Stamps Rounded Tag from smooth white cardstock
  • stamp the adorable little penguin from the Gerda Steiner Designs Peeking Friends set with Lawn Fawn Jet Black
  • color the image with Spectrum Noir Triblend Markers and add extra shading with Faber-Castell Polychromos pencils
  • add highlights with a white gel pen
  • ink up the edges with some left-over blue ink from a blending brush
  • stamp the sentiment from the same set with Versafine Clair Nocturne
  • dye a piece of torn seam binding with Distress Ink Peacock Feathers and thread it through the hole of the tag


Have you started creating your Christmas Projects, yet?

Hugs,


Sunday, November 28, 2021

Nutcracker Scene

Hi everyone! It’s Jeannie (InsideoutJeans) on the blog today with Gerda Steiner Design’s stamp set named, Nutcracker. It's the perfect stamp set for a scene card, with the help of a stencil and a couple dies.

I stamped out the images from the Nutcracker, using the little ballerinas and the ribbon, coloring them using copic markers. I also fussy cut them out. Of course, you can use the coordinating dies if you want. 

For my curtains, I used a piece of red cardstock as a base. I used the Center Stage die set for the stage and the side curtains. For the background and the top portion of the stage's curtain, I used the Curtain Call stencil and die set. It was really easy to add the details using some ink blending. 


I decided to go with a mini slimline size since it's so popular right now and it was the perfect size for the stage and the ballerinas. The only downside is that I wasn't able to add the Nutcracker into the scene without making the stage size look too small. I'll just use him for another card! 

For the sentiment, I used the one from the stamp set but I think it's a versatile set that you can use to swap out for any sentiment or occasion. 


Thanks for stopping by today and I hope you get inspired to create. Come back again soon for more inspiration and ideas! Happy Crafting! 


Joy to the world....!!

 Hello friends...

Being that it's coming up to the festive season I thought it was time to get some of my Christmas tags prepared so today's post features a set of co-ordinating tags using the Carol kitten set from Gerda Steiner designs!!


To create these tags I started with a red cardstock base that I stamped with a plaid background and then die cut using the bookmark die from Create a Smile stamps...

I then heat embossed some sentiments from Carol kitten set on black cardstock with WOW! Embossing opaque bright white powder then fussy cut them before adhering to the tags with foam tape!!

The kitten images were coloured using alcohol markers and then fussy cut...
One kitten for each tag along with some twine and the tags are ready for gifts!!


I hope you enjoy these tags and they get you inspired to make some too...
Happy crafting, hugs Ashlee


Friday, November 26, 2021

Namasleigh Postage Card


Hi friends!

It's Miki here, from @mp.cards and as promised last week, today I am back with a new project for my GSD Guest Design Role and this time I'm sharing with you a Christmas card using the Namasleigh stamp set

To find out how I made this card, please keep reading.

I started by focusing on the background - it was so easy! I took a stencil and inked it up with the Festive Berries Distress Oxide. I then cut it down to 3.75"x5" and adhered it to an A2 card base using foam tape.

Then, I moved on to the images. I first used three nesting postage dies to die cut them from white cardstock. For this card I used three images from the Namasleigh stamp set. I stamped the santa on the largest of the postage die cuts and colored him in. For added details I used a white gel pen for highlights. The smallest postage die cut I turned into a small scene. I first stamped the cute chick and created a mask for it and then I stamped the trees "behind" him. I colored them both, added some white highlights and a bit of shadow underneath the trees.

The sentiment went on the middle-size postage die cut and I chose to emboss that in black to make it stand out even more.

To finish the card I simply layered the three postage die cuts on my card using foam tape for added dimension and that was it. I think this card is super cute and funny and the sentiment is a perfect match!

I hope you like it and thanks so much for tuning in again!

Sending crafty hugs,
Miki


Thursday, November 25, 2021

You're my cup of tea by Noga Shefer


Hi crafty friends,
  Noga  
here and I am so happy to share with you another project for Gerda Steiner Designs today.


My box featuring the adorable "Positivi-Tea 4x6 Clear Stamp Set" stamp set and "Positivi-Tea Die Set". This set is so cute!!


I die cut a box using MFT box die out of Bristol smooth cardstock. 
I ink blended the background of the box using  picked raspderry distress oxide ink and splashed it with water.

Next I colored the sweet image using copic markers and glued it to front of the box.

Next I stamped a greeting from this stamp set using black ink and put tea bags inside the box.

 I hope you enjoy the card I created and feel inspired to create!

Thanks for stopping by,