Happy Monday everyone! I’m Allison Cope and I’m here today to share another fun digital
stamps creations with you!
I’m Canadian and we celebrate Thanksgiving in October. Our Thanksgiving is in
exactly two weeks so I needed to ensure that I had finished up all of my cards
by this week to send out to all of my family and friends in the mail this
week.
For my card today, I first created some back ground patterned paper using the
leaves from above the cat’s head in the digital stamp set, “Happy Fall Cat”.
Then I added a sentiment to the adorable “Cold Hedgehog” digital image. I colored in all of my leaves and my little hedgehog image using Copic Markers.
Thanks for stopping by today! I hope you too give some of our adorable
digital stamps a try! For more digital stamps, check out the shop HERE.
Happy creating everyone!
~ Ally ~
Monday, September 30, 2019
Sunday, September 29, 2019
Juggling Tiger
For today's inspiration I have used the 'Juggling Tiger' Digital Stamp.
- Base card: 14x10cm Copic X-Press It Blending Card.
- Print image onto base card. Colour with copic markers. Apply Nuvo Shimmer Pen and Glossy accents to the juggling balls. Set aside. Allow to dry.
- Colour background using Distress Oxide (I used Salty Ocean & Blueprint Sketch).
- Using die, cut grass from white card. Colour with ink (I used Catherine Pooler Lime Rickey). Adhere to base card.
- Using die, cut clouds from white card. Apply Nuvo Shimmer pen to solid 'cloud'. Adhere to base card. Apply glossy accents. Allow to dry.
- Apply glossy accents to the nose of the tiger.
I hope you have a great day
xxx
Labels:
Digital Stamps,
Juggling Tiger,
Melissa
 I live in the beautiful Blue Mountains, west of Sydney, Australia. I am married with 2 young boys. I started Rubber Stamping in the early 90's, Altered Art in early 2008, finally my addiction for Copic Markers in August 2010.
Saturday, September 28, 2019
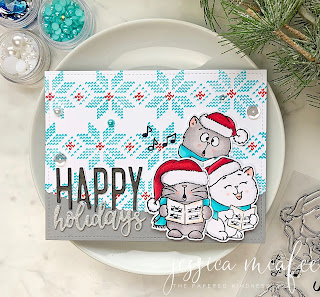
Carolling Kittens with Jessica
Let’s dive right in. I started by stamping the main images using the Misti and Memento Tuxedo Black Ink. We adopted two kittens last year and of course, that means I need ALL the cat stamps. Two of these cuties are modelled after ours, I find the Brown Grey Blend is a perfect match.
I tend to gravitate to non-traditional Christmas colours and I decided on the Blue Turquoise blend for the matching winter scarves. I wanted an aged look for the music sheets and used the lightest tone from the Tan Blend and smoothed out any harsh lines with my Blender pen.
I love the knit sweater effect and pulled out a cozy background stamp from my collection.
For added detail, I pulled out an edge die from my stash and ran it through my die cutting machine.
To finish off the card I added coordinating sequins, 3D Foam tape for dimension and a "Happy Holiday" die-cut sentiment. Thank you so much for stopping in!
-Jessica
Friday, September 27, 2019
BOO!
Happy Friday everyone! It's Cathy here sharing some funny spookiness today using the adorable new Ghosts stamps!
These are hands down my favorite ghost stamps out there! They are just too cute and what's even better about this stamp set? They come with birthday sentiments that are perfect with their expressions. Love that can you use these for October birthdays along with Halloween.
I couldn't wait to create a funny little scene with them. I've cut a panel for the background from watercolor cardstock and masked the moon with a die-cut circle before inking the night sky with Broken China, Chipped Sapphire, Dusty Concord and Black Soot Distress inks. I spritzed a little Perfect Pearls mixed with water to add a few stars and sparkle.
I added craters to the moon with a paintbrush and watered down Hickory Smoke Distress ink and used a bat stencil with black modeling paste for some texture and dimension.
I die-cut a Tim Holtz Gothic Gate and heat embossed it with clear embossing powder to give it a metallic shine. I've also die-cut the "BOO" sentiment with a Tim Holtz Sizzix die and colored it with Copics to match the witch hats on those mischievous little ghosts.
They really look like they've scared their friend! Look how pale he is!
I Copic colored all of the images and fussy cut them out, but there are also coordinating dies to this stamp set available in the shop. The pumpkins are from the brand new Pumpkin Bear stamps. I love how easy it is to mix and match Gerda Steiner stamps!
Hope you all have a fabulous crafty weekend and see you again soon!
Thursday, September 26, 2019
In a tangle....!!
Hey everyone....
Ashlee here with you today and I have a fun little christmas card to share with you using one of the new release stamps "Tangled penguin"!!
He is just the cutest little penguin all tangled up in his Christmas lights....
Ashlee here with you today and I have a fun little christmas card to share with you using one of the new release stamps "Tangled penguin"!!
He is just the cutest little penguin all tangled up in his Christmas lights....
To create this card I first used a stencil from Heffy doodle "Barber shop" and inked it using distress oxide inks in Twisted citron and Mowed lawn....
I then die cut some strips from green cardstock and added them to the card base with some foam tape, I love dimension on my cards!
I then die cut a snowglobe from La-La Land crafts (not sure if this die is available anymore) just out of white cardstock and added that to the card base with some foam tape...
I coloured up all the cute images in the Tangled penguin set with my Copics and layered them onto the snowglobe!!
Finished the card off with a speech bubble saying "Jolly season" that I got from the sentiment sets in the tangled penguin set, I just stamped some of the words not the whole sentiment sentences... and of course a touch of sequins too!!
Hope you like this card and feel inspired to get started on your Christmas cards too,
Hugs Ashlee.
Wednesday, September 25, 2019
A Scary Fun Masculine Card perfect for October Birthday's
Hello and Happy Wednesday Crafty Friends! Tina here from Cards & Coffee Time, today we are creating a scary-fun Birthday card with the BRAND NEW Ghosts Stamp Set available right now over at the Gerda Steiner Designs Shop , the Ghosts Coordinating Die Set are available too!! Okay…..I promise I never thought I would say this....How adorably cute are these ghosts, I mean really!! They can tell a story with out any words with those fun expressions:) Coloring ghosts are super easy I just added a touch of color with my copic markers. My background was created with a stencil, distress ink and glitter paste for some sparkle:) I just love how it turned out, kind-of masculine but I could probably give it to any birthday friend!
You can check out how I created this card down below, just click on the GHOSTS CARDMAKING TUTORIAL🙂 Thanks so much for visiting! Have a wonderful day!! Sending you Crafty Hugs, Tina
Happy birthday - Larissa
Hi everyone, I am Larissa from Car-d-elicious and today I am posting a new card on the blog from Gerda Steiner designs.
This time I have made a birthday card with the digital stamp Make a wish mouse from Gerda Steiner designs. I have coloured the image with my Polychromos pencils, the black glaze pen and a white gelpen. Then I have fussy cut the image. I have die-cut a square from white cardstock with the Crea-nest-lies XXL 50 from Crealies and the glued the image on it. I have stamped a sentiment from the set Happy hoppy (clear stamp) from Gerda Steiner designs in the left upper corner. I have made a card with the Crea-nest-lies XXL 54 from Crealies from white cardstock. On the card I glued a square that I have die-cut from green patterned paper from the Kraft in color - color paperpad from Doodlebug, that I have die-cut with the Crea-nest-lies XXL 50 from Crealies. I tied a white ribbon around the front of the card and then I glued the square with the image on the card with foamtape. I have die-cut a couple of flowers with the Floral flourishes Large flowers 6002/1081 from Joy crafts from pink patterned paper from the Create happiness paperpad from Studio light. I also have die-cut a couple of leaves from white cardstock with the Leaf cluster Die 066-c from Impression obsession. I glued the flowers and leaves on the card and then I decorated the flowers with white hotfix gems.
*********************************************************************************
STAMP: Make a wish mouse (digistamp) and Happy hoppy (clear stamp) from Gerda Steiner designs
COLORING MEDIUM: Polychromos pencils
PAPER: White cs, Kraft in color - color paperpad from Doodlebug, Create happiness paperpad from Studio light
INK: Versafine clair nocturne
DIES: Crea-nest-lies XXL 50 and 54 from Crealies, Floral flourishes Large flowers 6002/1081 from Joy crafts, Leaf cluster Die 066-c from Impression obsession
ACCESSORIES: Black glaze pen, white gelpen, white ribbon, white hotfix gems
I am a participant in the Gerda Steiner designs Affiliate Programme. This means that if you click on one of my links and subsequently make a purchase, I will receive a small commission of store credit, at no extra cost to you.
Labels:
birthday,
birthday card,
digistamp,
digital stamp,
Digital Stamps,
Happy Hoppy,
Larissa,
Make a Wish Mouse,
mouse,
Polychromos pencils
Tuesday, September 24, 2019
2 Cute Puppy Ghost Card by Karla
Hello! It's Karla back today with a super cute - and not too scary Halloween card using the adorable Gerda Steiner Designs Dog Dressed As Ghost digital stamp. If you're more of a clear stamp guy or gal you might want to check out this cutie also in the Where's The Candy clear stamp set! I'm sharing a video link below so you can see exactly how I put this cool card together.
I used Copic Markers and colour coordinated this puppy to match my papers.
I added inky layers with Distress Oxides, stencils and even glitter paste... lots of bling for Halloween!
Here's a look at the video where I'm putting this all together-
Thanks so much for stopping by! I hope you have a very happy and very crafty week ahead. Be sure to head over to the Gerda Steiner Designs Shop where you'll find lots of cute images to spark your craftiness 👻
Hugs,
Karla
Labels:
copic markers.,
Distress Oxide Inks,
Dog dressed as Ghost,
Halloween card,
Karla Yungwirth,
Youtube video
 I'm a mom of 3 beautiful girls, who LOVES crafting (scrapbooking, cardmaking, sewing, crochet...), decorating, and organizing. It's hard to find time, but a little creativity each day goes a long way to making my heart happy!
Sunday, September 22, 2019
Just Sneaking By To Say...
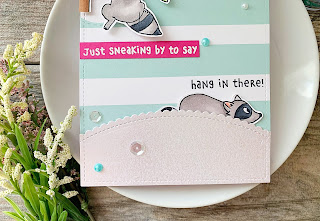
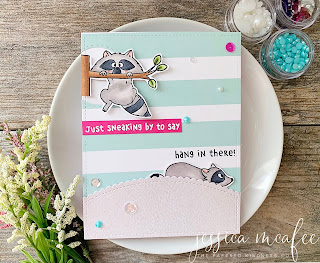
Hi everyone! It's Jessica here with an adorable encouragement card featuring the brand new Sneaky Raccoons stamp set. Where I live, raccoons have become an icon of our city, these cuties remind me of a few crafty creatures that roam our street at night.
I started by creating an A2 sized card front with pattern paper and die cut a scalloped edge. Next, I stamped and coloured in the main images using Memento Tuxedo Black Ink and Spectrum Noir Markers.
For the sentiment, I heat set white embossing powder on pink card stock. To finish off the card, I added coordinating sequins and 3D Foam tape for dimension.
Thanks so much for stopping by!
-Jessica
Saturday, September 21, 2019
Pumpkin Bear
Hi everyone! It’s Jeannie (InsideoutJeans) on the blog today with one of Gerda Steiner Designs’ newer release items with the amazing stamp set named, Pumpkin Bear. This is a smaller stamp set, but oh so adorable!
Lately, I've been really into scene cards and this was totally perfect for it. When I saw it, I felt all the autumn vibes with the red, orange, and yellows! Since this is a smaller set, I pulled an additional stamp set to help me out. Fall in Love is the perfect compliment to this card because I wanted to add a tree to the scene.
I went ahead and stamped out all the images from the set. I did minimal masking but I wanted the little bear to be in a pumpkin patch, where he decided on a pumpkin, so I added pumpkins everywhere. Once I colored in all the images, I really needed to set the scene by creating the ground. My coloring was very minimal, even though it looks like I spent a lot of time creating it. If you look closely, I used a dotting method with a lot of different colors. I kept the darker colors right under where images needed to be grounded (tree, pumpkins, bear) and worked my way out.
To finish off the sentiment, I stamped one of the ones from the set and added the little leaves around it. It really finished off the card and filled in the white space.
I love how this card turned out and am just in love with the colors and autumn vibes.
Thanks for stopping by! Come back again soon for some more inspiration and ideas!
Thursday, September 19, 2019
Happy OWL-oween!
Happy Thursday everyone! I'm Allison Cope.
Halloween is fast approaching! So I'm hard at work getting all those fun cards ready to go into the mail in a few weeks.
I thought I'd color up this adorable Owl on Pumpkin digital stamp image using some Polychromos Pencils.
And I thought he needed a whimsical scene to be in too so I made him a purely die cut back drop.
Thanks for dropping by! I hope you're getting some card making done this week!
Go get inky!
~ Ally ~
Wednesday, September 18, 2019
Have you seen the New "Moose Love" stamp set? It's a "Moose" have!!
Hello and Happy Wednesday Crafty Friends! Tina here from Cards & Coffee Time with a "Moose" wonderful Christmas Card using the Brand New Coming Soon to the Shop "Moose Love" stamp set over at the Gerda Steiner Designs Shop. Don't let this holly jolly card fool you, this stamp set has fantastic versatility as it can be used to created fun birthday cards too:)
I just looove the expression on this guy's face...it's amazing what that mistletoe can do!! I think it "Moose" be love! As always you can check out how I created this card down below, just click on the Moose Love Card Making Tutorial.
Thanks so much for stopping by! Don't forget to check out the Gerda Steiner Designs shop for this amazing set and much more crafty goodness:) Have a Fantastical Day! Hugs, Tina
Monday, September 16, 2019
'this the season to be JOLLY by Noga Shefer
Hi crafty friends, Noga here and I am so happy to share with you another project for Gerda Steiner Designs today.
To make this card I took an A2 panel of Bristol smooth cardstock.
The sky was created by blending tumbled glass and broken china distress oxide inks,
I splashed white paint on it to make snow and glued a snow hill.
Next I colored the images using copic markers and fussy cut them.
Next I glued them to my panel with foam tape for dimension.
Next I glued them to my panel with foam tape for dimension.
Next I stamped a greeting from this stamp set using white powder and heat embossed it.
I hope you enjoy the card I created and feel inspired to create!
Thanks for stopping by,
Labels:
clean and simple,
Clear Stamps,
copic copcoloring,
copic markers.,
Distress Oxide Inks,
DT,
gerda steiner designs
 Hi :) My name is Noga. I live in Israel, married to Yaniv and have two cute boys and a dog. In the morning I work in marketing in our nursery and at night I create cards. This is my therapy :)
Subscribe to:
Posts (Atom)


