Saturday, February 29, 2020

Hey Friend


Happy Saturday, Friends!
It's Cathy here sharing a clean and simple card today with this adorable little kitty from the
Valentines Cats stamp set.

I've used a sentiment from the Foxes stamp set to make this a card not specific to Valentine's Day, but I send love cards all year round, so I included a little heart background using a background stamp from La-La Land Crafts. I've colored this cutie with Copics and fussy cut out the stamped images, but there are coordinating dies available for this stamp set HERE.

Hope you're having a fabulous crafty weekend!


Friday, February 28, 2020

Just chicken in....!!

Hey everyone...

It's Ashlee here with you today and I have a card to share that I made using the super gorgeous stamp set "Chicken scratch"....

I wanted to create a fun little scene with the cheeky chicken above the group of piggies....
So I coloured up three piggies and the chicken using my Copic markers!!


I made a farm background for the animals using some dies from MFT...
- Stitched mini scallop rectangle stax
- Spring scene builder

and stencilled in a cloudy sky!!


I die cut the Heffy cut "hey" and embossed using WOW! Tracy Scott Peridot powder....
Using some black cardstock I die cut another hey and added it slightly off set to the embossed one to create a shadow effect!!

To finish off the card I added some Vegas Baby sequins from Catherine Pooler and attached them using micro glue dots (these glue dots are tiny and so perfect for adding sequins!!)...

Thanks for checking out my card, I hope you feel inspired to create a fun farm scene card too!!

Don't forget to check out the Gerda Steiner designs store for so many more awesome stamp sets perfect for anyones crafty stash!!

Happy crafting, Hugs Ashlee

Wednesday, February 26, 2020

Hello Spring Chicken Card by Karla

Hello friends! Karla here with another adorable card using the super sweet Gerda Steiner Designs digis! This one is brand new and will soon be in the shop!! You'll be able to find this cute Chick with her Mom soon in the Digital Stamp section. I think this could be used for lots of occasions - Spring, Mother's Day, Easter, Birthday or just a Hello like I did here.


I used a piece of woodgrain printed paper and added some chicken wire stenciling to the background with light grey ink. After I coloured these two cuties up with Copics I layered on a piece of gold thread and popped them up with foam tape.


I printed off a sentiment that I simply typed on my computer and cut it to fit the card. A black fine point marker was used to trace around the sentiment strip as well as the edge of the cardbase. I then added a few sparkly gold gems.


Thanks so much for stopping by! Be sure to check out all the wonderful crafty stamps - both clear and digital - in the Gerda Steiner Designs Shop, and make something that makes you happy today!

Hugs,
Karla

THANK YOU tag by Noga Shefer

Hi crafty friends,  Noga  here and I am so happy to share with you another project for Gerda Steiner Designs today.

My card featuring the brand new adorable Meerkats on the Lookout! 4x6 Clear Stamp Set and Meerkats on the Lookout - Coordinating Dies.


To create this tag I first die cut the Fold over tag confetti cuts from REVERSE CONFETTI and than stamped a greeting from this set using black ink.


The inside of the tag was created by blending spun sugar distress oxide ink.
Next I colored the sweet image using copic markers. I glued it to my panel with foam tape for dimension.


I hope you enjoy the card I created and feel inspired to create!

Thanks for stopping by,


Happy easter - Larissa


Hi everyone, I am Larissa from Car-d-elicious and today I am posting a new card on the blog from Gerda Steiner designs.


I have made an easter card this time with the digital stamp Bunny between eggs - Easter from Gerda Steiner designs. I have coloured the image with my Polychromos pencils, the black glaze pen and a white gelpen. Then I have fussy cut the image. I have diecut a rectangle from white cardstock with the Crea-nest-lies XXL 24 from Crealies. On the rectangle I applied Tumbled glass distress ink to make a background for the image. I have diecut a couple of clouds from white cardstock with the Cute cloud outlines die-namics from My favorite things and I glued those on the background. Then I glued the image with foamtape on the background and glued it all on a white card. In the left upper corner of the card I have stamped a sentiment from the set Scribble it (retired) from Clearly besotted stamps with black ink. 


*********************************************************************************
STAMP: Bunny between eggs - Easter from Gerda Steiner designs, Scribble it (retired) from Clearly besotted stamps
COLORING MEDIUM: Polychromos pencils, Distress ink
PAPER: White cs
INK: Versafine clair nocturne, Tumbled glass Distress ink
DIES: Crea-nest-lies XXL 24 from Crealies, Cute cloud outlines die-namics from My favorite things
ACCESSORIES: Black glaze pen, white gelpen

I am a participant in the Gerda Steiner designs Affiliate Programme. This means that if you click on one of my links and subsequently make a purchase, I will receive a small commission of store credit, at no extra cost to you.

Tuesday, February 25, 2020

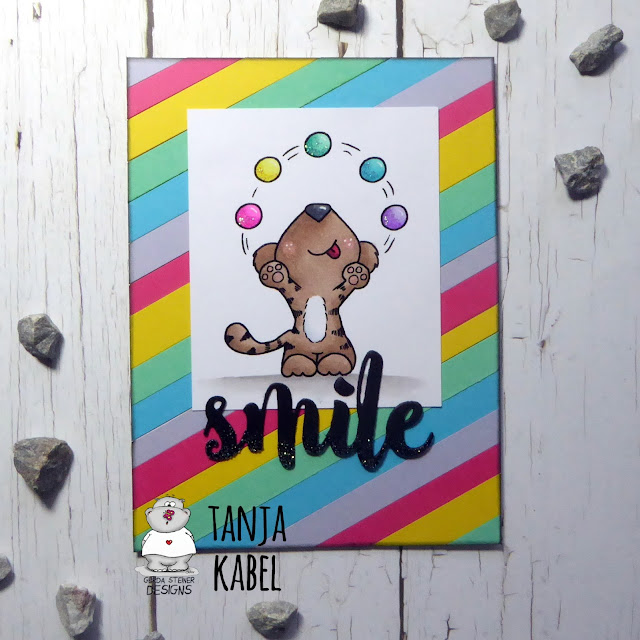
Smile Tiger

Hi there,

it's Tanja here and I created this colorful card using the Gerda Steiner Designs Juggling Tiger Digital Stamp:

  • color the Gerda Steiner Designs Juggling Tiger with Spectrum Noir Triblend Markers 
  • add highlights with a white gel pen and some sparkle with the Stickles Glitter Glue Crystal
  • for the background cut several strips of colored cardstock matching the colors of the balls and glue them onto a piece of cardstock at an angle
  • cut out the CUTplorations smile and cover the bottom part with Versamark - heat-emboss it with WOW! Clear Sparkle embossing powder
  • ink up the edges of the panel with Distress Oxide Ink Black Soot before adhering it to the cardbase


Have a wonderful day.

Hugs,


Monday, February 24, 2020

You Lift Me Up...and Up

Hi there!  It's Amy again (@card.chick on Instagram) with another guest designer project for you.  This time, my project involves pigs and balloons and lots of good feelings.

I really enjoy giving cards that expresses my gratitude towards uplifting individuals in my life, so this cute You Lift Me Up stamp set from Gerda Steiner Designs really checks off all the right boxes.


Here is my process in creating this card:

1)  I used Bristol Smooth paper and a homemade cloud stencil to create some yellow tinted clouds for the background.
2)  Then I used an old silicone mat to create a mirror stamped image of the pig. 


3)  I colored both pigs with Zig Clean Color Real Brush Markers and used a water pen brush to move the color around a bit.
4)  Both balloons were colored with Zigs.  Once they dried, I stamped the sentiment in each balloon.  For the "You lift me up!" sentiment, in order to fit the sentiment inside the balloon, I masked half of the sentiment and stamped it and then masked the other half to stamped the other two words.  I did not cut my sentiment stamp in half, though that is an option.
5)  I popped up the balloons and piggies with 3M foam tape to give it a little dimension.

Thank you for joining me today!  I hope you have an uplifting day ❤️


Sunday, February 23, 2020

Meerkats on the Lookout!

Hi everyone! It’s Jeannie (InsideoutJeans) on the blog today with one of Gerda Steiner Designs' newer stamp sets named, Meerkats on the Lookout! Isn't it super cute?


Per usual, I went first with a scene card because I wanted to use all the stamp images. I stamped everything out and masked everything as well because I wanted to do an ink blended background. I first blended browns and greens for the ground and then I went with a fun sunset sky.

While creating this card, I actually had to look up meerkats to see how to color them. I definitely don't see them around where I live... They are pretty cute and they are always standing up! While coloring, I tried to add some texture to them. I usually like to blend everything smoothly but I wanted to try something different. I really like how it turned out!


Once everything was colored up, I stamped out the sentiment that works perfectly for this card. I also love how there's a ton of sentiments to choose from. For this particular set, there's a lot of everything! 


If you're interested in seeing how this all came together, I also created a video to show my process.


Thanks for stopping by today and I hope you get inspired to create. Come back again soon for more inspiration and ideas! Happy Crafting!