Thursday, August 27, 2020

Lemonade Mouse Card by Karla!

 Hello friends! Karla here today with a sweet summer card for you using the adorable Mouse With Drink Digital Stamp from the Gerda Steiner Designs Shop! I wanted to celebrate the last few days of summer with this cutie!! My girls always love to have a lemonade stand, but of course this year they could not do that, so instead we are celebrating with lemonade at home, and I think they'll love this sweet card! 


I printed this guy on 65 lb cardstock and coloured him in with Copics. I used some diecuts to add layers and I thought the sweet lemon images from the Doodlebug Bar-B-Cute paper pad were perfect! I layered everything on some Cricut cardstock and even found some fun Paper Rose Shaker Mixes with various citrus fruits to add even more fun! 


Thanks so much for stopping by! Be sure to check out the Gerda Steiner Designs Shop to see all the amazing clear and digi stamps available. I hope you have an amazing week and squeeze in just a little more summer! 🍋

Big Hugs,

Karla

Wednesday, August 26, 2020

You are beary sweet (digital stamp) - Larissa


Hi everyone, I am Larissa from Car-d-elicious and today I have a new post for the blog from Gerda Steiner designs. This time I have made a little treat box with the shape of a slice of watermelon. I have decorated the box with the digital stamp You are beary sweet from Gerda Steiner designs. I have coloured the image with my Polychromos pencils, the black glaze pen and a white gelpen. I have fussy cut the image.


The box is made from white cardstock with the Silhouette cameo. I have used the file Watermelon box (324420) from Thaty Garcia. I coloured all different parts of the box with the following colours ink: Spun sugarWorn lipstickFestive berriesLucky clover and Black soot Distress ink. 


After I glued the box together I glued the image with foamtape on the box. The sentiment is made with black stickerletters.


*********************************************************************************
STAMP: You are beary sweet from Gerda Steiner designs
SILHOUETTE CUTTING FILE: Watermelon box (324420) from Thaty Garcia
COLORING MEDIUM: Polychromos pencils
PAPER: White cs
INK: Spun sugar, Worn lipstick, Festive berries, Lucky clover and Black soot Distress ink

ACCESSORIES: Black glaze pen, White gelpen, Black sticker letters


I am a participant in the Gerda Steiner designs Affiliate Programme. This means that if you click on one of my links and subsequently make a purchase, I will receive a small commission of store credit, at no extra cost to you.

Tuesday, August 25, 2020

Slimline Safari Card


Hello, it’s Karen here again!   I’ve got a slimline card today that could be used as either a thank you card or an encouragement card for a friend, or even a birthday card. I’ve used stamps from the Go Wild set, as well as the lion from the Party Animals set. 


 I started by stamping The Leafy Bold Print stamp from Hero Arts onto my card front with Versamark ink.  Once the ink was dry, I ink blended over it with original Distress Inks in Pine Needles, Lucky Clover and Peacock Feathers. I have to admit that I loved this card base so much that I made another card with the same background and added some flowers for a quick thank you card. 


Next, I stamped out my images by masking as needed and allowing room between my images to cut them out with a square die (I used the Selfie Square die from My Favourite Things). I used copic markers to colour them in, and also for the backgrounds.  I die cut 3 Polaroid frames from white cardstock using the Polaroid Shaker Frame die from My Favourite Things.  I wanted my images to look glossy like a photograph, so on the back of these frames, I placed double sided adhesive around the opening, and then adhered some scrap acetate (from a stamp set packaging), trimming it down to fit the opening.  Then I used a little glue to attach my coloured images to the acetate on the back of the Polaroid frames.  Just for fun, I fussy cut around the elephant’s trunk and made that come out over the front of the Polaroid frame (I had to cut a small slit in the acetate to allow it to come out). Finally, I hand wrote the hashtags messages on the front since I didn’t have any stamps for this, so you can get creative with what you write or personalize it for a special person.


I die cut the  sentiment from an older Neat and Tangled stamp and die set called “Awesome”.  The die set comes with a border die so I cut that from white cardstock, and the word from black cardstock.  I stamped the “You are so”  in black Versfine ink and clear embossed the sentiment at the top of the card, and then glued the die cut “Awesome” in place.  I placed the sentiment going down the side of the card as it allowed me to more easily fit my images without obscuring them too much.  This was a fairly quick and easy card to do and the slimline size gives you so much more room to play with.  Thanks so much for stopping by and I hope you’re having a great day!


Friends are like Stars

Hi there,

it's Tanja here and I created this sweet card using the owl from the Gerda Steiner Designs Foxes stamp set:

  • stamp the owl from the Gerda Steiner Designs Foxes set with Lawn Fawn Crunchy Leaf
  • color the image with Spectrum Noir Triblend Markers
  • cut out a Tim Holtz Stitched Oval from watercolor paper
  • create a background using Distress Oxide Inks (Chipped Sapphire, Black Soot) - add water and glitter droplets for more texture
  • stamp the star trio from the same set with Versamark and heat-emboss them with WOW! Metallic Gold Rich Super Fine embossing powder
  • stamp the the sentiment from the Avery Elle Written in the Stars set with Versafine Onyx Black and heat-emboss it with clear embossing powder
  • adhere the elements onto a stitched rectangular panel before adding all the layers to the cardbase


Have a wonderful day.

Hugs,


Monday, August 24, 2020

Christmas card by Galina

 Hello everyone it's Galina. And I'm here to share with another Christmas card using adorable stamp - Christmas Puppies 4x6 Clear Stamp Set

I stamped a puppy and colored it with alcohol markers. I cut out a white panel with a window and created a colorful sunset background using distress inks. I foam mount my puppy on the card panel and stamped a sentiment.

  The first part of the sentiment I stamped on the card background using black ink, and second part I stamped below the window using pink and violet oxide inks. To embellish my card I used star shaped sequins. 

To embellish my card I used star shaped sequins. 

Thanks for stopping by! Have a great day

Galina

Sunday, August 23, 2020

Alien Invasion

Welcome to the weekend crafty friends! Today, I’m sharing a card featuring, an oldie but goodie, stamp set: Alien Invasion. I actually started creating this card because I was just playing with watercolor inks and ended up with a fun and purpley background. I added a bit of splatter and it became the perfect galaxy background. 


I stamped images from the stamp set using Alien Invasion using a black ink. Then I colored them up using copic markers. I started out with just one alien in the little spaceship, the banner and the earth but after coloring it up, I wanted to fill up my galaxy a bit more with two more aliens and a moon. 


I forgot how much I love this set and I'm so glad my random watercolored background led me back to this cute set. 

Thanks for stopping by! Happy Crafting! 

Saturday, August 22, 2020

Thank You card by Noga Shefer


Hi crafty friends,  Noga here and I am so happy to share with you another project for Gerda Steiner Designs today


My card featuring the adorable Happy Bee-Day 4x6 Clear Stamp Set.


To make this card I took an A2 panel of Bristol smooth cardstock.

The background was created by blending twisted citron distress oxide ink.
I also splattered this distress oxide ink on the background.


Next I colored the image using copic markers and glued it to my panel.
Next I stamped a greeting from the stamp set using black ink.

For a final touch, I added some clear sequins and natural twine.

I hope you enjoy the card I created and feel inspired to create!

Stay safe and healthy!


Friday, August 21, 2020

BOO....!!

Hey my friends...

Ashlee here with you today with some new Gerda Steiner inspiration for you and seeing as though people are getting in the spirit with their halloween/fall inspired cards I thought I'd get out the super cute set "Ghosts" - (Co-ordinating dies also available)


I coloured a bunch of the ghosts up using Copic markers and I recently got some new glitter alcohol inks so I thought it would be fun to make an alcohol ink background for them to go on!!

Alcohol inks are so awesome to play around with as you always end up with something different....


I added on some BOO sentiments using dies from Simon says stamp and a touch of sequins, the card was complete!!

I hope you enjoy this BOO card and feel inspired to get creative with your Gerda Steiner goodies...
Happy crafting, Hugs Ashlee

Wednesday, August 19, 2020

Hugs - Larissa


Hi everyone, I am Larissa from Car-d-elicious and today I am posting a new card on the blog from Gerda Steiner designs. This week I have made a card with the digital stamp Chick mom from Gerda Steiner designs. I have coloured the image with my Polychromos pencils and the black glaze pen and then I have fussy cut the image.


I have die-cut the bottom edge of yellow patterned paper from the Birthday brights paper pad from My favorite things with a die from the Scalloped edges die collection (retired) from Clearly besotted and then I glued it on a white card. I have drawn lines on the card with a black fineliner. The sentiment is die-cut from black cardstock with the Simply hugs die Elle-ments from Avery elle. I have decorated the card with 2 black hotfix heart gems.


*********************************************************************************
STAMP: Chick mom from Gerda Steiner designs
COLORING MEDIUM: Polychromos pencils
PAPER: White cs, Birthday brights paper pad from My favorite things
DIES: Scalloped edges die collection (retired) from Clearly besotted, Simply hugs die Elle-ments from Avery elle
ACCESSORIES: Black glaze pen, Black fineliner, Black hotfix hearts

I am a participant in the Gerda Steiner designs Affiliate Programme. This means that if you click on one of my links and subsequently make a purchase, I will receive a small commission of store credit, at no extra cost to you.

Monday, August 17, 2020

Cute Christmas card with puppies

Hello everyone! It's Galina with you today and I want to share a cute Christmas card. For this card I used adorable stamp set with puppies called - Christmas Puppies 4x6 Clear Stamp Set. 

I stamped 3 puppies with black ink and colored them with alcohol markers. I cut out a panel with 4 windows and applied distress inks on the inner die cuts. I foam mount the stamped images on the panel and I stamped the first part of the sentiment on the right top corner and I add the second part of the sentiment inside of my card.


 Thanks for stopping by!

Galina


Thursday, August 13, 2020

Happiest Birthday bear....!!

Hey my crafty friends....

Ashlee here with you today and I have a slimline party card to share with you....

Slimline cards are so much fun to make, you can fit so much onto one card and they are perfect for doing scenes!!


I used the super awesome stamp set "Birthday bear" (co-ordinating dies also available) and coloured the images up using Copic markers....


To create the card base I die cut the slimline panel from a die by Trinity stamps and inked it using some distress oxide inks Mermaid Lagoon and Speckled Egg before spritzing it with water for a mottled effect!!


I added on a couple of tags die cut from an older die by Memory box and inked up the circle reinforcers with Mermaid Lagoon oxide ink...

I then tied on some yellow and white paper twine which finished off the tags!! 

A sentiment, a touch of Catherine Pooler sequins and the card was complete....

I hope you enjoy it, Hugs Ashlee

Wednesday, August 12, 2020

Monkey hanging in there - Larissa


Hi everyone, I am Larissa from Car-d-elicious and today I am posting a new card on the blog from Gerda Steiner designs. This time I have made a card with the digital stamp Monkey hanging in there from Gerda Steiner designs. I have coloured the image with my Polychromos pencils, the black glaze pen and a white gelpen. I have fussy cut the image.


With the Crea-nest-lies XXL 92 from Crealies I have die-cut a circle from green patterned paper from the Polka-dot parade paper pad from Sunny studio and I glued it on a white card. I have used the Crea-nest-lies XXl 41 from Crealies and Crea-nest-lies XXL 49 from Crealies to cut a circle frame from white cs and then I glued it with foamtape on a white card. I have glued the monkey inside the circle with foamtape. I have made the sentiment with the Lowercase alphabet (115633/0164) from Craft emotions from white cardstock. I have decorated the card with some 4mm Sparkling clear sequins from Pretty pink posh.


*********************************************************************************
STAMP: Monkey hanging in there from Gerda Steiner designs
COLORING MEDIUM: Polychromos pencils
PAPER: White cs, Polka-dot parade paper pad from Sunny studio
DIES: Crea-nest-lies XXL 41, 49 and 92 from Crealies, Lowercase alphabet (115633/0164) from Craft emotions
ACCESSORIES: Black glaze pen, White gelpen, 4mm Sparkling clear sequins from Pretty pink posh

I am a participant in the Gerda Steiner designs Affiliate Programme. This means that if you click on one of my links and subsequently make a purchase, I will receive a small commission of store credit, at no extra cost to you.

Leaping Frog Masculine Birthday Card

Hello again and welcome!  It’s Karen here today and I’ve got a card that I actually made a while ago, but have since made a video for it that I want to share with you.  I think of this card as being appropriate for a masculine card, so I’m going with that!  It features the adorable frogs from the “Frogs” stamp set from Gerda Steiner Designs  and I added a few images from the “Lucky Duck” stamp set as well.


If  you would like to see a video of how I made this card, I have it posted on my YouTube channel  and you can CLICK HERE to view it.


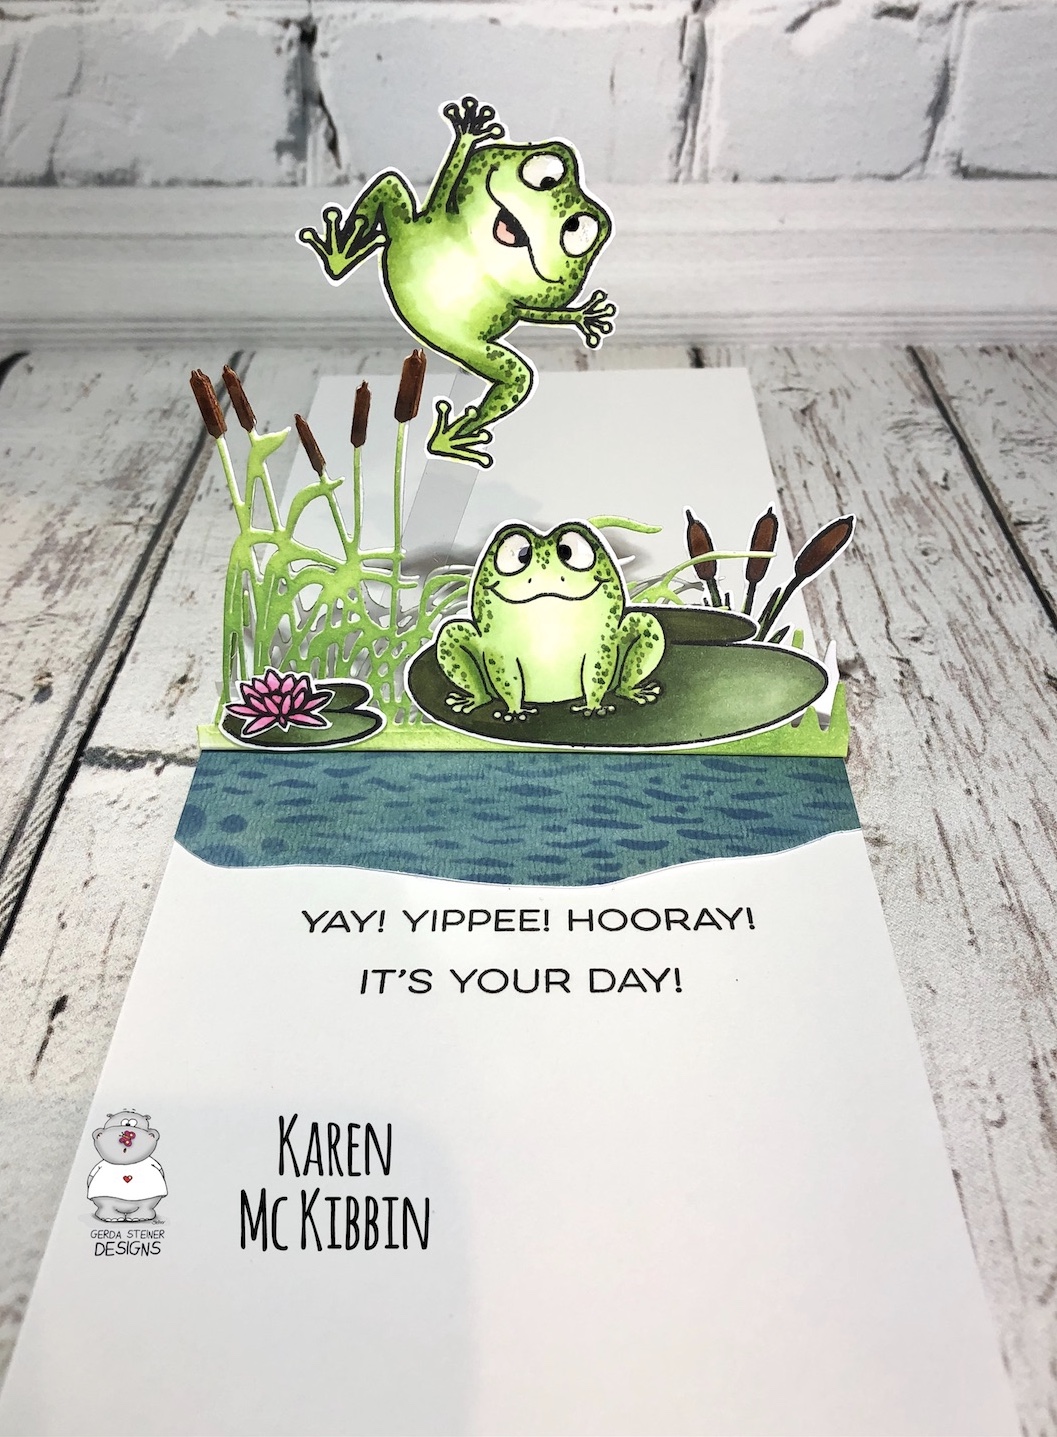
After copic colouring my images and cutting them out, I added glossy accents to all the frogs eyes and set them aside to dry. To create a shiny green cardstock for the happy birthday circles on the front, I combined some Nuvo glacier paste in Pineapple Delight and Sea Sprite to make a bright green, and spread that out on cardstock in a circle pattern. When it was dry, I used the Simon Says Stamp “Birthday Circle” die to cut it out. I also used this die to cut some circles from black cardstock. I stacked about 3 circles from white cardstock and added a final layer in the green for my center circle, then glued this in the center of my front panel. I glued down portions of circles around this in a mix of the black and green die cuts. I cut the hands from the front frog, trimmed his chest to fit in the circle, and then glued his hands down onto the center ring. Finally, I added dots with some of the copic markers I had used for the images, and added glossy accents to the dots.

For the inside of the card, I watercoloured a small piece of watercolour paper in a mix of blues and greens to make my pond. I used Distress Oxide Faded Jeans to stencil over the water with a stencil from The Crafters Workshop called Mini Sea Bubbles. I freestyle cut this piece to resemble a pond.

I die cut two grassy borders for the triangle pop up. You could use any straight grassy border in your supplies or even make your own border by cutting grass into 2 pieces of cardstock temporarily adhered together. I used a die from Paper Roses called Cattails and Grass border die. I then used brown copic markers to colour the cattails and Distress Oxide in Mowed Lawn for the grasses. I coloured both grassy borders, but for the one in back, remember that you actually colour the wrong side of the die cut. I creased both of these grassy die cuts at 1/4” from the straight edge, creased the folds and added double sided adhesive to the folds.

Next, I adhered the right leg of the leaping frog to a piece of scrap acetate with double sided tape and adhered him to the front grassy border with more double sided tape. Then I attached all my other images with glue, being careful not to get excess glue on the grassy areas.

I glued down my “pond” by positioning it 1/4” from the inside crease of my card. Now I could see where to stamp my inside sentiment and this is best done before adding the triangle pop up. I used a sentiment from MFT’S Yay for You set.

I glued together just the top portions of the grassy borders, to just about a quarter to a third of the way down. You need to leave the bottom of these borders unglued so they can form the triangle pop up. Then I removed the backing paper from the back grassy border, and lined it up along the crease on the inside of my card and pressed it down. Finally, I removed the backing paper on the front grassy border and folded my card base up and over the grassy borders and pressed it down. And that was the card done!

This is such a fun card to receive because the inside is so unexpected, and those frogs definitely make it a masculine card - always a bonus!!  I really hope you’ll give this one a try. Hope you have a great day!


Monday, August 10, 2020

Geometric floral card by Galina Filippenko

Hello everyone! It's Galina with you today. I want to share another card using Happy Bee-Day stamp set. For this card I decided to make a little bit unusual geometric design and play with masking technique.

On a white card panel I cut out two square windows. I stamped flowers on the inner die cuts and colored them with an alcohol markers.  I masked flowers with a masking paper and applied blue and dark blue distress ink on them using soft blender brushes.

I foam mount the white panel on the card base and attached colorful squares inside of the windows. To embellish my card I cut a few more tiny squares and foam mount them on the card, also I add two blue enamel dots.

I heat emboss the sentiment on the red cardstock and attached it in the middle of my card panel.

Than you for stopping by! Have a great day.

 Supplies

Sunday, August 9, 2020

Love Notes x5

Hi everyone! It’s Jeannie (InsideoutJeans) on the blog today with featuring five different little cards using Gerda Steiner Design’s stamp sets. I colored a bunch of images awhile ago but never created cards with them. I thought these would be perfect for a little note card. 


I stamped these images using Fadeout Ink and colored them up using Copic markers to achieve a no-line coloring look. My five images came from three different sets: Valentine Penguins, Peas Be Mine, and Fall in Love. I love that the images are of a couple of critters. 

Using a die set to create these mini cards, I created them all the same and was able to use up some scraps I had lying around in my stash. I used patterned paper for the heart and pieces of grey cardstock. Aren't they just adorable? It's be such a cute thing to pack with someone's lunch or just leave around for someone to find to brighten their day. 


Thanks for stopping by today and I hope you get inspired to create. Come back again soon for more inspiration and ideas! Happy Crafting! 


Thursday, August 6, 2020

What's On The Table Interactive Card by Karla

Hello friends! It's Karla back today with a cute interactive birthday card using the sweet What's On The Table Digi Stamp and some of  the fun accessories that come with it! This cute stamp even comes in a clear 4x6 stamp set with an adorable puppy added in! I printed all the images onto 65 lb cardstock and coloured them in with Copic Markers before arranging my scene on this cute interactive card base. 


I sponged orange and blue Distress Oxide Inks over the top and bottom areas of the card and added in a fun confetti stencil. I used the sweet party hat, adding it onto this cute kitty's head and I tucked some fun party balloons from a P13 paper pad behind him.


As you turn the wheel you can see four different sets of sentiments and images behind the window! What a wonderful way to celebrate! I cut the sentiments from a Tim Holtz Chit Chat Sticker Book to fit beside the cute images included in the digital stamp set.


I finished off with a couple more cupcakes - and as you can see someone couldn't resist a bite! a 'free cake' bubble puffy sticker and some Studio Katia gems. 


Thanks so much for stopping by! Be sure to check out the Gerda Steiner Designs Shop for so many sweet images that will get you crafting in no time!! Wishing you a healthy and happy weekend ahead!

Big Hugs,
Karla

Wednesday, August 5, 2020

Snowman and Birds

    
Hi, Margreet here.
I created a winter card with the sweet digital stamp Snowman and Birds from Gerda Steiner Designs.
I started with printing the cute digi. Colored with copics and fussy cut it.
Then I started by attaching design paper on white cardstock.
To cut the icicle die from Joy!crafts I used some blue glitter foam and attached it at the top of the card.
Then I cut some snow with Crealies dies. When thedie cuts were in place I made some extra snow with Foam Ball Clay.
The cute digi was stuck with foam parts and he got a cotton ball on his hat.
Although it is summer where I live, I hope you like this winter card.
Have a great day!
xxx Margreet


.


Picnic penguin - Happy day - Larissa


Goodmorning, today it is mu tunr again to pst something on the blog from Gerda Steiner designs and also on the Kleuren met potloden blog. This time I am posting a little present that I have made. I made a little picnicbasket with something delicious inside.


The basket is decorated with the digital stamp Picnic penguin from Gerda Steiner designs. I have coloured the image with my Polychromos pencils and the black glaze pen and then I have fussy cut the image.


I have cut the basket from kraft cardstock with the Silhouette cameo. I have used the file Picnic box with scallop edge (320295) from Pebbles in my pocket. I have decorated the side of the box with red gingham paper from the Tiny check paper pad from My favorite things. I have glued the image with foamtape on the basket. I have combined 2 words from 2 sentiments from the set Tiny type from Clearly besotted into a new sentiment. I stamped them on black cardstock with versamark ink and then I embossed them with white embossingpowder.


In the basket I have placed a "picnic blanket" from red gingham fabric. I also added a few bags of tea and some nougat.


*********************************************************************************
STAMP: Picnic penguin from Gerda Steiner designs, Tiny type from Clearly besotted
SILHOUETTE CUTTING FILE: Picnic box with scallop edge (320295) from Pebbles in my pocket 
COLORING MEDIUM: Polychromos pencils
PAPER: Kraft and black cs, Tiny check paper pad from My favorite things
INK: Versamark ink
ACCESSORIES: Black glaze pen, white embossingpowder, Black brads

I am a participant in the Gerda Steiner designs Affiliate Programme. This means that if you click on one of my links and subsequently make a purchase, I will receive a small commission of store credit, at no extra cost to you.