Showing posts with label Halloween card. Show all posts

Saturday, September 16, 2023

Have a Fun & Spooky Halloween

Hi crafty friends! I am very excited to be a guest designer for Gerda Steiner Designs.  I’m sharing a spooky scene card featuring the Halloween Ghosts Stamp set.


For this card, I created the background first by water coloring an A2-sized panel. I used two different shades of purple and swiped the color horizontally across the entire panel. Next, I created a grounding element by trimming a piece of blue cardstock and lightly blending the edges with blue ink. Then I splattered the background and the trimmed panel with diluted white paint for interest.  

I stamped the images with Copic-friendly ink and used my Copic Markers to color everything in. I also created the moon by die-cutting a circle and adding shading with my markers. 

Copic Marker 

Ghosts: BV01, BV00, BV000, BV0000
Eyes: B01, B000
Purple: V09, V17, V15, V12
Green: YG17, YG07, YG03, YG00
Sign: E42, E43, E44, E47
Broom: YR23, YR24, E35, E44, E47
Moon: C1, C0, C00, Y0000, Y000, Y00


Using a sweet sentiment from the stamp set, I white heat embossed it onto a piece of blue cardstock and adhered all of the elements to the front of my card panel using foam adhesive, liquid glue, or glue dots.

I hope you enjoyed my card today, and I will be back next week with another guest design project featuring the Halloween Ghosts Stamp set. 


Wednesday, August 23, 2023

Boo! Interactive Card with Guest Designer Annie Collins

Hello Crafty Friends - Annie here with a fun interactive card


Here's the video process 

Products Used:
Memento Ink: Tuxedo Black
VersaFine Ink: Onyx Black
The Maker's Movement: Paper Pad - Tricks & Treats
Bearly Art Glue - Used code ANNIE10 for 10% off
Copic Markers: B000,YG07, YR21, YR02, YR04,
YR68, RV02, Y19, Y23, V20, V22 & V25
Halloween Clay Bits
Tiny White Gems
Accent 80lb Ultra Smooth Cardstock: Opaque White
Recollections Brand 110lb Cardstock: Dove White
Recollections Brand 110lb Cardstock: Orange

These adorable little ghosts are just too cute to spook anyone!

For more inspiration and some fun join the monthly challenge

Thank you for stopping by the Blog today. I hope you found some inspiration!


Tuesday, October 26, 2021

A boo to you card with a turning ghost - Larissa


Hi everyone, I am Larissa from Car-d-elicious and today it is my turn again to post something on the blog from Gerda Steiner designs and this time I have made a mini slimline halloween card with a special effect. I have stamped the funny ghosts from the stamp set A boo to you from Gerda Steiner designs and then I coloured them with my Polychromos pencils and the black glaze pen. I have coloured the ghosts also with the Clear Spectrum noir sparkle glitter pen.


The mini slimline card is made with the die set Mini slimline B (CLCZ83) from Crealies. I have made the card from white cardstock. The second layer is cut from black cardstock. The purple patterned paper is from the Classic sunburst paperpad from Sunny studio. I have cut a couple of clouds from white cardstock with the Spooky clouds (retired) from Taylored expressions and I glued those on the purple paper. I added stars that I have cut with the Star confetti die from Alexandra Renke from black cardstock. 

The upper ghost can turn when you pull the white cord and to make this I followed a tutorial (dutch spoken) from Crealies. For the squares and circles for the mechanism I have used the die sets Crea-nest-lies XXL 21 from Crealies and Crea-nest-lies XXL 22 from Crealies. I have added a little clip with my turning ghost more down below in this post. After I glued the ghosts both on the card I have added a sentiment that I have stamped on the card with a sentiment from the set Peekin' pumpkin kitty from Gerda Steiner designs


*********************************************************************************
STAMP: A boo to you and Peekin' pumpkin kitty from Gerda Steiner designs
COLORING MEDIUM: Polychromos pencils
PAPER: White and black cs, Classic sunburst paperpad from Sunny studio
INK: Vewrsafine clair nocturne
DIES: Mini slimline B (CLCZ83) from Crealies, Crea-nest-lies XXL 21 and 22 from Crealies, Star confetti die from Alexandra Renke, Spooky clouds (retired) from Taylored expressions
ACCESSORIES: Black glaze pen, Clear Spectrum noir glitter sparkle pen. White embroidery thread, brad. 

I am a participant in the Gerda Steiner designs Affiliate Programme. This means that if you click on one of my links and subsequently make a purchase, I will receive a small commission of store credit, at no extra cost to you.


Tuesday, October 12, 2021

A boo for you - Larissa


Hi everyone, I am Larissa from Car-d-elicious and today it is my turn again to post something on the blog from Gerda Steiner designs. This time I have made a halloween slimline card with the clear stamp set A Boo for you from Gerda Steiner designs. I have coloured the images with my Polychromos pencils and the black glaze pen and then I have fussy cut the images.


From white cardstock I have cut a large rectangle with a die from the set Slimline Distressed (CR1569) from Marianne design. I made a spooky background on it with Mustard seed, Carved pumpkin, Crackling campfire and Black soot Distress ink. I have added the grass with the Stencil 20 from Gummiapan. I blended the grass on the card with Versafine clair nocturne ink to make it really black. I have drawn the 2 trees on the background and coloured them with a black permanent marker. I have glued the background on a white slimline card. For the little ghosts I used foamtape to add them on the card. I have stamped a sentiment from the clear stamp set A Boo for you from Gerda Steiner designs on white cardstock and then I have fussy cut all the words and glued them on the card. I have decorated the sky with black star rub-ons.


*********************************************************************************
STAMP: A Boo for you from Gerda Steiner designs
COLORING MEDIUM: Polychromos pencils, Distress inks
PAPER: White cs
INK: Versafine clair nocturne ink, Mustard seed, Carved pumpkin, Crackling campfire and Black soot Distress ink
DIES: Slimline Distressed (CR1569) from Marianne design
ACCESSORIES: Black glaze pen, Black star rub ons, Black permanent marker, Stencil 20 from Gummiapan 

I am a participant in the Gerda Steiner designs Affiliate Programme. This means that if you click on one of my links and subsequently make a purchase, I will receive a small commission of store credit, at no extra cost to you.


Tuesday, September 28, 2021

You are my boo! - Larissa


Hi everyone, I am Larissa from Car-d-elicious and today it is my turn again to post a card on the blog from Gerda Steiner designs and this time I have made a halloween card with the digital stamp You are my boo! ghost from Gerda Steiner designs. I have coloured the image with my Polychromos pencils and the black glaze pen and then I have fussy cut the image.

With the Crea-nest-lies XXL 76 from Crealies I have cut a rectangle from white cardstock. I used Shaded lilac, Wilted violet, Dusty concord and Black soot Distress ink to create a background for my image. With the help of the Slimline halloween stencil (PS8108) from Marianne design and Versafine clair nocturne ink I added a couple of bats on the background. I used a White Posca pen to add paint splatters on the background. I have glued the background on a white card and then I added the image with foamtape on the card. I have coloured the ghost and all the bats with the Clear Spectrum noir sparkle glitter pen. I have cut the sentiment from white cardstock with the Smalt alfabet (D190603) from Gummiapan and then I glued it above and below the image on the card.


*********************************************************************************
STAMP: You are my boo! ghost from Gerda Steiner designs
COLORING MEDIUM: Polychromos pencils, Distress inks
PAPER: White cs
INK: Versafine clair nocturne, Shaded lilac, Wilted violet, Dusty concord and Black soot Distress ink
DIES: Crea-nest-lies XXL 76 from Crealies, Smalt alfabet (D190603) from Gummiapan
ACCESSORIES: Black glaze pen, Clear Spectrum noir glitter sparkle pen, White Posca pen, Slimline halloween stencil (PS8108) from Marianne design

I am a participant in the Gerda Steiner designs Affiliate Programme. This means that if you click on one of my links and subsequently make a purchase, I will receive a small commission of store credit, at no extra cost to you.

Tuesday, September 14, 2021

Dog dressed as ghost - Larissa


Hi everyone, I am Larissa from Car-d-elicious and today it is my turn again to post a card on the blog from Gerda Steiner designs. This time I have made a halloween card with the digital stamp Dog dressed as ghost from Gerda Steiner designs. I have coloured the image with my Polychromos pencils and the black glaze pen and then I have fussy cut the image. 


I have followed a mini tutorial from Francine Vuillème for my card. I have torn a hole out of my masking paper and then I placed it on the front of a white card. Then I used Distress ink to create a spooky background. I have used Wild honey, Carved pumpkin, Rustic wilderness and Black soot Distress ink for the background. With a Black posca pen I have applied paint splatters on the card. I have glued the image with foamtape on the card. I have stamped a sentiment from the set Haunt it from Reverse confetti on the card. Unfortunately there are some splatters around the sentiment, so it is a bit more difficult to read. I stamped a couple of stars from the set Ghostly greetings from Hello bluebird on the background. I have drawn lines around the edges of the card with a black fineliner. 


*********************************************************************************
STAMP: Dog dressed as ghost from Gerda Steiner designs, Haunt it from Reverse confetti, Ghostly greetings from Hello bluebird
COLORING MEDIUM: Polychromos pencils, Distress inks
PAPER: White cs
INK: Versafine clair nocturne, Wild honey, Carved pumpkin, Rustic wilderness and Black soot Distress ink
ACCESSORIES: Black glaze pen, Black posca pen, Black fineliner, Masking paper

I am a participant in the Gerda Steiner designs Affiliate Programme. This means that if you click on one of my links and subsequently make a purchase, I will receive a small commission of store credit, at no extra cost to you.

Tuesday, October 20, 2020

Happy halloween - Larissa


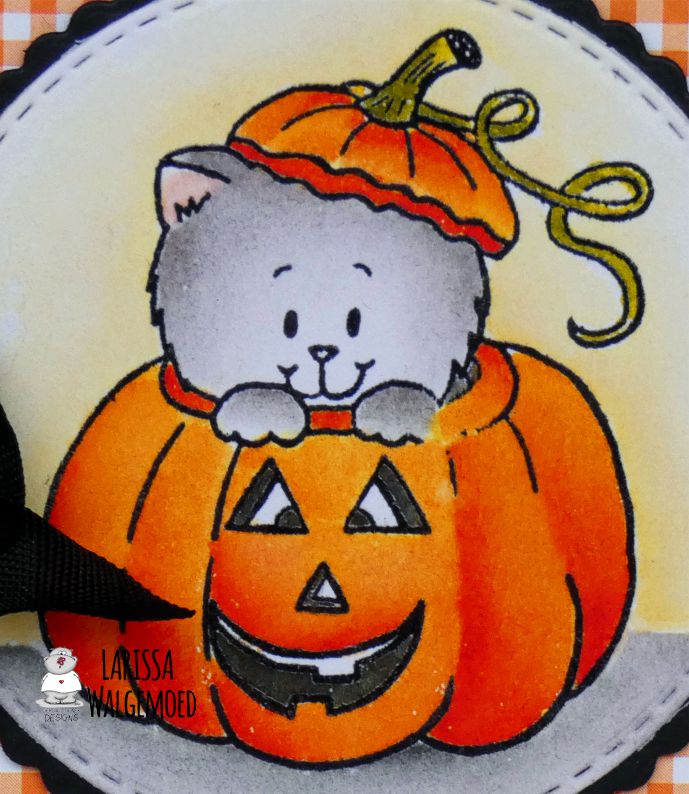
Hi everyone, I am Larissa from Car-d-elicious and today I am posting a new card on the blog from Gerda Steiner designs. I have made a halloween card with the clear stamp set Peekin' pumpkin kitty from Gerda Steiner designs. I have stamped the image on Aquarelpapier smooth Wit 200g A6 from Vaessen creative with Versafine clair nocturne ink and then I embossed the image with clear embossingpowder. I have coloured the image with my Distress inks.


I have die-cut the image with the Crea-nest-lies XXL 33 from Crealies and then I glued the image on a scalloped circle that I have die-cut from black cardstock with the Crea-nest-lies XXL 53 from Crealies. I have used a black card. I glued orange patterned paper on the card from the Tiny check brights paperpad from My favorite things after I have die-cut it with the Crea-nest-lies XXL 34 from Crealies and then I glued it on the card. I have tied black seam binding around the front of the card and then I glued the circle on the card. Under the image I have stamped a sentiment from the set Peekin' pumpkin kitty from Gerda Steiner designs


*********************************************************************************
STAMP: Peekin' pumpkin kitty from Gerda Steiner designs
COLORING MEDIUM: Distress inks
PAPER: Watercolour paper, Black cs, Tiny check brights paperpad from My favorite things
INK: Versafine clair nocturne
DIES: Crea-nest-lies XXL 33, 34 and 53 from Crealies
ACCESSORIES: Clear embossingpowder, Black seam binding

I am a participant in the Gerda Steiner designs Affiliate Programme. This means that if you click on one of my links and subsequently make a purchase, I will receive a small commission of store credit, at no extra cost to you.

Tuesday, September 29, 2020

Peekin' pumpkin kitty - Happy halloween - Larissa


Hi everyone, I am Larissa from Car-d-elicious and today it is my turn again to post a card, that also will be posted on the blog from Gerda Steiner designs. This time I have made a halloween card with the clear stampset Peekin' pumkin kitty from Gerda Steiner designs. This time I didn't stamp the image on watercolour paper, but instead of that I stamped it on pearlescent paper. Although it is not meant for watercolouring, I really had good results. Unfortunately it is really difficult to take good pictures. On the top picture you can't see it shine at all and on the second picture you see really well how the images shines, but you can't see really well how I coloured the image. That is a shame, because in real it looks really great. I have stamped the cat with Versafine clair nocturne ink on the pearlescent paper and then I embossed the image with clear embossingpowder. I have coloured the image with my Distress inks and then I have fussy cut the image. 


With the Crea-nest-lies XXL 33 from Crealies I have die-cut a circle from black and white patterned paper from the Black & white collection paperpad from Action. I used the Crea-nest-lies XXL 92 from Crealies to cut a larger circle from orange cardstock and then I glued the smaller circle on top of it. On a card from orange cardstock I glued black and white patterned paper from the Black & white collection paperpad from Action. Then I glued a strip orange cardstock on the card after I tied black seam binding around it. Then I glued the circles and the image with foamtape on the card. With the Star confetti die from Alexandra Renke I have die-cut a couple of stars from orange cardstock and I glued those on the card. The sentiment is also from the stamp set Peekin' pumkin kitty from Gerda Steiner designs. I stamped the sentiment on orange cardstock and glued it on the card. 


*********************************************************************************
STAMP: Peekin' pumkin kitty from Gerda Steiner designs
COLORING MEDIUM: Distress inks
PAPER: Pearlescent paper, Orange cs, Black & white collection paperpad from Action
INK: Versafine clair nocturne
DIES: Crea-nest-lies XXL 33 & 92 from Crealies, Star confetti die from Alexandra Renke
ACCESSORIES: Clear embossingpowder, Black seam binding

I am a participant in the Gerda Steiner designs Affiliate Programme. This means that if you click on one of my links and subsequently make a purchase, I will receive a small commission of store credit, at no extra cost to you.

Wednesday, October 23, 2019

Hippo in disguise - Larissa


Goodmorning, today I am posting a new card on the blog from Gerda Steiner designs.


This time I made a halloween card with the clear stamp Hippo in disguise from Gerda Steiner designs. I have coloured the hippo with my Polychromos pencils and the black glaze pen. I have fussy cut the image. I stamped the Plaid background stamp set from Concord & 9th on a piece of red cardstock with Versafine clair nocturne ink and then I have die cut a rectangle out of it with the Crea-nest-lies XXL 24 from Crealies. I have die cut a banner from black cardstock with the Crea-nest-lies XXL 59 from Crealies. I stamped a sentiment from the set Haunt it from Reverse confetti on it with versamark ink and then I embossed it with white embossingpowder. I have attached the banner on the background with the Tiny attacher from Tim Holtz. I glued the background with foamtape on a white card and then I also used foamtape to glue the image on the card. I decorated the card with a couple of tiny silver hotfix stars.


*********************************************************************************
STAMP: Hippo in disguise from Gerda Steiner designs, Haunt it from Reverse confetti, Plaid background stamp set from Concord & 9th
COLORING MEDIUM: Polychromos pencils
PAPER: White, red and black cs
INK: Versamark ink, Versafine clair nocturne
DIES: Crea-nest-lies XXL 24 & 59 from Crealies
ACCESSORIES: Black glaze pen, Tiny attacher from Tim Holtz, Silver hotfix stars, white embossingpowder

I am a participant in the Gerda Steiner designs Affiliate Programme. This means that if you click on one of my links and subsequently make a purchase, I will receive a small commission of store credit, at no extra cost to you

Wednesday, October 16, 2019

Happy halloween - Larissa


Hi everyone, I am Larissa from Car-d-elicious and today I am posting a card on the blog from Gerda Steiner designs.


This time I made a halloween card with the clear stamp set Peekin' pumpkin kitty from Gerda Steiner designs. I have coloured the image with my Caran d'ache Museum aquarelle pencils and the black glaze pen. I have fussy cut the image. On a white card I glued a strip of black and white patterned paper from the Black and white basics paper pack from My favorite things (retired) after I glued it on orange cardstock. I have glued the image with foamtape on the card.


I have die-cut the banner from orange cardstock with the Tag builder blueprints 5 die-namics from My favorite things. I stamped a sentiment from the clear stamp set Peekin' pumpkin kitty from Gerda Steiner designs on the banner and then I added white ribbon and black embroidery thread. I have glued the banner with foamtape on the card.


*********************************************************************************
STAMP: Peekin' pumpkin kitty from Gerda Steiner designs
COLORING MEDIUM: Caran d'ache Museum aquarelle pencils
PAPER: White and orange cs, Black and white basics paper pack from My favorite things (retired)
INK: Versafine clair nocturne
DIES: Tag builder blueprints 5 die-namics from My favorite things
ACCESSORIES: Black glaze pen, white ribbon, black embroidery thread

I am a participant in the Gerda Steiner designs Affiliate Programme. This means that if you click on one of my links and subsequently make a purchase, I will receive a small commission of store credit, at no extra cost to you.

Thursday, October 10, 2019

Mummy Kitten and Jack-o-Lantern Card with video by Karla

Hello friends! It's Karla back today with a sweet and not too spooky card and video for you using the awesome Halloween Kids Digital Stamp Set, which includes many images that are great for scene building. For this card I'm choosing to use the fence, jack-o-lantern and kitten. (PS You can also find this kitten separately as the Mummy Kitten digital stamp!)


I coloured up all the images with Copic Markers and some other alcohol based markers from my stash. I added some stitching with some embroidery floss, sewing in the holes created with a Sizzix oval dotted die. A few sequins add a little bling - because what would Halloween be without bling 😉


Inside, I added the Happy Halloween sentiment that is included in the Halloween Kids digital stamp set and another pumpkin.


Here's a look at the video where I'm putting this cute card together for my 13 Days Of Halloween Series -


Thanks so much for stopping by! Be sure to check out the Gerda Steiner Designs Shop where you'll find lots of cute creatures to colour up, and have a fantastic weekend ahead!!

Hugs,
Karla

Wednesday, October 2, 2019

Too cute to spook! - Larissa


Hi everyone, I am Larissa from Car-d-elicious and today I am posting a new project on the blog from Gerda Steiner designs and this time I made a card for my Memory dex. It has been a while since I made a card for it and I really should do it more often. It is real fun to create something on a tiny card.


I have made a halloween card for the month of october and I have used the clear stamp set Peekin' pumpkin kitty from Gerda Steiner designs. I have coloured the image with my Distress inks. I use those inks often for my backgrounds, but they are also very fun to use to colour image itself . I should do that also more. ;) After I coloured the image, I have fussy cut it.
With the Stencils SL120 from Studio light I have die-cut the base for my memory dex card from orange cardstock and I used the same dies to cut the layer from patterned paper from the Essential black & white paper pack from Altenew. On a strip of white cardstock I have stamped a sentiment from the set Too cute to spook from Reverse confetti and then I doodled some lines on it with a black fineliner. I glued the strip on the card and then I glued the image with foamtape on the card. I have die-cut a couple of stars from orange cardstock with the Confetti creative cuts from Mama elephant and glued those around the image.


*********************************************************************************
STAMP: Peekin' pumpkin kitty from Gerda Steiner designs, Too cute to spook from Reverse confetti
COLORING MEDIUM: Distress inks
PAPER: Orange and white cs, Essential black & white paper pack from Altenew
INK: Versafine clair nocturne
DIES: Stencil SL 120 from Studio light, Confetti creative cuts from Mama elephant
ACCESSORIES: Black glaze pen, black fineliner

I am a participant in the Gerda Steiner designs Affiliate Programme. This means that if you click on one of my links and subsequently make a purchase, I will receive a small commission of store credit, at no extra cost to you.

Friday, September 27, 2019

BOO!


Happy Friday everyone! It's Cathy here sharing some funny spookiness today using the adorable new Ghosts stamps!

These are hands down my favorite ghost stamps out there! They are just too cute and what's even better about this stamp set? They come with birthday sentiments that are perfect with their expressions. Love that can you use these for October birthdays along with Halloween.


I couldn't wait to create a funny little scene with them. I've cut a panel for the background from watercolor cardstock and masked the moon with a die-cut circle before inking the night sky with Broken China, Chipped Sapphire, Dusty Concord and Black Soot Distress inks. I spritzed a little Perfect Pearls mixed with water to add a few stars and sparkle.

I added craters to the moon with a paintbrush and watered down Hickory Smoke Distress ink and used a bat stencil with black modeling paste for some texture and dimension.


I die-cut a Tim Holtz Gothic Gate and heat embossed it with clear embossing powder to give it a metallic shine. I've also die-cut the "BOO" sentiment with a Tim Holtz Sizzix die and colored it with Copics to match the witch hats on those mischievous little ghosts.

They really look like they've scared their friend! Look how pale he is!


I Copic colored all of the images and fussy cut them out, but there are also coordinating dies to this stamp set available in the shop. The pumpkins are from the brand new Pumpkin Bear stamps. I love how easy it is to mix and match Gerda Steiner stamps!

Hope you all have a fabulous crafty weekend and see you again soon!

Wednesday, September 25, 2019

A Scary Fun Masculine Card perfect for October Birthday's


Hello and Happy Wednesday Crafty Friends!  Tina here from Cards & Coffee Time, today we are creating a scary-fun Birthday card with the BRAND NEW Ghosts Stamp Set available right now over at the Gerda Steiner Designs Shop , the Ghosts Coordinating Die Set are available too!!  Okay…..I promise I never thought I would say this....How adorably cute are these ghosts, I mean really!!  They can tell a story with out any words with those fun expressions:)  Coloring ghosts are super easy I just added a touch of color with my copic markers.  My background was created with a stencil, distress ink and glitter paste for some sparkle:) I just love how it turned out, kind-of masculine but I could probably give it to any birthday friend!


You can check out how I created this card down below, just click on the GHOSTS CARDMAKING TUTORIAL🙂  Thanks so much for visiting!  Have a wonderful day!!  Sending you Crafty Hugs, Tina


Tuesday, September 24, 2019

2 Cute Puppy Ghost Card by Karla

Hello! It's Karla back today with a super cute - and not too scary Halloween card using the adorable Gerda Steiner Designs Dog Dressed As Ghost digital stamp. If you're more of a clear stamp guy or gal you might want to check out this cutie also in the Where's The Candy clear stamp set! I'm sharing a video link below so you can see exactly how I put this cool card together.


I used Copic Markers and colour coordinated this puppy to match my papers. 


I added inky layers with Distress Oxides, stencils and even glitter paste... lots of bling for Halloween!


Here's a look at the video where I'm putting this all together-


Thanks so much for stopping by! I hope you have a very happy and very crafty week ahead. Be sure to head over to the Gerda Steiner Designs Shop where you'll find lots of cute images to spark your craftiness 👻

Hugs,
Karla

Thursday, September 19, 2019

Happy OWL-oween!

Happy Thursday everyone!  I'm Allison Cope.

Halloween is fast approaching!  So I'm hard at work getting all those fun cards ready to go into the mail in a few weeks.

I thought I'd color up this adorable Owl on Pumpkin digital stamp image using some Polychromos Pencils.


And I thought he needed a whimsical scene to be in too so I made him a purely die cut back drop.

Thanks for dropping by!  I hope you're getting some card making done this week!

Go get inky!

~ Ally ~

Wednesday, September 11, 2019

Coffee Monster - Halloween Shaker Card


Hello and Happy Wednesday Crafty Friends!  Tina here, I am up on the Blog today, sharing a monster of a card using the fun Monster Coffee stamp set:) This set is available over at the Gerda Steiner Shop! The expressions on these not-so-scary monsters is just to funny!!  One looks like he is ready for Halloween candy, one looks like he is in full blown, "I'm gonna get you" mode and the last one seems to have ate a bit to much candy and is not feeling that well.  Can you guess who's who?  I love the coffee sentiments that come along with the Coffee Monster stamp, but for today I used a Happy Halloween sentiment from the sweet Peekin' Pumpkin Kitty Stamp set, with Halloween not too far away, I thought we would make a Halloween Monster card.


Thanks so much for stopping by!  If you would like to see how I created this card check it out down below🙂  Just Click on the Coffee Monster Tutorial Link:)  Have a Fantastic and Crafty day!  Hugs, Tina