Showing posts with label Halloween. Show all posts

Friday, September 20, 2024

First the COFFEE...then the SPOOKY!

 Greetings everyone! It's me again, Jessie Scott (@chevy.scott on IG) here to share a too cute to spook Digital Stamp from Gerda Steiner Designs! Coffee Lover Ghost!

Go ahead and download it here - you know you need it! and make this card with me!

Ya'll know I love to giggle and I LOOOOOOVE digital stamps because you can make it any size and combine with whatever sentiment that SPOOKS to you ;-). 

For this one, I typed "Coffee ghost t-shirt" in my search bar and then told it to show me only images.  T-shirts are great for one-liner ideas for cards (shhhh my best kept card secret!). This fun sentiment "First the Coffee, then the Spooky" came up and I loved it.

The only challenge with a digital stamp is sizing it right so you don't need to print it again haha. I usually sketch out my card idea on scrap paper, decide where the image is going, then measure it. 
 

This is for my BONUS CARD at the end of this post. I sized the image and sentiment to the Mama Elephant frames I wanted to try with some fun alternating orange scallops. 

Ok so now for the fun coffee-themed background!
 

First I took a watercolor paper card front, then inked up Distress Ink randomly in spots with Tea Die, Walnut Stain, Spiced Marmalade, and Vintage Photo. Just random! Then I spritzed the entire paper with water (this easily blends the borders of my random colors). 

After it dried, I then grabbed my reinkers for Tea Dye and the darker Ground Espresso. I put a little but of water on my glass mat, then added a couple drops of one. I took a gel jar from my stash and used it to "stamp" a round coffee stain on my card in a few places. With the leftover ink, I took a paint brush and splattered a bit on the card. I then cleaned my mat and repeated with the other color with a different larger gel pot and then splattered.

I love this grungy, i-took-this-card-to-the-coffee-shop vibe!

The only thing that's left is to color and assemble! Ghosts are gun for Halloween but also because they are simple to color ;-)

Here's a video of the rest of the process!


Ok.... BONUS CARD!


I wasn't sure what font I would like so I printed two. Haha! This one I "tossed together" using paper and I love it just as much? Don't want to get dirty? Spice it up with some fun frames and patterned paper!
Here's another assembly video:


How do you like your ghosts?  Spooky blues or ghostly greys? 

See you again soon!
Sunday, October 15, 2023

Happy Halloween

 Hi everyone!

Stacey with you today stopping by to share a Halloween themed card that I created using that cute little owl from the Where Is The Candy Stamp Set.

Here is a look at the card that I created:


I covered a white card base with some patterned papers, leaving about an inch or so of the cardbase showing along the bottom. I stamped my owl from the Where Is The Candy stamp set with some Tuxedo Black Memento Ink and colored it with my Copic markers. I die cut it out using a circle die and layered it on top of another circle before using a stitched die to cut off the excess overhang so that my circle would be flush with my card base. I stamped my sentiment onto some orange patterned paper, added a black scallop & added it to my card. I completed my card with some black stars in the top right corner and a bow tied with some black crochet thread. 

Copic Colors Used:
--Pumpkin: YR12, YR14, YR18
--Owl: E50, E51, E31, E33, E35, R00, R20, C00
--Leaves: Y26, YR27/ E31, Y19, G94, Y11
--Hat: V12, V15, V17, N3, N5

Thank you so much for stopping by today!
I appreciate it so much!
I hope you have a great crafty day!
Stacey

Find Stacey on Instagram: @staceyscreativecorner


Sunday, October 8, 2023

Trick Or Treat!

Hi everyone!
Stacey with you today stopping by to share a Halloween themed card that I created using some of those amazing stamps from Gerda Steiner Designs!
For my card, I used the Halloween Ghosts, Ghosts & Where Is The Candy stamp sets. 
Here is a look at the card that I created:


I created my card by creating an A2 cardbase from some white cardstock and covering it with some striped & orange patterned papers. I heat embossed my sentiment from the Where Is The Candy stamp set using some white embossing powder onto a strip of black cardstock. I used a spider web border punch and created a fun little border along the bottom. I die cut a piece of green patterned paper and adhered my sentiment piece before popping the entire piece up with foam tape onto my card front. 
Next was the fun part....playing with those adorable little ghosts from the Halloween Ghosts stamp set! I wanted the little ghost with glasses to also have a witch hat. I stamped the hat from the Ghosts stamp set, masked it off, and then stamped the ghost with glasses so that he could have a costume also. I colored all the ghosts with my Copic markers and then fussy cut them out. I added them to my card, popping up the middle ghost with more foam tape. I added a spider from the Ghosts stamp set and some doodles with a black Micron pen to complete my card. Aren't those little ghosts so cute??

Copic Colors Used:
--Ghosts: C00, C0, BG000, RV00.
--Hats: N3, N5, N7.
--Purple Hat Band: V12, V17, Y18.
--Green Hat Band: G94, G99, Y18.
--Orange Hat Band: YR09, Y18.
--Broom: N3, Y26, Y28, Y18.
--Sign: N0.

Thank you so much for stopping by today!
I appreciate it so much!
I hope you have a great crafty day,

Find Stacey on Instagram: @staceyscreativecorner


Friday, October 29, 2021

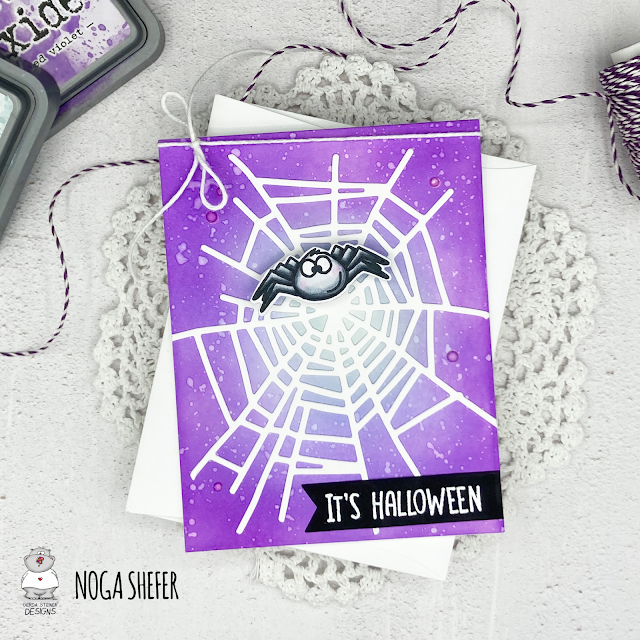
Halloween Card by Noga Shefer


Hi crafty friends,  Noga here and I am so happy to share with you another project for GSD today.

My card featuring the adorable Bats 4x6 Clear Stamp Set and Bats 4x6 Die Set.

To make this card I took an A2 panel of Bristol smooth cardstock.

The background was created by blending shaded lilac,speckled egg  and wilted violet distress oxide inks.
I spired some water onto it and soaked it up with paper towel.

Next I glued a white spider web on the background.
Than I colored the sweet spider using copic markers and glued it to my panel using  mini action wobbler.

Next I stamped a greeting from Gourds 4x6 Clear Stamp Set using white powder and heat embossed it on black banner.

For a final touch, I added a white twine.


I hope you enjoy the card I created and feel inspired to create!

Thanks for stopping by,


Tuesday, October 26, 2021

A boo to you card with a turning ghost - Larissa


Hi everyone, I am Larissa from Car-d-elicious and today it is my turn again to post something on the blog from Gerda Steiner designs and this time I have made a mini slimline halloween card with a special effect. I have stamped the funny ghosts from the stamp set A boo to you from Gerda Steiner designs and then I coloured them with my Polychromos pencils and the black glaze pen. I have coloured the ghosts also with the Clear Spectrum noir sparkle glitter pen.


The mini slimline card is made with the die set Mini slimline B (CLCZ83) from Crealies. I have made the card from white cardstock. The second layer is cut from black cardstock. The purple patterned paper is from the Classic sunburst paperpad from Sunny studio. I have cut a couple of clouds from white cardstock with the Spooky clouds (retired) from Taylored expressions and I glued those on the purple paper. I added stars that I have cut with the Star confetti die from Alexandra Renke from black cardstock. 

The upper ghost can turn when you pull the white cord and to make this I followed a tutorial (dutch spoken) from Crealies. For the squares and circles for the mechanism I have used the die sets Crea-nest-lies XXL 21 from Crealies and Crea-nest-lies XXL 22 from Crealies. I have added a little clip with my turning ghost more down below in this post. After I glued the ghosts both on the card I have added a sentiment that I have stamped on the card with a sentiment from the set Peekin' pumpkin kitty from Gerda Steiner designs. 


*********************************************************************************
STAMP: A boo to you and Peekin' pumpkin kitty from Gerda Steiner designs
COLORING MEDIUM: Polychromos pencils
PAPER: White and black cs, Classic sunburst paperpad from Sunny studio
INK: Vewrsafine clair nocturne
DIES: Mini slimline B (CLCZ83) from Crealies, Crea-nest-lies XXL 21 and 22 from Crealies, Star confetti die from Alexandra Renke, Spooky clouds (retired) from Taylored expressions
ACCESSORIES: Black glaze pen, Clear Spectrum noir glitter sparkle pen. White embroidery thread, brad. 

I am a participant in the Gerda Steiner designs Affiliate Programme. This means that if you click on one of my links and subsequently make a purchase, I will receive a small commission of store credit, at no extra cost to you.


Tuesday, October 12, 2021

A boo for you - Larissa


Hi everyone, I am Larissa from Car-d-elicious and today it is my turn again to post something on the blog from Gerda Steiner designs. This time I have made a halloween slimline card with the clear stamp set A Boo for you from Gerda Steiner designs. I have coloured the images with my Polychromos pencils and the black glaze pen and then I have fussy cut the images.


From white cardstock I have cut a large rectangle with a die from the set Slimline Distressed (CR1569) from Marianne design. I made a spooky background on it with Mustard seed, Carved pumpkin, Crackling campfire and Black soot Distress ink. I have added the grass with the Stencil 20 from Gummiapan. I blended the grass on the card with Versafine clair nocturne ink to make it really black. I have drawn the 2 trees on the background and coloured them with a black permanent marker. I have glued the background on a white slimline card. For the little ghosts I used foamtape to add them on the card. I have stamped a sentiment from the clear stamp set A Boo for you from Gerda Steiner designs on white cardstock and then I have fussy cut all the words and glued them on the card. I have decorated the sky with black star rub-ons.


*********************************************************************************
STAMP: A Boo for you from Gerda Steiner designs
COLORING MEDIUM: Polychromos pencils, Distress inks
PAPER: White cs
INK: Versafine clair nocturne ink, Mustard seed, Carved pumpkin, Crackling campfire and Black soot Distress ink
DIES: Slimline Distressed (CR1569) from Marianne design
ACCESSORIES: Black glaze pen, Black star rub ons, Black permanent marker, Stencil 20 from Gummiapan 

I am a participant in the Gerda Steiner designs Affiliate Programme. This means that if you click on one of my links and subsequently make a purchase, I will receive a small commission of store credit, at no extra cost to you.


Tuesday, October 5, 2021

Dog dressed ghost - Larissa


Hi everyone, I am Larissa from Car-d-elicious and today it it my turn again to post a project on the blog from Gerda Steiner designs. This time I have made a little box for halloween and I filled it with candy in a little bag. The box is decorated with the digital stamp Dog dressed as ghost from Gerda Steiner designs. I have coloured the image with my Polychromos pencils and the black glaze pen. I have fussy cut the image. 

The box is made from purple cardstock with the Silhouette cameo. I have decorated the box with black and white dotted paper from the Do what you love pretty paper block ( PK9149 - retired) from Marianne design. I have tied a white ribbon around it and then I glued it on the box. I have added the image with foamtape.

On the backside of the box I have added the black and white dotted paper again. I have rounded the corners from the paper with a corner punch. I have stamped a sentiment from the set Happy haunting from Mama elephant on white cardstock. I have die-cut the sentiment with the Crea-nest-lies XXL 33 from Crealies and then I glued it on the box. The box closes with a velcro circle. 


*********************************************************************************
STAMP: Dog dressed as ghost from Gerda Steiner designs, Happy haunting from Mama elephant
COLORING MEDIUM: Polychromos pencils
PAPER: Purple cs, Do what you love pretty paper block ( PK9149 - retired) from Marianne design
INK: Versafine clair nocturne
DIES: Crea-nest-lies XXL 33 from Crealies
ACCESSORIES: Black glaze pen, white ribbon, Corner punch, Velcro

I am a participant in the Gerda Steiner designs Affiliate Programme. This means that if you click on one of my links and subsequently make a purchase, I will receive a small commission of store credit, at no extra cost to you.

Tuesday, September 28, 2021

You are my boo! - Larissa


Hi everyone, I am Larissa from Car-d-elicious and today it is my turn again to post a card on the blog from Gerda Steiner designs and this time I have made a halloween card with the digital stamp You are my boo! ghost from Gerda Steiner designs. I have coloured the image with my Polychromos pencils and the black glaze pen and then I have fussy cut the image.

With the Crea-nest-lies XXL 76 from Crealies I have cut a rectangle from white cardstock. I used Shaded lilac, Wilted violet, Dusty concord and Black soot Distress ink to create a background for my image. With the help of the Slimline halloween stencil (PS8108) from Marianne design and Versafine clair nocturne ink I added a couple of bats on the background. I used a White Posca pen to add paint splatters on the background. I have glued the background on a white card and then I added the image with foamtape on the card. I have coloured the ghost and all the bats with the Clear Spectrum noir sparkle glitter pen. I have cut the sentiment from white cardstock with the Smalt alfabet (D190603) from Gummiapan and then I glued it above and below the image on the card.


*********************************************************************************
STAMP: You are my boo! ghost from Gerda Steiner designs
COLORING MEDIUM: Polychromos pencils, Distress inks
PAPER: White cs
INK: Versafine clair nocturne, Shaded lilac, Wilted violet, Dusty concord and Black soot Distress ink
DIES: Crea-nest-lies XXL 76 from Crealies, Smalt alfabet (D190603) from Gummiapan
ACCESSORIES: Black glaze pen, Clear Spectrum noir glitter sparkle pen, White Posca pen, Slimline halloween stencil (PS8108) from Marianne design

I am a participant in the Gerda Steiner designs Affiliate Programme. This means that if you click on one of my links and subsequently make a purchase, I will receive a small commission of store credit, at no extra cost to you.

Friday, September 24, 2021

Halloween Card by Noga Shefer


Hi crafty friends,  Noga here and I am so happy to share with you another project for GSD today.


 My card featuring the adorable Ghosts Stamp Set , Ghosts Die Set,  Gourds 4x6 Clear Stamp Set and Gourds Die Set.

I love to make Halloween cards so much!

To make this card I took an A2 panel of Bristol smooth cardstock.

The background was created by blending dried marigold distress oxide ink.
I also splashed black paint on it  and glued a black scallop frame.

Next I colored the cute image using copic markers and glued it to my panel with foam tape for dimension.

Next I stamped a greeting from this stamp set using black ink.

I hope you enjoy the card I created and feel inspired to create!

Thanks for stopping by,

Tuesday, September 14, 2021

Dog dressed as ghost - Larissa


Hi everyone, I am Larissa from Car-d-elicious and today it is my turn again to post a card on the blog from Gerda Steiner designs. This time I have made a halloween card with the digital stamp Dog dressed as ghost from Gerda Steiner designs. I have coloured the image with my Polychromos pencils and the black glaze pen and then I have fussy cut the image. 


I have followed a mini tutorial from Francine Vuillème for my card. I have torn a hole out of my masking paper and then I placed it on the front of a white card. Then I used Distress ink to create a spooky background. I have used Wild honey, Carved pumpkin, Rustic wilderness and Black soot Distress ink for the background. With a Black posca pen I have applied paint splatters on the card. I have glued the image with foamtape on the card. I have stamped a sentiment from the set Haunt it from Reverse confetti on the card. Unfortunately there are some splatters around the sentiment, so it is a bit more difficult to read. I stamped a couple of stars from the set Ghostly greetings from Hello bluebird on the background. I have drawn lines around the edges of the card with a black fineliner. 


*********************************************************************************
STAMP: Dog dressed as ghost from Gerda Steiner designs, Haunt it from Reverse confetti, Ghostly greetings from Hello bluebird
COLORING MEDIUM: Polychromos pencils, Distress inks
PAPER: White cs
INK: Versafine clair nocturne, Wild honey, Carved pumpkin, Rustic wilderness and Black soot Distress ink
ACCESSORIES: Black glaze pen, Black posca pen, Black fineliner, Masking paper

I am a participant in the Gerda Steiner designs Affiliate Programme. This means that if you click on one of my links and subsequently make a purchase, I will receive a small commission of store credit, at no extra cost to you.

Monday, August 16, 2021

Halloween card by Noga Shefer


Hi crafty friends,  Noga here and I am so happy to share with you another project for GSD today.


My card featuring the adorable Ghosts Stamp Set  and Ghosts Die Set.

To make this card I took an A2 panel of Bristol smooth cardstock.

The sky was created by blending twisted citron  and old paper distress oxide inks and splashed it with water and clear shimmer spray.

I glued a black frame with trees.

Next I colored the cute images using copic markers and glued it to my panel with foam tape for dimension.

Next I stamped a greeting from this stamp set using black ink.

I hope you enjoy the card I created and feel inspired to create!

Thanks for stopping by,