Showing posts with label Party Animals. Show all posts

Wednesday, October 7, 2020

Go Wild!


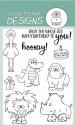
 Hi Friends! Cathy here today from "Inkredible Adventures"sharing a fun birthday card using the Party Animals and Go Wild! clear stamp sets. These are two of my favorites and they just never get old!

For the background of this card, I've die-cut an animal print cover plate die from Momenta out of black cardstock and glued it to the card base. I then cut a 3" x 4" piece of white cardstock and inked it with Old Paper distress ink. I die-cut the top edge of the cardstock piece with a stitched rolling hills die and glued it to the bottom of the card front.

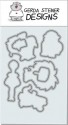
For a little African savanna scene, I die-cut a circle from white cardstock and inked the top portion with Ripe Persimmon and Scattered Straw distress ink. I die-cut the circle again from black cardstock and used a safari skyline die from Club La-La Land Crafts across the center of the die-cut circle and then glued the circle die-cuts together.

I colored all of the critters and the jeep with Copics, fussy cut them out and glued them to the card front as shown. Since they're driving a little wild, I dabbed a little white gouache around the tires with a paint brush to indicate a little dust and movement.

Hope you've enjoyed and have a great crafty week!

Tuesday, August 25, 2020

Slimline Safari Card


Hello, it’s Karen here again!   I’ve got a slimline card today that could be used as either a thank you card or an encouragement card for a friend, or even a birthday card. I’ve used stamps from the Go Wild set, as well as the lion from the Party Animals set. 


 I started by stamping The Leafy Bold Print stamp from Hero Arts onto my card front with Versamark ink.  Once the ink was dry, I ink blended over it with original Distress Inks in Pine Needles, Lucky Clover and Peacock Feathers. I have to admit that I loved this card base so much that I made another card with the same background and added some flowers for a quick thank you card. 


Next, I stamped out my images by masking as needed and allowing room between my images to cut them out with a square die (I used the Selfie Square die from My Favourite Things). I used copic markers to colour them in, and also for the backgrounds.  I die cut 3 Polaroid frames from white cardstock using the Polaroid Shaker Frame die from My Favourite Things.  I wanted my images to look glossy like a photograph, so on the back of these frames, I placed double sided adhesive around the opening, and then adhered some scrap acetate (from a stamp set packaging), trimming it down to fit the opening.  Then I used a little glue to attach my coloured images to the acetate on the back of the Polaroid frames.  Just for fun, I fussy cut around the elephant’s trunk and made that come out over the front of the Polaroid frame (I had to cut a small slit in the acetate to allow it to come out). Finally, I hand wrote the hashtags messages on the front since I didn’t have any stamps for this, so you can get creative with what you write or personalize it for a special person.


I die cut the  sentiment from an older Neat and Tangled stamp and die set called “Awesome”.  The die set comes with a border die so I cut that from white cardstock, and the word from black cardstock.  I stamped the “You are so”  in black Versfine ink and clear embossed the sentiment at the top of the card, and then glued the die cut “Awesome” in place.  I placed the sentiment going down the side of the card as it allowed me to more easily fit my images without obscuring them too much.  This was a fairly quick and easy card to do and the slimline size gives you so much more room to play with.  Thanks so much for stopping by and I hope you’re having a great day!


Wednesday, May 20, 2020

Ha-bee birthday (digital stamp) - Larissa


Hi everyone, I am Larissa from Car-d-elicious and today I made a card with a sweet bee from Gerda Steiner designs. The card is made for the To bee or not to bee bloghop that is organised by Milka. One of the sponsors from our bloghop is Gerda Steiner designs, so I also wanted to make a card with a sweet bee from Gerda for the hop.


I have coloured the Birthday bee (digital stamp) from Gerda Steiner designs with my Polychromos pencils and the white gelpen. Then I have fussy cut the image. On a kraft card I glued rainbow patterned paper from the Really rainbow petite paper pack from Lawn fawn and then I added another layer of kraft cardstock. I doodled lines on the edges of the kraft cardstock with a black gelpen. Then I glued the little bee with foamtape on the card. The sentiment Hooray is from the set Party animals (clear stamp) from Gerda Steiner designs and I stamped it under the image. I doodled the stitched swirl with a black gelpen. Then I stamped a couple of stars on the card with the star stamp from the set Alien invasion (clear stamp) from Gerda Steiner designs. I added black hotfix gems on the antenna from the bee.


Giveaway:
Clearly Besotted Stamps, £20 e-Gift Card to the Store
Gerda Steiner Designs, $15 Gift Code to the Store
Jane’s Doodles, stamp set of winner’s choice
Lawn Fawn, $25 Gift Certificate to the Store
Newton’s Nook Designs, $25 Store Credit
Pretty Pink Posh, $30 Gift Certificate to the Store
STAMPlorations, $20 Gift Code to the store
STAMPlorations, “Bee” package: stencil, clear sticker pack and embellishments (this prize is available for commentator located in US or has US mailing address)
Uniko, ₤15 e-Gift Certificate to the Store
Your Next Stamp, $20 Gift Card to the Store


Milka is also giving away one Jane’s Doodles stamp set of winner’s choice to one lucky winner.
12 prizes will be given away to 12 winners.


Giveaway is opened Worldwide (+18), except for minors.
For your chance to win, hop along blogs of the participating designers listed in blog hop list and leave comment on each blog hop stop (19 stops). After commenting, return back to Milka’s blog and add your name to InLinkz, but prior you do, please read Blog Hop details, terms, giveaway rules and privacy policy which are shared in Milka's blog post below InLinkz.

InLinkz opens on May 20th, 2020, 6 PM CEST.
InLinkz closes on May 27th, 2020, 11:59 PM CEST.
Winners’ names will be announced on Milka’s blog on May 31st 2020 during the day.


Blog hop list:
  1. Milka Gubo
  2.  Alice Huang
  3.  Amy Tsuruta
  4. Anushree Vaish
  5.  Beverley Brown
  6.  Ishani
  7.  Julie Elak
  8. Kaja Vezenšek
  9. Kathleen Curry
  10. Larissa Walgemoed
  11. Laura Volpes
  12. Linda van Wely
  13. Melissa Chipperfield
  14. Neha Bhatt
  15. Nonni Niskanen
  16. Samantha Mann
  17. Sue Hastead
  18. Tanja Kabel
  19. Valentina Bizjak
Milka Gubo (InLinkz – return after commenting and add your name to InLinkz)

*********************************************************************************
STAMP: Birthday bee (digital stamp) from Gerda Steiner designs, Party animals (clear stamp) and Alien invasion (clear stamp) from Gerda Steiner designs
COLORING MEDIUM: Polychromos pencils
PAPER: Kraft cs, Really rainbow petite paper pack from Lawn fawn
INK: Versafine clair nocturne
ACCESSORIES: White gelpen, Clear Spectrum noir glitter sparkle pen, Black gelpen, Black hotfix

I am a participant in the Gerda Steiner designs Affiliate Programme. This means that if you click on one of my links and subsequently make a purchase, I will receive a small commission of store credit, at no extra cost to you.

Monday, May 27, 2019

Hello Party Animals!

Hello, crafty friends! Its Rebekah with you today sharing a card I made using the first stamp set I ever purchased from Gerda Steiner  - The Party Animals Stamp Set!

I have made several cards using this set but today I only used one of the five different animals in this set.


I think this ostrich is just too funny and  so cute! I wanted to keep the focus in the image for this card so I kept the scene super simple!

On Copic friendly paper with Copic safe ink, I started by stamping the middle ostrich and then created a mask. I placed the mask on that ostrich and then stamped another ostrich on each side.


I wanted them to have a lot of texture to mimic the look of feathers. Its is easy to creat using a flicking motion with the brush end of the markers.

I added a bit of a ground for these little guys  and my card was just about done. I mounted the panel with my colored images on gray cardstock, added the sentiment,  which is from the Frogs stamp set, and called it a day! I am quit happy about the way it turned out!

Thanks for spending a few minutes of your day with me! Now go get crafting!

Wednesday, September 5, 2018

Whoo gives a hoot about age? - Happy birthday - Larissa


Goodmorning, today I am posting a new card on the blog from Gerda Steiner designs. This time I made a birthday card for someone who will be celebrating her 50th birthday soon. I forgot to take a picture of the inside of the card. On the inside I stamped the sentiment Happy birthday. I used 5 different stampsets to make this card. The owl and branch are from the set Owl rather be with you from Gerda Steiner designs. The present is from the stampset Monster fun from Gerda Steiner designs. The delicious cake is from the set Party animals from Gerda Steiner designs. I have used a partyhat from the set Dachshunds from Gerda Steiner designs. The balloon is from the stampset Happy hoppy from Gerda Steiner designs and I decorated it with black number stickers.I have coloured all the images with my Polychromos pencils and the black glaze pen and then I have fussy cut them all.


With the Crea-nest-lies XXL 44 from Crealies I have diecut a rectangle from yellow design paper from the Perfectly plaid spring paperpad from Lawn fawn. I glued it on a kraft card. With the Crea-nest-lies XXL 49 from Crealies I have die-cut a circle from white cardstock. I made a background on it with the Mini cloud edges stencil from My favorite things and Tumbled glass distress ink. I have diecut a scalloped circle from kraft cardstock with the Crea-nest-lies XXL 53 from Crealies and glued the circle with the images on it. The sentiment is made on the computer and after I printed it I added a frame around it with a black pen. I glued the sentiment on kraft cardstock and then I glued it on the card.


*********************************************************************************
STAMP: Owl rather be with you, Monster fun, Party animals, Dachshunds and Happy hoppy from Gerda Steiner designs
COLORING MEDIUM: Polychromos pencils
PAPER: White and kraft cs, Perfectly plaid spring paperpad from Lawn fawn
INK: Versafine onyx black, Tumbled glass distress ink
DIES: Crea-nest-lies XXL 44, 49 and 53 from Crealies
ACCESSORIES: Black glaze pen, Mini cloud edges stencil from My favorite things, Black pen, Black number stickers

Wednesday, August 15, 2018

Go wild! - Larissa


Goodmorning! Today it is my turn again to post a new card on the blog from Gerda Steiner designs. This time I have made a large birthday card and I used 3 stampset from Gerda Steiner on it.


From the set Go wild from Gerda Steiner designs I have used the images of the giraffe, elephant and the vulture. I used all animals from the stampset Party animals from Gerda Steiner designs. They are the lion, crocodile, ostrich, gorilla and the rhinoceros. From the stampset Hoppiness from Gerda Steiner designs I only used the image of the little bird. I stamped all images on masking paper and the I have fussy cut them all. With the help of the masks I stamped all the animals on the white cardstock. Then I ahev coloured all the images with my Polychromos pencils and the black glaze pen. I have put the masks back again on all the animals and started on the background. With the Mini cloud edges stencil from My favorite things and Broken china distress ink I made some clouds in the sky. I have used the Grassy edges stencil from My favorite things and Mowed lawn distress ink to make the grass. I have stamped a sentiment from the set Go wild from Gerda Steiner designs on the card. Then I pierced little holes in the image panel and added stitching with white embroidery thread. I glued the panel with foamtape on a kraft card.


*********************************************************************************
STAMP: Go wild, Party animals and Hoppiness from Gerda Steiner designs
COLORING MEDIUM: Polychromos pencils, Distress inks
PAPER: White and kraft cs
INK: Versafine onyx black, Broken china and Mowed lawn distress ink
ACCESSORIES: Black glaze pen, Mini cloud edges stencil and Grassy edges stencil from My favorite things, White embroidery thread


Wednesday, May 30, 2018

Wild animal medals - Larissa


Hi everyone, I am Larissa from Car-d-elicious.


Last sunday my little nephews Menno and Niek participated in the Run voor Kika (Kika is a Dutch organisation  that raises money to help find a cure for children with cancer). I am really proud of these little guys and the money they raised for this organisation, so I made a little medal for both runners. Just to let them know they are simply the best! ;)


A while ago I found a handlettering set in a Dutch store with chiboard circles in it and I used those to make the medals. On one medal I stamped a lion and on the other the crocodile from the stampset Party animals from Gerda Steiner designs. I added a sentiment from the set Happy hoppy from Gerda Steiner designs on both medals. I have coloured the image with my Polychromos pencils. I thought it would be really hard to do, but it was actually really easy to do. I didn't add any shadows on these. I have coloured the eyes with a black glaze pen. I added a little metal ring and some ribbon and so the chipboard circles became 2 medals.


*********************************************************************************
STAMP: Party animals and Happy hoppy from Gerda Steiner designs
COLORING MEDIUM: Polychromos pencils
INK: Versafine onyx black
ACCESSORIES: Black glaze pen, Metal ring, yellow ribbon, Chipboard circle

Monday, May 15, 2017

Happy Birthday!

Hello everyone!

Alexandra here from made by Alexandra sharing a pop up box card that I made using Party animals stamp set and the sentiment and banner from Alien invasion


I always loved interactive cards, and this pop up box card is just perfect too add all the critters from the stamp set when you don't know which one too choose :) , but also can be intimidating to create one! I remember that I saw lots of pop up boxes on Instagram but I felt like they are so hard to make .

But no ! They are very easy and also they create addiction :))

To start I cut a stripe of paper 12 cm tall ( scoring at 6 cm ) and 25 cm long.
Then I scored every 6 cm ,12cm ,18 cm and finally 24 cm leaving 1 cm to be able to close the pop up box. 
The upper part where the scoring is I cut were the scoring lines are so when the box is open you are able to see the critters inside.
Also I cut 3 stripes of paper 1 cm tall and 8 cm long to have were to put the critters inside the box.


Next I colored the critters from Party animals stamp set using Spectrum Noir Alcohol Markers and also inked the entire box using Distress inks and to add  a bit of details I used a stencil.

The sentiment is from Alien invasion and the banner too . I adhered everything using strong tape and my card was done!

Thank you so much for stopping by!  Have a lovely day!


Friday, April 14, 2017

Flamingo mania


Good morning peeps!
here I am again, with my second card... made with Party Animal clear stamp set... I loved it!! It's a very simple card, but I love coloring on craft, and I love flamigos!! =D


I wanted to thanks once more Gerda Steiner Designs for inviting me to be guest here, I really feel honored for the chance...
Wish you all ladies the best, and thanks for passing by....

Monday, April 10, 2017

Coloring a Lion -tep by Step Copic Marker Tutorial


Hello! It's Mindy from My Creative Scoop. Today I'm sharing another Copic Marker Tutorial with you all using this darling lion stamp from the Party Animals Stamp Set.

You can also get matching dies that coordinate with this set -- making creating super easy!

Ok, let's start the tutorial. Each new colorI use is in the photo making this Copic Marker Tutorial super easy to follow. :)


Since the stamp is stamped with Black ink, we want to add some W7 into the main, this will add much more definition to your coloring and really creating hair like texture.


I added some W3 to the bottom of the eyes giving them a little shadow will give them more dimension and appear more 3d like.


Well, I hope you have enjoyed my Copic Marker tutorial. You can find more Copic Tutorials on my website. www.MyCreativeScoop.com

♥Mindy


Monday, April 3, 2017

Guest Design - Rhino Birthday by Australe Créations

Hello everyone! 

It's Céline from Australe Créations, I'm  so happy to find you today for another card :)
                                                                                                              
I chose the rhinoceros from the Party Animals stamp set, he’s so cute


 Colored with Copic Markers (again hihi), sentiment with white embossing powder,

                                                    
And a watercolor backgroung made with Gelatos


Thanks so much for stopping by today, I hope you like it !
                                                                                       
See you soon


Saturday, April 1, 2017

Guest Design - Lion party by Australe Créations

Hello everyone! 

It's Céline from Australe Créations, I hope you are well !
                                                                                                              
Today I propose you some invitation cards for birthday very simple and quick to make. To realize them I chose the cute lion from the Party Animals stamp set, I love it !


Colored with Copic Markers (always  hihi) and glossy accent on the nose,

                                                    
Different digital papers for background,


It remains for me to print the inside of the cards when I have all the information of the party.

I hope you like them !
                                                                                       
See you soon


Friday, March 31, 2017

Guest Designer | VIDEO | Party Animals Masked One-Layer Card


I'm thrilled to be returning as a Guest Designer for Gerda Steiner Designs! Today's card and video features the newly-released Party Animals stamp set. Coordinating dies are still en-route to me so I made this one-layered birthday card with lots of masking. See how it came together here:


By using a grey pigment ink to stamp the images, the images have a storybook look, especially with the watercolouring. It may take a while to create all the masks but every scene you create looks amazing and is perfect for mailing!


In order to keep all the colours of this busy scene organized, I only used three colours for all the animals and the trees. I simply used three different shades of each colour to create variation. I used a brighter accent colour to highlight the ostrich's head, cake and gift. To finish, I added blue for the sky around the animals.


The adorable koala is from You're Koalafied and was featured in a previous video HERE.

Please visit my blog for a full supply list. Thanks so much for stopping by!