Showing posts with label friendship. Show all posts

Wednesday, January 3, 2024

So Glad You're My Friend!

 Happy New Year, everyone!  

I'm Beverly Gerard, so happy to be back as a guest designer for Gerda Steiner Designs!

Today I'm sharing a card made with the adorable Valentine Penguins set.

Although we don't often have snow here in North Texas, I do love the glisten of snow.  I thought of a beautiful rainbow when the snowy moisture & sunlight are in perfect alignment to create a wintery rainbow.  Thus, this rainbow was created in soft pastel shades.  

I started with a light blue cardstock for the sky, then softly applied white pigment ink in touch & go style smudges, just to soften up the color as on a snowy day.  Next I used a cloud stencil and applied Distress Oxide Spun Sugar to add a fanciful interest to the sky.


The snowy hills are cut from shimmery white paper which was not adhered completely across the upper snow lines.  That created a bit of added dimension.  The adorable penguin is popped up on foam tape along with its balloon.  

I love the option of this friendship sentiment included in the stamp set, along with the following valentine greetings:  Happy Valentine's Day!   -   You are so loved!    -   and  
Waddle I Do Without You

Welcome to a brand new year!   

Bev Gerard

Beverly on Instagram:  texasgrammy
Beverly's SCS Gallery:  TexasGrammy at Splitcoaststampers


Tuesday, April 20, 2021

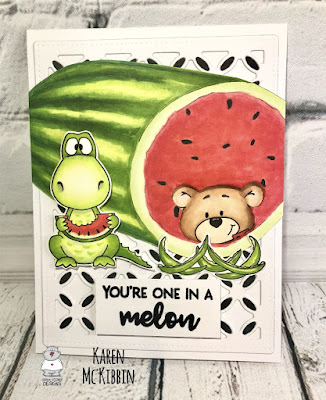
One in a Melon

Hi and happy Wednesday everyone.  It’s Karen here today and I want to share a card made with a brand new stamp set from Gerda Steiner Designs called Melon Friends. This is such a cute stamp set as you can see from the little critters on my card and it will be available in the Gerda Steiner Designs shop tomorrow! 


To make this card, I drew a rough watermelon (just an oval with a round end), and when I had it looking the way I wanted it, I went over my pencil lines with a copic marker. After colouring it in with copic markers, I fussy cut it out right against the coloured line.  I stamped and copic coloured almost all the images in the stamp set and cut them out.

Next, I diecut a lattice background frame from white and black cardstock.  I paper pieced the black pieces into the small oval shapes, gluing them in place. Any cover die would work here or just leave the card as it is - the die is hardly noticeable.  I then glued the lattice frame down to my card base.  I had made a mask of the little bear image, and I placed this where I wanted it to go on the watermelon.  I was hoping it would look like he was inside the watermelon to match the sentiment, but I was also conscious that inside the card, his body would have to be able to fit towards the bottom of the card.   Now here’s the scary part - I fussy cut out the bear image through all the layers of cardstock.  If you have the dies, this would be much easier! I started in the middle of the bear’s head and cut out to the edge. It got a little dicey around the ears, but I was fairly happy in the end.  I went around the cut edge with the same red copic marker I had used for the watermelon to give it a smoother look.  Now, the easier way to have done this, would be to stamp, colour and cut out a second bear head and then just glue that to the front of the card.  But that’s hindsight at work ...! :)

I spread glue across the back of my coloured bear image, held him up to the inside of the card, and once I had his head lined up with the opening in the watermelon, I carefully pressed him down to the inside of the card so he was positioned correctly.  I added the watermelon border just underneath him on the inside.  On the front of the card, I attached the dinosaur with foam tape and glued the rinds just under the bear.  The sentiment is stamped and embossed in black, and popped up on foam tape. 

Thanks so much for stopping by and I hope you’re having a great day!


Friday, November 6, 2020

Guest Design - Glide we are friends by Izzy Scrap


Bonjour !

My name is Izzy from Izzy Scrap and I'm super excited and very honoured to be guest designing for Gerda Steiner Designs this month. A very huge thank you to Gerda and her team for welcoming me !

Today I am featuring the Buckets of Love 4x6 clear stamp set. It includes four images and four sentiments. If you are a cat lover like me, I am pretty sure that you will love this stamp set. I have two cats and I love watching them playing together in the garden. So I decided to create an interactive slimline card to make the cats playing together !


As you can see this adorable grey cat is sliding on the soaped water spilled by the red cat and he is joining the two surprised cats which were in their bucket.


To create this card I started by colouring the water with a blue Copic marker on a slimline die cut panel. I drew the bubbles with colour pencils, and I also added a very soft touch of inks on the top of the panel. I stamped the sentiment and then I cut the slider part.


On the back of this panel I adhered adhesive foam and I created a tab with a strip of paper also coloured in blue. I took care that the coin on which the cat is going to slide can easily move between the adhesive foam.


On a scrap of white paper I stamped the cats and the soap, I coloured them with colour pencils then I fussy cut them.


Then I layered it all together, attaching my front panel onto a white card base and foam mounting the soap and the different buckets both on the card and on the coin.


Et voilĂ  ! I love how it turned out and I hope you too. Thanks so much for stopping by and I hope to see you back here later this month...

Wishing you a beautiful and crafty day !

Izzy 


Wednesday, May 15, 2019

So happy we're friends - Larissa


Hi everyone, I am Larissa from Car-d-elicious and today I am posting a card on the blog from Gerda Steiner designs.


This week I have made a card with the clear stamp set Lovely panda's from Gerda Steiner designs. I stamped one of the panda's but today I didn't want to colour it like a panda, but instead I made a normal bear. I coloured the image with my Polychromos pencils and the black glaze pen. I have coloured the eyes of the bear with the Clear Spectrum noir sparkle glitter pen. Then I have fussy cut the image. With the Crea-nest-lies XXL 36 from Crealies I have die-cut a rectangle from white cardstock. I used the same dies to also cut a window. Behind the window I have glued blue design paper from the Classic gingham paper pack from Sunny studio and then I glued everything together on a white card. I used foamtape to place the image inside the window. Inside the window I have stamped two sentiments from the set Lovely panda's from Gerda Steiner designs. I have die-cut a couple of hearts with the Lots of hearts - Creative cuts from Mama elephant from the blue design paper and glued those on the card.


*********************************************************************************
STAMP: Lovely panda's from Gerda Steiner designs
COLORING MEDIUM: Polychromos pencils 
PAPER: White cs, Classic gingham paper pack from Sunny studio
INK: Versafine onyx black
DIES: Crea-nest-lies XXL 36 from Crealies, Lots of hearts - Creative cuts from Mama elephant
ACCESSORIES: Black glaze pen, Clear Spectrum noir sparkle glitter pen

Monday, January 28, 2019

Friendship card with Kaja

Hi there,
It's Kaja from Kajcyika crafts with you today with a cute friendship card!

Take a look:
I decided to go with a simple design that has a valentine's day feel to it. I think it's important to remember letting our loved ones know how do we feel about them and that's the reason I made this friendship card.

First, I stamped out the penguins from the Valentine penguins stamp set and colored them in using alcohol markers. I used pinks for the hearts and the black for their bodies.
Then, I cut down a piece of gray patterned paper that I put on the top half of my card. I placed the three penguins on the edge of it.

The last thing I added was a sentiment that reads 'I'm so glad you're my friend' which I put on a die cut banner.

This finished of the card. Thank you so much for joining me!

Kaja

Saturday, January 5, 2019

Lovely pandas with Kaja

Hi there,
It's Kaja from Kajcyika crafts here with you today with a cute card using a brand new set called Lovely pandas. :)

Take a look at the card:
I wanted to make a cheerful card for a friend, so I colored in the pandas using the alcohol markers. I used the traditional black and white colors with a touch of pink on their cheeks.

Then, I took a piece of white card stock in size of my card base from which I die cut a rectangle thta has a stitching on the outside edge. I put some patterned paper in the background and since I wanted to make a fun card, I used a rainbow paper.
I placed the pandas one on each side and I added the sentiment that reads 'so happy we're friends'. I heat embossed the sentiment on a piece of black card stock with white powder.

The last thing I added was some black crystals which actually finished off the card.

Thank you so much for joining me!
Kaja

Friday, August 31, 2018

Inspirational Foxes!...

Hello everyone, DT member Jayne here, dropping by with a FOXY post featuring the new "Foxes" stamp set.

When I saw the acorn wreath, I knew exactly what I wanted to do with it...


The cute little fox and wreath were coloured with Copic markers, cut out and popped up on to foam tape for added dimension. The background was ink blended with Tumbled Glass Oxide ink and splattered with Gold Acrylic paint. The sentiments were stamped directly to the card panel and then mat and layered with Gold mirror card.

For the second card I wanted to ink a night scene because I thought it would look good to stamp the sentiment in the Moon...


Once again, I used Copic markers to colour the cute critters and I ink blended the background elements using Oxide inks.

Be sure to pop over to Gerda's shop for this stamp set and many more!...

Happy crafting and see you soon xxx

Jayne x

Thursday, October 12, 2017

Bear Hugs & Pies | by Anna Sigga

I just adore the bears in the More than Pie stamp set and they do make the prettiest cards.


Bear, hugs, and pies are a great combo for a card for that special someone and what better way to show a friend that you care than with a bear hug. 


The pie is filled with fresh red berries so why not use the same color combo for a background. PLus the pink splatters kinda mimic the pie.


Thanks so much having me as your guest, I have loved every second.

Thursday, October 5, 2017

To a Pie-fect Friend | by Anna Sigga

Hi there!

It's Anna Sigga here and I am thrilled to be guest designing for Gerda Steiner Designs this month.


I do love a good pie so this stamp set is not only adorably cute but it kinda makes me hungry too.

Wednesday, January 13, 2016

Stretch your Christmas stamps!!

Hi there!!

it´s Yolanda here, from Scraping Time. I hope you had a great start of the year.
Have you seen the new Clear Stamps on the shop??? I am looking forward to starting playing with them but meanwhile, I am going to try to stretch my Christmas stamps! Yes... don´t be afraid... I am not going to show you more Christmas cards this year !!! :)

I know that there are many people that after Christmas, take the Christmas stuff and put them away till next year. But I am sure that you can use it more if you look at them with "cardmaker" eyes! ;)

For my cards, I have used some stamps from "Peeking friends" and "Snowman friends".


In my first card I used this critter that can be used for many kind of cards... Birthday cards, friendship... 
I used three diferent colours of Distress Inks for the background and then I did my panel. I die cut a false stitched square on white cardstock and I die cut a smaller one but I decided not to put it straight! I coloured the stamp with Spectrum Noir markers and I finished the card with the sentiment from Mama Elephant and some silver sequins. 


For my second card, I decided to use these cute snowmen for a Valentine's card. I love this set and it is lovely for a winter scene too! 


I show you how I made this card:


I really enjoyed playing with these two lovers!! :) 

I hope you look at your stamps twice from now on and see you soon!!