Showing posts with label Where is the Candy?. Show all posts

Wednesday, October 18, 2023

Where's the Candy?

Greetings! 
It's me again, Jessie Scott, Guest Designing for Gerda Steiner Designs! This week I wanted to show something fun you can do with the brick wall stamp in the new release "Skyline" stamp set.  

The brick wall stamp in "Skyline" is a perfect element to use for a Bridge Card design. Not familiar? Here's detailed steps below for a Landscape Bridge Card!

1. Cut black card stock 7-1/2" x 4-1/4"

2. Score at 1" and 2" from both ends of the 7-1/2" length (on a large scoreboard, at 1", 2", 5-1/2", 6-1/2")
**don't fold and burnish yet, wait until after stenciling so you don't get hard ink lines on your folds**

3. Starting at the top of the black card base, stencil clouds on with white ink, blending off the top of the edge of the stencil. Go from the stencil edge to the top of the card Shift down the card base and add more until you're at the bottom. For the 2nd and on stencilings make sure you start on the stencil and very lightly blend up white into the black space and fade into the edge of the cloud line above.
4. Stamp the brick pattern across the bottom of a 5-1/2" x about 2" scrap white paper for coloring (or just use grey and add accents) continue the pattern to fill the whole width. Trim top and bottom to edge of your stamping.


5. Stamp some candy and sentiment from Where's the Candy? stamp set, a hat and spider from the Ghosts stamp set and the kitty (or pup) from the On the Table stamp set.
*I decided later I didn't want a pile of candy laying around and was inspired by the challenge last week to hand-draw an element. I drew a small bowl the size I needed! 
** I used a quote bubble die from my stash for the sentiment but you can hand-cut one!
6. Color all images in a monotone color scheme (or just stamp on grey and add accents). I also added shading to the quote bubble too. I used my OLO Markers C-0 thru C-9 and then accented with a white gel pen for the bricks.

7. Fold and burnish your card base into a Bridge Card (outside folds are mountain and inside folds are valley)


8. Glue the bricks on one side first, just the outside 1" at the bottom. Make sure you collapse the card down towards the center to ensure the other end of the bricks are straight with the bottom of the card the whole way.
9. Line up the bricks on the other end of the card base and apply glue only on the outer 1". Collapse the card base as before, folding in towards the center so the brick glues down flat to the card base. This is the mailing position for the A2 Bridge Card.
10. Trim if needed if you have any overhang of brick off the edge of the card.


11. Apply the pieces! Character gets glued on the paws and centered. Witch hat from the Ghosts stamp set works great for these characters! Quote bubble gets glued only on the left side on the outer 1" and a tiny spot on the ear.
12. Take the candy (from Where's the Candy? stamp set) and start piling and gluing it to the bowl (or background, whatever works for you).
13. Add effects!  Tiny accent spider (from the Ghosts stamp set) in the background, glitter gelly roll on the hat buckle and candy, crystal effects on the character's eyes.
14. Collapse to the side to fit into an A2 envelope for mailing!


I hope to be back in the future, but in the meantime you can follow me on Instagram (@chevy.scott) and subscribe to my blog for more card designs!

Have a wonderful Halloween Season!!! 

Sunday, October 15, 2023

Happy Halloween

 Hi everyone!

Stacey with you today stopping by to share a Halloween themed card that I created using that cute little owl from the Where Is The Candy Stamp Set.

Here is a look at the card that I created:


I covered a white card base with some patterned papers, leaving about an inch or so of the cardbase showing along the bottom. I stamped my owl from the Where Is The Candy stamp set with some Tuxedo Black Memento Ink and colored it with my Copic markers. I die cut it out using a circle die and layered it on top of another circle before using a stitched die to cut off the excess overhang so that my circle would be flush with my card base. I stamped my sentiment onto some orange patterned paper, added a black scallop & added it to my card. I completed my card with some black stars in the top right corner and a bow tied with some black crochet thread. 

Copic Colors Used:
--Pumpkin: YR12, YR14, YR18
--Owl: E50, E51, E31, E33, E35, R00, R20, C00
--Leaves: Y26, YR27/ E31, Y19, G94, Y11
--Hat: V12, V15, V17, N3, N5

Thank you so much for stopping by today!
I appreciate it so much!
I hope you have a great crafty day!
Stacey

Find Stacey on Instagram: @staceyscreativecorner


Sunday, October 8, 2023

Trick Or Treat!

Hi everyone!
Stacey with you today stopping by to share a Halloween themed card that I created using some of those amazing stamps from Gerda Steiner Designs!
For my card, I used the Halloween Ghosts, Ghosts & Where Is The Candy stamp sets. 
Here is a look at the card that I created:


I created my card by creating an A2 cardbase from some white cardstock and covering it with some striped & orange patterned papers. I heat embossed my sentiment from the Where Is The Candy stamp set using some white embossing powder onto a strip of black cardstock. I used a spider web border punch and created a fun little border along the bottom. I die cut a piece of green patterned paper and adhered my sentiment piece before popping the entire piece up with foam tape onto my card front. 
Next was the fun part....playing with those adorable little ghosts from the Halloween Ghosts stamp set! I wanted the little ghost with glasses to also have a witch hat. I stamped the hat from the Ghosts stamp set, masked it off, and then stamped the ghost with glasses so that he could have a costume also. I colored all the ghosts with my Copic markers and then fussy cut them out. I added them to my card, popping up the middle ghost with more foam tape. I added a spider from the Ghosts stamp set and some doodles with a black Micron pen to complete my card. Aren't those little ghosts so cute??

Copic Colors Used:
--Ghosts: C00, C0, BG000, RV00.
--Hats: N3, N5, N7.
--Purple Hat Band: V12, V17, Y18.
--Green Hat Band: G94, G99, Y18.
--Orange Hat Band: YR09, Y18.
--Broom: N3, Y26, Y28, Y18.
--Sign: N0.

Thank you so much for stopping by today!
I appreciate it so much!
I hope you have a great crafty day,

Find Stacey on Instagram: @staceyscreativecorner


Tuesday, October 5, 2021

Ghostly Greetings

Hi there,

it's Tanja here and I created this Halloween Card using the Gerda Steiner Designs  Where is the Candy? and Bats stamp sets:

  • stamp the cat from the Gerda Steiner Designs Where is the Candy? set with Lawn Fawn Jet Black
  • color the image with Spectrum Noir Triblend Markers and add extra shading with Faber-Castell Polychromos pencils
  • add highlights with a white gel pen
  • create a background on a piece of smooth white cardstock using Distress Ink (Frayed Burlap, Chipped Sapphire), a hill, a moon and a cloud stencil
  • ink up the edges of the panel with Distress Ink Black Soot
  • color in the moon with Finetec Mica Watercolors (Moon Gold, Meteor)
  • stamp some bats from the Gerda Steiner Designs Bats set with Versafine Clair Nocturne 
  • stamp the sentiment from the My Favorite Things Fab-BOO-lous Friends set with Versamark and heat-emboss it with WOW! Bright White Super Fine embossing powder
  • add a strip of patterned paper to the left and right side of the panel before adhering it to a cardbase


Have a wonderful day.


Hugs,


Tuesday, October 15, 2019

Happy Fall Y'All!

Hi there,

it's Tanja here and I created this halloweeny fall card for you:

  • stamp the owl from the Gerda Steiner Designs Where is the Candy? set with Lawn Fawn Crunchy Leaf
  • color the image with Delta, Touch Twin Brush and Copic Markers and add extra shading with Faber-Castell Polychromos pencils
  • cut out a stitched panel from kraft cardstock and cut out the Poppy Stamps Leafy Breeze
  • layer a piece of glitter paper behind the openings
  • stamp some small leaves from the Gerda Steiner Designs Happy Fall set with Versamark and heat-emboss them with WOW! Rose Glintz embossing powder
  • stamp the sentiment from the Gerda Steiner Designs Fall in Love set with Versamark and heat-emboss it with WOW! Bright White Super Fine embossing powder
  • ink up the edges of the panel and the sentiment strip with Distress Oxide Ink Vintage Photo
  • assemble the card


Have a wonderful day.

Hugs,


Tuesday, October 8, 2019

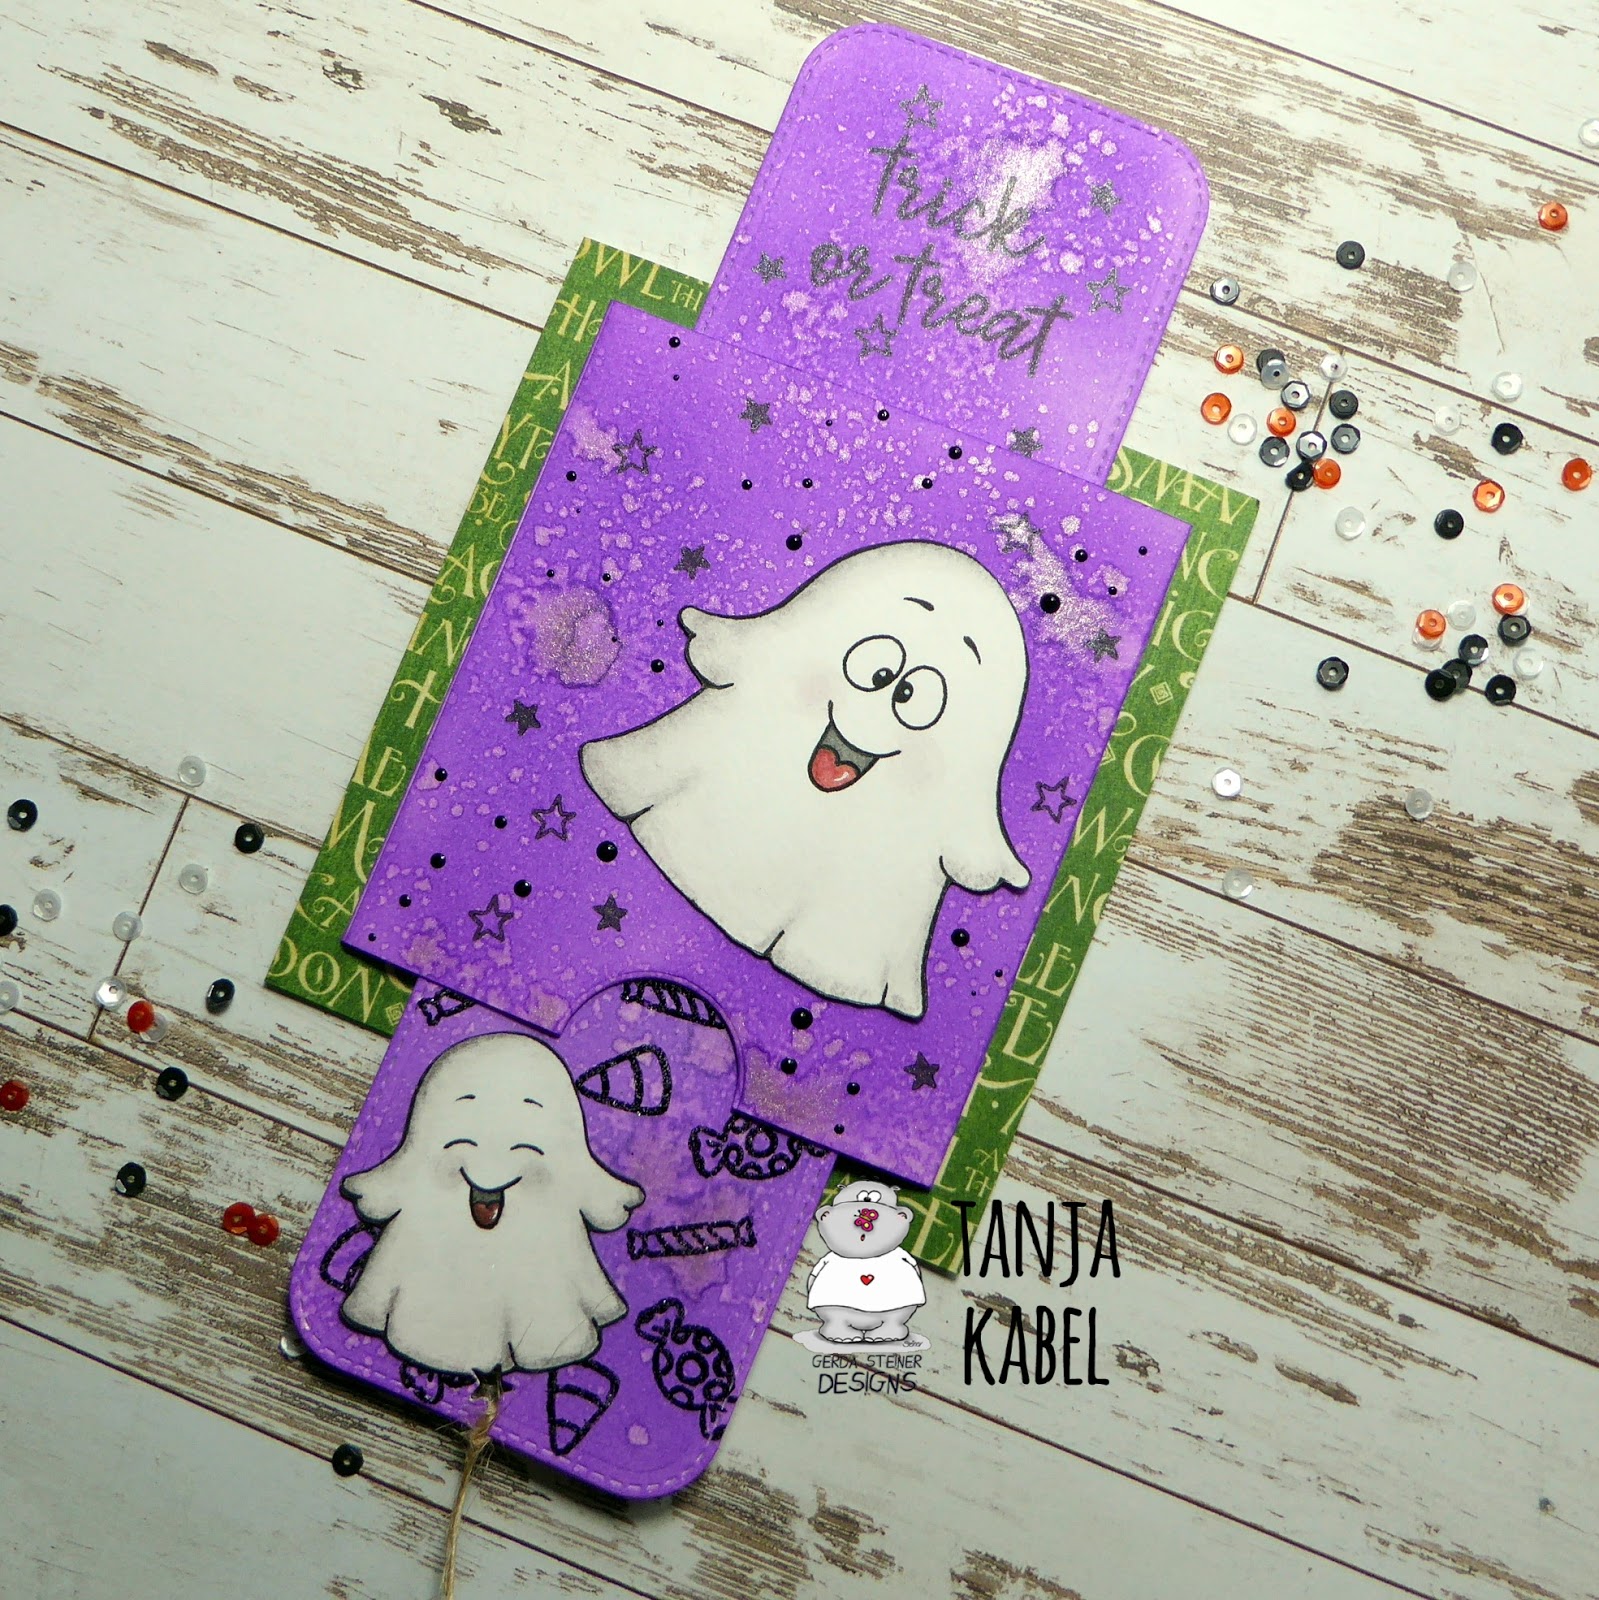
Trick or Treat Ghosts

Hi there,

it's Tanja here and I created this double slider card using the Gerda Steiner Designs A Boo for you stamp set:

  • create a double slider mechanism using the My Favorite Things Stitched Rounded Rectangle STAX, watercolor paper, one of the Kesi'Art Encoches and a piece of plastic
  • add color with Distress Oxide Ink Wilted Violet and a Mini Ink Blending Tool
  • mist the panels with Pearlized Water for extra texture and shimmer
  • color the adorable little ghosts from the Gerda Steiner Designs A Boo for you set with Derwent Graphitint pencils and a damp watercolor brush
  • add highlights with a white gel pen
  • decorate the bottom panel with candy from the Gerda Steiner Designs Where is the Candy? set using Versamark and WOW! Black Twinkle embossing glitter
  • stamp the sentiment from the same set with Delicata Black Shimmer onto the top panel
  • add some stars from the Gerda Steiner Designs Alien Invasion set with that same black ink 
  • Nuvo Crystal Drops in Ebony Black are the final embellishment on the front and top panel
  • punch a star-shaped hole into the bottom panel and thread a piece of natural twine through it
  • cover a cardbase with patterned paper from the Graphic 45 An eerie Tale 6x6 paper pad before adhering the slider panel


I hope you got inspired.

Hugs,


Monday, October 8, 2018

Where is the Candy??


Hello Crafty Friends!  Happy Monday to you!  Tina here and Oh my Goodness...isn't this little dressed up kitty adorable!!!  I have to tell you...if I had a filled candy bowl, no doubt I would give this little guy my entire bowl:)  


I created my project with the super cute "Where is the Candy" stamp along with the "Where is the Candy" Dies:)  I just looove cutesy Halloween themed cards and this set fits the bill!!  You can watch how I created the card above below:)  Thanks so much for stopping by!  Wishing you a fun and crafty filled day!  Hugs


Wednesday, October 11, 2017

Happy halloween - Larissa


Hi everyone, I am Larissa from Car-d-elicious and today I am posting a halloween card with a cute cat on it.


On my card I used an image from the set Where is the candy from Gerda Steiner designs. I have coloured the cat with my Polychromos pencils and a black glaze pen and then I fussy cut the image. From orange desigg paper from the Beachside petite paper pack from Lawn fawn (retired) I have cut a large banner. With a black pen I drew some lines on it. From black cardstock I cut a smaller banner. I stamped a sentiment from the stampset Crazy talk from Stampers anonymous on it with versamark ink and then I embossed it with white embossingpowder. I adhered the black banner a bit crooked on top of the orange banner and then I adhered the image with foamtape. On the white card I drew some more lines with the black pen. I decorated the card with black enamel dots.


*********************************************************************************
STAMP: Where is the candy from Gerda Steiner designs, Crazy talk from Stampers anonymous
COLORING MEDIUM: Polychromos pencils, 
PAPER: White and black cs, Beachside petite paper pack from Lawn fawn
INK: Versamark, Versafine onyx black
ACCESSORIES: Black glaze pen, black pen, white embossingpowder, black enamel dots

Wednesday, October 4, 2017

Happy fall - Larissa


Hi everyone, I am Larissa from Car-d-elicious and today I am posting a fall card on the Gerda Steiner designs blog.


This time I made a card with the stampset Where is the candy from Gerda Steiner designs. This time I used the owl image. I have coloured the owl with my Polychromos pencils and the black glaze pen and then I fussy cut the image. From black cardstock I have cut a circle with the Wonky stitched circle stax from My favorite things and I adhered the image on it with foamtape. On a white card I adhered orange starry design paper from the Beachside petite paper pack from Lawn fawn (retired) after I first tied black ribbon around it. With the Katie alphabet from Quickutz I die-cut a sentiment from black cardstock and I adhered it on the card.


*********************************************************************************
COLORING MEDIUM: Polychromos pencils
PAPER: White and black cs, Beachside petite paper pack from Lawn fawn (retired)
INK: Versafine onyx black
DIES: Wonky stitched circle stax from My favorite things
ACCESSORIES: Black glaze pen, black ribbon

Sunday, September 24, 2017

Where is the candy? - Larissa


Hi everyone, I am Larissa from Car-d-elicious and today I am posting a halloween card. :)


I made a card with the stampset Where is the candy from Gerda Steiner designs. I stamped the funny dog and then I coloured it with my Polychromos pencils and the black glaze pen and then I fussy cut the image. I stamped the sentiment on white cardstock and added faux stitching lines above and belowe the image. I have cut the strip with the sentiment and then I adhered it on a purple card. I adhered the image with foamtape on the card. I also added faux stitching on the card. Then I stamped stars in a couple of sizes from the stampset Big greetings from Avery elle on the card. With the banner punch from Stampin up I punched a little banner from white cardstock and I stamped another 3 stars on it. I added a staple with the Tiny attacher and then I adhered the banner on the card.


*********************************************************************************
STAMP: Where is the candy from Gerda Steiner designs, Big greetings from Avery elle
COLORING MEDIUM: Polychromos pencils
PAPER: Purple and white cs
INK: Versafine onyx black
ACCESSORIES: Black glaze pen, black pen, Stampin up banner punch, Tiny attacher from Tim Holtz

Thursday, September 21, 2017

Where is the Candy | Distress Background | Scrapbena Creations

Hello, it is Jenn from Scrapbena Creations on YouTube. I am back with another card as a Guest Designer. This time I am using the adorable too cute to spook stamp set from Gerda Steiner Designs called Where is the Candy. I chose the cat and dog in costumes images for this scene card. The fence and bats were from a My Favourite Things stamp set called Frightful Friends, but you can use whatever you have in your stash!


My watercolour paper of choice is Canson XL watercolour paper because it is high quality and affordable. I stamped out the images with Versafine Black Onyx ink and created masks to make an outdoor Halloween scene. The moon was created using a circle punch with full adhesive post-it note paper, which I used for all of the masks. Once everything was masked, I used Distress Inks to create the background. I love purples for Halloween night scenes. From lightest to darkest, I used shaded lilac, wilted violet, seedless preserves and black soot. For the ground, I used bundled sage with a tiny bit of black soot. I spritzed some water over the entire scene with the masks still on the images and blotted it with a paper towel for an amazing textured background.


I watercoloured the images with my Zig Clean Color Real Brush Markers. I list the colours used in my process video, which you can watch by clicking the play button on the image below.


Thanks for stopping by the blog today. I hope you enjoyed this card and it inspires you to make some cute Halloween cards. Happy crafting.

This blog post contains affiliate links at no extra cost to you.

Tuesday, September 19, 2017

You are Spooktacular

Hi there,

it's Tanja here and I created this Halloween project with the new Gerda Steiner Designs Where is the Candy? stamp set:


  • stamp the adorable owl from the new Gerda Steiner Designs Where is the Candy? set with Versafine (Onyx Black) and color the image with Faber-Castell Albrecht-Dürer Pencils and a damp watercolor brush
  • create a background with the help of the My Favorite Things Mini Scallop Circles STAX, the Memory Box Modern Landscape, black cardstock, watercolor paper, Distress Oxide Inks (Wilted Violet, Black Soot) and Pearlized Water
  • stamp the sentiment from the Lawn Fawn Spooktacular set with Versafine (Onyx Black) and add some little stars as well

Hope to see you again soon.

Yours,


Friday, September 1, 2017

More Candy....

 Hello Everyone,

WOW September already!!! Where is 2017 going to???  

Its Hazel from Didos Designs here today with another couple of makes using the Super Cute Where is the Candy 6 x 4 Stamp Set. 
Where is the Candy? 4x6 Clear Stamp Set
For my first creation I have used the pretty Owl and Pumpkin.  I coloured it using Promarkers. I did another monochrome one on the card insert to make it more interesting as well. I finished the outside using the Happy Halloween Stamp too. I love the font that Gerda has used here as it's so easy to read!! 
 I could play all day with Halloween things so I went for a wee Trick or Treat Box for my second make today.  I have a carton die that I ran through my cuttlebug to make the box then colored the Ghost Kitty for my main image. 
I finished it off using the Trick or Treat Sentiment on a tag. These would be great for handing out to all the kids at Halloween.

Thanks for dropping by today, I hope I have inspired you to get this super set, 

 Love Hazel xx