Showing posts with label distress ink. Show all posts

Tuesday, September 24, 2024

Caroling Woodland Animals SNEAK PEEK collab with Pear Blossom Press

 Greetings everyone! It's me again, Jessie Scott (@chevy.scott on IG) here to share a fun light up card with Gerda Steiner Designs products!

Today I have another fun collaboration with Pear Blossom Press products to share and its also... drumroll.... a SNEAK PEEK of the new Caroling Woodland Animals coming out next month!!!


Aren't these new critters adorable??? That mouse is just singing his little heart out!

I splattered the background with Dr. PH. Martin's Bleed Proof White, then ink blended the edges with Mermaid Lagoon distress ink. I cut a curvy bottom snow drift out of glitter paper and then cut a star out of the background and backed it with gold paper for some flare.

Images were colored with my OLO Markers.  I'm still in love with them! 
Here's a coloring video if you would like to check out how these images came together:

For the sentiment I put it on a sentiment strip die that fir perfectly. 

For the rest of the card details and how to make this star LIGHT UP on this card, venture over to the companion post on my blog today!

Here's the finished card!  I also have a full process video on my blog.


See you again soon!


Sunday, September 22, 2024

BOO! Shake it up with new Ghost Digital Stamps!

 Greetings everyone! It's me again, Jessie Scott (@chevy.scott on IG) here to share another too cute to spook card with the new Ghost Digital Stamps from Gerda Steiner Designs! See the Collection of Digital Ghosts!

I used three stamps to make this card. Boo - Cute Ghost, Coffee Lover Ghost, and Pumpkin Ghost


Aren't they adorable??? This time I colored my ghosts a spooky green instead of the blues and greys option from last time
For this one, I didn't think it needed a sentiment other than the "Boo" sign in the center image.

The only challenge with a digital stamp is sizing it right so you don't need to print it again haha. I usually sketch out my card idea on scrap paper, decide where the image is going, then measure it. 
 

I use the "insert - shape" option in MS Word to draw a box to the shape I need to fit to. Before I print, I delete the boxes.

Ok so now for the fun assembly! Shaker cards are my favorite this time of year and I had a lot of shaker bits to use up. Here's a video of the rest of the process!


 Get your shake on!


How do you like your ghosts?  Spooky blues or ghostly greys or how about this creepy green? 

See you again soon!

Friday, September 20, 2024

First the COFFEE...then the SPOOKY!

 Greetings everyone! It's me again, Jessie Scott (@chevy.scott on IG) here to share a too cute to spook Digital Stamp from Gerda Steiner Designs! Coffee Lover Ghost!

Go ahead and download it here - you know you need it! and make this card with me!

Ya'll know I love to giggle and I LOOOOOOVE digital stamps because you can make it any size and combine with whatever sentiment that SPOOKS to you ;-). 

For this one, I typed "Coffee ghost t-shirt" in my search bar and then told it to show me only images.  T-shirts are great for one-liner ideas for cards (shhhh my best kept card secret!). This fun sentiment "First the Coffee, then the Spooky" came up and I loved it.

The only challenge with a digital stamp is sizing it right so you don't need to print it again haha. I usually sketch out my card idea on scrap paper, decide where the image is going, then measure it. 
 

This is for my BONUS CARD at the end of this post. I sized the image and sentiment to the Mama Elephant frames I wanted to try with some fun alternating orange scallops. 

Ok so now for the fun coffee-themed background!
 

First I took a watercolor paper card front, then inked up Distress Ink randomly in spots with Tea Die, Walnut Stain, Spiced Marmalade, and Vintage Photo. Just random! Then I spritzed the entire paper with water (this easily blends the borders of my random colors). 

After it dried, I then grabbed my reinkers for Tea Dye and the darker Ground Espresso. I put a little but of water on my glass mat, then added a couple drops of one. I took a gel jar from my stash and used it to "stamp" a round coffee stain on my card in a few places. With the leftover ink, I took a paint brush and splattered a bit on the card. I then cleaned my mat and repeated with the other color with a different larger gel pot and then splattered.

I love this grungy, i-took-this-card-to-the-coffee-shop vibe!

The only thing that's left is to color and assemble! Ghosts are gun for Halloween but also because they are simple to color ;-)

Here's a video of the rest of the process!


Ok.... BONUS CARD!


I wasn't sure what font I would like so I printed two. Haha! This one I "tossed together" using paper and I love it just as much? Don't want to get dirty? Spice it up with some fun frames and patterned paper!
Here's another assembly video:


How do you like your ghosts?  Spooky blues or ghostly greys? 

See you again soon!

Tuesday, December 15, 2020

Christmas puppies - Have a howly-jolly christmas - Larissa


Hi everyone, I am Larissa from Car-d-elicious and today it is my turn again to post something on the blog from Gerda Steiner designs. This time I have made a christmas card with the clear stampset Christmas puppies from Gerda Steiner designs. I have stamped 2 images from the set on Aquarelpapier smooth Wit 200g A6 from Vaessen creative with Versafine clair nocturne ink and then I embossed the image with clear embossingpowder. Then I coloured the images with Distress inks and then I have fussy cut the images. 

On a pink card I have glued the patterned paper Winter wonderland (retired) from Doodlebug. With the Big labelzz & tagzz Smooth (CLBLT16-retired) from Crealies I have cut a label from pink and white cardstock and made a background on it with Tumbled glass distress ink. I have glued the images with foamtape on the tag. I have stamped a sentiment from the set Christmas puppies from Gerda Steiner designs on the tag above the images. I have die-cut a couple of little stars with the Star confetti die from Alexandra Renke from pink cardstock and glued those on the tag. 


  *********************************************************************************
STAMP: Christmas puppies from Gerda Steiner designs
COLORING MEDIUM: Distress inks
PAPER: Florence watercolour paper smooth from Vaessen creative, Pink and white cs, Winter wonderland (retired) from Doodlebug
INK: Versafine clair nocturne
DIES: Big labelzz & tagzz Smooth (CLBLT16-retired) from Crealies, Star confetti die from Alexandra Renke
ACCESSORIES: Clear embossingpowder, Glitter, Black cord

I am a participant in the Gerda Steiner designs Affiliate Programme. This means that if you click on one of my links and subsequently make a purchase, I will receive a small commission of store credit, at no extra cost to you.

Tuesday, October 27, 2020

Frogs (clear stamps) - Larissa


Hi everyone, I am Larissa from Car-d-elicious and today I am posting a new card on the blog from Gerda Steiner designs. This time I have made a card with the clear stampset Frogs from Gerda Steiner designs. I have stamped the frog on Florence watercolour paper smooth from Vaessen creative with Versafine clair nocturne inkt and then I embossed the image with clear embossingpowder. I have coloured the image with my Distress inks and then I have fussy cut the image. 


On a white card I have made a background with the Mini cloud edges stencil from My favorite things and Tumbled glass distress ink. I have used the Tear away stencil from Clearly besotted with Broken china distress ink to add water on my card. I have glued the image with foamtape on the card. With the Crea-nest-lies XXL 110 from Crealies I have die-cut a frame from white cardstock and then I glued it on the card. Then I added a sentiment from the set Frogs from Gerda Steiner designs on the card. 


*********************************************************************************
STAMP: Frogs from Gerda Steiner designs
COLORING MEDIUM: Distress inks
PAPER: White cs, Florence watercolour paper smooth from Vaessen creative
INK: Versafine clair nocturne
DIES: Crea-nest-lies XXL 110 from Crealies
ACCESSORIES: Clear embossingpowder, Minin cloud edges stencil from My favorite things, Tear away stencil from Clearly besotted

I am a participant in the Gerda Steiner designs Affiliate Programme. This means that if you click on one of my links and subsequently make a purchase, I will receive a small commission of store credit, at no extra cost to you.

Tuesday, October 13, 2020

Let's have coffee - Larissa


Hi everyone, I am Larissa from Car-d-elicious and today it is my turn to post a card on the blog from Gerda Steiner designs. This time I have made a card with the Warm fuzzies clear stamp from Gerda Steiner designs. This image is also available as a digital stamp: Warm fuzzies digital stamp. I have stamped the image with Versafine clair nocturne ink on watercolour paper and then I embossed the image with clear embossingpowder. Then I coloured the image with Distress inks and then I have fussy cut the image. 


I decided to make a "mini slimline" card again from white cardstock. On my card I have glued blue and white patterned paper from the Spots & brights paperpad (retired) from Sugarpea designs and then I cut a hole in it with a die from the set Snijmallen DL "Slimline kaart 2" from Carlijn design. After I glued the patterned paper on my card I glued the image with foamtape on the card. On a strip of white cardstock I have stamped a sentiment from the set Coffeesaurus clear stamp from Gerda Steiner designs with Versafine clair nocturne ink and then I embossed the sentiment with clear embossingpowder. I have coloured the strip with Picked raspberry Distress ink and glued it with foamtape on the card. I have also diie-cut a couple of flowers from white cardstock after I first coloured it with the pink ink. I added a coupleof leaves from green cardstock and then I glued the flowers with foamtape on the card. I have decorated the flowers with white pearls. 


*********************************************************************************
STAMP: Warm fuzzies clear stamp  and Coffeesaurus clear stamp from Gerda Steiner designs
COLORING MEDIUM: Distress inks
PAPER: White cs, Spots & brights paperpad (retired) from Sugarpea designs
INK: Versafine clair nocturne, Picked raspberry Distress ink
DIES: Snijmallen DL "Slimline kaart 2" from Carlijn design, Flower and leaves die
ACCESSORIES: Clear embossingpowder, White pearls

I am a participant in the Gerda Steiner designs Affiliate Programme. This means that if you click on one of my links and subsequently make a purchase, I will receive a small commission of store credit, at no extra cost to you.

Wednesday, July 1, 2020

Sorry to hear you're under the weather - Larissa


Hi everyone, I am Larissa from Car-d-elicious and today it is my turn again to post something on the blog from Gerda Steiner designs. This time I have made a tag with the Under the weather clear stamp set from Gerda Steiner designs. I have stamped the mouse on watercolour paper and then I embossed it with clear embossingpowder. Then I have coloured the image with Distress inks. I have been practising colouring with these inks very much lately and now I have a big pile of coloured images. I really need to make cards with them soon. ;) Then I have fussy cut the image.


I have die-cut a tag from white cardstock with the Stencil SL 277 from Studio light. I have die-cut the top part of the tag from pink paper from the Classic gingham paperpack from Sunny studio and glued it on the tag. With a black fineliner I doodled lines on the tag. On the white part of the tag I have made rain with the Rainy day stencil from Clearly besotted and Peacock feathers Distress ink. I glued the image with foamtape on the tag. I have stamped a sentiment from the Under the weather clear stamp set from Gerda Steiner designs on the tag.


*********************************************************************************
STAMP: Under the weather clear stamp set from Gerda Steiner designs
COLORING MEDIUM: Distress inks
PAPER: White cs, Classic gingham paperpack from Sunny studio
INK: Versafine clair nocturne, Peacock feathers Distress ink
DIES: Stencil SL 277 from Studio light
ACCESSORIES: Clear embossingpowder, Black glaze pen, Rainy day stencil from Clearly besotted, White ribbon, White embroidery thread, Black fineliner

I am a participant in the Gerda Steiner designs Affiliate Programme. This means that if you click on one of my links and subsequently make a purchase, I will receive a small commission of store credit, at no extra cost to you.

Wednesday, April 15, 2020

New baby - Larissa


Hi everyone, I am Larissa from Car-d-elicious and today it is my turn again to post something on the blog from Gerda Steiner designs.


I have made a baby card with a new digital stamp. This is Chick mom from Gerda Steiner designs. I have coloured the image with my Polychromos pencils and the black glaze pen. Then I have fussy cut the image. With the help of masking paper and a circle die I put a mask on my white card with a circle opening. Then I made a cloudy background with the Mini cloud edges stencil from My favorite things and Tumbled glass distress ink. I also added grass with the Grassy edges stencil from My favorite things and Mowed lawn distress ink. I have stamped a sentiment from the set So much to say (retired) from Clearly besotted stamps on the card. The card is decorated with a couple of crystal hotfix gems.


*********************************************************************************
STAMP: Chick mom from Gerda Steiner designs, 
COLORING MEDIUM: Polychromos pencils
PAPER: White cs
INK: Versafine clair nocturne, Tumbled glass and Mowed lawn Distress ink
DIES: Circle dies
ACCESSORIES: Black glaze pen, Masking paper, Mini cloud edges stencil and Grassy edges stencil from My favorite things, Crystal hotfix gems

I am a participant in the Gerda Steiner designs Affiliate Programme. This means that if you click on one of my links and subsequently make a purchase, I will receive a small commission of store credit, at no extra cost to you.

Sunday, September 8, 2019

Mermaid

Hi, Margreet here.
I created a card with the sweet digital stamp Mermaid from Gerda Steiner Designs.
I have colored the mermaid, the little fish and the waterplant with Copic Markers and then fussy cut them.
On Yupo paper I have played with Various Ink (refills of the Copic Markers) and made 2 underwater backgrounds. As I couldn't make a choise which one to use, I decided to use them both.
 
I used some black soot distress ink to put around the edges. I glued the mermaid, fish and plant onto the smaller background and added some sequins. I also made some waterdrops with Glossy Accents.
Then I glued it with foam onto the larger background.
 
Here a closeup to see the 'golden' stripes in the background, made with reactive foil on the pieces which were not completely dried yet.
Have a great day!
xxx Margreet


Saturday, June 15, 2019

Frog card by Noga Shefer



Hi crafty friends,  Noga here and I am so happy to share with you another project for Gerda Steiner Designs today.


My card featuring the adorable brand new  Frogs 4x6 Clear Stamp Set  and  Frogs - Froesche - Sapos 4x6 Die Set .
This set available also in German and Spanish version!! This is so amazing!!

I started this card with an  A2 panel of Bristol smooth cardstock. The background was created by blended twisted citron distress oxide ink and splattered white paint on it.


Next I colored the images with copic markers and glued them to my panel with foam tape.


Next I stamped a greeting from the stamp set using black ink.

To finish off , I added some clear drops for decoration. 

I hope you enjoy the project I created and feel inspired to create!

Have a wonderful day! Noga


Wednesday, June 12, 2019

Happy Birthday

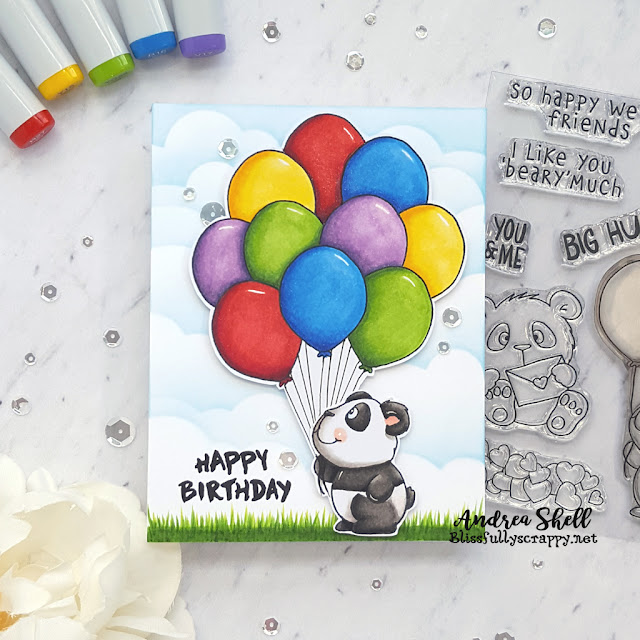
Hello!  It's Andrea Shell with you today, and I'm thrilled to be a guest designer this month!  I just love Gerda's adorable illustrations: The sweet faces of her critters just make my heart melt.

Panda with Balloons Card by Andrea Shell | Lovely Pandas stamp by Gerda Steiner Designs

Birthday cards are my favorite cards to make, and nothing says "Happy" like a big bunch of balloons!  I gave this cutie pie from Lovely Pandas a whole lot of balloons to hold by stamping and masking just the balloon of the image.  I stamped the panda separately and cut off the single balloon.  I stamped everything with Memento Tuxedo Black ink and colored with Copics.  I  hand-drew the strings with a black pen and fussy-cut both images.

Panda with Balloons Card by Andrea Shell | Lovely Pandas stamp by Gerda Steiner Designs

To keep the focus on the panda and balloons, I kept the background pretty simple.  I used a cloud stencil and Tumbled Glass distress ink for the sky and green Copics for the grass.  I stamped a sentiment from Happy Hoppy with Versafine Onyx Black and adhered the panel to a white card.

Panda with Balloons Card by Andrea Shell | Lovely Pandas stamp by Gerda Steiner Designs

I popped up the colored images with foam tape and added highlights with a white gel pen.  For some sparkle, I adhered clear sequins and brushed Spectrum Noir Clear Sparkle Overlay onto the balloons.

Have a wonderful day!

Monday, June 10, 2019

Ha-bee Birthday

Hi, Margreet here.
I created a card with the sweet digital stamp Ha-bee Birthday! from Gerda Steiner Designs
 I started with die cutting using Sizzix hexagons.
Then I used distress ink Pumice Stone and the Dutch Doobadoo Mask Art chicken wire on the yellow cardstock.
Finished with some Gnome Ribbon - Bees from Crafty Ribbons
Stamped and colored the sweet image with copics.
Added Stickles on the wings and distressed the edges with yellow ink.
It was a pleasure working with this happy bee.
xxx Margreet