Greetings!
It's me again, Jessie Scott, Guest Designing for Gerda Steiner Designs! This week I wanted to show something fun you can do with the brick wall stamp in the new release "Skyline" stamp set.
The brick wall stamp in "Skyline" is a perfect element to use for a Bridge Card design. Not familiar? Here's detailed steps below for a Landscape Bridge Card!
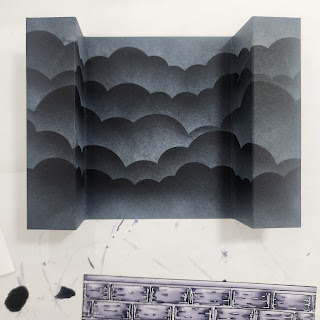
1. Cut black card stock 7-1/2" x 4-1/4"
2. Score at 1" and 2" from both ends of the 7-1/2" length (on a large scoreboard, at 1", 2", 5-1/2", 6-1/2")
**don't fold and burnish yet, wait until after stenciling so you don't get hard ink lines on your folds**


3. Starting at the top of the black card base, stencil clouds on with white ink, blending off the top of the edge of the stencil. Go from the stencil edge to the top of the card Shift down the card base and add more until you're at the bottom. For the 2nd and on stencilings make sure you start on the stencil and very lightly blend up white into the black space and fade into the edge of the cloud line above.
4. Stamp the brick pattern across the bottom of a 5-1/2" x about 2" scrap white paper for coloring (or just use grey and add accents) continue the pattern to fill the whole width. Trim top and bottom to edge of your stamping.
5. Stamp some candy and sentiment from Where's the Candy? stamp set, a hat and spider from the Ghosts stamp set and the kitty (or pup) from the On the Table stamp set.
*I decided later I didn't want a pile of candy laying around and was inspired by the challenge last week to hand-draw an element. I drew a small bowl the size I needed!
** I used a quote bubble die from my stash for the sentiment but you can hand-cut one!
6. Color all images in a monotone color scheme (or just stamp on grey and add accents). I also added shading to the quote bubble too. I used my OLO Markers C-0 thru C-9 and then accented with a white gel pen for the bricks.
7. Fold and burnish your card base into a Bridge Card (outside folds are mountain and inside folds are valley)
8. Glue the bricks on one side first, just the outside 1" at the bottom. Make sure you collapse the card down towards the center to ensure the other end of the bricks are straight with the bottom of the card the whole way.
9. Line up the bricks on the other end of the card base and apply glue only on the outer 1". Collapse the card base as before, folding in towards the center so the brick glues down flat to the card base. This is the mailing position for the A2 Bridge Card.
10. Trim if needed if you have any overhang of brick off the edge of the card.
11. Apply the pieces! Character gets glued on the paws and centered. Witch hat from the Ghosts stamp set works great for these characters! Quote bubble gets glued only on the left side on the outer 1" and a tiny spot on the ear.
12. Take the candy (from Where's the Candy? stamp set) and start piling and gluing it to the bowl (or background, whatever works for you).
13. Add effects! Tiny accent spider (from the Ghosts stamp set) in the background, glitter gelly roll on the hat buckle and candy, crystal effects on the character's eyes.
14. Collapse to the side to fit into an A2 envelope for mailing!
I hope to be back in the future, but in the meantime you can follow me on Instagram (@chevy.scott) and subscribe to my blog for more card designs!
Have a wonderful Halloween Season!!!


No comments:
Post a Comment
Thank you so much for taking the time to leave a comment!