Showing posts with label Ink blending. Show all posts

Sunday, January 9, 2022

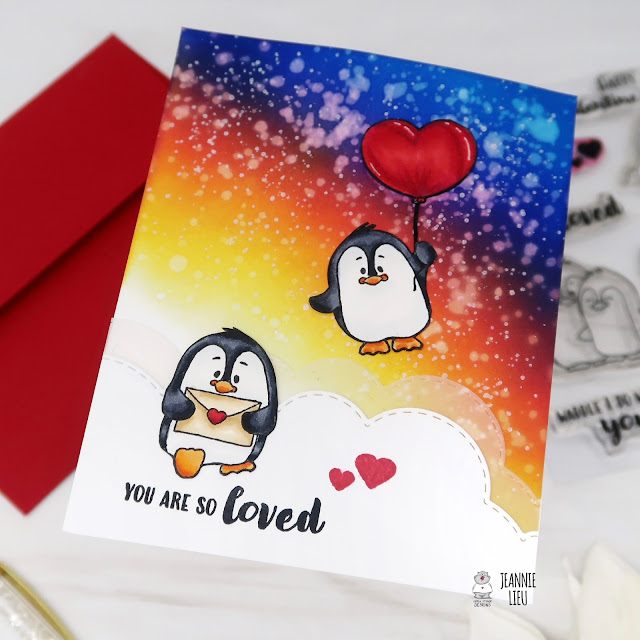
Valentine Penguins - Ink Blending Sky

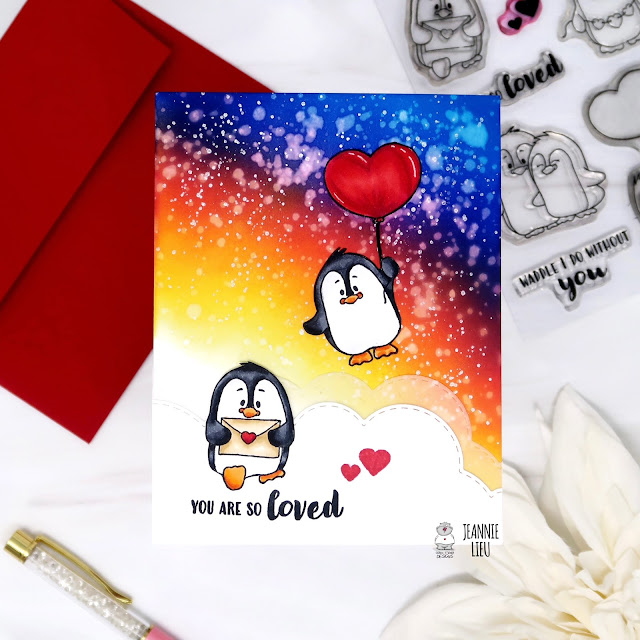
Hi everyone! It’s Jeannie (InsideoutJeans) on the blog today with Gerda Steiner Design’s stamp set named, Valentine Penguins. Yes, it's January but I didn't intend to make a valentine's card at all. I actually don't like the commercial aspect behind the holiday and firmly believe that you should always show people you care about them year round.


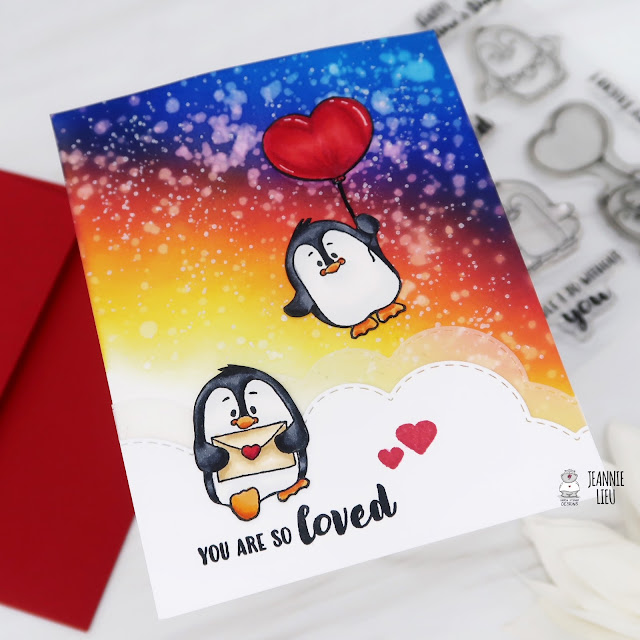
For this card, I'm using some atelier inks to do ink blending. They blend so smoothly and I wanted a non-traditional colored sky (mainly because one of my goals for the year is to go outside my comfort zone). I used Bee Sting Yellow, Sweet Petunia Pink and Peacock Blue with a splatter of water and Perfect Pearls all over. Also, I wanted to add an element of the sky, so I used the clouds border die, cutting pieces of white cardstock and vellum to give it a bit of interest.


I colored up the two penguins with copic markers and fussy cut them out. I tend to really like the no white outline look but you definitely can use the dies or cut with an outline too. They are pretty simple images to cut (one of the reasons why I love to mask and fussy cut with Gerda Steiner sets).

The card came together really nicely and I am so happy with how it turned out since, it's not specifically a valentine's day card but a card to tell someone they are loved.


Thanks for stopping by today and I hope you get inspired to create. Come back again soon for more inspiration and ideas! Happy Crafting! 


Sunday, November 14, 2021

Namasleigh

Hi everyone! Today, I’m sharing a card featuring Gerda Steiner Design's stamp set named, Namasleigh, which is super cute combining yoga and the holidays! Since all the images are in yoga poses, I thought it would be easiest to do a cute stack.


I stamped images from the Namasleigh stamp set using Memento Tuxedo ink. This actually can be done without any masking because I lined it up exactly so the lines would not overlap each other. However, I did end up cutting out masks from Eclipse masking paper because I wanted to add some ink blending right behind them. I wanted the card panel to have white space on the bottom so I masked off all the images and the bottom part of the card panel.


Then I colored them up using copic markers. For the background, I used Festive Berries distress ink, which works so well for holiday cards. I added the sentiment by stamping it on black cardstock and heat embossing it with white embossing powder. To add a bit of interest, I trimmed the card panel down by 3/8 of an inch so I could mat some red glitter cardstock, and then added some washi tape.  


I'm super happy with how this turned out and they are soooo cute and happy to be hanging out with each other. Thanks for stopping by! Happy Crafting! 


Sunday, August 8, 2021

Sneaky Raccoons

Hi everyone! It’s Jeannie (InsideoutJeans) on the blog today with Gerda Steiner Design’s stamp set named, Sneaky Raccoons. I've been digging into my stash for new sets to play with and this was the one that spoke to me.

I wanted to create a fun scene card so I stamped three images from the Sneaky Raccoons stamp set using Memento Tuxedo black ink. I did a bit of masking because I wanted the raccoon with a sign to stand on top of the tree stump. Because I wanted to ink blend a background, I created masks for all the images. Using distress oxide inks, I used four colors to create the grassy area, then a sunset sky. I figured it was perfect since raccoons usually come out at night and I wanted to have a pretty sunset in the background. I also used water and perfect pearls for some splatter to add texture in the background.


I colored all the images using copic markers, using warm grays. To finish off the card, I used the sentiments to add a sentiment on the sign and then a supporting sentiment to go with it. I'm so happy with how this card turned out. It's so fun!

Thanks for stopping by today and I hope you get inspired to create. Come back again soon for more inspiration and ideas! Happy Crafting! 

Saturday, June 20, 2020

It's a good day for happy mail by Noga Shefer


Hi crafty friends,  Noga here and I am so happy to share with you another project for Gerda Steiner Designs today.


My card featuring the brand new Puppy Mail 4x6 Clear Stamp and Puppy Mail 4x6 Die Set.

This set is perfect for all your happy mails that you are sending!

To make this card I took an A2 panel of Bristol smooth cardstock.
The background was created by blending ice Spun Sugar distress oxide ink with bricks stencil.

I also splattered some Spun Sugar with water on the background.
The floor was created by blending Iced Spruce distress oxide ink.

Next I colored the images using copic markers and glued them to my panel with foam tape for dimension.

Next I stamped a greeting from this stamp set using black ink.


To finish off, I added some sequins for decoration.

I hope you enjoy the card I created and feel inspired to create!

Thanks for stopping by,

Thursday, February 6, 2020

An "Uplifting" Card Tutorial!


Hi there!  Tina here with a fun and uplifting card tutorial to share with you today. Have you seen the "You Lift Me Up" stamp set  over at the Gerda Steiner Designs Shop?  It's fairly new and so stinking adorable!  I mean what is not to love about a piggie and balloons, maybe the encouraging sentiment, right:)

I had to have this piggie floating up in the clouds and don't you just love the look on this guys face?  He is one happy camper!!


Thanks so much for stopping by!  If you would like to see how I created this card check it out down below, just click on the You Lift Me Up Tutorial Link.🙂  Have a Fantastic and Crafty day!  Hugs, Tina


Saturday, February 23, 2019

Owl in a heart with Kaja

Hi there,
It's Kaja from Kajcyika crafts and today I have prepared a cute card for you!

Take a look:
I decided to go with a clean and simple look, so I started out by inkblending a heart towards the left edge of the card. I used distress oxides since they are really reach in color.

Next, I stamped out the cute owl from the Foxes stamp set and color it in using alcohol markers. I used gray for the owl since I wanted to make it a snowy owl.
Then, I die cut a heart in white and cut the top part off. I stamped the sentiment that reads 'you are the best' and put the owl image at the top of white piece.

I popped the owl up using foam tape and then I added some black crystals to finish off the card.

Thank you so much for joining me!
Kaja

Saturday, January 26, 2019

Two peas in a pod valentine

Hello friends! Happy Saturday!

Today I'm sharing a Valentine's Day card I made using the gorgeous new stamp set called Peas be Mine.


To start off, I stamped and coloured the adorable peas in their pod image using copic markers. I then cut it out using my scan n cut and set it aside to create the rest of the card.

Using distress inks I ink blended the background to achieve a gradient look. I then decided to apply a small falling hearts stencil and ink blend some more to add the tiny hearts on the background.

Next, I die cut the 2 stitched hearts from this background and set those hearts aside and cut some more hearts out of white cardstock and ink blended those hearts separately. I stamped the sentiment onto the darker heart and heat embossed it using clear embossing powder over the top.  I die cut the hearts three more times using white card stock and glued and stacked the heart pieces together for dimension.


I stamped a piece of A2 white card using a diagonal stripe background stamp so that I could have a small strip down each side. I trimmed the pink ombre panel so that it was slightly smaller than the diagonal panel.
Now it was time to assemble the card. First I adhered the diagonal stripe piece to the card base and then adhered the pink panel on top of that and inlaid the stacked hearts into the die cut pieces. I adhered the pea image to the bottom heart using foam tape for even more dimension.


I stamped the sentiment inside the card and added a stamped image of the peas in the pod and some hearts.

This completes the card for today, I hope you like it. I will be back next week with another cute pea card.

Enjoy your weekend!
Catherine x


Saturday, January 12, 2019

Have a Sweet Day

Hello friends,

This is my first post for 2019, I hope you've all had a wonderful start to the year!

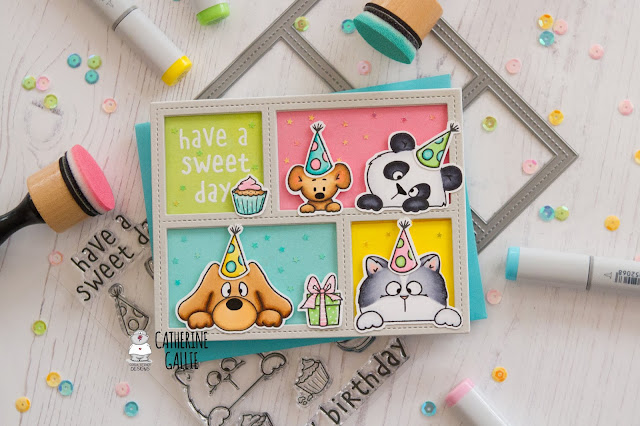
Today I'm sharing a card I made using the new On the Table stamp set as well as a sweet panda from the Lovely Pandas stamp set and a cute mouse from the Fall Mice stamp set.


First I stamped and coloured the images using copic markers and then cut them out using my Scan n Cut although there are coordinating dies in the store. I attached party hats to each critter and I then set them aside while I created the rest of the card.


I used the Lawn Fawn Peekaboo Backdrop die for this card. First I die cut a piece of light grey cardstock with it, then a piece of smooth white card and then a piece of fun foam. I adhered the grey frame to the foam piece for dimension and then put this piece aside.


I took the white 'window' inserts and ink blended them in different colours and set them aside to dry. Once dry I took the green piece and heat embossed the sentiment onto it. It took a few separate goes using the masking technique as I stacked the sentiment to suit the size of the piece of card.
Next, I started attaching the frame and the inserts to the card base. When this was done I decided I wanted a little more something for a 'celebration' so I pulled out my tiny stars in the 4 coordinating colours and adhered some randomly in each window.

 To finish, I adhered the cute little critters with foam tape into their windows, along with the cupcake and gift.


I hope you like my card for today, I will be back soon to share another card with you. Until then, have a wonderful weekend!

Catherine x

Thursday, December 27, 2018

Fun winter card with Kaja

Hi there,
It's Kaja from Kajcyika crafts here with you today with a cute card!

Take a look:
This time I decided to use the stamp set called Happy fall, but I made a winter card with it. I started out by ink blending. I used two distress oxide inks - Cracked pistaccio and Broken china.

I masked off the top and the bottom of my card base, so I got the ink blended area only in the center.. For the bottom edge I tear the paper and used that as a mask and for the top one I used a normal post it note sticky.
Then, I stamped out the two squirrels and colored them in using alcohol markers. I placed one on the left hand side, towards the top and one in the middle of the ground.

I added a lovely kite to the squirrel that is standing and draw in it's string using black marker. Then I used a gray markers to add some shadow under the squirrel's feet.

The last thing I added was the sentiment that reads 'Yippeeh!!!'. I stamped it out in black on a white card stock.

Thank you so much for joining me!
Kaja

Saturday, December 15, 2018

[Video] Sketch inspired card with Kaja

Hi there,
It's Kaja from Kajcyika crafts and today I made a cute card using the Deck the halls stamp set. :)

Take a look:
It's not unusual to have a creative block from time to time and today I will share some advise what to do if it happenes to you. I love sketches so my inspiration hunt starts with them. 

Watch the video to find out more about the sketch I used today and how I made this card:

Hope that you feel inspired and that you will join some challenges in the future!

Hugs,
Kaja

Saturday, October 20, 2018

Guest Design - Pencils Colored Foxes in The Spotlight with Ksenija Rizova

Hello Everybody!

It's Ksenija here and this is my final post as a guest designer for Gerda Steiner Designs in October. I was very excited to feature several stamps sets I received from the company.
Pencils Colored Gerda Steiner Designs Foxes in The Spotlight
I should confess, I fell in love with Gerda Steiner Designs adorable critters stamps. I was not paid or asked to say this.

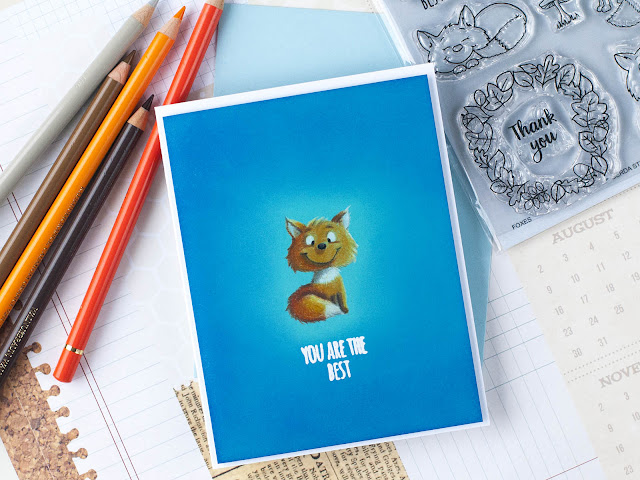
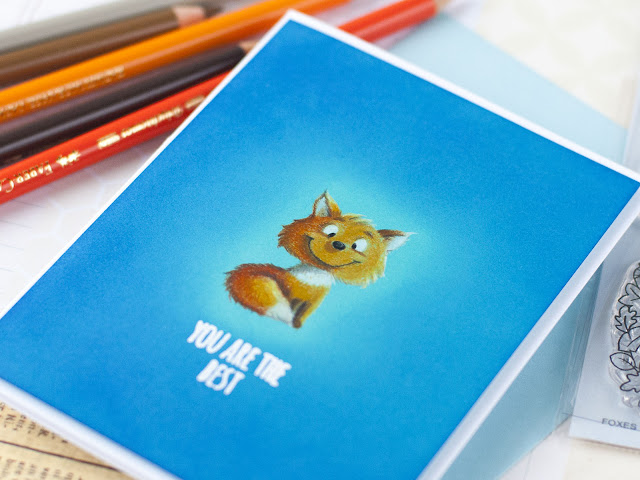
Today I am showcasing the recently released FOXES 4 x 6 Clear Stamp Set. This set is good for year-round friendship cards to encourage, to express gratitude or just to send a note.

It contains image of a serious owl, three foxes, a leafy wreath and three accessory stamps. How to use accessory stamps in a new way you can read HERE.
Pencils Colored Gerda Steiner Designs Foxes in The Spotlight
Mushrooms, a wreath can be misleading, but do not think only about Fall themed cards.

Today I am sharing a Clean and Simple card design suitable for any season.

This fox image is perfect for pencils colouring. This is a medium sized outline image without shading or small details.

To make this card I started with heat embossing the sentiment You Are The best in fine white powder down onto aqua card stock panel.

Next I stamped down a sitting fox image in light brown ink and coloured the image with Polychromos pencils.
Pencils Colored Gerda Steiner Designs Foxes in The Spotlight
When I was happy with my colouring I blended Blueprint Sketch Distress ink around the fox image.

Ink blending has changed the colour of the card panel and also created a spotlight around the focal image.

To finish off the card I foam mounted the panel onto a white card note.
Pencils Colored Gerda Steiner Designs Foxes in The Spotlight
Thank you for stopping by! I wish you a beautiful day!

Tuesday, October 16, 2018

Guest Design - Making A Framed Card with Partial Die Cutting | Card Video |

Hello Everybody!
Today I am sharing an episode about creative use of Partial Die cutting technique for Clean and Simple cards.
Video Tutorial: Making A Framed Card with Partial Die Cutting with Gerda Steiner Designs Bats
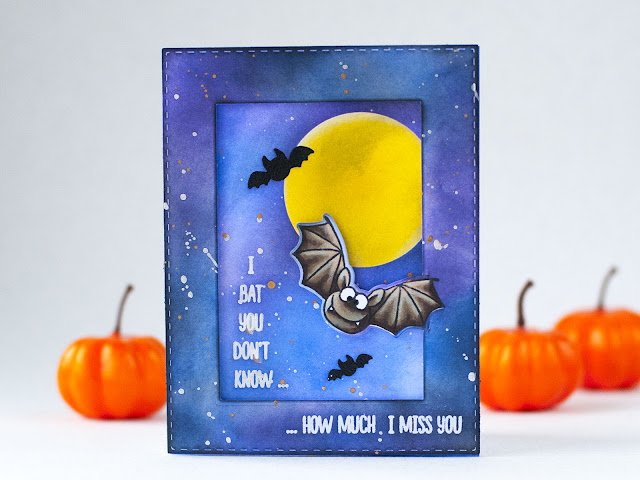
Today I am featuring the Gerda Steiner Designs Bats 4x6 Clear Stamp Set and coordinating dies set. This set includes five main stamps - three bats, a spider, a web, as well as a couple of accessory stamps for creating a background and several phrase builders. This set is very good for friendship and love cards.
Video Tutorial: Making A Framed Card with Partial Die Cutting with Gerda Steiner Designs Bats
The focal image is stamped in alcohol friendly inks and coloured with alcohol markers. The background is created with inks blending.
Video Tutorial: Making A Framed Card with Partial Die Cutting with Gerda Steiner Designs Bats
Here is the video to show you how I create this card.

Are you feeling inspired to use partial die cutting technique for your next card?

Thank you for stopping by! I wish you a beautiful day.

Friday, September 28, 2018

[video] Carol kitten with Kaja

Hi there,
It's Kaja from Kajcyika crafts here with you and today I made a card using a stamp set called Carol kitten that will be released in a few days! :)

Take a look at the card:

I made a cute winter card and if you want a sneak peek of the new stamp set make sure you watch the video tutorail of the card that you can find here:

A little close up of the right kitten:

And a close up of the left kitten:

That's it for today! Thank you so much for joining me! See you next time.

Kaja

Saturday, September 15, 2018

Wild foxy birthday with Kaja

Hi there,
It's Kaja from Kajcyika crafts and today I will show you my first card as a GSD design team member! 

Take a look at the card:
I made a cute fall card that is perfect for these days! I started by ink blending and I used three colors of Distress ink - Forest moss, Peeled paint and Crushed olive. I went from darkest at the bottom towards the lightest at the top.

To make the background more interesting I used clear water and make some splatters. This gives a nice effect of rainy fall weather. 

Next, I die cut the background into a stitched square and I started working on the images.

I used two GSD stamp sets for the images, the main one is called Foxes (the fox image and mashrooms) and the second one is called Happy fall (the leaves). I stamped everything out with memento tuxido black ink and then used alcohol markers to color them in. 

Next, I placed everything on the inkblended panel using liquid glue and foam rectangles.

The last thing I added was the sentiment. I really wanted to make a birthday card so I used the sentiment that reads 'it's your birthday go wild!' from Go wild! stamp set.

To finish the card off, I glued the sentiment and the background down using double sided tape. 

That's it for today! Thank you so much for joining me! See you next time.


SUPPLIES:

Wednesday, September 6, 2017

To a pie-fect friend

Hello everyone!

Alexandra here from made by Alexandra  sharing a card that I made using the adorable More than pie cute bear and pie stamp set


For this card I started by coloring the adorable bears using Spectrum Noir Alcohol Markers and the fussy cut them. Next I worked on my background and for that I cut a piece of cardstock to match a card base and the I took a rectangle die cut and cut out the rectangles from the piece of the cardstock.


Next I inked the background using Distress inks and Memento dew drops inks and stamped the sentiment in the middle on the panel. Adhered the panel to the card base using foam tape and the adhered the cute critters.

As final touch I added some sequins and my card was finished ! Thank you so much for stopping by today! Have a wonderful day!

Supplies 


Wednesday, August 30, 2017

Hey , cutie pie


Hello everyone!

Alexandra here from made by Alexandra  sharing a card that I made using this adorable stamp set from Gerda called More than pie with cute bear and pie


For this card I started by stamping the cute bear which apparently can't decide which pie should he eat :) using Spectrum Noir Alcohol markers.

Next I die cut the front panel and ink it using Distress ink , as well as with the little hill.


Finally I adhered everything down using foam tape and for the sequins I used glossy accents!

Thank you so much for stopping by! Have a lovely day! 

Supplies