Showing posts with label Fall Mice. Show all posts

Tuesday, November 23, 2021

Sending you Love and Blessings

Hi there,

it's Tanja here and I created this Thanksgiving Card using the Gerda Steiner Designs Fall Mice stamp set:

  • stamp the cart and the pumpkins from the Gerda Steiner Designs Fall Mice set with Lawn Fawn Crunchy Leaf - use the masking technique
  • stamp one of the mice from the same set with that same brown ink
  • color the images with Spectrum Noir Triblend Markers and add extra shading with Faber-Castell Polychromos pencils
  • add highlights with a white gel pen
  • stamp the sentiment from the same set with Versafine Clair Pinecone
  • ink up the edges of the top part of the panel with some left-over blue ink from your Blending Brush
  • die cut a decorative edge and adhere the panel to a cardbase covered with burlap


Have a wonderful Thanksgiving.


Hugs,


Tuesday, November 12, 2019

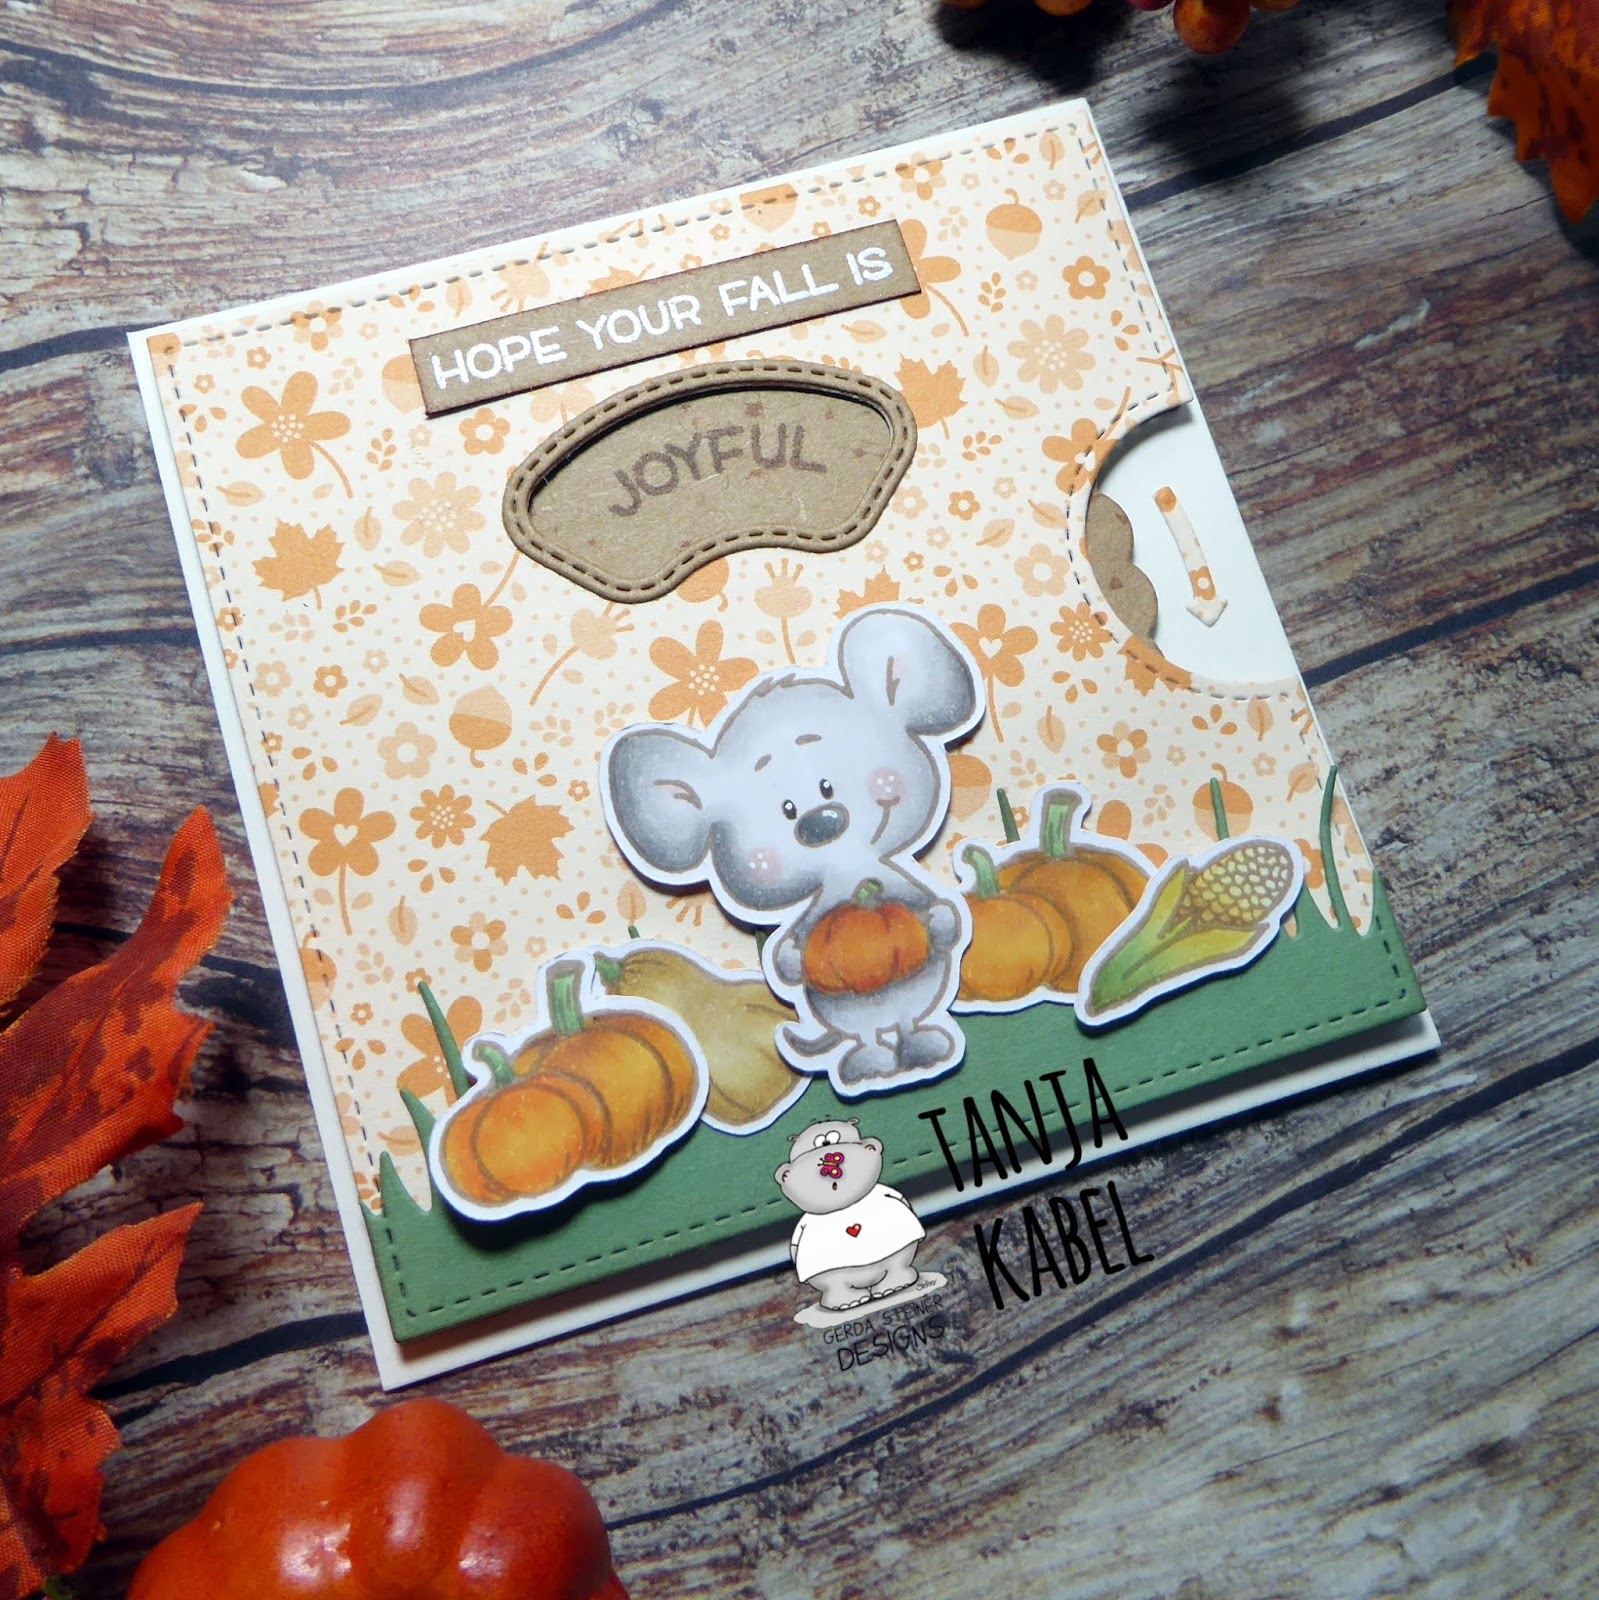
Hope your Fall is Joyful

Hi there,

it's Tanja here and I created this sweet Reveal Wheel Card for you:

  • stamp the adorable little mouse, some pumpkins and corn from the Gerda Steiner Designs Fall Mice set with Lawn Fawn Crunchy Leaf - use the masking technique for the mouse with the pumpkin
  • color the images with Delta, Touch Twin Brush and Copic Markers and add extra shading with Faber-Castell Polychromos pencils
  • add highlights with a white gel pen
  • cut out the Lawn Fawn Reveal Wheel from patterned paper from the Lawn Fawn Fall Fling 6x6 paper pad and from kraft cardstock
  • add a grass border cut from green cardstock with the help of one of the Lawn Fawn Meadow Borders dies
  • stamp the first part of the sentiment from the Lawn Fawn Reveal Wheel Holiday Sentiments with Versamark onto a strip of kraft cardstock and heat-emboss it with WOW! Bright White Super Fine embossing powder
  • stamp the second part(s) of the sentiment from the same set directly onto the Reveal Wheel with Versafine Vintage Sepia - add some splatters to the wheel with watered-down Distress Ink Vintage Photo
  • assemble the card using double-sided adhesive and double-sided foam tape


Have a wonderful day.

Hugs,


Saturday, January 12, 2019

Have a Sweet Day

Hello friends,

This is my first post for 2019, I hope you've all had a wonderful start to the year!

Today I'm sharing a card I made using the new On the Table stamp set as well as a sweet panda from the Lovely Pandas stamp set and a cute mouse from the Fall Mice stamp set.


First I stamped and coloured the images using copic markers and then cut them out using my Scan n Cut although there are coordinating dies in the store. I attached party hats to each critter and I then set them aside while I created the rest of the card.


I used the Lawn Fawn Peekaboo Backdrop die for this card. First I die cut a piece of light grey cardstock with it, then a piece of smooth white card and then a piece of fun foam. I adhered the grey frame to the foam piece for dimension and then put this piece aside.


I took the white 'window' inserts and ink blended them in different colours and set them aside to dry. Once dry I took the green piece and heat embossed the sentiment onto it. It took a few separate goes using the masking technique as I stacked the sentiment to suit the size of the piece of card.
Next, I started attaching the frame and the inserts to the card base. When this was done I decided I wanted a little more something for a 'celebration' so I pulled out my tiny stars in the 4 coordinating colours and adhered some randomly in each window.

 To finish, I adhered the cute little critters with foam tape into their windows, along with the cupcake and gift.


I hope you like my card for today, I will be back soon to share another card with you. Until then, have a wonderful weekend!

Catherine x

Friday, May 25, 2018

Let's meet

Hi there,

it's Tanja here and I created this fun card using the sweet little mouse from the Gerda Steiner Designs Fall Mice stamp set for the Spring and Summer Coffee Lovers Blog Hop:

  • cut out a stitched rectangle from smooth white cardstock
  • stamp the coffee mug from the Gerda Steiner Designs You're koalified set and mask it, stamp the mouse from the Gerda Steiner Designs Fall Mice set and mask it as well, stamp the computer and the sentiment from the STAMPlorations Hello you set
  • color the scene with Delta, Touch Twin Brush and Copic Markers - add extra shading with Prismacolor Colored Pencils and Zest-it
  • add highlights with a white gel pen
  • cut out a larger stitched rectangle from patterned paper and adhere all the layers onto a white cardbase

Enjoy the Summer Coffee Lovers Blog Hop.

Hugs,


Tuesday, October 24, 2017

Thank you Hedgehog

Hi there,

it's Tanja here and this time I created this sweet Fall card:

  • cut out a stitched panel from Neenah Desert Storm kraft cadrstock
  • stamp the hedgehog from the Gerda Steiner Designs Hedgehog with Sign set, pumpkins, pears and apples from the Gerda Steiner Designs Fall Mice set and leaves from the Gerda Steiner Designs Happy Fall set with Versafine Vintage Sepia - use the Masking Technique
  • color the images with Prismacolor Colored Pencils and Zest-it
  • add highlights with a white gel pen
  • create a backdrop with the help of patterned paper from the Maja Design Walking in the Forest 6x6 paper pad, the My Favorite Things Wonky Stitched Rectangles and the My Favorite Things Stitched Scallop Basic Edges 2
  • adhere the layers to a dark brown cardbase


I hope you got inspired.

Yours,


Saturday, April 15, 2017

Guest Designer - Welcome To The World

Hello everyone!

I'm Diana from Moments of Creativity and I'm back with another card featuring a very cute and recently released Go Wild Clear Stamp Set which turns out to be perfect for creating any adventure scenes with adorable animals.

And here is what I came up with for today:

Yes, this stamp set came also in handy for making newborn baby cards 😊

I started off by creating ink blended background and then spritzed some water on the panel to get the spots. Once this was done, I die cut a star on one side of the panel and added some false stitches on the other one. After placing a piece of design paper and the panel on the card base, I stamped a mouse, an elephant and balloons onto a piece of paper and colored them with my Copics. Then I put all the elements together and added the stamped sentiment. Since the card looked a little empty I added a butterfly and a cloud to fill in the empty space. And that's how this project was created 😃

Well, I guess that's all for today 😊

Thanks for stopping by! See you next time!

Yours, Diana

Wednesday, February 1, 2017

Romantic Mice Valentines Card - Guest Designer Lesley Oman


Hello everyone!
Its Lesley Oman again, from Hungry Heffy Crafts, and I am delighted to be back with another guest designer post for Gerda Steiner Designs! This time I am working with the sweet Fall Mice stamp set - aren't they adorable! I figured that Valentines Day is fast approaching and so I was inspired to use soft, romantic colours, and I wanted my card to have a love theme! Lucky for me, the stamp set has a great greeting which says Sending You Love and Blessings, which was perfect for this card. I wanted to create a soft, romantic background, so I grabbed a large text print stamp from my stash and clear heat embossed the image onto some watercolour cardstock. I used some post-it tape as a mask along the crease to make sure the back of my card stays clean.


Next I used a few distress inks to blend some colour over the top of my embossed image- with soft Spun Sugar at the top blending into Picked Raspberry, and then a Shaded Lilac at the bottom. I had to work this pretty hard, but I got there in the end! Next I stamped two sweet mice from the Fall Mice stamp set from Gerda Steiner Designs onto watercolour cardstock, and painted these with my watercolour paint. I used the wet on wet technique to build up some soft, blended colours then I used my heat tool to dry the paint completely, before adding some shadows. Next I created my own watercolored heart - using a heart die as a guide. This is for my mouse to hold behind his back. Aren't they adorable!? To create a panel for my greeting, I used a scalloped rectangle die, but by running it through my cuttlebug machine a couple of times, I was able to create a uniquely sized rectangle that was just the right size! I stamped and heat embossed the greeting from the stamp set on the white panel, and then added a touch of spun sugar distress ink to give it a pop of subtle colour.
 

To create some contrast on the card, I wanted to add a frame using some dark grey cardstock but unfortunately I only had scraps left over. I didn't let that stop me though - I simply cut the frame in two parts, and then stuck these to the card, hiding the join behind the scalloped rectangle panel. I also mounted the watercolour heart on the same grey cardstock so it had a nice frame, and then stuck my card all together. To finish, I darkened the eyes with a little sakura glaze pen, and added a sweet wooden heart and some adhesive pearls! Thank you so much for joining me again. I had such fun playing with these stamps, and I am sure you will too.

Check out the video below for a full tutorial on how I made this fun card!


 x Lesley Oman aka Hungry Heffy

Tuesday, November 29, 2016

Happy Fall Mice with Sign

Hi there,

it's Tanja here and on today's card I am using one of the fabulous new Gerda Steiner Designs Digital Stamps:

  • color the Gerda Steiner Designs Two Mice with Sign with Delta and Touch Twin Brush Markers
  • add Wink of Stella Clear Glitter to the sign and add highlights with a white gel pen
  • cut the Lawn Fawn Stitched Journaling Card from watercolor paper and create a background by stamping pumpkins from the Gerda Steiner Designs Fall Mice set and leaves from the Gerda Steiner Designs Happy Fall set with Versafine (Vintage Sepia)
  • color the pumpkins and leaves with Daniel Smith Watercolors
  • run a stitched panel of kraft cardstock through your Big Shot inside a leaf embossing folder
  • adhere the different layers with foam tape and double-sided adhesive to the cardbase

I hope you have a wonderful day.

Yours,

Monday, November 14, 2016

Non Traditional Use Of Fall Stamp Sets

Hello everyone!

I'm Diana from Moments of Creativity and I have the huge honor of being a Guest Designer for this super talented team for the next couple of weeks.
I came across Gerda Steiner Designs stamps a year ago and immediately fell in love with them, so I was really happy when Gerda asked me if I wanted to do a guest spot.

Today I want to share with you 2 very wintery cards featuring the adorable "Cheerful Hedgehog" and "Fall Mice" stamp sets. You won't believe, but these stamp sets are so versatile that you can easily use them for your Christmas cards.

So, let's start ...

For my first card I chose 2 little cuties and asked them to trim a Christmas tree:)

I started off by creating ink blended sky with setting sun. After this I used texture paste and added some stars and falling snow to create a perfect winter scene.

While the background was drying, I stamped the hedgehogs onto a piece of paper and colored them with my Copics. Then I die cut the rest of the elements and colored some of them with Distress Inks.
The only thing which was left was to put all pieces together. Once it was done, a huge part of the work was finished.

Except for some last touches:)

The first and the main one was to draw a string of lights my hedgehogs are going to trim a Christmas tree with - checked;
Second - to draw some shadow under everything and everyone who is staying in the snow - checked;
And last but not least - to add some Wink of Stella to stars, street lamp light and snow - checked.
And that's how the first car was created. Easy peasy, isn't it?:)

Well, the second card was done by following the same steps, except this time I went for heat embossing instead of applying texture paste and replacing one hedgehog with a mouse.

I guess these are all tricks I was planning on sharing with you this time;)

I hope you liked my little inspiration.
Thanks for stopping by! See you next time!

Yours, Diana


Saturday, October 8, 2016

Sending you lots of Love and Blessings

Hi there!
I'm Anna (al_handmade) and this is my last (*sigh*) post as a guest designer for this fabulous team. This is why I want to greet you all with a funny autumnal project featuring a little friend from “Fall Mice” stamp set.


First I drew a tree with Copic Markers and filled the background with multicolor leaves. I wanted to create a colorful autumn scene full of leaves and pumpkins and, with such a background, the "Fall Mice" stamp set was the perfect choice for building a happy scene.

I stamped the barrow, the mouse and some pumpkins directly on my card panel and colored them with Copics. Since I needed to create some dimensions, I stamped a new barrow and several other pumpkins on copic friendly paper, colored them, cut them and created a multilayered composition to enrich my card.


I chose a warm wish for this joyful scene. I stamped half of the sentiment directly on my card and half on a piece of kraft paper - heatembossing it with some white powder.

As a final touch I added some sequins and grabbed my Wink of Stella Clear Brush to make some pumpkins shine.


Thanks for stopping by! I hope you enjoyed this project!
Have a nice weekend!


Supplies list:
  • Ink: Memento Tuxedo Black, Versamark Ink
  • Wink of Stella Clear brush
  • Copic Markers:
    Tree: E31 E33 E35 E37 E29
    Leaves: Y17 Y32 Y38 YR07 YR16 YR18 YR27 YG03 YG25 G94
    Barrow: E31 E33 E35 E37 E29
    Mouse: E41 E43 E51 YR00
    Pumpkins: Y17 Y32 YR07 YR16 YR18 YR27 BG93 G94 G99

Wednesday, September 28, 2016

Love and Blessings!!

Hi there!!

It's Yolanda here, from Scraping Time!! Autumn is here and to tell you the truth, I start feeling a bit down since I prefer summer, sunlight and fun hehehe... but I forgot all these feelings when I saw these cutties from the new Autumn Stamps Sets from Gerda Steiner Designs.
They are just adorable!!!


Today, I decided to mix stamps from different sets and I did a bit of masking!! I love that technique! I think this sentiment is so sweet and I decided to stamp it in Delicata Ink since its colour is very soft and bright at the same time. If you have used this ink you know what I mean!


I used a scalloped border to give some interest to the pannel and I decided to use this decorated paper from Lawn Fawn. It looks great with the leaves from the Cheerful Hedgehog Stamp Set.

I coloured the images with Spectrum Noir and Copic markers.

For the final touch, a bit of Glossy Accent on the nose and Wink of Stella Clear in every detail.


I hope you enjoy the card and see you next Wednesday with a very special post.

Have a great week!!

Saturday, September 24, 2016

A Very Thankful Mouse

Hi there!
I'm Anna (al_handmade) and today I want to share with you a project featuring a sweet little mouse from the super adorable “Fall Mice” stamp set.


For this card I wanted to create a nice background to my lovely furry friend. I started drawing a sun ray shape on a white card panel and cut it off. Then I stamped some fruits and veggies with Memento Ink London Fog on copic-friendly paper and colored them with Copic Markers in order to create a colorful background pattern.
At first, I wanted to use saturated fall colors but then I decided to go for softer shades. Maybe I'm not in an autumnal state of mind yet! :) Finally I masked my colored background with the sun ray frame previously cut.


I stamped the cute critter and colored it with my Copic markers - trying to give him a furry look. Since I wanted to use a sentiment about love and affection, I added a big glossy heart in his arms.

Finally I heat embossed the sentiment on vellum with some golden powder - adding one last shiny touch to my card.


Thanks for stopping by today! I hope you enjoyed this project.
See you next week!


Supplies list:
  • Inks: Memento Tuxedo Black, Memento London Fog, Versamark Ink
  • Glossy Accents
  • Copic Markers:
    Background: YR00, YR0000
    Background fruit/veggies: Y11, Y15, Y32, YR14, G20, G12, R05, E33, E43
    Heart: R14, R37, R89
    Mouse: E41, E43, E51, YR00
    Mouse Background: B0000, G20, YG03, YG25

Thursday, September 22, 2016

Video: Clean & Simple Halloween Card

Hi guys! This is Emily Cupely and for today's video I made a Halloween 4bar card which turned out very pretty, but, at the same time, very easy and quick to make. I hope you enjoy the video below! :)


Supplies:


http://gsd-stamps.com/collections/shop-clearstamps/products/fall-mice-4x6-clearstamp-set http://gsd-stamps.com/products/bats-halloween-4x6-clear-stamp-set http://gsd-stamps.com/collections/shop-clearstamps/products/cheerful-hedghog-4x6-clear-stamp-set


Tuesday, September 20, 2016

Do I smell Cake?

Hi there,

it's Tanja here and I would like to show you this sweet creation using the new Gerda Steiner Designs Fall Mice stamp set:

  • color the cake and the little mouse from the Gerda Steiner Designs Fall Mice stamp set with Lyra Rembrandt Polycolor Pencils and Zest-it
  • add highlights and some details with a white gel pen and Wink of Stella Silver Glitter
  • cut out the Clearly Besotted Stamps Window from Neenah Desert Storm Kraft cardstock and ink it up with Distress Ink (Gathered Twigs)
  • stamp the Hero Arts Designer Woodgrain with the same ink onto the frame
  • cut out a stitched panel from the same kraft cardstock and add splatters with Heidi Swapp Color Shine (Gold)
  • stamp the sentiment from the Gerda Steiner Designs Monster stamp set with Versamark and heat-emboss it with WOW! Bright White Super Fine embossing powder
  • adhere the panel onto a dark kraft cardbase

I hope to see you again soon.

Yours,


Friday, September 2, 2016

VIDEO Prismacolors on Kraft featuring Fall Mice

Hi all!  Happy Friday!  It's Tara and today I am sharing another fabulous fall card with you all! The Fall Mice stamp set is perfection if you're a love of fall like I am!  I wanted the adorable images to shine so I used one of my favorite coloring methods - Prismacolor pencils on kraft card stock!

Using some simple masking I created a cute little scene using this sweet little mouse and a few of the many, many fall images in this set.  I then used my Prismacolor pencils to color everything in.  The trick to creating depth with colored pencils is lots and lots of light layers!  
 
 
I love how this sweet and simple one-layer card turned out!  It got me more excited than ever for pumpkin everything!!  Thank you so much for joining me today!  Have a fabulous weekend and I'll see you again soon!  Bye!


Tuesday, August 23, 2016

Happy Fall Mouse

Hi there,

it's Tanja here and I would like to show you this creation using one of the brand new Gerda Steiner Designs fall stamp sets:

  • cut out a stitched panel from Confetti White cardstock
  • color the mouse, the wagon and the pumpkins from the Gerda Steiner Designs Fall Mice stamp set with Delta and Touch Twin Brush Markers
  • add details with Lyra Rembrandt Polycolor Pencils and a white gel pen
  • cut the My Favorite Things Happy into the panel and layer burlap behind the cutout
  • add the sentiment from the Gerda Steiner Designs Happy Fall stamp set with Versafine (Vintage Sepia)

I hope you got inspired.

Yours,