Showing posts with label coloring pencils. Show all posts

Friday, April 5, 2024

YOU ALWAYS MAKE ME SMILE


Hello all you creative minds, 
Nicole here again from Hamburg/Germany.

Today we're going underwater and meeting some friends from the stamp set "A Whale of a Time".


For an underwater shaker card I used a great design paper from Whimsy Stamps "Under the Sea".

First I punched out the design paper with the punching template.


Then colored the stamp impressions with the markers from Ohuhu.
Color combination:

Waale: MG020, MG030, MG060, MG100

Octopus: GY7, G260, G270, G470, G080

Cheeks: R120, R188

And then cut out.


Before you glue the windows of the card, you should consider positioning the cut-out backgrounds on the base card. I tend to forget that from time to time!😉

Then you can fill the shaker elements into the squares and apply the front card with 3D tape.


I embossed the stamp text with WOW embossing powder/white and then attached it to the card with the cute friends.
In the beginning I always thought shaker cards were too much work, but once you understand the system, you can turn all the punching templates into a great and effective shaker.


For more inspiration, come and visit me on Instagram under "Stempelfiziert".

I would be delighted to help you.


 I hope you enjoyed my post and that it has inspired you a little.


See you soon 

Nicole aka Stempelfiziert

Friday, February 16, 2024

Hello creative minds, 
Nicole here again from Hamburg/Germany.
I'm here to inspire you creatively once again using the "LOVELY PANDAS".


In a small illustrated instruction I leave you again my combination of the Ohuhu markers.

I ordered these little love letters especially for this stamp set because they are so perfect for a shaker card.


The picture frame punching template is from Whimsy Stamps and is always great for designing a shaker card.


I always set smaller accents with a white gel pen and a gray polychromo for the shading.


I hope the instructions are clear for you and you can implement it for yourself.

If not, you can always contact me on Instagram at Stempelfiziert


                                I wish you a nice creative weekend and hope to see you soon.

                                                        Yours Nicole aka Stempelfiziert


Friday, February 9, 2024

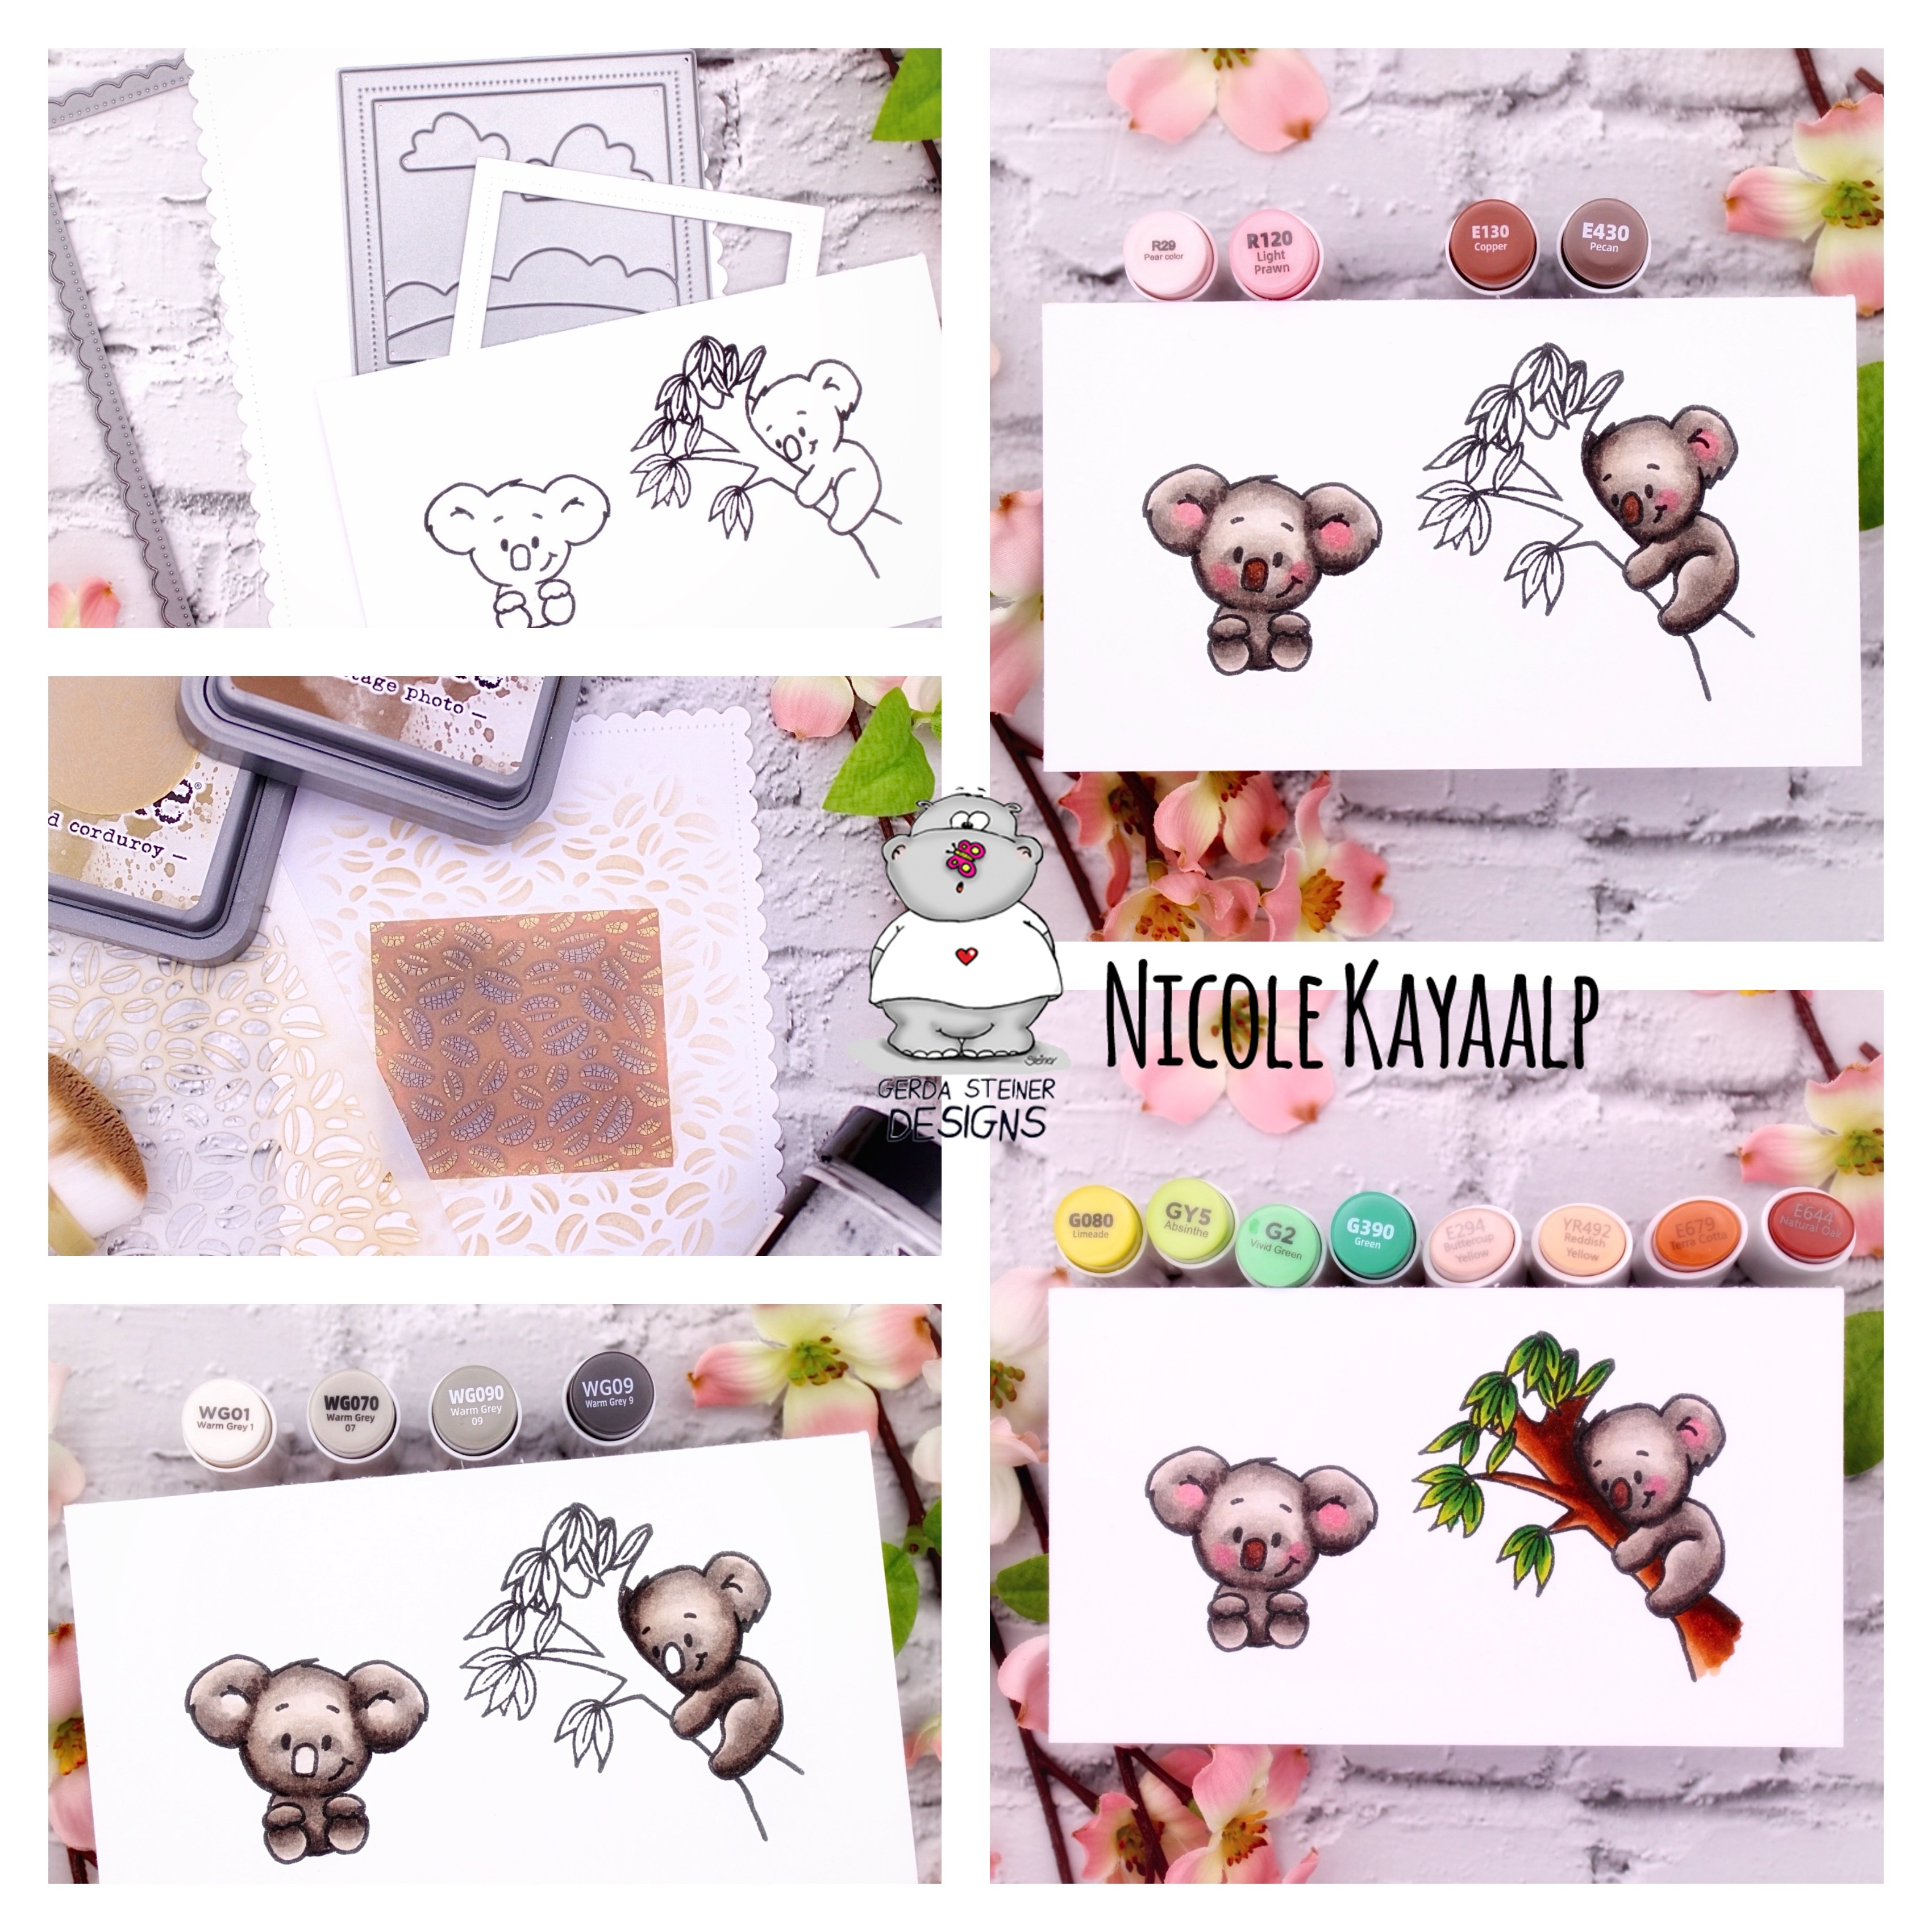
YOU ARE KOALAFIED...

Hello dear craft friends, 
Today I'd like to introduce you to another little inspiration with the YOU ARE KOALAFIED stamp set.


I have again included the materials I used in the illustrated instructions in the picture.

First I designed the background with the stencil from the M4Y and the DistressOxide Inks. As a special feature I used a texture paste that looks broken for the coffee beans.


Then I colored the koala and leave you my combination of markers from OHUHart in the picture.

I carefully applied the smaller shades again with a polychromo pencil.

I always use a white gel pen to accentuate the light spots.

The Polaroid punch is from AveryEll "Photo Mat"
The frame punch is from Create a Smile.


I particularly like coffee cards. I'm a coffee junkie and of course I like it with a piece of chocolate.

In contrast to my gaudy cards, this is a quieter version of my cards.


What is your favorite way to relax?


Have a nice creative time and I hope you enjoyed my post.
If you have any questions or suggestions, I'm always here for you.

Creative greetings
Nicole alias Stempelfiziert


Friday, February 2, 2024

YOU ARE STRONGER ...

Hello dear crafting community, today I am allowed to be creative again and today I am tearing out trees with the stamp set BIG GUY.


I leave you again a small instruction in the pictures, where you can see that I have wiped the background with stencil and previously stamped and masked the mammoth.

Then remove the masking and color the GUY.


I thought if he's already strong, then he can also pull a fir tree out of the ground 😉

Because if you have to, you are strong and can change the world. This buddy definitely has what it takes.


I hope you like the little card and that I can inspire you a little.

Thank you for reading 💓

Creative greetings

Nicole alias Stempelfiziert


Friday, January 12, 2024

YOU ARE SO AWESOME

Hello dear creative minds.
I am Nicole Kayaalp from Hamburg/Germany and I am very happy to be able to contribute to the blog.

           Today I have the pleasure of presenting you a card with the Hippo and his friend the butterfly.


The two are so familiar that the Hippo's heart lights up immediately.
In the following pictures I show my applied DistressOxides and combinations of Ohuhu markers.


I used a stencil from MFT for the clouds. (Rolling Clouds ST143).


I always prime with the lightest color first and continue shading with the darker colors. Finally, I blend with the lightest color.


       I used a system from Pear Blossom Press to make the heart shine. These are very easy to work with.


                                          All in all a beautiful, simple card with a nice effect.

                     I hope you enjoyed my first blog post and that you have a nice creative time.


                                                                    Best regards 

                                                    Nicole Kayaalp alias Stempelfiziert


Friday, November 27, 2020

Guest Design - Deck the halls by Izzy Scrap


Bonjour !

Izzy Scrap here today with some inspiration ! I'm back with a new guest designing post for Gerda Steiner Designs. 

Today I'm featuring the Reindeer & a tree  stamp set. It includes six adorable reindeers, a Christmas tree, Santa and few ornaments. For my card I only used the reindeers, all of them, and the ornaments. In a few days it will be the countdown to Christmas, and we will start by decorating the tree and the house. 

This year will be a bit different because of the Sanitary situation, we are not sure to be able to spend Christmas day with our families because of the lockdown. So, to stay in the weird, I imagined a Christmas tree with a pyramid of reindeers !


With a lot of masking, I stamped the reindeers one by one starting by the bottom of the pyramid (left and right) and going up. Before taking off all the masks I also stamped the floor and I blended a soft pink touch of ink for the wall.


Then I removed the masks and I coloured the reindeers and the floor with colour pencils. For the ornaments I used some glitter pens.


I stamped the sentiment in two shades of red, then I heat embossed it with clear powder. I also hung a little star from this sentiment.


To finish I adhered a pattern paper on the double card and I glued the image on top. Aren't they funny these adorable reindeers ? I especially hope that they will bring a smile to the recipient. 

Et voilà ! I've been very happy and delighted to share my cards with you this month. Again, a very huge thank you to Gerda and her team for welcoming me.

Wishing you a beautiful and crafty day !

Izzy


Wednesday, November 28, 2018

Fa-la-la-Llama Coloring with Polychromos Pencils

Howdy all!  Allison Cope here! Happy Wednesday.

Come and join me for a video tutorial on how to color our adorable “Fa-la-la-Llamas” digital stamp set using Polychromos Pencils on Kraft cardstock.

Grab a cup of something warm and meet me at my desk…
https://www.youtube.com/watch?v=cGq6KRXPtr8

And here’s a quick peek at the card again…

I hope you too get a chance to try out some kraft paper and colored pencils for your next card creation!

~ Allison Cope ~

Saturday, October 20, 2018

Guest Design - Pencils Colored Foxes in The Spotlight with Ksenija Rizova

Hello Everybody!

It's Ksenija here and this is my final post as a guest designer for Gerda Steiner Designs in October. I was very excited to feature several stamps sets I received from the company.
Pencils Colored Gerda Steiner Designs Foxes in The Spotlight
I should confess, I fell in love with Gerda Steiner Designs adorable critters stamps. I was not paid or asked to say this.

Today I am showcasing the recently released FOXES 4 x 6 Clear Stamp Set. This set is good for year-round friendship cards to encourage, to express gratitude or just to send a note.

It contains image of a serious owl, three foxes, a leafy wreath and three accessory stamps. How to use accessory stamps in a new way you can read HERE.
Pencils Colored Gerda Steiner Designs Foxes in The Spotlight
Mushrooms, a wreath can be misleading, but do not think only about Fall themed cards.

Today I am sharing a Clean and Simple card design suitable for any season.

This fox image is perfect for pencils colouring. This is a medium sized outline image without shading or small details.

To make this card I started with heat embossing the sentiment You Are The best in fine white powder down onto aqua card stock panel.

Next I stamped down a sitting fox image in light brown ink and coloured the image with Polychromos pencils.
Pencils Colored Gerda Steiner Designs Foxes in The Spotlight
When I was happy with my colouring I blended Blueprint Sketch Distress ink around the fox image.

Ink blending has changed the colour of the card panel and also created a spotlight around the focal image.

To finish off the card I foam mounted the panel onto a white card note.
Pencils Colored Gerda Steiner Designs Foxes in The Spotlight
Thank you for stopping by! I wish you a beautiful day!

Thursday, August 24, 2017

Guest designer - Pool piggies by Larissa Walgemoed (Part 4)

Hello everyone, it is Larissa with a another post on the Gerda Steiner designs blog. Today is my last post with a card made with the Pool piggies. I really had fun making these 4 cards with the Pool piggies. Thanks so much Gerda and Macy for asking me as a guestdesigner!


My last card is a shakercard. A pool piggie has to be in a swimming pool on a pool ring. For this card I stamped a piggie and the poolring from the stampset Pool piggies from Gerda Steiner designs. I have coloured the images with my Polychromos pencils and then I fussy cut the images. I adhered them on top of each other with foamtape.


From white cardstock I cut a rectangle panel with a square hole in it with the Crea-nest-lies XXL 44 & 50 from Crealies. I adhered a piece of plastic sheet behind the window. On a piece of cardstock I made a background with the following colours of distress ink: Tumbled glass, Broken china, Salty ocean and Mermaid lagoon distress ink. Then I went over the background again with Mermaid lagoon distress ink and the Curved lines stencil from Create a smile. This way I got a pretty water background. I adhered foamtape on the white panel and filled my shaker with Sparkling clear sequins 3mm from Pretty pink posh and Blue sequins from Witte boekhandel (a Dutch store). I adhered the white panel on a red card. The sentiment is from the set Pool piggies from Gerda Steiner designs and I stamped it below the shakerpart. Then I adhered the piggy onto the swimming pool and my card is done. 


*********************************************************************************
STAMP: Pool piggies from Gerda Steiner designs
COLORING MEDIUM: Polychromos pencils, distress inks
PAPER: White and red cs
INK: Versafine onyx black, Tumbled glass, Broken china, Salty ocean and Mermaid lagoon distress ink. 
DIES: Crea-nest-lies XXL 44 & 50 from Crealies. 
ACCESSORIES: Curved lines stencil from Create a smile, Blue sequins from Witte boekhandel, Sparkling clear sequins 3mm from Pretty pink posh

Thursday, August 17, 2017

Guest designer - Pool piggies by Larissa Walgemoed (Part 3)

Hello everyone, it is Larissa with a another post on the Gerda Steiner designs blog. So happy to be back again today! Today I am showing you my thirth card that I made with the cute Pool piggies!


Today's card is my favorite from the set of cards that I made with the Pool piggies from Gerda Steiner designs. It was a lot of work, but I love the end result. I made a nice summer scene with the help of the pool piggies and a cut file from the Silhouette store. I really had fun making this card!
I started with stamping the female piggies and the beachball from the stamp set Pool piggies from Gerda Steiner designs and then I coloured all images with my Polychromos pencils, the black glaze pen and the Clear Spectrum noir sparkle pen and then I fussy cut the images. With a white gelpen I have drawn little dots on the bikini and the swimming suit. I have cut a large square from white cardstock with the Crea-nest-lies XXL 50 from Crealies. I made a background on it with distress inks. On the bottom of the sqaure I used Peeled paint and for the sky I used Tumbled glass and Broken china.


Then I used the silhouette and the cutting file Miss Kate bear in pool from Miss Kate cuttables to cut a swimming pool, a sun, 2 palm trees, a couple of clouds and water droplets for my scene. I have coloured all these parts with distress ink. For the swimming pool I used the colours Picked raspberry and festive berries. The sun is coloured with Mustard seed, Wild honey and Spiced marmelade. The water parts are coloured with Salty ocean ink. I have coloured the palm trees with Vintage photo, Ground espresso and Peeled paint. On the clouds I used a little bit of Tumbled glass ink. I adhered all these parts together with the piggies on the sqaure. Some pieces are adhered directly on the sqaure and for other parts I used foamtape and that way I have gotte a nice little summer scene. I adhered the sqaure with foamtape on a white card. I applied glossy accents on the sun and the sunglasses. Once I know who is going to get this card, I will stamp my sentiment on the inside of the card. Next week I will be posting card 4 from this collection.


*********************************************************************************
STAMP: Pool piggies from Gerda Steiner designs
SILHOUETTE CUTTING FILE: Miss Kate bear in pool from Miss Kate cuttables
COLORING MEDIUM: Polychromos pencils, Distress inks
PAPER: White cs
INK: Mustard seed, Wild honey, Spiced marmelade, Peeled paint, Salty ocean, Mermaid lagoon, Vintage photo, Ground espresso, Picked raspeberry, Festive berries, Tumbled glass, Broken china distress inks. 
DIES: Crea-nest-lies XXL 50 from Crealies
ACCESSORIES:Black glaze pen, Clear Spectrum noir sparkle pen, Glossy accents, white gelpen. 

Monday, April 24, 2017

Larissa - Coffeesaurus

Hello everyone, today my name is Larissa from the blog Car-d-elicious and I am from the Netherlands. Today I am guestdesigning at Gerda Steiner designs. I have made 2 cards with a cute coffee drinking dinosaur. 


On the first card I have coloured the Coffeesaurus from Gerda Steiner designs with my Polychromos pencils and then I fussy cut the image. On a white card I adhered a piece of green star design paper from the Lucky prints paper pack from My favorite things. I have cut a rectangle from black cardstock and stamped sentiments from the stampset on it with Versamark ink. Then I embossed the sentiments with white embossingpowder. I have cut a label from white cardstock with the Sentiment label strip die-namics from My favorite things and after I adhered the label on the card I adhered the dinosaur on the card. I have decorated the label with black hotfix stars.


Green coffeesaurus
STAMP: Coffeesaurus from Gerda Steiner designs
COLORING MEDIUM: Polychromos pencils
PAPER: White and black cs, Lucky prints paper pack from My favorite things
INK: Versafine onyx black, Versamark ink
DIES: Sentiment label strip die-namics from My favorite things
ACCESSORIES: White embossingpowder, black hotfix stars


And this is my second card:


On my second card I decided to colour the dinosaur from the stamp set Coffeesaurus from Gerda Steiner designs in pink with my Polychromos pencils. Again I have fussy cut the image. On a piece of white cardstock I stamped a sentiment from the stampset a couple of times with Chocolate brown dye ink from My favorite things. I have cut 2 squares from the white cardstock and also from a piece of dark brown cardstock with the Crea-nest-lies XXL 42 and 50 from Crealies. I have adhered the squares on top of each other and then I cut a little label from the darkbrown cardstock. I have attached the label with the Tiny attacher from Tim Holtz onto the squares. Then I adhered the squares on a pink card. I adhered the dinosaur with foamtape on the card. 


Pink coffeesaurus
STAMP: Coffeesaurus from Gerda Steiner designs
COLORING MEDIUM: Polychromos pencils
PAPER: Pink, dark brown and white cardstock
INK: Chocolate brown dye ink from My favorite things, Versafine onyx black
DIES: Crea-nest-lies XXL 42 and 50 from Crealies
ACCESSORIES: Tiny attacher from Tim Holtz


I am a participant in the Gerda Steiner designs Affiliate Programme. This means that if you click on one of my links and subsequently make a purchase, I will receive a small commission of store credit, at no extra cost to you.