Showing posts with label Easter bunnies. Show all posts

Thursday, March 21, 2024

Somebunny Special


Hi everybody!

Easter is coming up fast and I'm happy to share this adorable bunny today.  I started this card by stamping the bunny from the set 'Easter Bunnies' on watercolor paper.  Then I used Derwent Inktense pencils and a water brush to color in the image.  Once this was dry, I fussy cut the bunny out and used a black marker along the edges to cover any white areas.


For the background, I started with a generic birch tree stencil and laid it on a piece of watercolor paper.  Then I sprayed over the stencil with some Tim Holtz Distress Spray Stains in candy apple, dried marigold, squeezed lemonade, and uncharted mariner. 

 While this dried, I embossed a piece of white cardstock with an embossing folder to add a little texture.  Next, I used an egg shaped die to cut an egg from the center of the embossed piece and trimmed it down to be slightly smaller than an A2 card base.  Once the backing was dry, I moved the stain sprayed piece around until I like the colors that were showing in the 'egg window'.  I trimmed off the extra paper and attached this piece to the embossed white cardstock.  I had an extra 'strip' of stained watercolor paper that I stamped the sentiment from the set 'Hoppy Easter' and used a banner die to cut this out.  Last, I attached the sentiment and bunny to the backing with glue and taped the whole piece to a A2 white card base.

Thank you for reading and I hope you're inspired to make some colorful Easter eggs!


Tuesday, April 12, 2022

Happy Easter

Hi there,

it's Tanja here and I created this Easter Card using the Gerda Steiner Designs Easter Bunnies stamp set:

  • stamp one of the bunnies from the Gerda Steiner Designs Easter Bunnies set with Lawn Fawn Jet Black
  • color the image with Spectrum Noir Triblend Markers, add extra shading with Faber-Castell Polychromos pencils and highlights with a white gel pen
  • cut out a Clearly Besotted Stamps Rounded Tag from kraft cardstock and add a grass border
  • embellish the tag with a ribbon bow
  • create a backdrop using strips of colored and kraft cardstock
  • finish the card with a patterned paper sentiment strip


Have a wonderful Easter Time.

Hugs,


Tuesday, March 29, 2022

Have an Egg-Stra Special Day

Hi there,

it's Tanja here and I created this clean and simple Easter Card inspired by the wonderful and brave Yana Smakula and I used the grass border from the Gerda Steiner Designs Nerdy Easter Bunny stamp set:


Have a wonderful Easter Time.

Hugs,


Sunday, March 28, 2021

Spring Bunnies

Hi everyone! It’s Jeannie (InsideoutJeans) on the blog today with Gerda Steiner Design’s stamp set named, Easter Bunnies. I thought they would be so nicely with ThermOWeb's card spring card fronts, called Blossom Buddies, since they had a spring and floral feel.


I stamped out two of the bunnies from this set, one using black ink and one with fadeout (no-line coloring) ink. The black stamped bunnies give a bolder look, while the fadeout ink gives a softer look. 


I picked out two different foils: Ocean Blue and Twinkling Pink. Using them along with each of the unique designs in the Blossom Buddies set, I thought I'd use one card front for two cards and end up with four total cards. 


For my first card, I decided to use the Twinkling Pink foiled card front and cut it diagonally down the middle. I used the bunnies stamped with the black ink since this background is a bit busier so I wanted the bunnies to really stand out. 


For the Ocean Blue foiled card front, I decided to cut two rectangles using some nesting dies. One card will have a thin frame with a bold rectangle in the middle whereas the second card would have a bold frame. I added the bunnies to the card and loved how they looked against the fun pattern. 


I used the "Happy Spring" sentiment for all my cards so these are cards that can be used through the season... the bunnies are so cute and they look so happy! 


Thanks for stopping by today and I hope you get inspired to create. Come back again soon for more inspiration and ideas! Happy Crafting! 


Friday, April 10, 2020

Easter cards for my nephews (Freebie image!!!) - Larissa


Hi everyone, I am Larissa from Car-d-elicious and today I am posting the easter cards that I have made for my little nephews Menno and Niek. These will also be posted on the blog from Gerda Steiner designs. I have made the cards with a freebie from Gerda Steiner designs. This image is Easter bunnies digital stamp from Gerda Steiner designs. I have coloured the image with my Polychromos pencils, the black glaze pen and a white gelpen. I have fussy cut the images.


With the Crea-nest-lies XXL 24 from Crealies I have die-cut a rectangle from white cardstock. On this rectangle I have made a background with the Mini cloud edges stencil from My favorite things and Peacock feathers Distress ink. I have glued the image with foamtape on the rectangle. I have die-cut the sentiment (Happy easter Niek/Menno) from black cardstock with the Smalt alfabet (D190603) from Gummiapan and glued it on the rectangle.


*********************************************************************************
STAMP: Easter bunnies digital stamp from Gerda Steiner designs
COLORING MEDIUM: Polychromos pencils, Distress ink
PAPER: White and black cs
INK: Peacock feathers Distress ink
DIES: Crea-nest-lies XXL 24 from Crealies, Smalt alfabet (D190603) from Gummiapan
ACCESSORIES: Black glaze pen, white gelpen, Clear Spectrum noir sparkle glitter pen, Mini cloud edges stencil from My favorite things


I am a participant in the Gerda Steiner designs Affiliate Programme. This means that if you click on one of my links and subsequently make a purchase, I will receive a small commission of store credit, at no extra cost to you.


Wednesday, April 1, 2020

Happy easter - Larissa


Hi everyone, I am Larissa from Car-d-elicious and today I am posting a new card on the blog from Gerda Steiner designs. This time I have made a card with a freebie image, that is perfect for easter!


This is Easter bunnies digital stamp from Gerda Steiner designs. I have coloured the image with my Polychromos pencils, the black glaze pen and a white gelpen and then I have fussy cut the image. I have die-cut a circle from white cardstock with the Crea-nest-lies XXL 49 from Crealies. With Peacock feathers Distress inkt I made a background for my image on the circle. I have glued the image on the circle. Then I have die-cut a scalloped circle from white cardstock with the Crea-nest-lies XXL 53 from Crealies and I glued the circle with the image on top of it. I have die-cut a square with the Crea-nest-lies XXL 50 from Crealies from purple patterned paper from the Classic gingham paper pack from Sunny studio and tied white seam binding around it. I glued the patterned paper on a white card and then I used foamtape to glue the circles on my card. On the grass of the image I have stamped a sentiment from the set PI I'm all ears (retired) from My favorite things. I have decorated the card with white hotfix gems.


*********************************************************************************
STAMP: Easter bunnies digital stamp from Gerda Steiner designs, PI I'm all ears (retired) from My favorite things
COLORING MEDIUM: Polychromos pencils
PAPER: White cs, Classic gingham paper pack from Sunny studio
INK: Peacock feathers Distress ink, Versafine clair nocturne
DIES: Crea-nest-lies XXL 49, 50 and 53 from Crealies
ACCESSORIES: Black glaze pen, white gelpen, Clear Spectrum noir sparkle glitter pen, white seam binding, white hotfix gems

I am a participant in the Gerda Steiner designs Affiliate Programme. This means that if you click on one of my links and subsequently make a purchase, I will receive a small commission of store credit, at no extra cost to you.

Wednesday, March 11, 2020

Happy easter - Larissa


Hi everyone, I am Larissa from Car-d-elicious and today I am posting a new card that I am also posting on the blog from Gerda Steiner designs.


I have made a card with the Easter bunnies digital stamp bundle from Gerda Steiner designs. I edited the image on the computer to add the eggs on the sign the bunny is holding. The eggs are also in the stampset. I have coloured the image with my Polychromos pencils, the black glaze pen and a white gelpen. I have fussy cut the image. With Peacock feathers Distress ink I have made a background on a white card. From white cardstock I have cut a grassborder with the Fresh cut grass die-namics (retired) from My favorite things and coloured it with Mowed lawn distress ink. I have stamped a sentiment from the set So much to say (retired) from Clearly besotted stamps a couple of times on the background with Wilted violet, Salty ocean, Mowed lawn, Mustard seed, Spiced marmelade and Candied apple Distress oxide ink. I decided to go for Distress oxide inks, because they stamp very well. I have glued the bunny and the grass border with foamtape on the card. 


*********************************************************************************
STAMP: Easter bunnies digital stamp bundle from Gerda Steiner designs, So much to say (retired) from Clearly besotted stamps
COLORING MEDIUM: Polychromos pencils, Distress inks
PAPER: White cs
INK: Peacock feathers and Mowed lawn Distress ink, Wilted violet, Salty ocean, Mowed lawn, Mustard seed, Spiced marmelade and Candied apple Distress oxide ink
DIES: Fresh cut grass die-namics (retired) from My favorite things
ACCESSORIES: Black glaze pen, White gelpen

I am a participant in the Gerda Steiner designs Affiliate Programme. This means that if you click on one of my links and subsequently make a purchase, I will receive a small commission of store credit, at no extra cost to you.

Wednesday, April 10, 2019

Easter bunnies on a Memory dex card - Larissa


Hi everyone, I am Larissa from Car-d-elicious and today today I am posting a new creation on the blog from Gerda Steiner designs. This time I made a card for my Memory dex.


Today I used a freebie digital stamp. This is the Easter bunnies digital stamp from Gerda Steiner designs. I have coloured the image with my Polychromos pencils and the black glaze pen and then I have fussy cut the image. I love this advantage of digital stamps, you are able to print the image in the perfect size so it can even fit on a tiny Memory dex card. I only had to use a black fineliner to add some more grass border.
I have die-cut my Memory dex card with the Stencils SL120 from Studio light. I have die-cut the second layer from purple design paper from the Classic gingham paperpad from Sunny studio. I have die-cut the upper layer from white cardstock and then I have coloured it with Tumbled glass, Broken china en Faded jeans distress ink. I have die-cut a little sun and a couple of clouds from white cardstock with the Craftables CR1459 from Marianne design. I coloured the sun with Wild honey and Spiced marmelade distress ink and then I glued them all on the sky. I have glued the image with foamtape on the Memory dex card. 


*********************************************************************************
STAMP: Easter bunnies digital stamp from Gerda Steiner designs
COLORING MEDIUM: Polychromos pencils, Distress ink
PAPER: White cs, Classic gingham paperpad from Sunny studio
INK: Tumbled glass, Broken china, Faded jeans, Wild honey and Spiced marmelade distress ink
DIES: Stencils SL120 from Studio light, Craftables CR1459 from Marianne design
ACCESSORIES: Black glaze pen, black fineliner

Friday, March 22, 2019

Wishing You a Very Happy Easter

Happy Friday! It's finally Spring!! Easter will be here soon and I just love this bunny from the new Easter Bunnies stamp set.

First, I created a background for the bunny by die-cutting a large egg and inking a few clouds and grass with Distress Inks.

For a little extra interest, I adhered the egg to a piece of white cardstock slightly overlapping the edge and then die-cut using a stitched rectangle die.

I stamped and masked 2 eggs and the bunny from the stamp set in a light gray ink and colored them with Copics. Since I used the no-line coloring technique, I was able to easily cover the crack line in one of the eggs by coloring stripes over it.


I fussy cut around the images, but there are coordinating dies to this set available as well.

To finish, I stamped the sentiment from the set in Versamark ink, heat embossed with black embossing powder and added some grass and shadows to the scene with Copics.

Hope you have a great weekend and see you again soon!

Wednesday, March 20, 2019

Happy easter - Larissa


Hi everyone, I am Larissa from Car-d-elicious and today I am posting a new card on the blog from Gerda Steiner designs.


This time I made a card with the stampset Easter bunnies from Gerda Steiner designs. I have coloured the bunny with my Polychromos pencils, the black glaze pen and a white gelpen. I also stamped a couple of eggs and coloured those also with my pencils. I have fussy cut all the images. With the Crea-nest-lies XXL 34 from Crealies I have die-cut a square from white linen cardstock and I made a background on it with the Mini cloud edges stencil from My favorite things and Tumbled glass distress ink. I have die-cut 2 grass hills with the Grassy hills die-namics from My favorite things and I coloured them with Mowed lawn distress ink. I have die-cut a tree from white cardstock with a Tree die from Action and I coloured it with Vintage photo distress ink. I have die-cut a couple of leaves with the Leaves mix 115633/ 0238 from Craft emotions and those are coloured with Mowed lawn and Pine needles Distress ink. I have glued the leaves on the card with some foamtape. Then I glued the bunny and all the eggs on the card with foamtape. I have stamped a sentiment from the set Easter bunnies from Gerda Steiner designs on the card.


*********************************************************************************
STAMP: Easter bunnies from Gerda Steiner designs
COLORING MEDIUM: Polychromos pencils, Distress inks
PAPER: White cs
INK: Versafine onyx black, Mowed lawn, Pine needles, Tumbled glass and Vintage photo distress ink
DIES: Crea-nest-lies XXL 34 from Crealies, Tree die from Action, Leaves mix 115633/ 0238 from Craft emotions, Grassy hills from My favorite things
ACCESSORIES: Black glaze pen, White gelpen, Mini cloud edges stencil from My favorite things

Saturday, March 16, 2019

Easter Bunnies

Hi everyone! It’s Jeannie (InsideoutJeans) on the blog today to share a card I created using Gerda Steiner Designs' new stamp set, Easter Bunnies. It's such a perfect spring set! Right now, it definitely still feels like winter so I can't wait for spring to come! 

The chick peeking out from the hatched egg is so adorable. I had to use it but I also wanted to incorporate at least one of the bunnies in it, so the one holding an egg was perfect! This set also has a couple of eggs, and I remembered that last year there was another set with eggs, Peeking Easter Friends. I had the idea to build a mountain of eggs with the little chick right on top. 


I stamped and masked everything out so I could use distress inks to color up the background. I picked light, pastel colors and inked up the bottom right hand side of the card. I wanted to leave white space on the top left for the sentiment. 


Isn't this the cutest card? It's so perfect for spring! I hope you enjoyed this card and got some inspiration from it. I'll be back soon to share another card! 

Thanks for stopping by! 

Saturday, March 9, 2019

Bring On the Easter Bunnies!!


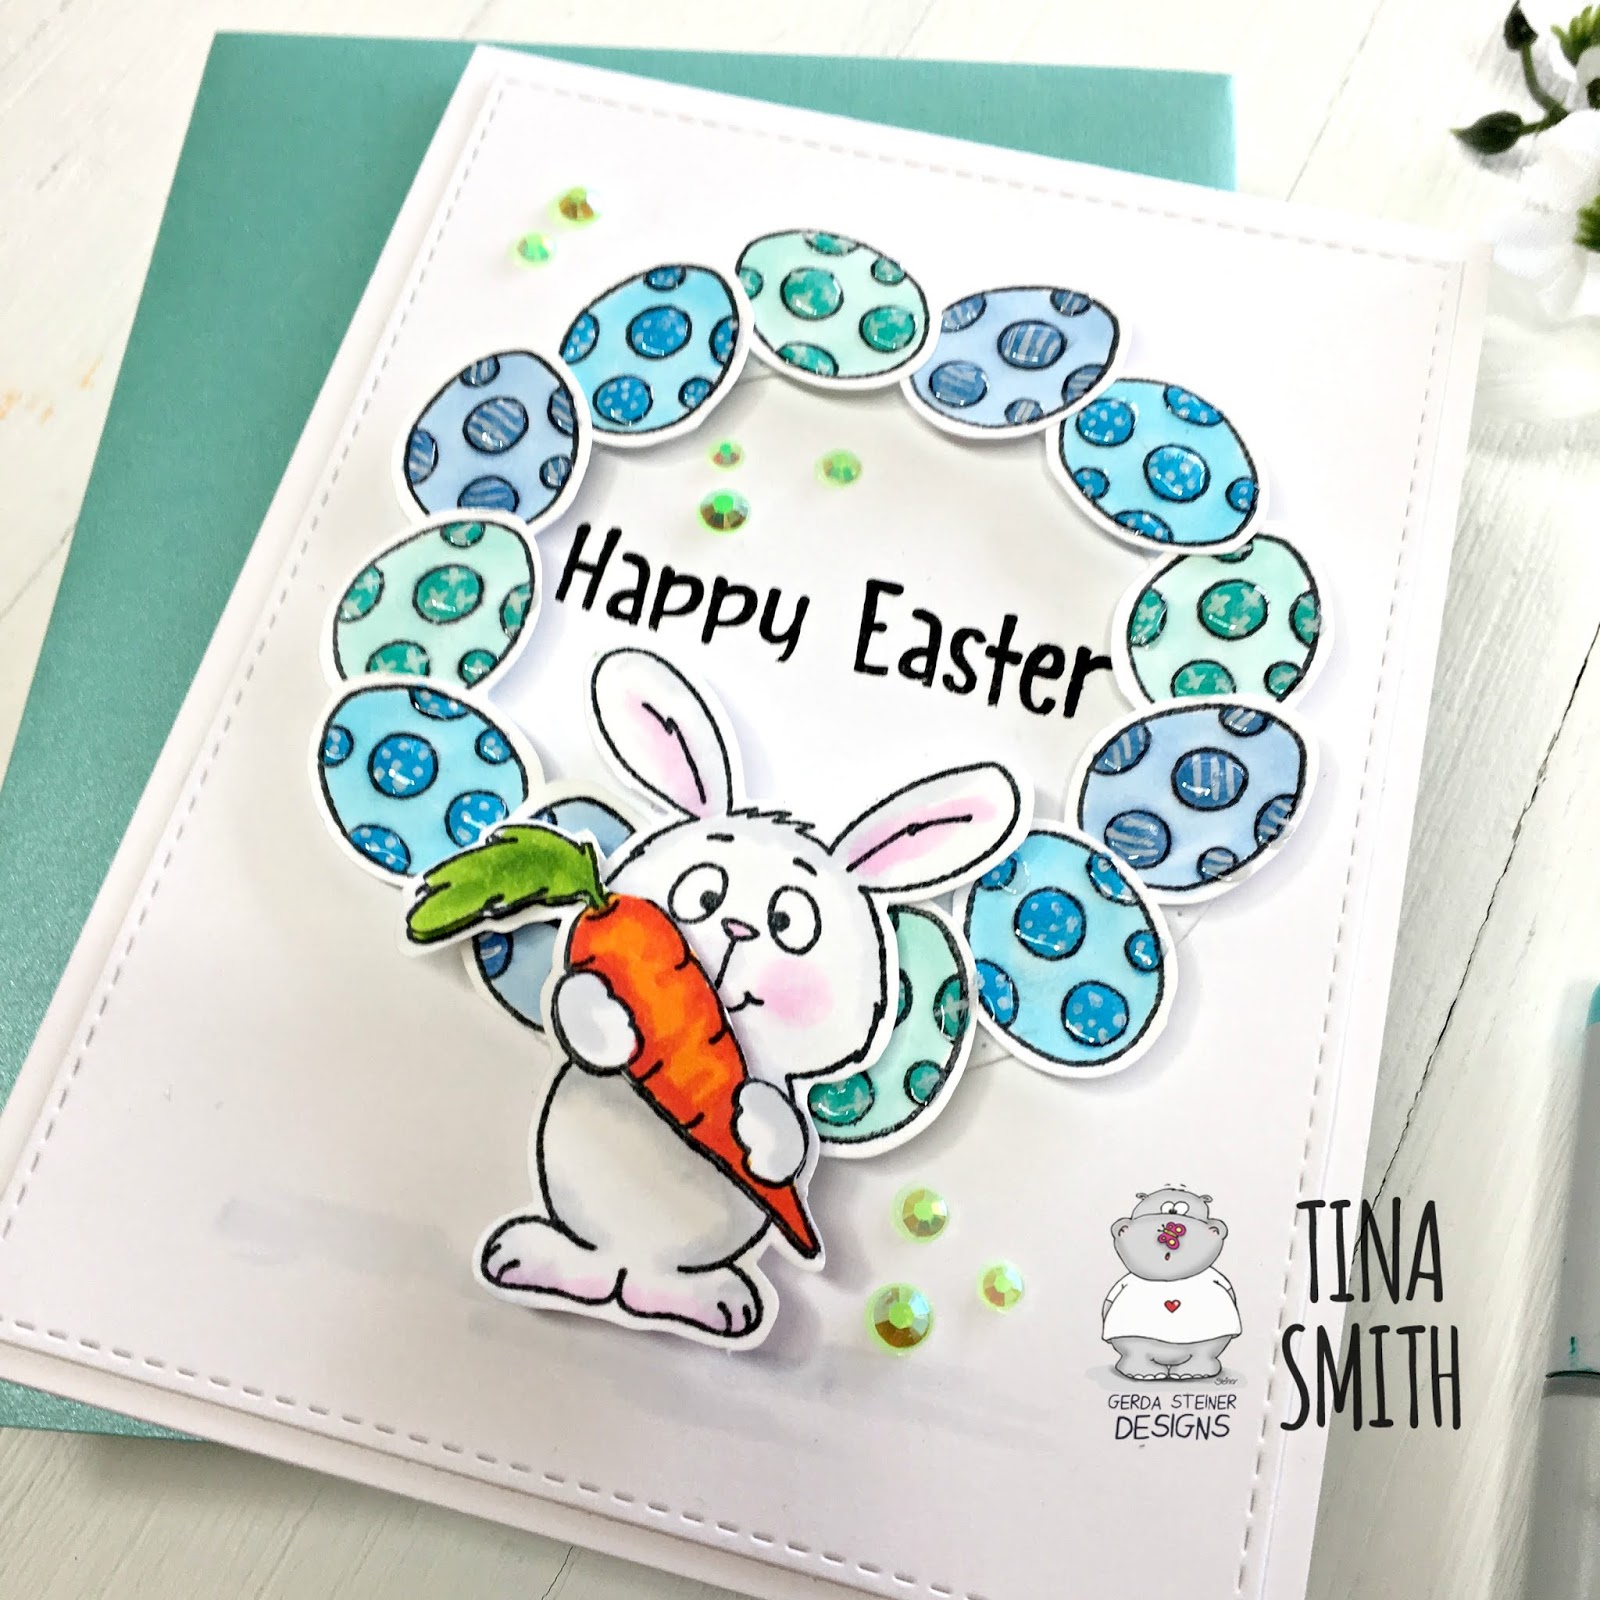
Hello and Happy Saturday Crafty Friends!  Tina here from Cards and Coffee Time.  Spring is in the Air and it's time to Bring on the Easter Bunnies!!  Today I am "EGG"cited to share with you a card made with the adorable Easter Bunnies stamp set.  I created an Easter Egg wreath in several shades of blue and added the sweet Easter Bunny holding the carrot.  I love the way the bunny stands out against the blue wreath background:)  I hope you do too!!


This weekend some of us have to change our clocks and lose an hour of our day, so sad!!  But on the bright side Spring is almost here, flowers are blooming, the grass is becoming greener, birds are singing, so happy Yay!!  You can check out the step by step tutorial on how I made this Easter card down below:)


 Thanks so much for stopping by!  Have a Lovely Day that makes you Smile!  Hugs, Tina


Tuesday, March 5, 2019

[VIDEO] Bright Hello Card feat Easter Bunnies with Laura

Bright Spring Card feat Gerda Steiner Designs Bunny Friends

Hi everyone! It's Laura here, with a bright and colorful card featuring the new Bunny Friends stamp set and a video tutorial showing how you can create it!
I started by stamping the bunnies with black yybrid ink on Neenah Solar White 110lb cardstock. I colored the images with Copic markers and fussy cut the with my EK Success Cutterbee scissors.

Bright Spring Card feat Gerda Steiner Designs Bunny Friends

I created the background on some yellow Bazzil cardstock. I die cut it with a stitched A2 rectangle  die and added some detail with Distress Oxide in Mustard Seed and a stencil.

Bright Spring Card feat Gerda Steiner Designs Bunny Friends


I then die cut some light blue Bazzil cardstock using the a tag die and added some shading to it with Distress Oxide in Salty Ocean and my Ranger Blending Brushes.
I created two grassy borders by combining that same tag die with some grassy border dies. I the shaded them with Distress Oxide in Mowed Lawn.

Bright Spring Card feat Gerda Steiner Designs Bunny Friends


Using a frame tag die, I die cut some pink cardstock. I ended up cutting it twice and layering the die cuts, in order to create some dimension.
For the sentiment I used some alphabet dies. I cut the word hello, once from pink cardstock and three times from white cardstock. I stacked all the die cuts together and glued the sentiment on my card.

Bright Spring Card feat Gerda Steiner Designs Bunny Friends


I mounted everything on a top-folding A2 card base and decorated the inside of the card. I stamped one of the bunnies in the Easter Bunnies stamp set by Gerda Steiner Design with Memento ink in London fog. I also stamped the sentiment thank you for being you from the Bunny Friends stamp set with the same London Fog ink.
I finished off the front of the card by adding some Nuvo Drops in Dandelion Yellow, Carnation Pink and Caribbean Ocean and a little bow that I tied from some gray and white twine.

As I mentioned at the beginning of this post, I uploaded a video tutorial in which I show how to make this fun and bright spring card. Make sure to watch it, as I am also sharing some tips on how to glue your die cut sentiment so that they are straight and centered.


And that's it for today! I really hope you enjoyed the post and the video and I hope I inspired you to create with the Gerda Steiner Designs Bunny Friends stamp set!

Thank you all so much for stopping by and have a great day!

Thursday, February 28, 2019

Easter Bunnies Card using our FREE Digi Stamp!

Howdy everyone!  I'm Allison Cope and welcome to the last day of February! 

Today we're going to be doing some watercoloring with our adorable FREE digital stamp, Easter Bunnies today.  We are going to working with ZIG Clean Color Real Brush Markers on Strathmore's Bristol Smooth Surface Watercolor Paper.

So grab a cup of your favorite beverage and join me at my desk...

https://www.youtube.com/watch?v=rgkJ-Nij2Wo&feature=youtu.be

Once again, here is our fun Easter Bunnies card...


To download our FREE "Easter Bunnies" digital stamp, click HERE.

To check out all the fun digital images from Gerda Steiner Designs, visit HERE.  We always something new popping up in the shop!

I hope you too will give watercolouring and digital images a try!  See you again soon!

~ Ally ~