Showing posts with label Laura Volpes. Show all posts

Friday, April 5, 2019

[VIDEO] Masked Scene with Laura

Masked Scene feat Gerda Steiner Designs Chicken Scratch

Hi everyone! It's Laura here and today I am back with a fun masked scene I created with the Gerda Steiner Designs Chicken Scratch stamp set and a video tutorial showing how to make it!

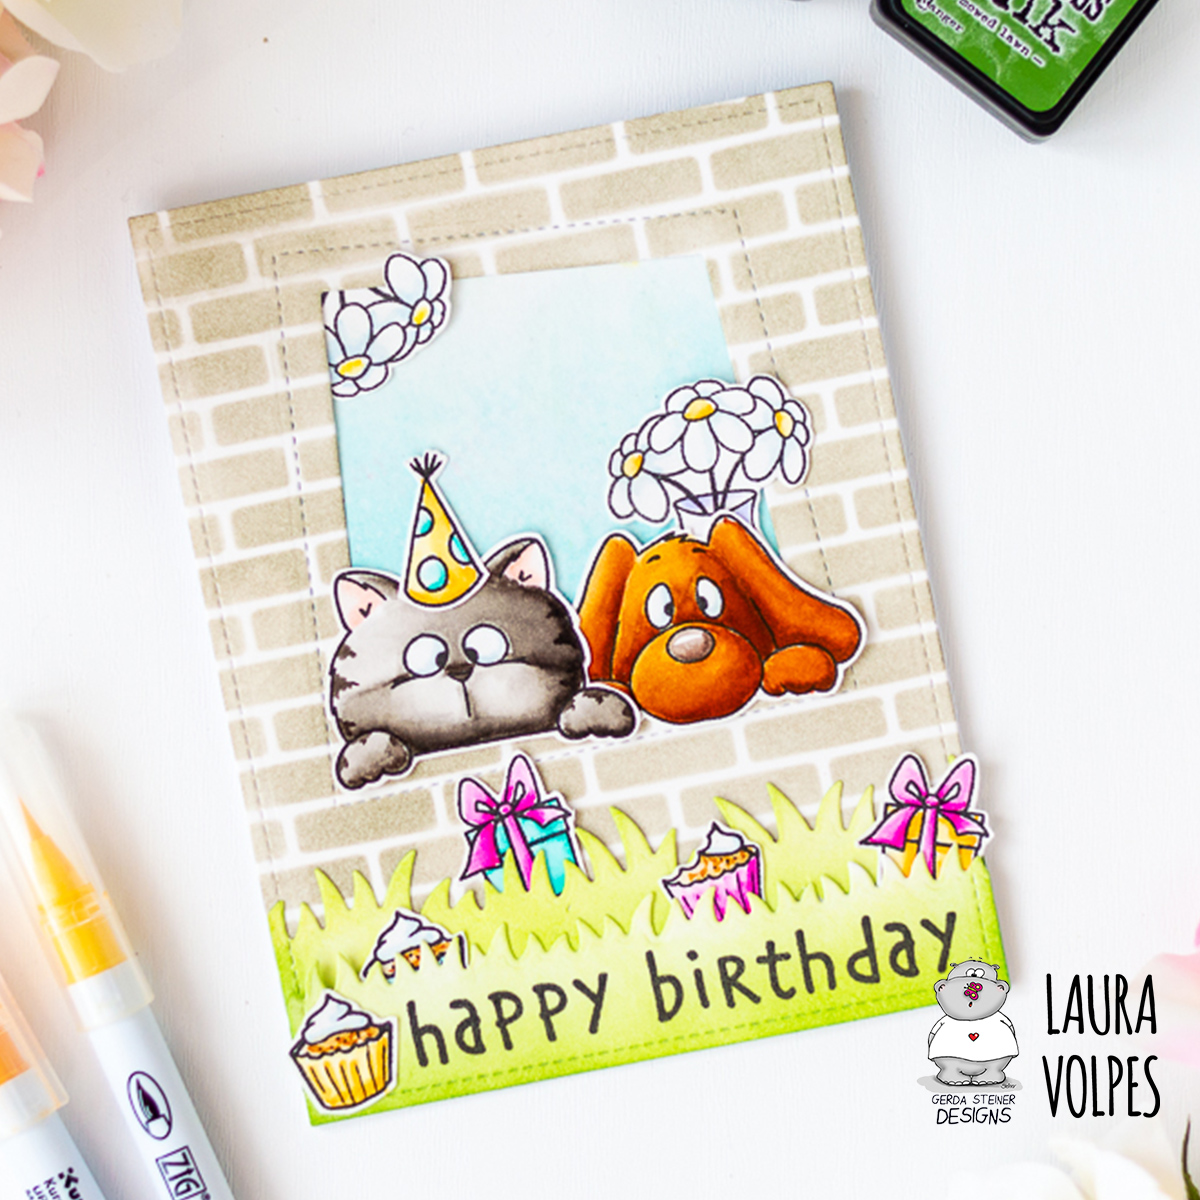
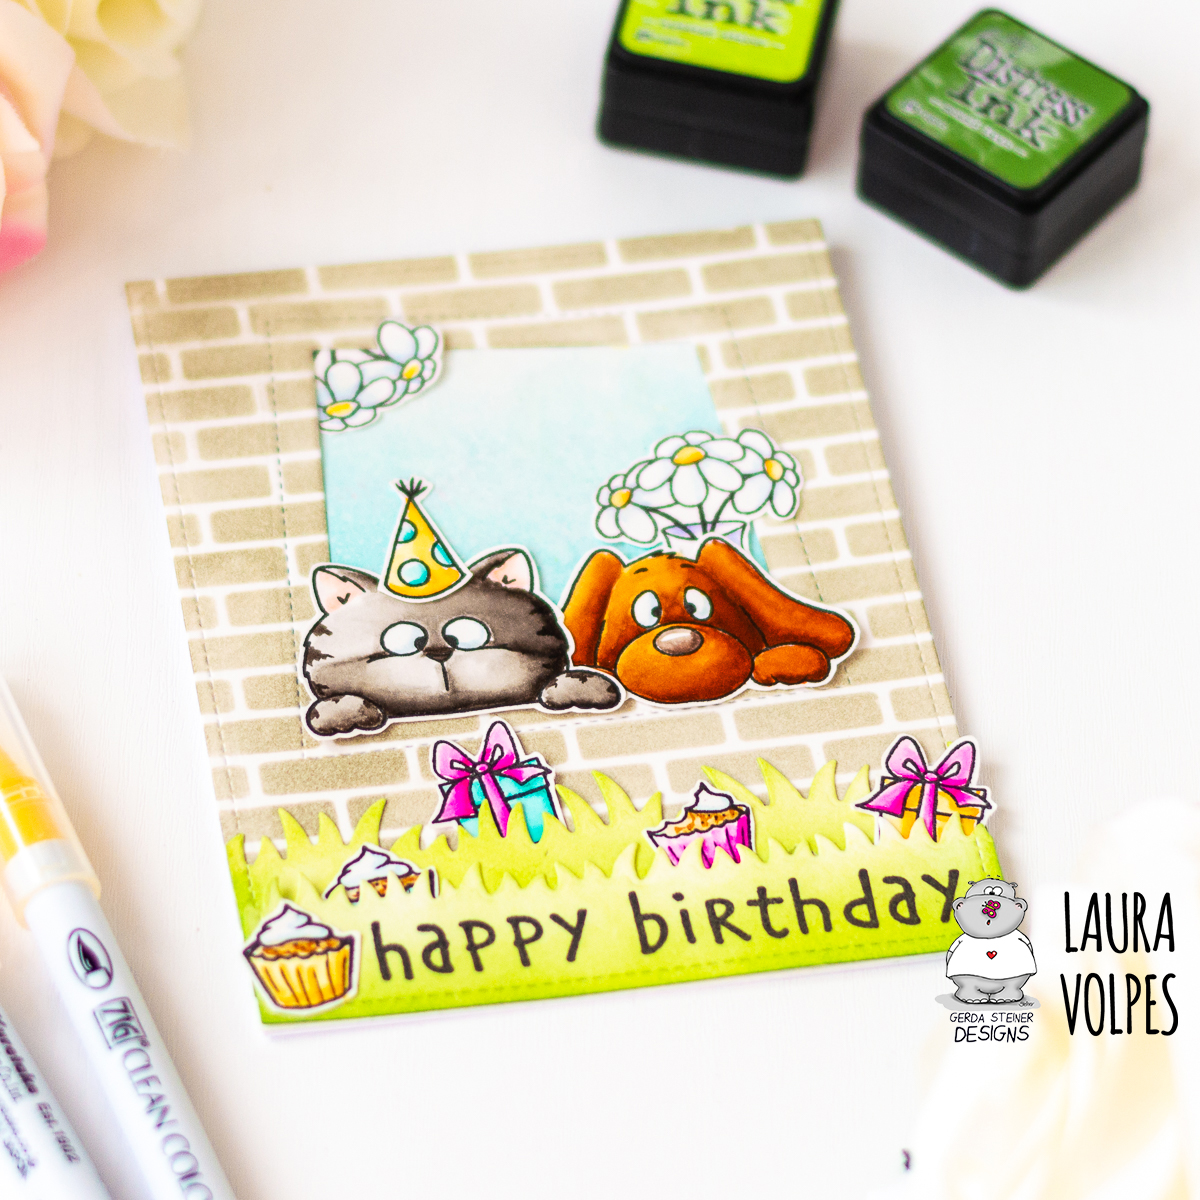
I created my scene on some Neenah Solar White 110lb carstock that I die cut with the a stitched rectangle die. For the masks I used some removable packaging labels and to stamp the images I used my Mini MISTI and hybrid black ink.

Masked Scene feat Gerda Steiner Designs Chicken Scratch

After I was done stamping, and with the masks still in position, I did some ink blending with Distress Oxides and the Ranger Blending Brushes. I used Crushed Olive and Peeled Paint for the grass and Broken China and Tumbled Glass for the sky. I added some water droplets for an extra detail on the background.

Masked Scene feat Gerda Steiner Designs Chicken Scratch

To color the images I used Spectrum Noir alcohol markers. You can watch the coloring process, including a list of the markers I used, in the video tutorial at the end of this post.

Masked Scene feat Gerda Steiner Designs Chicken Scratch

I created a background for my scene using a 4.25x5.5" stitched rectangle die and some woodgrain patterned paper. I adhered everything to a top folding A2 card base and moved on to the finishing touches.

Masked Scene feat Gerda Steiner Designs Chicken Scratch

I added some details to the images with Glossy Accents and some enamel dots with Nuvo Drops in Simply White.
And that's my card for today! As I mentioned, I filmed a video tutorial for you, showing you how to create this cute masked scene with the Gerda Steiner Designs Chicken Scratch Stamp Set. You can watch it down below or directly on my YouTube channel. 


Thank you all so much for stopping by and have a great day! 

Laura


When possible, affiliated links are used at no additional cost to you. This means that if you make a purchase through one of these links, I will get a small commission at no additional cost to you. The money I earn this way goes towards running this blog and my YouTube channel. Thank you for supporting my creative journey! 💖


Tuesday, March 5, 2019

[VIDEO] Bright Hello Card feat Easter Bunnies with Laura

Bright Spring Card feat Gerda Steiner Designs Bunny Friends

Hi everyone! It's Laura here, with a bright and colorful card featuring the new Bunny Friends stamp set and a video tutorial showing how you can create it!
I started by stamping the bunnies with black yybrid ink on Neenah Solar White 110lb cardstock. I colored the images with Copic markers and fussy cut the with my EK Success Cutterbee scissors.

Bright Spring Card feat Gerda Steiner Designs Bunny Friends

I created the background on some yellow Bazzil cardstock. I die cut it with a stitched A2 rectangle  die and added some detail with Distress Oxide in Mustard Seed and a stencil.

Bright Spring Card feat Gerda Steiner Designs Bunny Friends


I then die cut some light blue Bazzil cardstock using the a tag die and added some shading to it with Distress Oxide in Salty Ocean and my Ranger Blending Brushes.
I created two grassy borders by combining that same tag die with some grassy border dies. I the shaded them with Distress Oxide in Mowed Lawn.

Bright Spring Card feat Gerda Steiner Designs Bunny Friends


Using a frame tag die, I die cut some pink cardstock. I ended up cutting it twice and layering the die cuts, in order to create some dimension.
For the sentiment I used some alphabet dies. I cut the word hello, once from pink cardstock and three times from white cardstock. I stacked all the die cuts together and glued the sentiment on my card.

Bright Spring Card feat Gerda Steiner Designs Bunny Friends


I mounted everything on a top-folding A2 card base and decorated the inside of the card. I stamped one of the bunnies in the Easter Bunnies stamp set by Gerda Steiner Design with Memento ink in London fog. I also stamped the sentiment thank you for being you from the Bunny Friends stamp set with the same London Fog ink.
I finished off the front of the card by adding some Nuvo Drops in Dandelion Yellow, Carnation Pink and Caribbean Ocean and a little bow that I tied from some gray and white twine.

As I mentioned at the beginning of this post, I uploaded a video tutorial in which I show how to make this fun and bright spring card. Make sure to watch it, as I am also sharing some tips on how to glue your die cut sentiment so that they are straight and centered.


And that's it for today! I really hope you enjoyed the post and the video and I hope I inspired you to create with the Gerda Steiner Designs Bunny Friends stamp set!

Thank you all so much for stopping by and have a great day!

Thursday, February 14, 2019

[VIDEO] Birthday Window Card with Laura

Window Birthday Card feat Gerda Steiner Designs On the Table

Hi everyone! It's Laura here, and today I am back with a window birthday card I created with the Gerda Steiner Designs On the Table stamp set. At the end of this post you can also find a video tutorial showing how you can make it too!

As a first step I stamped my images with Scrapbook.com Premium Hybrid Ink on Strathmore Bristol Smooth Cardstock. I then colored them with Zig Clean Color Real Brush Markers and fussy cut them with my scissors. Coordinating dies are also available, if you are interested. 

Window Birthday Card feat Gerda Steiner Designs On the Table

For my card base I die cut some more Bristol Smooth Cardstock by Strathmore using the an A2 stitched rectangle die. I then die cut an opening in the panel, which will be the window where the critters will peek through. I blended Distress Ink in Pumice Stone through the a stencil to create a brick wall effect.

Window Birthday Card feat Gerda Steiner Designs On the Table

I die cut two grassy borders and blended Distress Inks in Mowed Lawn and Twisted Citron to add color and dimension to the them.

Window Birthday Card feat Gerda Steiner Designs On the Table

I stamped the Happy Birthday sentiment from the On the Table stamp set on the grassy border that was going to be in the foreground, using Scrapbook.com Premium Hybrid Black Ink.
For the window background I blended Distress Inks in Peacock Feathers and Tumbled Glass on a piece of Bristol Smooth cardstock. I added some interest to the panel by spritzing it with water from a Distress Sprayer.

Window Birthday Card feat Gerda Steiner Designs On the Table

I glued all the elements on my scene and mounted everything on a top-folding A2 card base. 

If you want to see the cardmaking process in more detail, you can watch the video tutorial below.


And that's it for today! I really hope you guys enjoyed this post and I hope I inspired you to create with the adorable Gerda Steiner Designs On the Table stamp set! Thank you all so much for stopping by and have a great day! 

Friday, January 11, 2019

Valentine's Day Card feat Lovely Pandas with Laura

Prismacolor and Distress Oxides on Toned Gray Paper - Valentine's Day Card


Hi everyone! Today I am back with a post and a video tutorial in which I will be sharing how to create a Valentine's Day card with the Gerda Steiner Designs Lovely Pandas stamp set.
For this card I used Prismacolor Pencils and Distress Oxides on Strathmore Toned Gray paper. This is a favorite combination of mine, I think it produces a very interesting and soft look. I also created my own DIY colored texure paste, more on that later.

Prismacolor and Distress Oxides on Toned Gray Paper - Valentine's Day Card


To start off the card I stamped some of the images in the Gerda Steiner Designs Lovely Pandas stamp set. I used Memento Tuxedo Black Ink and my Mini MISTI, and then moved on to the coloring. As mentioned, I used my Prismacolor pencils today. In the video tutorial down below you will see the full coloring process and here is the list of pencils I used.


Once I was done coloring my images I fussy cut them with my EK Success Cutterbee Scissors - super sharp and really precise, they really make fussy cutting a much smoother process. Coordinating dies for the Lovely Pandas stamp set are also available on the Gerda Steiner store.

I then moved on to my background. I die cut some Toned Grey paper by Strathmore with the Large Pierced Scallops Elle-Ments Die. I used the large and the small scalloped rectangles in the set and die cut to panels.

Prismacolor and Distress Oxides on Toned Gray Paper - Valentine's Day Card


For the larger one I proceeded as follows. I started by creating my own colored texture paste by mixing Distress Oxide in Festive Berries. I then used a spatula and created a pattern on my panel by applying the texture paste through the C.C. Designs Mini Heart Stencil. I set the panel aside to dry and started working on the smaller one. I used my Ranger Blending Brushes to blend some Distress Oxide in Festive Berries on the edges of the panel.

For the base panel I die cut some more Toned Gray paper with the Studio Katia Darling Ribbon and Frames. I blended Distress Oxide in Black Soot on the edges of this panel, and I also added some shading to the panel with the stenciled hearts.

Prismacolor and Distress Oxides on Toned Gray Paper - Valentine's Day Card


For my sentiment I did some heat embossing with white embossing powder on Toned Gray cardstock. I die cut a strip around it with the Heffy Doodle Strips of Ease and shaded it with Distress Oxide in Black Soot. I assembled everything on a top folding A2 card base, raising the smaller scalloped rectangle over some foam tape.

I decorated the inside of the card by stamping one more image and one more sentiment from the Lovely Pandas stamp set and that finished off my card.

Prismacolor and Distress Oxides on Toned Gray Paper - Valentine's Day Card


As I mentioned at the beginning of this post, I also created a video tutorial showing how to make this sweet Valentine's day card. If you do like the video I would love for you to let me know by leaving a comment and giving it a thumbs up! And if you'd like to see more inspiration from me, you can subscribe to my channel! Thanks for your support!


And that's it for today! I really hope you guys enjoyed this post and liked the video, and I hope I inspired you to create with the Gerda Steiner Designs Lovely Pandas! Thank you all so much for stopping by, and have a great day! 


Friday, December 14, 2018

VIDEO - Winter Shaker Card with Laura

Winter Shaker Card feat Gerda Steiner Designs

Hi everyone! It's Laura here and today I am back with a post and a video in which I will show you how to create a snow globe shaker card. I chose the sentiment so that this could be a card good for any occasion, but you can easily switch that and turn this into a winter birthday card, for example.

The stamp set I used today is the Gerda Steiner Designs Snowman Friends stamp set.
I stamped the images on Neenah Solar White 110lb cardstock with Scrapbook.com Premium Hybrid Black ink and I colored them with my Spectrum Noir markers. There are also coordinating dies available for this set, and I will link them down below in case you are interested. I don't have them, though, so I cut the images with my EK success Cutterbee scissors.
Here is a color chart for you as a reference, in case you'd like to reproduce this card.


Winter Spectrum Noir Markers Color Combination

I then moved on to the shaker. I die cut some white cardstock with the Lawn Fawn Large Stitched Rectangle Stackables, and created an opening with the Lawn Fawn Ready Set Snow Shaker Add-on dies. Before die cutting the shaker window I adhered a strip of patterned paper from the Lawn Fawn Perfectly Plaid Winter paper pad.

Winter Shaker Card feat Gerda Steiner Designs 3

I then used more dies from the dies in Ready Set Snow Shaker Add-on set and patterned papers by Lawn Fawn to create the snow globe. For the base of the snow globe I used papers from the Knock on Wood paper pad, and for the sky I used the Beachside paper pad. All the other elements are die cut from white cardstock.
To add interest to the snow hill, I added some shading with a Ranger Blending Brush. I took the brush that I normally used for my blue Distress Oxides and used whatever ink was left on the bristles to shade the bottom of the hill.

Winter Shaker Card feat Gerda Steiner Designs 2

For the inside of the shaker I used some Faux Snow and some Studio Katia Chunky Glitter, and I really love the look! Finally, for the sentiment I die cut the word hello from the MFT Hello There Die-Namics out of white cardstock and I glued it to the top left of my card front.

Winter Shaker Card feat Gerda Steiner Designs 3


I also decorated the inside of my card with one more snowman from the Gerda Steiner Designs Snowman Friends and with a sentiment from the Foxes stamp set, which I stamped with Memento Ink in London Fog.
I also created a video showing you how to create this easy winter shaker card, you can watch it down below!
And if you like it, don't forget to subscribe to my channel for more inspiration!


And that's it for today! I really hope you enjoyed the post and the video, and I hope I inspired you to create with the Gerda Steiner Designs Snowman Friends Stamp Set.

Thank you all so much for stopping by, and have a great day!

Laura

Sunday, September 30, 2018

[Video] Friendship Card with Laura


Hi everyone! It's Laura here, and today I am here on the Gerda Steiner Designs blog with a card and a video I created with the Gerda Steiner Designs Foxes stamp set. This set was released during the summer and is full of cute images! You can get it from the Gerda Steiner Designs shop, where you will find also the coordinating dies.

For my card today I used one of the foxes and the owl in the set, and created a clean and simple card. If you follow me on Instagram, you might have seen me color the fox during a live, a few weeks ago. For both the fox and the owl I used My Favorite Things Black Licorice Hybrid Ink for stamping and Spectrum Noir markers for the coloring.


For the sky I did some ink blending with Distress Inks. I started by blending Seedless Preserves, Chipped Sapphire and Black soot on some Bristol Smooth Cardstock. I then went over the blue and purple areas with Salty Ocean and Wilted Violet to brighten them up a bit. I then used gold, copper and silver Gansai Tambi watercolors to add some stars to my sky.


For the front panel I die cut some cardstock using the Studio Katia Darling Ribbon and Frames dies and the Birthday Balloons dies. I stamped the sentiment using again My Favorite Things Black Licorice Hybrid Ink and I started assembling my scene. Before gluing down the fox, I created a little patch of grass using my Spectrum Noir markers, so that the fox would have something to stand on.


As a final embellishment I used the Studio Katia Gold Foil Confetti on the top right and bottom left of my card front, and then mounted everything on a top-folding A2 card base.

I also created a video for this card, you can watch it down below.


And that's it for today! I really hope you guys liked this card and enjoyed the video! Thank you all so much for stopping by, and have a great day!

Laura