Showing posts with label Gerda Steiner Designs LLC. Show all posts

Thursday, October 3, 2024

Beary, Merry Christmas


 Hi everyone!  I'm excited to share another card using the new Gerda Steiner Designs set, Beary Merry Christmas.   This set combines some of my favorite things... reindeer and bears!

When it come to making cards, sometimes I have the whole card planned out and sometimes I stamp a bunch of images, spend time coloring the images, then design and create later.  That is what happened with this "reindeer bear". 

I stamped this bear on Tim Holtz watercolor paper, then colored him with Derwent Inktense pencils and a water brush.  I used the scalloped edges die from Unity Stamp Co to cut the black cardstock, then us an oval die to cut out the center.  

I glued these two layers to a white A2 card base, letting dry under a heavy book (always a good idea when working with watercolor paper and lots of water).  The card felt like it was missing something at this point so I used a Sakura white gel pen to trace a straight edge and free form some squiggly lines around the edges to complete the card.

This card was so much fun to make, I can't wait to see what you make with this set.  Thanks for reading!


Tuesday, October 1, 2024

Oh Christmas tree, oh Christmas tree…


Happy release day everyone! I'm excited to share this Christmas card today using the new Gerda Steiner Designs set, Caroling Woodland Animals.   It's hard to believe Christmas is around the corner, but this set is getting me excited about making Christmas cards.

To create this card I broke it down into two smaller projects: the large tree background and the adorable caroling forest critters.

I wanted to create a larger tree as a background for the forest critters.  To do this I used a Misti and Tim Holtz distress watercolor pencils (using the direct to stamp method) to stamp portions of the Christmas tree from the Caroling Woodlands Animals set.  The direct to stamp method involves dipping the pencil in water for a few seconds then coloring directly on a small section of the stamp (larger sections will dry too quick) and stamping immediately.  After stamping I used a water brush to soften or move some of the color around.  I started by "stamping" the whole tree on the top, then moving the stamp and repeating with just parts of the tree to create one big tree.  In the end, I had three rows of the Christmas tree to create this 5x8 inch card.


For the caroling animals, I stamped these on Tim Holtz watercolor paper and colored using Derwent Inktense pencils and water brush.  Once these dried, I used the circle dies from Gina K Designs master layouts 3 and 7 to cut them out.  Finally, I glued all the layer to a 5x8 inch black card base, using a heavy book to keep the layers flat until dry (a necessity when using lots of water and watercolors).

I hope you enjoyed and found a little inspiration.  Thank you so much for reading and happy Christmas card making!


Saturday, May 25, 2024

Enjoy the ride


Hi Everyone!  Just passing by to share this card with the adorable new set "Enjoy the ride".

To create this card I used the masking technique to stamp the puppies and car on one sheet.  I started by stamping the puppies on a piece of watercolor paper (I used Tim Holtz distress watercolor paper).  Next I used some 'not too sticky' washi tape I had laying around to loosely cover up the puppies where I didn't want the lines from the car image to stamp.  Alternatively, you could stamp the puppies on some scrap paper, cut them out and lay the cutout over the stamped puppies.


Next I lined up where I wanted the car window to be with the puppy's paws and stamped this over the washi tape.  I carefully removed the washi tape (watch out for wet ink over the washi tape if using this as the mask) and then realized I covered up too much of the puppies and had to draw in part of the window (after all, it is a journey right?).


To color the puppies, I used Derwent Inktense and a water brush.  Once this dried, I used a Misti to position the top and bottom sentiments from the 'Enjoy the ride' set and stamped these.  


I used the scalloped rectangle from Unity Stamp Co to cut out the image and glued this to an A2 dark grey card base.  Lastly, I finished by gluing some sequins to the card.

Hopefully part of your journey includes creating some cute cards with these two puppies.  Enjoy the journey!


Thursday, April 4, 2024

Have a mice day


Hi everyone!

I'm thrilled to be back, sharing another card using the new release "In your corner".  I stamped the image from this set on a piece of watercolor paper and colored in using Derwent Inktense pencils and a water brush.  Once this dried, I used the smaller 'rectangle' from AALL & Create Splodazzlers to cut out the image. 

 I used the larger 'rectangle' from the same die set to cut a backing from black cardstock.  The set also comes with several dies in the shape of splotches, which I used to cut some pieces from black cardstock.  I attached the watercolor piece to the black background, attaching this whole piece to an A7 ivory card base.  Finally I stamped the sentiment from 'In your corner' in the lower right corner and glued the two circle cutouts in the upper left.

This was really an easy card to put together.  Thank you so much for reading and I hope you have a mice day!


Tuesday, April 2, 2024

So Grateful


Hi everyone!

Today I'm sharing a card using the newly released "Best Mom Best Dad" and one of my favorite sets "Grow Happiness".  I wanted a cleaner look for this card and also decided to stay with more neutral colors.

I started this card by choosing three of the plants from the "Grow Happiness" set and stamping them on Tim Holtz distress watercolor paper (this watercolor paper is closer to a bright white than some others I've used).  Next, I used Derwent Inktense pencils and a water brush to color the plants.  Hint, for plants and flowers it's more realistic to use several different colors or shades on the leaves.  In this case I pulled some browns in with a couple greens.  After coloring the pots, I added a neutral grey to the edges to add some dimension (this is the same grey I used for the shadows underneath and on some of the leaves, pulling everything together).  Once this dried, I used Gina K Designs master layout one to cut the image out and cut a black mat for the background.


I decided to keep this card on the generic side since I didn't know what I was going to use it for yet.  I used the row of hearts and 'so grateful for you' from "Best Mom Best Dad" in a Misti to stamp the sentiment below the plants.  When working with watercolor paper, it's best to use a Misti or similar stamping device since the rougher paper usually requires you to stamp several times for a better image.  After layering the two pieces together and attaching to a kraft card base, this card was finished for me for the moment.  Any of the other sentiments (listed below) in the "Best Mom Best Dad" set will work great stamped inside of the card once I know who it's for.
Happy Father's Day
Happy Mother's Day
Thank you for all you do
You are the best

So grateful to all of you for taking the time to read about this card, happy crafting!


Wednesday, March 27, 2024

In your corner


Hi everyone!

This little guy, from the new release 'In Your Corner', is too cute not to share.  The sentiment is also extra special.

I started this card by stamping the image from 'In Your Corner' on a piece of watercolor paper.  Then I used Derwent Inktense pencils, graphitint paints and a water brush to color in the image.  I used circle dies from Gina K Designs master layouts to cut out the mouse image and a piece of grey cardstock for the backing, attaching these to each other.


For the background, I used the two larger dies from AALL and Create's 'Frayed Frames' dies to cut a piece of white card stock (smaller piece) and black cardstock (bigger piece).  I attached these two to each other, then loosely laid the circle on the rectangle piece to estimate where the sentiment should go, stamping the sentiment using a Misti.

I used a blending brush and a dark grey ink to darken the edges of a grey A7 card base.  Next I attached the rectangle piece to the card base.  Finally I used foam squares to pop up the circle in the middle.

Thank you for reading and I hope you have someone in your corner!


Thursday, March 21, 2024

29 AGAIN?


Hello dear creative minds, 
here is Nicole again from Germany/ Hamburg.

I am happy to be able to contribute to the blog once again and have made a birthday card.

I used the "Cupcake Mice" stamp set.


We are all 29 in the head, aren't we? That's why the colorful card doesn't reveal the correct date of birth 😉

I stamped the cute mouse on a Perfect Coloring Paper and the same on a label paper (which I used for masking). Cut out the print on the label paper and stick it on the print as protection. Then you can start working with the stencil and the distress oxides. I applied the inks from light to dark.

On the 2nd picture you can see which Distress Oxide and which Stencil I used, but I'd like to note it again here:

DistessOxide: mustard seed, carved pumpkin, festive berries and dusty concord.
The stencil is available at Memories4you.


I colored with the markers from Ohuhu Art . The combinations are:
Mice: CG2, CG1104, CG5, CG1107
The hat and the cupcake: V160, V070, V160 and Y030, Y080 and Y3
The ears: R120 and R188


If you have any questions or other suggestions, please feel free to write to me on my Instagram profile   " Stempelfiziert"


And now it's time to celebrate and, of course, to continue crafting.

See you soon and best wishes

Nicole Kayaalp


Somebunny Special


Hi everybody!

Easter is coming up fast and I'm happy to share this adorable bunny today.  I started this card by stamping the bunny from the set 'Easter Bunnies' on watercolor paper.  Then I used Derwent Inktense pencils and a water brush to color in the image.  Once this was dry, I fussy cut the bunny out and used a black marker along the edges to cover any white areas.


For the background, I started with a generic birch tree stencil and laid it on a piece of watercolor paper.  Then I sprayed over the stencil with some Tim Holtz Distress Spray Stains in candy apple, dried marigold, squeezed lemonade, and uncharted mariner. 

 While this dried, I embossed a piece of white cardstock with an embossing folder to add a little texture.  Next, I used an egg shaped die to cut an egg from the center of the embossed piece and trimmed it down to be slightly smaller than an A2 card base.  Once the backing was dry, I moved the stain sprayed piece around until I like the colors that were showing in the 'egg window'.  I trimmed off the extra paper and attached this piece to the embossed white cardstock.  I had an extra 'strip' of stained watercolor paper that I stamped the sentiment from the set 'Hoppy Easter' and used a banner die to cut this out.  Last, I attached the sentiment and bunny to the backing with glue and taped the whole piece to a A2 white card base.

Thank you for reading and I hope you're inspired to make some colorful Easter eggs!


Thursday, March 14, 2024

Mammoth Adventures


Hi Everyone!  

I'm happy to share this mammoth adventure card featuring the recently released Gerda Steiner Design's stamp set, Big Guy.  Here in the Midwest we're getting some nicer weather days which makes for some great hiking.  The mammoth is the mascot for one of our trails so it just felt natural that he would take on some adventure.

I started the background for this card by stamping the Unity Stamp Company's Jolande's Ledger on white cardstock.  Then I tore off the edges to give an aged look.  After this I used a blending brush and brown ink called expresso to darken the edges, adding a little color and continuing with the aged theme.

For the mammoth, I stamped the image from Big Guy on watercolor paper and colored the image in with Derwent Inktense pencils and a water brush.  Once this was dry, I used the die from Big Guy to cut out the image.

Finally, I found a scrap piece of cardstock in light green.  I stamped this sentiment from Impression Obsession's Outdoor Adventures and cut the sentiment out using a die from Scallops and Banners by Unity Stamp Co.  To help this sentiment piece work well with the background, I used the blending brush and expresso ink to darken the edges.

The last step was to layer all of these pieces together, attaching to a Kraft card base.  

Thank you for reading.  I hope that you're able to get out for a few mammoth adventures of your own and enjoy some beautiful weather.


Thursday, March 7, 2024

Hoppy Easter


Hi Everyone!

I’m excited to get to share another card using the recently released “Hoppy Easter”.   I usually stamp on watercolor paper and color with Derwent Inktense pencils.  For this card, I used a similar idea, without the watercolor paper.

I started by stamping the basket of bunnies on medium grey card stock .  I used the Derwent Inktense pencils and a water brush to add a hint of color to the bunnies, eggs, and basket.  Besides the hint of color, I mostly used the pencils to add dimension to the image and kept the color concentrated towards the edges.  I also tried to keep the amount of water I used minimal since this was card stock and not watercolor paper.

Once this was dry, I went back over the areas I wanted to highlight with a white charcoal pencil.  Then I used a word stencil by Craftreat and a blended brush with grey ink to add a little interest to the background (carefully avoiding the area around the bunnies).

Finally, I cut this piece with a rectangle die from Unity Stamp Co and also cut a scalloped rectangle from darker grey card stock.  Lastly, I attached these two to a white card base.

I love how this turned out, reinforcing the idea that it’s always good to try new ideas.  Thank you for reading and I can’t wait to see what everyone creates with these adorable bunnies.


Thursday, February 29, 2024

Hoppy Easter


Hi Everyone!

I'm excited to have the opportunity to share a card today using the new release "Hoppy Easter".  These two bunnies are adorable and I'm loving the hint of spring in this card (especially since the weather’s all over the place in the midwest at the moment).

I wanted a lighter feel from this card and decided to back the bunnies with some branches.  To create these, I used a stamp from Pink Fresh  called "Artistic Foliage" in a Misti to stamp on watercolor paper.  To color the stamp, I used Tim Holtz watercolor pencils, dipped in water, and colored on small sections of the stamp at a time (so it wouldn't not dry out).  Then I stamped this and repeated until the entire image is completed.


I choice to use several different shades of greens and browns to get a more natural look.  After I was done stamping the whole image, I went over some of the lines with a water brush to blend out the edges a bit.  Once this was dry I used a die to cut these out, then cut the large branch into two pieces.


Originally, I had planned to use Derwent Inktense pencils to color the basket and bunnies, but after seeing how the branches turned out I decided to stick with the Tim Holtz watercolor pencils for everything.  I stamped the basket on watercolor paper and used a water brush directly to the pencil, picking up color, then to the paper.  To keep the color light, I did not use any direct pencil to the paper.

I finished this card by cutting a scalloped edged rectangle from white cardstock for a backing.  Then I cut the basket out with a scalloped circle die (using a rectangle die after this to create a corner).  I laid out the branches to determine where I wanted them to be, then glued them down (letting them sit under a book for a bit).  To finish up, I attached the circle piece with a couple of foam dots to lift it up.

Thank you so much for reading and hopefully you found a little bit of spring in this card.


Friday, February 16, 2024

Hello creative minds, 
Nicole here again from Hamburg/Germany.
I'm here to inspire you creatively once again using the "LOVELY PANDAS".


In a small illustrated instruction I leave you again my combination of the Ohuhu markers.

I ordered these little love letters especially for this stamp set because they are so perfect for a shaker card.


The picture frame punching template is from Whimsy Stamps and is always great for designing a shaker card.


I always set smaller accents with a white gel pen and a gray polychromo for the shading.


I hope the instructions are clear for you and you can implement it for yourself.

If not, you can always contact me on Instagram at Stempelfiziert


                                I wish you a nice creative weekend and hope to see you soon.

                                                        Yours Nicole aka Stempelfiziert


Wednesday, February 14, 2024

Stay cool


Hi everyone!

I'm here today to share a card using this cute little penguin from "Penguin with a Heart".  As I've been working on a few Valentine themed cards recently, I've been trying to use alternative color combinations or different sentiments to leave the options open on who to give these to.

I started this card by stamping the penguin on watercolor paper and coloring him in with Derwent Inktense pencils and a water brush (my favorite way to color).  I set him aside to dry, fussy cutting him out once he was dry.


For the background, I inked up and stamped a section of a background stamp from Unity Stamp Company called "Criss Cross Grunge".  Next I used a blending brush and saffron ink to add some color to the background.  I picked the saffron because it is a complementary color for the purple in the heart.  Before attaching to the card, I taped this piece to a black matt to help the colors pop a bit.

The penguin was attached with a couple of foam squares and a few gold gems were glued on next.  When it came to adding a sentiment, I knew I wanted something more non-traditional.  There were several sentiments that would have worked well from the "Pigeons" set, but I finally settled on "Stay Coo!".

Thank you for reading and I hope you found some inspiration to explore your color options!


Friday, February 9, 2024

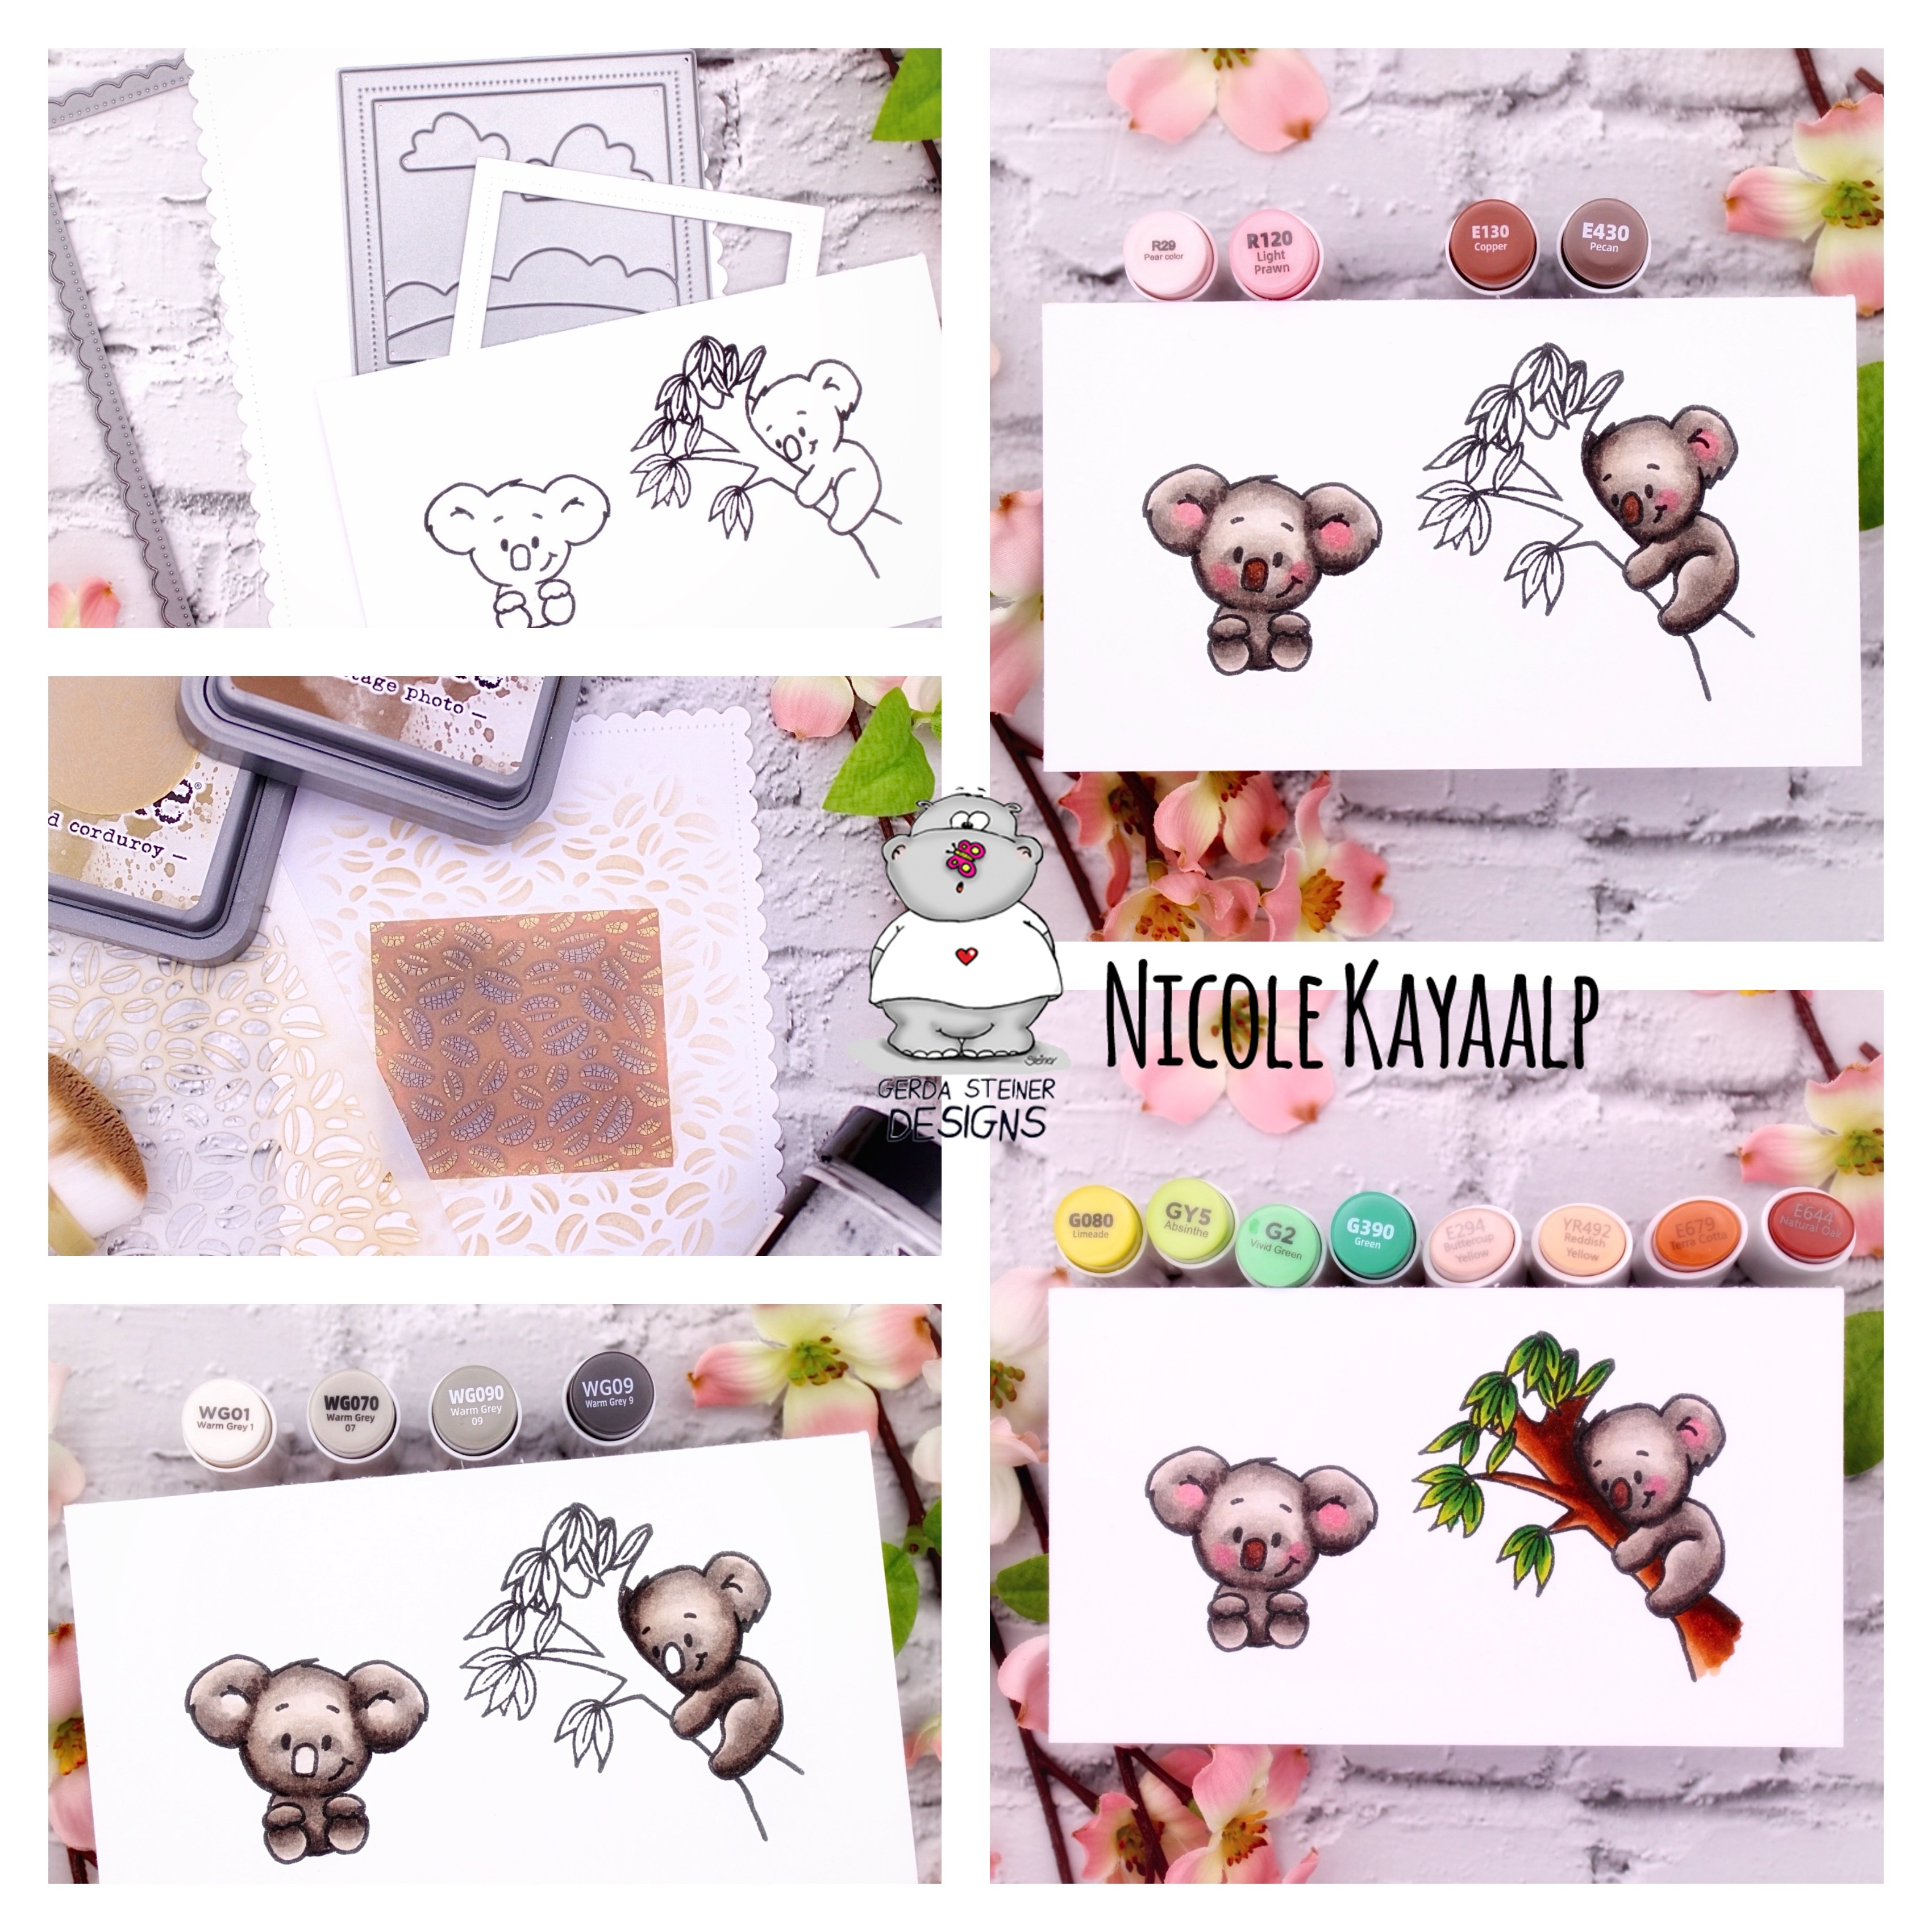
YOU ARE KOALAFIED...

Hello dear craft friends, 
Today I'd like to introduce you to another little inspiration with the YOU ARE KOALAFIED stamp set.


I have again included the materials I used in the illustrated instructions in the picture.

First I designed the background with the stencil from the M4Y and the DistressOxide Inks. As a special feature I used a texture paste that looks broken for the coffee beans.


Then I colored the koala and leave you my combination of markers from OHUHart in the picture.

I carefully applied the smaller shades again with a polychromo pencil.

I always use a white gel pen to accentuate the light spots.

The Polaroid punch is from AveryEll "Photo Mat"
The frame punch is from Create a Smile.


I particularly like coffee cards. I'm a coffee junkie and of course I like it with a piece of chocolate.

In contrast to my gaudy cards, this is a quieter version of my cards.


What is your favorite way to relax?


Have a nice creative time and I hope you enjoyed my post.
If you have any questions or suggestions, I'm always here for you.

Creative greetings
Nicole alias Stempelfiziert


Wednesday, February 7, 2024

Monster love


Hi everyone! 
 I'm here today to share a little Valentine's day inspiration.  Or maybe just a card to share a little love.

For today's card, I started by stamping this cute monster from "Be Mine Monster" on watercolor paper.  Then I used my favorite coloring medium, Derwent Inktense pencils, and a water brush to color in the image.  These pencils are a bit tricky to get used to but the colors are amazing (kind of like bold watercolors).  Inktense pencils are ink based, permanent color.  You must work quickly with these, or you'll end with spots that won't blend in.  For this monster, I colored along the edges of the monster and heart (dry coloring).  Then I used the water brush to wet the center of the heart and monster where there was no color, moving towards the outer, colored edge.  Once the colored edge was wet, I was able to move the color slightly back towards the center, leaving a darker edge and a lighter center.  After the monster dried, I cut the image using a stitched, rectangle die.

I cut a scalloped edge matt, tag and tiny heart from the same dark grey cardstock.  I darkened the edges around the tag and heart for a little depth.  I've found glue and a heavy book to work nicely to flatten watercolor paper when the paper gets a bit "wrinkled" from all the water usage.  Once dry, I added a couple silver gems just to add a little shine.  I choice not to add a sentiment to this card, making it usable for Valentine's Day or just because.

I hope you feel some inspiration with this monster.  Thank you for reading and have fun spreading the love.


Friday, February 2, 2024

YOU ARE STRONGER ...

Hello dear crafting community, today I am allowed to be creative again and today I am tearing out trees with the stamp set BIG GUY.


I leave you again a small instruction in the pictures, where you can see that I have wiped the background with stencil and previously stamped and masked the mammoth.

Then remove the masking and color the GUY.


I thought if he's already strong, then he can also pull a fir tree out of the ground 😉

Because if you have to, you are strong and can change the world. This buddy definitely has what it takes.


I hope you like the little card and that I can inspire you a little.

Thank you for reading 💓

Creative greetings

Nicole alias Stempelfiziert