Tuesday, March 29, 2022

Have an Egg-Stra Special Day

Hi there,

it's Tanja here and I created this clean and simple Easter Card inspired by the wonderful and brave Yana Smakula and I used the grass border from the Gerda Steiner Designs Nerdy Easter Bunny stamp set:


Have a wonderful Easter Time.

Hugs,


Friday, March 25, 2022

Easter Kitten :-)

Hi my dears,

Today it's my turn, and I want to inspire you with my Easter card. I have cats, so I fell in love with the new "Easter Kitten 3*4 Clear Stamp Set."


I colored the image and then placed it in a punched-out spring wreath. At the end I stamped the "Happy Easter" sentiment.


Isn't the cat cozy in her Easter egg basket? You want to go on an egg hunt with the cat immediately!

I hope I could inspire you!
Hugs
Alma

Wednesday, March 23, 2022

Bugs and Kisses....!!

Hey crafty friends...

I'm back with another card made using the awesome new Ladybugs stamp set by Gerda Steiner designs!! It's a super adorable set so I couldn't resist making another card using them....


I started with a piece of white cardstock and then used a mix of distress oxide inks to create a pretty blend of colour. I then added some splatters using an opaque white paint mixed with a little water....

Using another piece of cardstock I used some of the same oxide ink colours and did a bit of a blend so I could die cut the sentiment HUGS. I also die cut the sentiment from a piece of black foam so that I could glue it to the back of the cardstock cut out giving it nice sturdy dimension!!


I die cut a tag along frame by Heffy doodle from Neenah desert storm cardstock and threaded in a piece of white/black twine before adding foam tape on the back and adhering to the base...

The Hugs sentiment was then adhered to the frame...

I added a sub sentiment by using WOW! Opaque bright white embossing powder on black cardstock (The bugs and kisses sentiment is included in the ladybugs stamp set). Once I embossed it I fussy cut around it and adhered to the card base also using foam tape...

Time for some cute little ladybugs of course...

I stamped/coloured and fussy cut three of the ladybugs and then found them a home just above the large sentiment. To finish it all off a touch of shiny sequins!!


Thanks for checking out my latest card, I hope you feel inspired to get your crafty goodies out and get creative. Happy crafting, hugs Ashlee.

Wrapped Up Easter Kitten

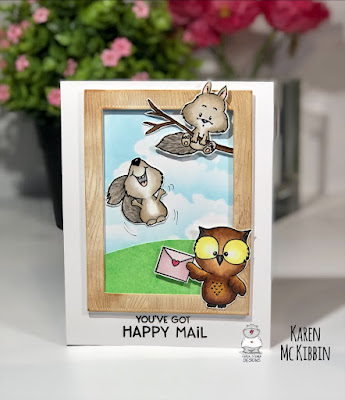
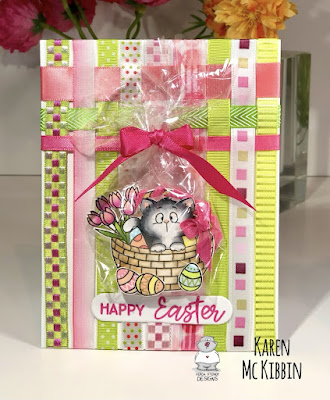
Hello and welcome back, it’s Karen here again.  I’ve got an Easter card today made with the sweet little Easter Kitten stamp set from Gerda Steiner Designs. This little kitten has gotten herself in a little trouble as she has been wrapped up into the Easter basket she was hiding in! Honestly, as I’m typing this up, I’m thinking “What was I thinking when I made this card!”. 


I coloured my images with Copic markers (I’m sorry, but I forgot to write down which ones I used). I fussy cut them out and used my craft knife to cut out the area just under the handle of the basket. Then I  wrapped some ribbon around the handle and made a little bow.  I popped the additional eggs up on foam tape and attached them to the front of the basket.  Here’s where it gets a little weird - I cut a piece of cello wrap and wrapped up my image and tied it off with another piece of ribbon.  It’s a bit hard to see in the photo, but in real life, it does look like the kitten is in a gift bag. 

For the background, I dug into my stash of ribbons to make a slightly woven background.  I applied some double sided tape to the back of the card front at the top and bottom of the card.  Starting at the top, I adhered strips of ribbon, trying to space them out evenly.  Then I wove three strips of ribbon through the vertical strips and adhered them to the back of the card with some more double sided tape.  Finally, I adhered the vertical strips to the bottom where I’d already placed the tape. Then I used glue to attach the card front to the card base.

I then stamped the sentiment, from the same stamp set, in Picked Raspberry Distress Oxide ink and clear heat embossed it.  I used a rounded rectangle die to cut it out and then attached it to the front with double sided tape.  Finally, I used double sided tape to adhere my gift wrapped kitten onto the ribbon background.   I just love the surprised look on that kitten’s face!  

Thank you so much for stopping by and I hope you’re having a great day! 


Sunday, March 20, 2022

Bug me anytime.....!!

 Hey friends...

I've got a new card to share with you all today and this one uses the super fun new stamp set Ladybugs (co-ordinating dies also available)....


To create this card I started with a white cardstock base and masked off the bottom portion with post it tape. I then used a cloud stencil and some distress oxide inks to create a cloudy blue sky ready for the ladybugs....

Then using another piece of white cardstock I used some distress oxide inks to create a blend and splatter so that I could die cut the Hello sentiment. I die cut the sentiment also from black foam so that I could adhere that behind the ink blended die cut pieces to pop them up off the card base!!


I then stamped the bug me anytime sentiment also from the Ladybugs stamp set using black ink directly onto the card base....

The ladybugs were stamped, coloured with alcohol markers and then fussy cut before adding layers of foam tape behind and popping them into the cloudy sky!!

To complete the card I attached some plain black sequins using micro glue dots.

I hope you enjoyed this new creation, I had lots of crafty fun!!

Happy crafting, hugs Ashlee.

Friday, March 18, 2022

Happy Garden Critters

 Hi, here is Alma and today I want to show you a card with the AMAZING Rollypollys. 

The image is part of the new  "Garden Critter 4x6 Clear Stamp Set" and I think the cuties are perfect for a little garden scene. 


I decided to create a happy and colorful card with a lot of Rollypollys.  I stamped a lot of "Rollies" and colored them with Copics (Rainbow Colors). 


Then I created six little "scenes" on the card and used the sentiments  " I just wanted to say" and "Hi". 

I hope you like my little scene!


Tuesday, March 15, 2022

Don't Let Things Bug You

Hi there,

it's Tanja here and I created this sweet tag using the Gerda Steiner Designs Ladybugs stamp set:

  • cut out the Clearly Besotted Stamps Rounded Tag from smooth white cardstock
  • stamp one of the adorable ladybugs and the sentiment from the Gerda Steiner Designs Ladybugs set with Lawn Fawn Jet Black
  • color the image with Spectrum Noir Triblend Markers and add extra shading with Faber-Castell Polychromos
  • ink up the edges of the tag with Distress Ink (Tumbled Glass, Hickory Smoke)
  • add little shiny dots with a Stardust Gelly Roll Pen
  • thread two strands of twine through the hole of the tag


Thanks for stopping by.

Hugs,


Sunday, March 13, 2022

Easter Kitten

Hi everyone! It’s Jeannie (InsideoutJeans) on the blog today with Gerda Steiner Design’s stamp set named, Easter Kitten. This was a freebie at the beginning of the month with purchase, did you snag one up?  


I wanted to share an idea with you for a super simple but fun card, where you don't even need to color up the image. I stamped the Easter Kitten right in the middle of an A2 card. All the color comes from the background, which I used copic markers to add a rainbow paint splash right behind the image. 


I also wanted to ground the image, so I used a cool gray to blend out a ground right underneath the kitten's basket. To finish off the card, I stamped the "hello" sentiment under the basket. It's a very simple card but I love it. 

Thanks for stopping by today and I hope you get inspired to create. Come back again soon for more inspiration and ideas! Happy Crafting! 


Friday, March 11, 2022

Bug me anytime by Noga Shefer

Hi crafty friends,  Noga  here and I am so happy to share with you another project for Gerda Steiner Designs today.


My card featuring the adorable  Ladybugs - 4x6 Clear Stamp and Ladybugs - Dies.
This set is must have!!

To make this card I die cut an oval window die out of white cardstock. 
I ink blended the background on Bristol smooth cardstock using kitsch flamingo distress oxide ink  and splashed it with water and glued it under the white window cover.

Next I colored the sweet images using copic markers and  glued it to my panel with foam tape for dimension.
Next I stamped a greeting from this stamp set using black ink.

For a final touch, I added pink sequins.

I hope you enjoy the card I created and feel inspired to create!

Thanks for stopping by,


Wednesday, March 9, 2022

You’ve Got Happy Mail!

Hello and welcome back, it’s Karen here today.  I've got a card today that features the Owl My Love and Happy Fall stamp sets from Gerda Steiner Designs, because who doesn't love happy mail?!  Here's a picture of my card.


I used Copic markers to colour in all the images and then fussy cut them out.  I die cut 4 of the wooden frames from a Hero Arts die called Wood Frame.  I used some Distress Ink in Vintage Photo to ink blend on the top frame, and then glued the layers together.

From the inside section of one of the frames, I inked up a grassy green colour, spritzed it with water and blotted up some of the ink with a paper towel.  Once it was dry, I freestyle cut a grassy hill.  

On the card front, I stamped and clear heat embossed the sentiment (which is from the Owl My Love set) below where the frame would sit. Next, I masked off the area outside where the frame would go, and used a cloud stencil (Cloud Edger  from Colorful Life Designs) to create the sky.  I then glued the frame around the inked area.  And finally, I adhered the images with glue and foam tape as needed.  I love that squirrel that is jumping for joy!

Thank you so much for stopping by and I hope you’re having a great day. 

Tuesday, March 8, 2022

Hi, little Caterpillar

Hi there,

it's Tanja here and I would like to show you this Clean and Simple Card created using the Gerda Steiner Designs Garden Critters and You Rock stamp sets:

  • stamp the caterpillar and the sentiment from the Gerda Steiner Designs Garden Critter set with Lawn Fawn Jet Black - the sentiment is from the Gerda Steiner Designs You Rock set
  • color the images with Spectrum Noir Triblend Markers and add extra shading with Faber-Castell Polychromos 
  • add a strip of purple cardstock to the left and right side of the panel before adhering it to a cardbase
  • use some pastel pearls as final embellishments


I hope you got inspired.

Hugs,


Friday, March 4, 2022

Happy Spring

 It's Alma and today it's my turn to show you an Easter inspiration using Gerda Steiner's stamps.


The focus of my card is the no-line coloring of the bunnies from the "Chicks and Bunnies 4x6 Clear Stamp Set". I colored the bunnies with markers.

Then I punched out an egg and used the "Hello Spring 4x6 Clear Stamp Set" to design the background using the no-line technique.


So that the egg also gets a cozy nest, I arranged straw and feathers and glued the egg and the bunny motifs on.
 This creates a particularly three-dimensional effect!


Bugs & Kisses by Noga Shefer


Hi crafty friends,  Noga  here and I am so happy to share with you another project for Gerda Steiner Designs today.


My card featuring the adorable  Ladybugs - 4x6 Clear Stamp and Ladybugs - DiesThis set is must have!!

To make this card I die cut a scallop frame die out of Bristol smooth cardstock. 
I ink blended the background using candied apple distress oxide ink  and splashed it with water.

Next I colored the sweet images using copic markers and  glued it to my panel with foam tape for dimension.
Next I stamped a greeting from this stamp set using black ink.

For a final touch, I added a  tiny heart.

I hope you enjoy the card I created and feel inspired to create!

Thanks for stopping by,