Saturday, August 31, 2019

Chicken Scratch and a Singing Puppy

Hello again everyone!  It’s Karen from @karens_kardzz and I'm back with another card using Gerda Steiner's "Chicken Scratch" stamp set and a very happy, singing puppy from her "Howl are You?" stamp set.  I absolutely adore this little puppy!

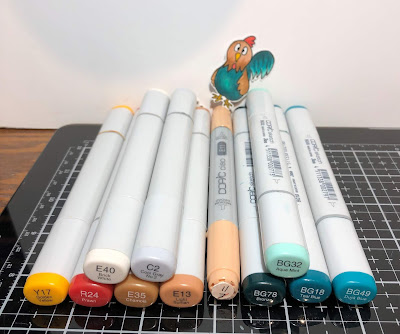
I started by stamping all my images onto 110# cardstock using copic friendly ink (I used Gina K amalgam black ink).  I then used copic markers to colour in all the images and then fussy cut them out.  The markers I used are shown below and also at the end of this post in a list.  I also used a black glaze pen on all the eyes.


For the background, I used the Cloud stencil from My Favorite Things with Distress Oxide Tumbled Glass ink to make the sky.  I then used Lawn Fawn's Little Picket Fence border die to cut a fence from white cardstock.  I also cut the grass from green cardstock that I had in my stash, using Lawn Fawn's Stitched Hillside dies.  I embossed the grass using Lawn Fawn's Stitched Trails die to give the grass area some interest.


I then adhered the grass and fence onto my card front.  I stamped the Happy Birthday sentiment (from MFT's Essential Sentiments stamp set) with Versafine Ink, and then heat embossed it with white embossing powder. I stamped the "To YOUUUUUUUU!!!" sentiment onto white cardstock using VersaFine onyx black ink, and then freestylye drew a speech box around it using a T ruler and rounding the corners.  I fussy cut this out and used a blending foam to ink the outside edges with Tumbled Glass Distress Oxide Ink.


Then I adhered all my images to the card front.  I popped up the puppy and the "To YOUUUUUUUU!!!" sentiment on foam tape while all the other images were glued directly to the card front.  Finally, I adhered my card front to the card base.

Thanks again for joining me, and I hope you have a wonderful day!
I’m
Supplies used:

Gerda Steiner - Chicken Scratch, Howl are You? stamp sets
MFT's cloud stencil
Lawn Fawn dies - Little Picket Fence, Stitched Hillside, and Stitched Trails
Distress Oxide Tumbled Glass ink, Versamarkink, Versafine onyx black ink, Gina K amalgam black ink
Copic Markers:
Chickens - R24, Y17, E23, E35, E13, E11, C2, E40
Rooster - BG78, BG18, BG49, BG32, R24, Y17, E35, E13, E11
Pig - R22, R20, R43, N4
Dog - E79, E59, E51, E53, E34, E23, R39, R29, R35

Friday, August 30, 2019

Just Sneaking By...


Happy Friday everyone! It's Cathy here sharing a card using the new Sneaky Raccoons stamp set. How funny is this little guy in the garbage can?!

I used a simple design on this one to really let the raccoon steal the show. 

For the background, I inked a brick stencil with Gathered Twigs and Walnut Stain Distress inks and added some Copic details. I inked a separate piece of white cardstock with Hickory Smoke Distress ink and then layered the pieces on black cardstock on the card front.


I no-line colored the image with Copics and fussy cut it out, but there are also coordinating dies to this set HERE.

To finish it off, I heat embossed a sentiment from this set and added some shadow around the can with Copics.

Hope you have a great weekend and see you again soon!


You've Got Mail!

Happy Friday all!  I'm Allison Cope and today we're going to play with a few different digital stamps.  I wanted to use the adorable "Snailmail" digi but I wanted my little snail to have some adorable companions so I found I few other digital images that had envelopes in their hands.  I found the owl with the letter in the "December/January 2016-2017 Digital Bundle" and also the cute "Monster Holding Letter".

I also wanted to share a bit about how I created my image in my editing software.  I use a very old version of PhotoShop, CS3.  If you are not familiar with it or it's out of your price range, try downloading and use the "GIMP" program.  There are tons of YouTube videos to help you learn all about the program plus it's FREE!

Now, come and join me in my craftroom and learn all about how I made this card!

Here's another look at the final card!


Aren't my little letter carriers adorable?

Now, go and visit the Gerda Steiner Designs shop!  There's a sale going on right now too... TODAY's the final day to take advantage of it!
Happy shopping and creating!

~ Ally ~

Tuesday, August 27, 2019

Let's meet Mouse Tag

Hi there,

it's Tanja here and I created this sweet little mouse tag using the Gerda Steiner Designs Tea-riffic Mouse Digital Stamp:

  • color the Gerda Steiner Designs Tea-riffic Mouse with Faber-Castell Polychromos pencils
  • add details with a white gel pen
  • cut out a tag from Neenah Desert Storm kraft cardstock and apply Distress Ink Ground Espresso to the Scrapberry's Mini Hearts stencil
  • cut out a speech bubble and stamp the sentiments from the STAMPlorations Hello you set with Versafine Vintage Sepia
  • ink up the edges of the speech bubble and the whole tag with that same brown Distress Ink
  • thread two strands of twine through the hole of the tag


Have a wonderful day.

Hugs,


Monday, August 26, 2019

Chicken Scratch meets Howl are You

Hello Everyone, it’s Karen from @karens_kardzz and I am beyond excited to be able to do a guest design post for Gerda Steiner today!  I've got a card today made with the adorable "Chicken Scratch" stamp set and I had this idea to pair it up with one of the puppies from her "Howl are You?" stamp set.  I absolutely love the expressions on the faces of her animals - they tell a story without needing any words!


I stamped out all the chicken images with copic friendly ink ( I used Gina K black amalgam ink).  The pictures below show which copic markers I used, and I have them listed below also.


I had previously stamped and coloured in this dog from the "Howl are You" set several months ago.  I frequently do stamp more images and colour them all at the same time as it saves time trying to decide which markers to use and then getting them out.  Then I store them either with the stamps or in a plastic folder so I can quickly make a card as needed or when inspiration strikes!  So I'm not entirely sure which markers I used, but my best guess is N4, N6 for his paws, E79, E59, E57 for the darker brown areas, and YR23, E35 for his snout, and R20 for inside his ears.  I also used a black glaze pen for the eyes on both the chickens and the dog as well as the dog's nose.  I used glossy accents to fill in his teeth and give them a little shine.


After colouring in all my images, I fussy cut them out.

I die cut the frame from black cardstock using a Double Stitch Rectangle Frame die from Poppy Stamps.   I adhered black foam squares from Scrapbook Adhesives to the back of the frame to give it  some dimesion.
I also cut one of the frames from white cardstock and kept the middle inside piece for my card.  I embossed this inside piece with an embossing folder from Taylored Expressions called On the Spot. I liked how the circles give a rather whacky feel to the card which I thought was in keeping with the stacked chickens and long suffering dog.

Once everything was cut and embossed, I positioned my elements on my card and decided where I wanted my sentiment to go. I then positioned my card front in my stamp positioner, removed my elements leaving the stamp in place, and embossed the sentiment with Versafine black ink.


Then I adhered my frame above the sentiment, added in the inside embossed piece and then finally adhered my dog and chickens.  The final step was to adhere my card front to my card base.

Thank you so much for joining me for this fun little card.  Have a great day and happy crafting!

Supplies used:
Gerda Steiner stamps - Chicken Scratch, Howl are You?
Poppy Stamps - Double Stitch Rectangle Frames, model 1996
Taylored Expressions - On the Spot embossing folder
Copic markers - R24, R20, Y17, E23, E35, E13, E11, E40, C2, N4, N6, E79, E59, E57, YR23, E35.
Ink - Gina K black amalgam ink, Versafine Onyx black ink
110# cardstock

Sunday, August 25, 2019

Different Perspective Flamingo

Hi Everyone, Melissa here.


For today's inspiration I have used the 'Different Perspective Flamingo' Digital Stamp.
  • Base Card 10.5x14.5cm
  • Colour base card using Distress Oxide (Salty Ocean)
  • Print image onto Copic X-Press It Blending Card.  Colour with Copic Markers.  Fussy Cut around image and set aside.
  • Cut 'Grass' from white card stock.  I did this 3 times.  Colour using Green ink (I used Catherine Pooler Lime Rickey). Set aside.
  • Cut a piece of white card. 10x14cm.  Using an oval die, place at top middle of this piece and cut.  Set aside.
  • Print Sentiment onto black card stock and foil using White foil.  Trim to size and set aside.
  • Start to assemble to card.  Layer the grass where it needs to be, slightly under the 'oval.  Adhere to base card.  Adhere the white 'oval' piece onto using foam tape.  Adhere coloured image to base card using foam tape.
  • Adhere sentiments to card.  For the 'Wire' sentiment, I used a liquid glue.

I hope you have a great day
xxx

Saturday, August 24, 2019

Sneaky Raccoons by Jeannie

Hi everyone! It’s Jeannie (InsideoutJeans) on the blog today to share a sneak peek into a new stamp set by Gerda Steiner Designs. This new set is called Sneaky Raccoons and it is adorable! There are quite a few images in this set but one of my favorites is the one I'm using today.


Since I wanted the main focus to be the raccoon, I decided the way to let a person focus on him was to use layers to create a background. I used some die cuts for the grass and for the sky. For the sky, I did a second layer so there was a bit of glitter showing through. 


I particularly liked this raccoon because he was holding up a sign and there are a bunch of little sentiments that worked well but I wanted a simple "hello". There is a little texture on the woodpiece so I outlined the sentiment with a pen so it stood out more. 


Isn't he so adorable?! I can't wait to use the rest of the stamp set for more cards. I hope you're excited about the new stamp set coming and I'll be back to share more projects using this set!

Thanks for stopping by! Come back soon! 


Congratulations by Noga Shefer


Hi crafty friends,  Noga here and I am so happy to share with you another project for Gerda Steiner Designs today.


I would like to make a sea card with all those adorable critters.


To make this card I took an A2 panel of Bristol smooth cardstock. The background sand was created with hills stencil and shaded lilac distress oxide ink.

The sea was created by blending tumbled glass and blueprint sketch distress oxide inks.


Next I colored the images using copic markers. 
I glued them to my panel with foam tape for dimension. 


Next I stamped a greeting from Big Bite 4x6 Clear Stamp Set using white embossing powder, I want that the sentence will be like a part from the sea background.


To finish off, I added some clear sequins for decoration.

I hope you enjoy the project I created and feel inspired to create!


Have a wonderful weekand! Noga