The cats in this stamp set are just too fun!! I loved coloring them with copic markers.
The cat I used in today's card reminded me of the beloved grumpy cat!
I colored this cat with the gray (N1-N5 family) copic markers, then fussy cut it out. Next, I used some patterned paper from Doodlebug design for the background layer. Then I used a grass border die to die cut some green grass for the cat to sit on. I added this to white card stock that is embossed with a cloud embossing folder then die cut with a 3x4 journal die. The cute birds are paper pieced with matching patterned papers and sitting on a twine rope, I added some knots to the corners. Finally, I added the fun "Stay Pawsitive" sentiment from the stamp set, in black ink, to a die cut banner then added some twine around the edge ending in a bow. For a finishing touch, I added some glossy accents to the eyes and beaks and a few white gel pen accents.
Hello, hello! It is Lisa Lahiff back here today, woot woot! I have a sweet one layer watercolored card that I've created using the Buckets of Love Stamp Set. Check it out...
To create this card I started by stamping the bucket of hearts image repeatedly on my front panel of watercolor cardstock. Next I went in with my Gansai Tambi Watercolor set and went about making a rainbow of buckets. I just love rainbows, and thought this would really brighten the card up. I added my sentiment in the bottom right hand corner and finished the card off with some tickles and clear sequins.
Thanks so much for swinging by today, and make sure you grab the Buckets of Love Stamp Set just in time for Valentines Day!
Happy Crafting!
Lisa
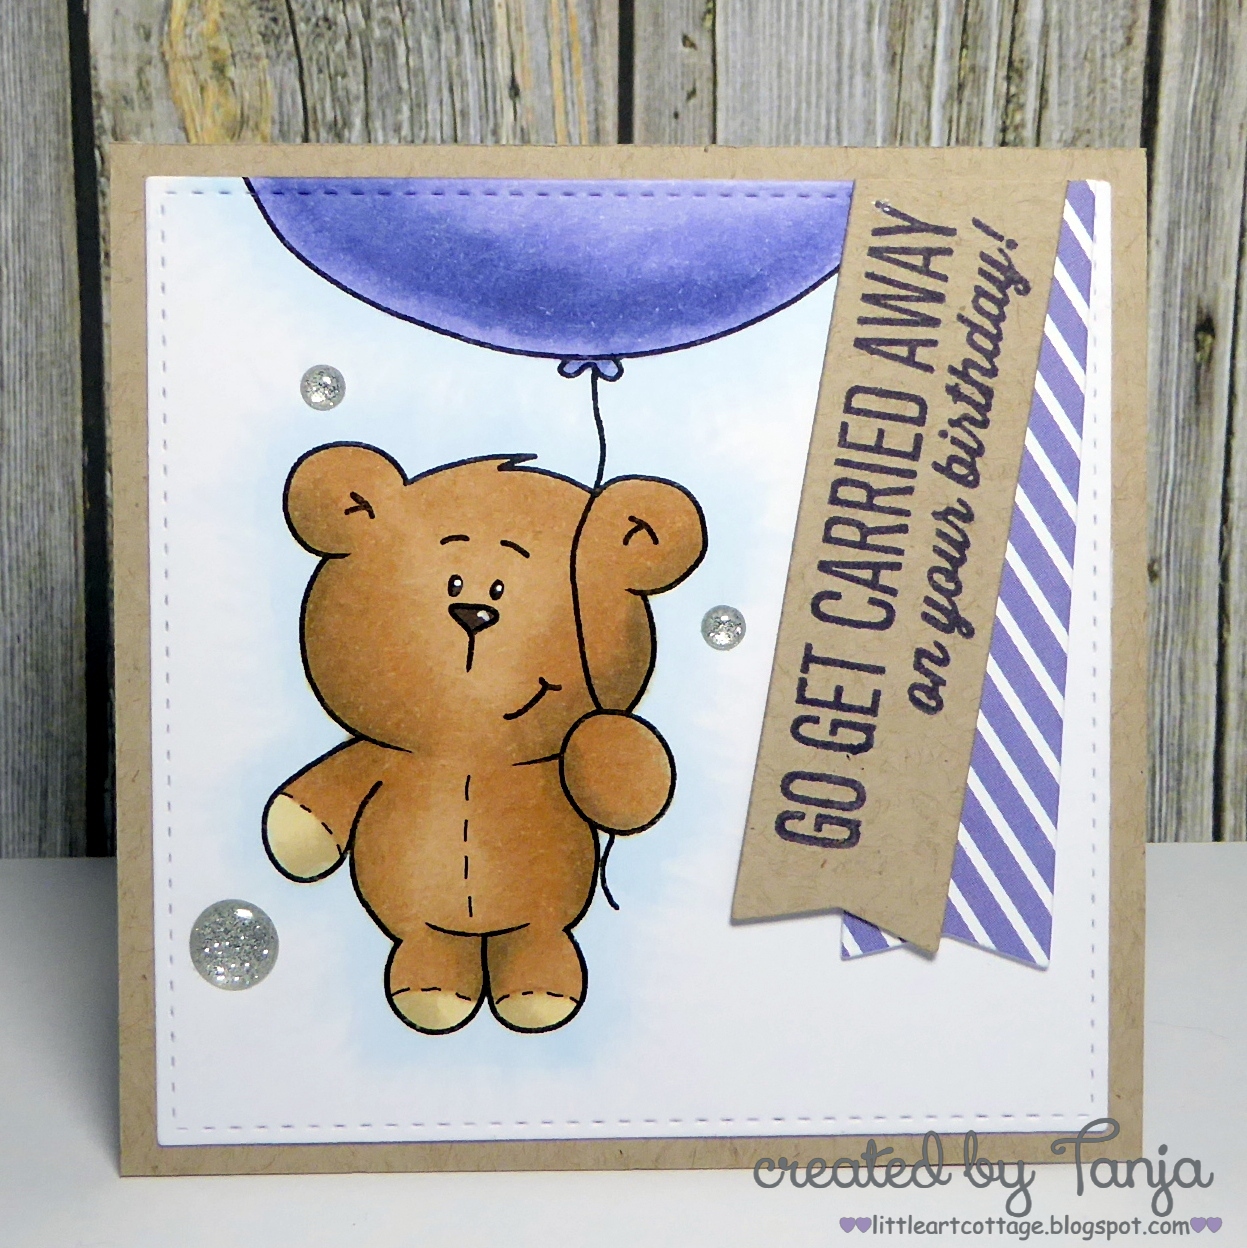
This card is a bit different then my usual cards , I not using that much pattern paper but one of my crafty goals for this year is too use the loads of pattern paper that I am always buying but never use :)
and I was very happy with how my card turned out
I think that this bear is too cute and I wanted to color him using some colors that match with the pattern paper and for that I am using Spectrum Noir Alcohol Markers.
I hope you liked my card ! Thank you so much for stopping by!
Have a great day!
Hey stampers, Anni here!
I am super excited to be a guest designer for Gerda Steiner Designs.
Right at the moment when I saw this super cute armadillo from the set LLama Tell You I knew I had to make a card with it! And because it's winter I needed a lot of color in it! So rainbow is the answer!
I stamped the armadillo on white paper with Memento ink and colored it with alkohol markers. I used these markers for the background and the grass, too. To add some highlights I used a white gel pen.
For the sentiment I chose the Thank You from the same set.
I cut down the paper and added stripes of rainbow colored patterned paper to the edges - a fun detail to bring in even more bright colors.
Then I adhered the panel to a cardbase of warm grey cardstock.
Hello! It is Lisa Lahiff back here with you today and I have a super sweet new card to share with you today, using the newly released Bucket's of Love Stamp Set. This set has some super cute kitties in it that are just begging to be colored and loved!
To create this card I stamped this cute kitty onto watercolored cardstock and used my Gansai Tambi Set to watercolor him in. I then set this off to the side to dry. Next, I stamped my sentiment onto a different panel of watercolor cardstock and added various colors to the background with a water brush and my Clean Color Brush Markers. I dropped a few drops of pink spritz and heat set this. I fussy cut out my cat image and diecut my panel before layering them together. This was then added to my cardbase with a layer of foiled acetate and I added some hearts from my scrap pile.
Thanks so much for stopping by today and Happy Crafting!
Lisa
Hi there! My name is Sandy Allnock and I'm excited to share a cute card with you today. I just love coloring - and the Gerda Steiner images are perfect for someone like me. I'm guessing they are for you too!
I've created a coloring video to show you how I made today's card, both the coloring and how I made the little lift-up sign. Watch it below or click HERE to see it on YouTube!
The kitties look like cats I know; and that's one of the great things about making our own cards. We can customize them to suit our own critters!
The little sign is a special treat on a birthday card - with a "secret message" inside!
I hope you enjoyed my card today...and if you'd like to see more, visit me over on my blog!
stamp
the sentiment from the Mama Elephant Carried away set with Versafine
(Imperial Purple) onto a banner cut from Neenah Desert Storm cardstock
with the help of one of the dies from the My Favorite Things Blueprints
27 set
cut another banner from patterned paper from the My Favorite Things Hearts and Stripes 6x6 paper pad
mount the stitched square onto a Neenah Desert Strom kraft cardbase
add three Doodlebug Design Sprinkles Enamel Dots (Silver) as final embellishments
When I made this card I was having in mind a great summer day where two friends want to start a journey to a place that they were dreaming for long time :)
To start I inked my panel using Distress inks also the fence and the grass.
The cute critters are colored using Spectrum Noir Alcohol Markers and for the balloons I added a bit of Glossy Accents.
Stamp the sentiment adhered everything down to my card base using foam tape for a bit of interest and my card was done!
Thank you so much for stopping by! Have a great day!
Como les comentaba antes, me siento muy contenta de poder estar en este lindo blog y le agradezco a Gerda por esta linda oportunidad!!
Ahora les comento un poco acerca de la tarjeta que realice: Esta tarjeta está hecha en la medida estándar A2 (4.25"x5.5") y con una base de cartulina kraft, en el fondo coloque cintas de washi tape. Estampe la imagen de llama y un armadillo en cartulina blanca y tinta negra Memento, colore los animalitos con marcadores Copic. Luego troquele un círculo de scallop y allí cree un escenario para estos dos lindos animalitos. También estampe la frase I like the way you roll.
Una tarjeta súper sencilla de realizar!
Te dejo por aquí el vídeo de como realice esta tarjeta
Bueno espero que encuentres esta tarjeta interesante para estos días de San Valentín y que te ayude a crear tarjetas con estos lindos sellos de Llama tell you.
Una vez más muchas gracias por pasar y dejarme un lindo saludito!!
Hello and Happy Friday!!! It is Lisa Lahiff again and I'm back with one more cute card using the You're Koalafied Stamp Set, and this time I'm shaking things up...
To create this fun shaker I've used the You're Koalafied Stamp Set and Matching Dies. I stamped all of my images onto separate cardstock and colored them in with Copic Markers before die cutting them out. Next I created my shaker with patterned paper, acetate, sequins and foam adhesive. I adhered the koala in the tree behind the first heart cut but in front of the acetate so it wouldn't get lost in a sea of heart sequins, ha! Since the patterned paper had words all over it I didn't feel it needed a sentiment so I finished it off with a pink bow.
Thanks so much for stopping by today and Happy Crafting!
Lisa
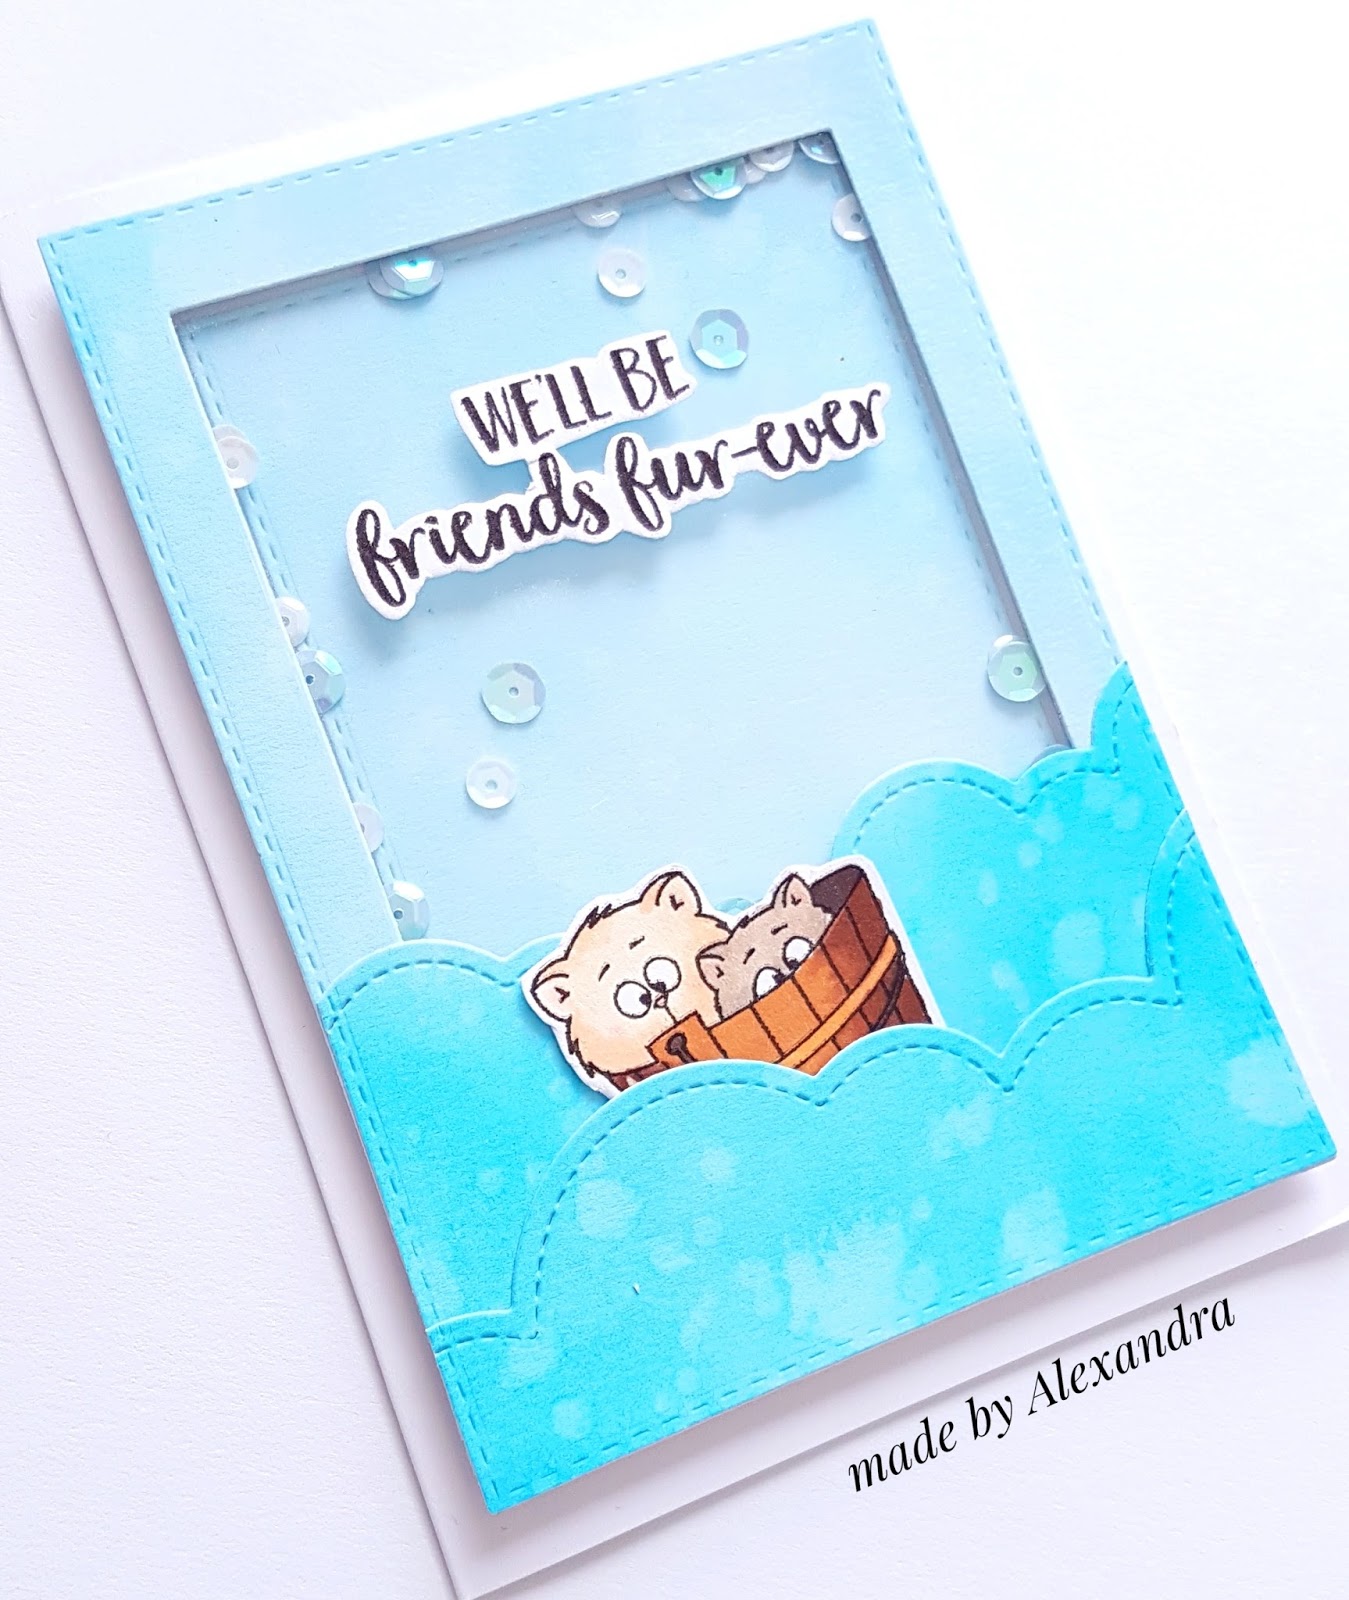
Did someone said damsels in distress? :) I mean kitties in distress ??
When is saw this stamp set my first thought was Aristocats :) i wanted to create a scene were the kitties were sailing on a river
I started by inking the panel using Distress inks and then I inked the waves, which i die cut using some clouds dies. The cute kitties are colored using Spectrum Noir Alcohol Markers .
For the shaker card i added some sequins in blue and white colors to match with the water theme and adhered everything on my card base!
The sentiment is from the same stamp set and i fussy cut it!
I hope you liked my card ! Thank you so much for stopping by!
Have a great day!
I created the shaker cards by sponging two distress colours in the background, on textured watercolour cardstock. Then I sprayed the panels with shine mist. While those panels dried, I stamped, heat embossed and watercoloured the images.
After stamping and heat embossing the corresponding sentiments on the front panels, I added an acetate window, placed the three types of sequins and adhered the panels to the card base with foam tape. To finish, I adhered all of the images to the acetate, tucking them slightly under the bottom edge of the windows.
I loved working with these products and can't wait to share more. Please visit my blog for a full supply list. Thanks so much for stopping by!
Hello! It is Lisa Lahiff back here with another Guest Design Post, yay! I just can't get enough of the super cute Koalas in the You're Koalafied Stamp Set, I mean come on, just look at this little guy...
And guess what else... he's back in stock! yay!!! To create this card I started by embossing my heart onto the front of my Kraft card base. I then stamped my little koala with Memento ink several times for a clean and dark image. I also added the sentiment and smaller hearts at this time. To make sure my colors would stand out against the kraft I used my PrismaColored Pencils, and more specifically I started by coloring the koala and heart in with my white pencil first and then added my colors over the top.
I started by creating the background ink blending distress inks ( Worn Lipstick and Abandoned coral) then stamping with Versa Mark some hearts and embossed tehm using white embossing powder.
The cute kitties are colored using Spectrum Noir Markers and then fussy cut them using a white border.
The sentiment is from the same stamp set .
Thank you so much for stopping by! Have a great day!
Para mi es un deleite el estar por aquí compartiendo un poquito de mi trabajo con todos ustedes. Y especialmente que Gerda nos permitió venir y poder estar en su blog y digo nos, porque yo sé que ustedes son parte de esto también!!!
Y por ello he preparado una linda tarjeta utilizando el set de sellos de Llama tell you, es un set donde trae una variedad de sellos que podemos usar en diferentes formas.
Si eres amante a las Llamas te invito a que adquieras este sello, estoy segura que te va a encantar!!!
Ahora te presento la tarjeta que realice con esta linda Llama. Ésta es una tarjeta con una medida estándar A2 (4.25"x5.5") y está hecha en 3 capas.
Te dejo un mini paso a paso de como realice esta tarjeta
1. Con papel de acuarela Canson de 140 Lb. y tintas Archival negro y verde estampe la Llama y los cactus, después con tintas Distress Everegreen Bough, Iced Spruce, Peacock Feathers y Mowed Lawn cree un fondo acuarelable y también pinte los cactus.
2. En cartulina blanca estampe la Llama con tinta Memento Rich Coco y coloree con marcadores Copic W0 W03 W05 E25 E35 para la piel y R20 para la lengua de la Llama. Luego recorte la imagen de la LLama dejándole un borde blanco.
3. Cree un banderín con cartulina rosada, donde estampe la frase How much I like you y esto lo hice con tinta Versa Mark y polvos de grabado Ranger de color blanco.
4. Pegue todo sobre la base de cartulina rosada. Y por último decore con unos corazones.
Como te comentaba, me encanta las Llamas y ésta es una belleza total!!
Además creo, que con este sello tú puedes lograr crear mucho más!
Materiales:
Set de sellos Llama tell you GSD
Cartulina Blanca y rosada Bazzill Basics
Papel para acuarela Canson cold press 140 Lb./300 g.
Tintas Distress Evergreen Bough, Iced Spruce, Peacock Feathers, Mowed Lawn
Tintas Ranger Archival Negro Azabache y Verde Hoja
Marcadores a base de Alcohol Copic W0, W03, W05, E35, E25, R20
Marcador blanco Gelly Roll
Tinta VersaMark
Polvos de Grado Blanco Ranger
Almohadilla Antiestática
Pincel redondo #6
Bloques de acrílico
Misti Tool
Tinta Menento Rich Coco
Tabla para marcar
Guillotina, tijeras y cinta de doble cara
Bueno, te invito a que sigas a Gerda Steiner Designs en sus redes sociales, te va a encantar todas las cosa lindas que ella tiene!!
Hello everyone, and thank you for having me as a guest designer here on Gerda Steiner Designs. My name is Lesley Oman, also known as Hungry Heffy from Hungry Heffy Crafts.
Today I am sharing a video tutorial on how I created this fun UFO spinner card with the adorable Alien Invasion stamp set and coordinating dies. As soon as I saw this set, I knew exactly what I wanted to create - a fun, interactive, spacetime scene!
The video walks through exactly how I created the card, but heres a quick run down of the steps I took.
To begin, I trimmed up two panels of watercolour cardstock so I could create the basis of the card. One panel is 5.5 inches x 8.5 inches, and the other is 5.5 x 4.25 inches. I taped them to a craft mat with some masking tape and reached for my watercolour paints, as I wanted to create my own watercolour galaxy effect background.
This is a fun technique, and you will see in the video that it very much looks like a hot mess for a while, but before long it all comes together to create a SPACE-TACULAR background! I flicked white paint onto the panels with a paintbrush to create clusters of stars.
Whilst my watercolour was drying, I used my MISTI tool to stamp the alien and spaceship images onto some copic friendly paper. I also needed to create a matching reverse image for both items, so I used a mirror stamp to do a little mirror stamping. This is a fun way to reverse your stamp images, and is perfect for creating spinner elements like this! I also had the idea to create the illusion of glass in my UFO using acetate. I think this really makes the whole thing come to life!
I coloured in my stamped images with a little copic colouring, and then assembled my alien in his UFO, making sure to sandwich a doubled up piece of sewing thread between the two alien images. This is what will make the flying saucer spin!
Before long, my watercolour panels were dry so I creased the larger piece with the painted side facing in - this then became the base of my card. Then I used washi tape to temporarily stick the smaller painted panel to the front, and using a circular die, I cut an aperture in the front of my card - through both layers of cardstock.
I was then then able to secure the thread using sticky tape, so that the flyer saucer was positioned beautifully in the middle of my circle aperture, between the two painted piece of cardstock. In the video I share a TOP TIP to ensure that the thread doesn't loosen or get accidentally pulled out!
Once my UFO was in place, I could adhere the top panel onto the card base, and finish the project with a few extra features. I added a stamped greeting to the front and inside of the card, as well as two images which I watercoloured with my Artquest Stargazers pearlescent watercolour paints. I even used some white gouache and a fine paintbrush to add a few more dominant stars and some cute constellations! I just love that these stamps all work so well together!
And now the card is done! All you have to do is gently turn the UFO round and round, and you will see the thread twisting over itself. Closing the card will hold the alien in place, but when you open the card -- WHOOOSHHH - this cute extraterrestrial is having extra fun as he whizzes across the universe! :-)
Be sure to watch the video for more details on how to make this card and thank you once again for letting me be a guest designer on the blog today! I am very blessed.... and a little dizzy from watching this sweet little guy spin round and round..... but he is just so addictive! :-) You can check out more of my projects over on my blog Hungry Heffy Crafts or see more videos over at my YouTube channel YouTube.com/hungryheffy
have a great day, and until next time.... happy crafting!
Lesley
Hello ...How are you doing today??...This is Pri from Me And My Daily Papercraft guest designing for Gerda Steiner Designs....I am sharing a glittery card that I have made using the latest stamp set called You're Koalafied...It also has a coordinating die set... I have seen so many Koalas at various wildlife sanctuaries and zoos here in Australia and they are very cute and cuddly....but the Koala babies are even cuter...and for today's card I have used the little baby Koala hanging off his mum's back.... The card base is made from textured pink cardstock and the top layer has been die cut from black cardstock using a stitched rectangle die...I also die cut a panel from silver glitter cardstock using MFT stitched scallop basic edge dies and placed it on the top layer...I also placed a few die cut circles in pink and gold onto this panel...
On a separate piece of cardstock,I stamped the cute Koala images and coloured it in using the following Spectrum Noir markers - GG1 IG5 & BG5...I applied some glossy accents after cutting out the image and once dry,I placed it on the card...
I stamped the sentiment using watermark ink and heat embossed it with gold embossing powder...and finally I have adhered quite a few tiny gold star sequins to embellish this card....
Thank you so much for your visit today....Please visit Gerda Steiner Designs store if you'd like to buy this stamp set or browse other products like stamps,coordinating dies and digi stamps...


