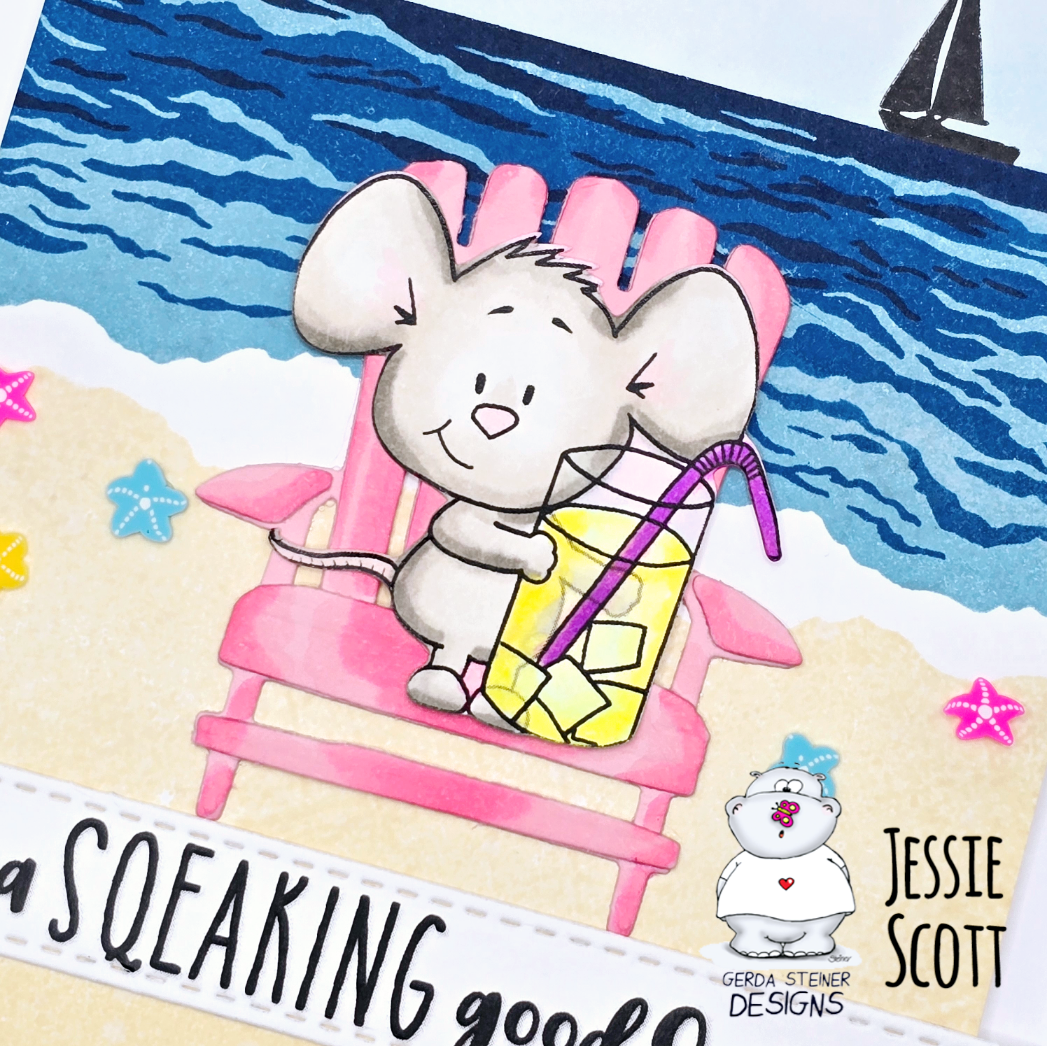
Saturday, March 16, 2024

A little Easter gift basket


Hello dear creative community,


greetings from Germany again today.

 This time I don't have a card for you, but a little tutorial for a small Easter basket.


It is modeled on the typical fruit crates. You can decorate it however you like.


All you need is photo card, glue, scissors, a scor pal or something similar, a ruler and I think that's it.


First you need a piece of photo cardboard measuring 6" x 8".  This is folded from each side at 1" and cut as shown in the picture.


The side pieces are folded up and glued together to create the base of a box.


For the next step, we need 4 pieces of photo cardboard measuring 1.5" x 3.5". These are folded lengthwise in the middle and then glued in each corner.


Now we need 4 pieces of photo cardboard measuring 6" x 1" and 4 pieces measuring 4" x 1". These will be the cross struts of the box and glued to the long and short sides. And now the box is finished and can be decorated and filled. I think everyone will be happy about this little gift at Easter. Especially when there is not only something sweet inside, but also a cute GSD stamp.


Have a great, creative weekend.

Best regard,
Nicole


And if you like, feel free to check me out on Instagram. 


https://www.instagram.com/kimbaslydog/

Thursday, March 14, 2024

Hoppy Easter in Pink!

Hi friends!  It's Bev Gerard, bringing a sweet pink card featuring the Hoppy Easter stamp set from Gerda Steiner Designs.  Oh these darling bunnies ... Can't you just imagine patting their so soft fur?!

Even though this is a horizontal layout, the card folds at the top, with the bottom corners rounded with a large corner rounder.  So many happy circles in this overall design!


Scallops fit so well with the circles, that I included them in the image mat, sentiment oval, and decorative strip beneath the ribbon.  I couldn't resist adding tiny dots to the scalloped edges.

          Here are the Copic markers I've used:                       

Basket:  RV11, RV95

Basket:  RV11, RV95

Bunnies:  C0, C1, C00, RV00 (cheeks/ears)

Bow:  BG000, BG01, BG05

Eggs:  YG25, RV23, Y02, YR04, V06, BG53


Happy Spring to you!  Thanks for your visit!


Beverly on Instagram:  texasgrammy
Beverly's SCS Gallery:  TexasGrammy at Splitcoaststampers


Mammoth Adventures


Hi Everyone!  

I'm happy to share this mammoth adventure card featuring the recently released Gerda Steiner Design's stamp set, Big Guy.  Here in the Midwest we're getting some nicer weather days which makes for some great hiking.  The mammoth is the mascot for one of our trails so it just felt natural that he would take on some adventure.

I started the background for this card by stamping the Unity Stamp Company's Jolande's Ledger on white cardstock.  Then I tore off the edges to give an aged look.  After this I used a blending brush and brown ink called expresso to darken the edges, adding a little color and continuing with the aged theme.

For the mammoth, I stamped the image from Big Guy on watercolor paper and colored the image in with Derwent Inktense pencils and a water brush.  Once this was dry, I used the die from Big Guy to cut out the image.

Finally, I found a scrap piece of cardstock in light green.  I stamped this sentiment from Impression Obsession's Outdoor Adventures and cut the sentiment out using a die from Scallops and Banners by Unity Stamp Co.  To help this sentiment piece work well with the background, I used the blending brush and expresso ink to darken the edges.

The last step was to layer all of these pieces together, attaching to a Kraft card base.  

Thank you for reading.  I hope that you're able to get out for a few mammoth adventures of your own and enjoy some beautiful weather.