Tuesday, April 30, 2019

Celebrate Birthday Bear

Hi there,

it's Tanja here and I created this sweet Birthday Card using the Gerda Steiner Designs Birthday Bear:

  • color the Gerda Steiner Designs Birthday Bear with ZIG Clean Color Real Brush Pens and a damp watercolor brush
  • add Nuvo Crystal Glaze to the candle and the icing on the cake
  • stamp the sentiment from the Altenew Label Love with Versafine Onyx Black
  • apply Distress Oxide Ink (Picked Raspberry, Carved Pumpkin, Squeezed Lemonade) through the Clearly Besotted Stamps Heart Confetti stencil onto a stitched panel with Blending Brushes
  • prepare a piece of cardstock with Versamark and WOW! Silver Bells embossing powder and cut out three hearts with the help of the Sizzix Magical Unicorn die set
  • adhere the panel to a yellow cardbase


Hope to see you again soon.

Hugs,


Monday, April 29, 2019

Chicken Scratch!

Have you seen this stamp set??


This is Chicken Scratch from Gerda Steiner Designs and I LOVE it! I would dare say it's one of my most favorite sets to date! The images are hysterical and so are the sentiments! Check out the one on the bottom of the above image.... 'this card was made from scratch'! Haha! Totally my sense of humor!

This is a card I whipped up using the Chicken Scratch set.


This card is obviously a clean and simple design which really keeps these adorable
chickens the stars of the card.


To make this I started by stamping the three darker chickens first, being sure to leave space for the other two chickens. I made maskes for the three dark chickens, and then stamped the remaining images.


I then colored each of the chickens using Copic markers and added white spots to the darker chickens with a Uni- ball Signo white gel pen.

I gave them shadows with my neutral gray Copics and stamped the sentiment with Versa Fine black ink.


I think it turned out pretty cute! Now.....who should I send this too?? Thank goodness my friends and family would totally get the humor!

Sunday, April 28, 2019

Hello Bunny Card


Hello friends! Karla here today with a sweet little Hello card perfect to send to a friend. I'm actually using the super cute Easter Bunnies Digital Stamp Bundle, but as you can see this set is not just for Easter! Bunnies are adorable year round, and this little guy's sign can be customized to say whatever you'd like. I chose to stamp a little 'hi' sentiment and add a diecut 'hello love' speech bubble after colouring him in with Copics and Hobby Colour Markers. 


Inside, I'm playing on the carrot theme with a cute sentiment that matches the adorable little carrot button I added to the front of the card. A few pretty sequins decorate the front and inside as well. 


I added some decorative elements using some pretty pompoms to create a little banner and various embroidery thread colours to stitch the holes in the diecuts. I'll definitely be getting lots of use out of this Easter Bunnies Digital Stamp Bundle, and I can't wait to see what you create with it!


Thanks so much for stopping by! Be sure to head over to the Gerda Steiner Designs Shop to see what inspires you today!

Hugs,
Karla

Saturday, April 27, 2019

I Just Miss You A Lot!


Hi everyone and Happy Saturday! It's Cathy here sharing a quick and simple card using this cute sad-faced little puppy from the I Just Miss You Puppy stamp set.


I started this one by die-cutting the background panel from white cardstock and taping a straight line about 1/2" from the bottom using eclipse tape. I then inked that bottom 1/2" portion using Pumice Stone distress ink.

A happy accident happened at this point when I then taped off the 1/2" inked portion using drafting tape. Don't ask me why I switched tapes. I just reached for the nearest roll. After inking the top portion using Iced Spruce distress ink, I removed the tape and the texture of the tape pulled some of the ink off in fine lines.

It made it look a little bit like a rug or carpet! 

Love it when a mistake works out.


Next, I heat embossed the sentiment from the set and then to add a little something extra, I inked another piece of white cardstock with Iced Spruce and die-cut a few paw shapes. It gave it a subtle embossed effect.

I colored the puppy image with Copics and fussy cut around it.
After adhering the image, I added some shadow under the dog bed using 
N3 and N2 Copics.

Hope you have a fabulous weekend with lots of crafty time!

See you again soon!

Friday, April 26, 2019

Hi everyone! It’s Jeannie (InsideoutJeans) on the blog today to share a card I created using Gerda Steiner’s stamp set named, Under The Weather. This stamp set is one of the smaller stamp sets but packs a punch with cuteness. This is also a digital stamp in the shop so you have a choice of what you want!

I don't know about you but the weather has been so rainy last month and we are finally getting nice weather where I live. The last two weeks have been sunny and so nice! I really wanted to create something fun to celebrate the end of the rainy season so I pulled this stamp set out.


I decided that I wanted to do a reflection of this image. I did it by stamping on a piece of acetate and pressing it right beneath the main image. The transfer isn't 100% perfect but I'll use an alcohol safe marker to line the image. 

To create the look of the reflection, I simple colored him the same just with lighter shades. Then I pulled out a bunch of blue markers and colored right over the mouse. 


I actually didn't know what I wanted to do after creating the puddle but I ultimately decided to use a simple background with a few clear droplet gems. I stamped out the sentiment on white cardstock to finish off the card. I really love how this turned out and I hope you do too. 


Thanks for stopping by! Come back soon!


Thursday, April 25, 2019

Video: 3-D Critter Scene

Howdy all!  Happy Thursday!  It’s Allison Cope here today to share a very simple tutorial on how to make your little critters (or any other images) POP!

The key ingredient to this technique today is Olba glue. It’s a thick, clear glue with lots of body.  It allows you create a 3-D backer for your fussy cut images to pop up.

Today my card features the adorable “Monkey Hanging in There” and the “Bunny with Glasses” digital stamp sets.

So come and join me at my desk and we’ll go get creative with digital stamps and Copic Markers!

https://www.youtube.com/watch?v=_GCJWUSAU2E&feature=youtu.be

Here’s a look at our card once again…

And here is a close up of our bunny (photos don’t do this justice!)

And here is a closer look at the monkey as well…

Thanks for joining me today!  I hope you too get to try adding some more dimension to your card creations sometime soon.

~ Ally ~


stamps: GSD (Monkey Hanging in There, Bunny with Glasses)
patterned paper: Echo Park Paper Co. (Imagine That! 6x6)
cardstock: Recollections (65# White)
tools: Copic Air Brush System
inks: Copic Markers
3D glue: Olba Glue

Tuesday, April 23, 2019

Miss you

Hi there,

it's Tanja here and today I would like to show you this sweet Miss You Card created with the Gerda Steiner Designs Dog and Butterfly Digital Stamp set:

  • color the Gerda Steiner Designs Dog and Butterfly Digital Stamp set with Zig Clean Color Real Brush Pens and a damp watercolor brush
  • stamp the sentiment from the Create a Smile Kleine Sprüche set with Versafine Onyx Black 
  • cut out a scalloped stitched panel around the image
  • adhere the panel to a cardbase covered with patterned paper from the Little Yellow Bicycle Fern & Forest 6x6 paper pad


Hope to see you again soon.

Hugs,


Monday, April 22, 2019

Hoppiness!

Hi, crafty friends! Its Rebekah with you today!

I love creating a scene! Sometimes they can get quite complicated and then there are some which are super easy! I am going to share a simple scene card with you today using the stamp set Hoppiness Stamp Set from Gerda Steiner!


This scene came to gather so quickly! First, I stamped the little bunny and butterfly. I also made masks for them and placed the masks over the images.


I then stamped the fence. The fence stamp, itself will not go all the way along the card front. I stamped the fence in the middle of the card once and then, looking through the acrylic block which the stamp was on, I could see how to like up the next row of fencing! I continued this until it was across the card!


I used a cloud stencil to color a few puffy clouds with Distress inks and then took the masks off the bunny and butterfly.  I the clored in my images with Copic markers!


I drew in a few tufts of grass along the bottom.of the fence which added a little more color to the card and also disguised that face that I did not stamp perfectly straight!

Easy scene and so much fun!

Thanks for visiting the blog today! Be sure to share with us what you are working on this weekend!

Sunday, April 21, 2019

Bunny holding sign

Hi Everyone,  Melissa here.


For today's inspiration I have made a tag and  have used the 'Easter Bunnies Digital Stamp Bundle'.

The image has been printed onto Copic X-Press It Blending Card and coloured with Copic Markers.  I have fussy cut the image leaving a small white border.  Stamp sentiment.

The base is a tag cut from white thick white cardstock.

The coloured background is made using Copic Various Ink onto Yupo paper.  Once Dry, cut a piece measuring 8.5x10cm and adhere to tag.

Using a length a twine, adhere to tag using small staples.

Adhere image to tag using foam tape.

Loop seam binding to tag and adhere using a small piece of twine.


I hope you have a great day
xxx

Saturday, April 20, 2019

Easter shaker card by Noga Shefer


Hi crafty friends, Noga here and I am so excited to be part of the amazing Gerda Steiner Designs DT!!


My card featuring the adorable Easter Bunnies 4x6 Clear Stamp Set and  Easter Bunnies 4x6 Dies. This set is just perfect addition to your stash.


To make this card I took an A2 panel of Bristol smooth cardstock and  cut an half circle shape.
next I took another A2 panel of Bristol smooth and blended ink with antique linen distress oxide ink.

than I created a shaker  and filled it with sequins.


Next I colored the adorable image using copic markers and glued it to my panel.


 To finish of I stamped a greeting from the stamp set using black ink.


I hope you enjoy the card I created and feel inspired to create!

 Thank you for visiting the blog.

Happy Easter!

Noga.


Easter bunnies digital stamp bundle - Larissa


Hello, I am Larissa from Car-d-elicious and today I am posting a new project with a digital stamp from 
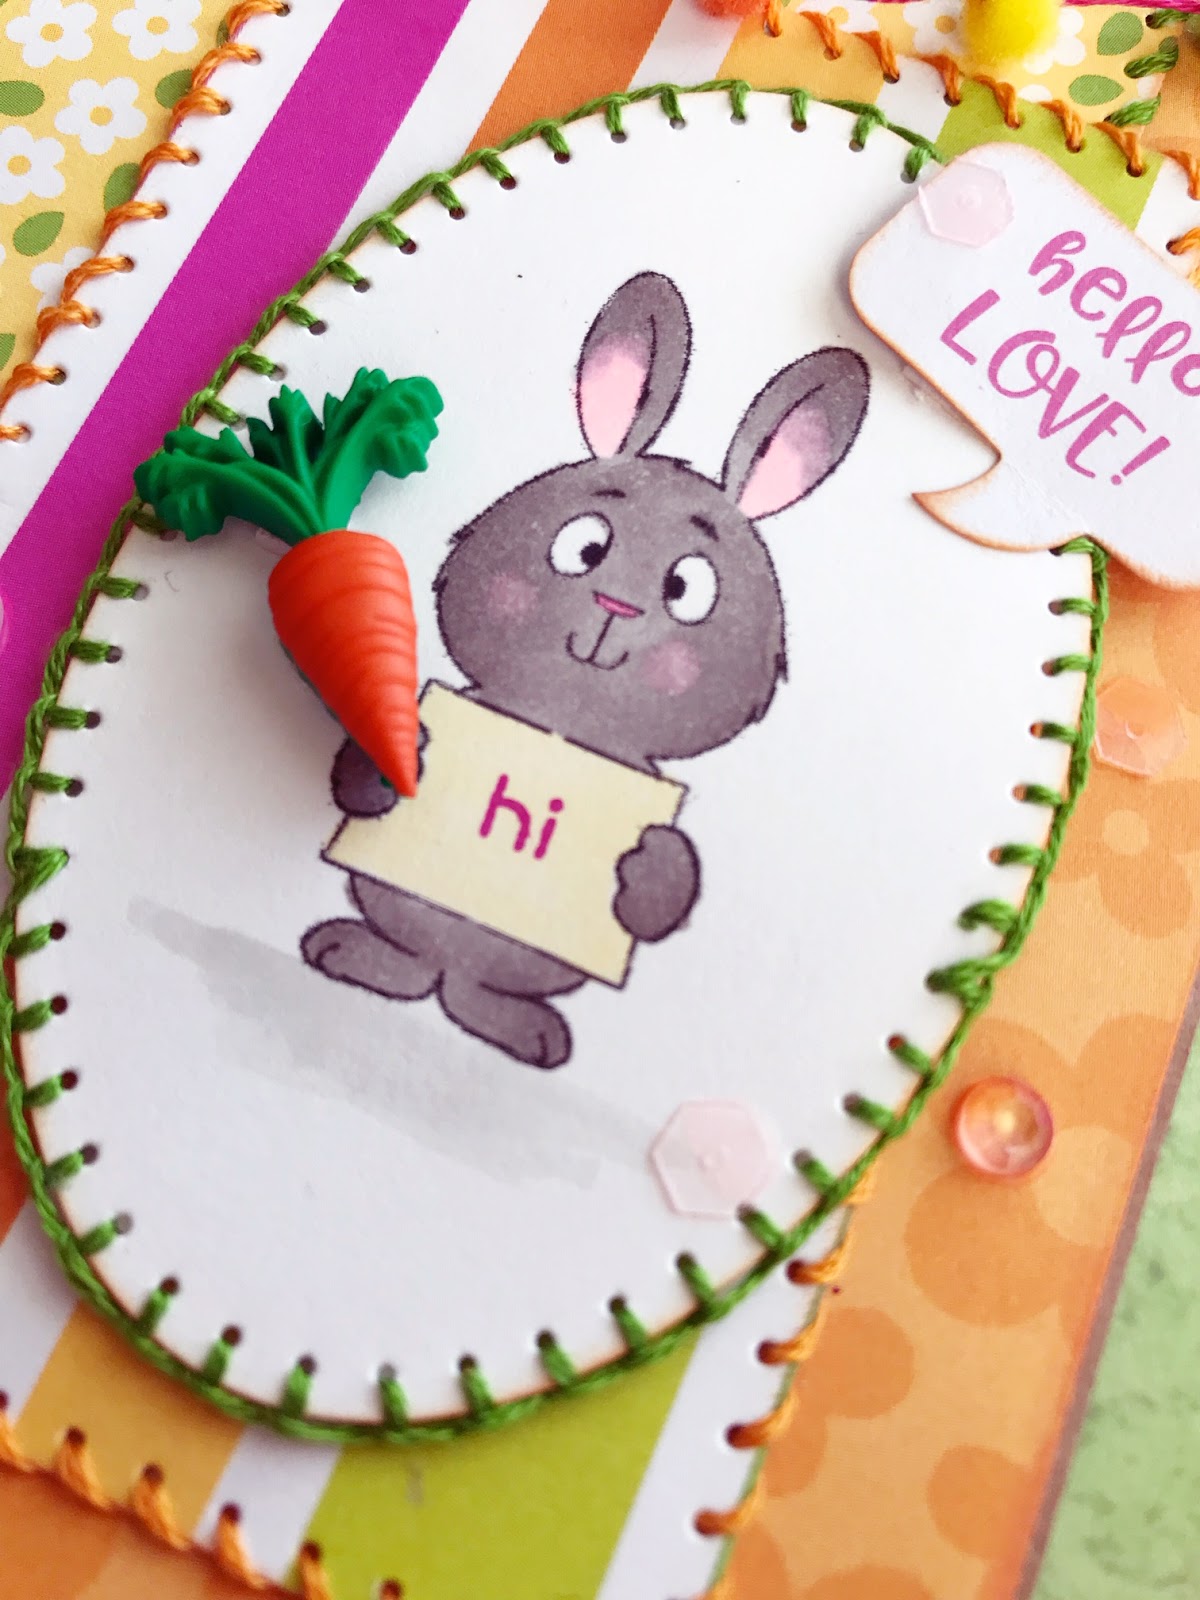
Gerda Steiner designs. My mother designed a box for chocolate easter eggs for me with the silhouette and I made a matching tag for it. On the tag I used a digital stamp from the Easter bunnies digital stamp bundle from Gerda Steiner designs.


Like I said the box is made with the silhouette from white cardstock and mica. To decorate the box I have die-cut a couple of grass borders from green dotted design paper that I bought from the Lidl a while ago. I used the Grassy fields die-namic from My favorite things to die-cut the borders. I have die-cut a couple of tiny flowers from yellow design paper and glued those on the grass edge.


I have made a tag for my box. On the tag I used an image from a bunny from the Easter bunnies digital stamp bundle from Gerda Steiner designs on the tag. I have coloured the bunny with my Polychromos pencils, the black glaze pen and the white gelpen. I have fussy cut the image. From white cardstock I have die-cut a tag with the Tag along die collection from Clearly besotted. I coloured the tag with Broken china Distress ink. I have die-cut a grass border from green dotted design paper from a paperpack that I bought once from the Lidl with the Grassy fields die-namic from My favorite things. I have die-cut a couple of tiny flowers from yellow design paper from the Classic gingham paper pad van Sunny studio with a Flower die from Action. I used yellow bakers twine to hang the tag onto the box.


*********************************************************************************
STAMP: Easter bunnies digital stamp bundle from Gerda Steiner designs
COLORING MEDIUM: Polychromos pencils, Distress ink
PAPER: White cs, Paperpack from Lidle, Classic gingham paper pad from Sunny studio
INK: Broken china Distress ink
DIES: Tag along die collection from Clearly besotted, Grassy fields die-namic from My favorite things, Flower die from Action

ACCESSORIES: Black glaze pen, white gelpen, Yellow bakers twine


Friday, April 19, 2019

Bunny Friends

Hi everyone! It’s Jeannie (InsideoutJeans) on the blog today with a card to share with you today using Bunny Friends. This is a 3x4 stamp set that is just incredibly adorable... you can use it for an Easter card, friendship, or a just because.

For today's card, I decided to make it a simple card. I masked off part of my card base and used distress inks to color up the top portion of the card. I used bright and cheerful colors so the bunnies would pop against them. Once I finish adding the ink, I used water to splatter everywhere and picked it up using a towel. I just love the effect of the distress inks for a background.


In this set, there are three sentiments that you can mix and match. I chose to use two of them "Thank You" and "for being in my life". I wanted to heat emboss them on black cardstock and to use the second sentiment as a place for the bunnies to sit. I staggered them slightly just so it looks like the perfect place for the bunnies.


I just adore this set and I hope you do too! Can't wait to use them again!


Thanks for stopping by. Come back again soon for some more inspiration and ideas!

Thursday, April 18, 2019

Hey...This card is made from scratch


Hello and Happy Thursday Crafty Friends!  Tina here from Cards and Coffee Time with a super fun card "made from scratch" to share with you today:)  I am using the New Chicken Scratch stamp set and I have to tell you this set had me smiling all day long!  I love the punny sentiments along with the silly chicken expressions.  We own a few chickens here at the Smith home, so I don't have to tell you I fell in love with this stamp:)


Thank you so much for joining us today!  If you would like to see how I created this card you can check it out below:)  Wishing you a day filled with smiles and crafty goodness!!  Hugs, Tina


Happy easter - Larissa


Hello, I am Larissa from Car-d-elicious and today I am posting a card on the digital stampblog from Gerda Steiner designs. This time I have made a card with a couple of images from the Easter bunnies digital stamp bundle from Gerda Steiner designs.


I combined the images on the computer into a scene and printed it. I have coloured the image with my Polychromos pencils and the black glaze pen. I have fussy cut the image. I have die-cut a stitched rectangle with the Crea-nest-lies XXL 36 from Crealies and made a background for the image on it with Mowed lawn and Tumbled glass distress ink. I have die-cut a larger rectangle from black cardstock with the Crea-nest-lies XXL 24 from Crealies and glued the rectangle with the image on top of it. On a kraft cardI glued some yellow dotted design paper from the Designer mega sheets Dots - Bright colours from Card deco. I have glued the image with foamtape on the card. In the right bottom corner I stamped a sentiment from the set Easter bunnies (clear stamp) from Gerda Steiner designs.


*********************************************************************************
STAMP: Easter bunnies digital stamp bundle from Gerda Steiner designs, Easter bunnies (clear stamp) from Gerda Steiner designs
COLORING MEDIUM: Polychromos pencils, Distress inks
PAPER: White, kraft and black cs, Designer mega sheets Dots - Bright colours from Card deco
INK: Versafine onyx black, Mowed lawn, Tumbled glass and Broken china distress ink
DIES: Crea-nest-lies XXL 24 & 36 from Crealies
ACCESSORIES: Black glaze pen