Hi everyone. It's Laurie back with another Halloween ghost card.
I stamped the ghost in Versafine ink and heat embossed it so that I could color it with Copic's. I have had the designer paper in my Halloween stash of paper forever, so it was fun to put it to use on this card. It came from a Tim Coffey Halloween pack of paper put out by K&Company.
I used a few stitched dies to cut the ghost out and the fishtail banner. Layered it onto a black background and adhered everything onto a purple card base.
Stayed tuned for next Thursday as I have another creation made with this stamp set.
Hello my Crafty Friends! Christi here from Scrapping For Tranquility. I have the honor of being a Guest Designer for Gerda Steiner Designs today and again on September 5th. I hope if you enjoy my project you will join me again on the 5th! Without further ado:
I chose the " Little Reindeer " stamp set. It is a 3 X 4 clear stamp set and is just ADORABLE!
I wanted to use non tradition Christmas colors and something a little masculine which I think I achieved. I started finding my pattern paper in my 6 X 6 paper pads. This was a Echo Park pad but I apologize I didn't have the cover any longer. When I found the pattern paper I wanted to use , I chose my black base which is American Crafts Black.
(I will list below where I get all my cardstock and card making materials. It is an affiliate link , at no cost to you but helps me keep my cost down. If you use the link you will get a 10% discount!)
His nose I used Red Nuvo Drops which gave him a raised look along with being shiny. I loved how it turned out.
Choosing the sentiments from the stamp set, I used my Misti to stamp onto a banner and used Distressed Embossing powder in black. It gave it that cracked look. I am not sure I really like that look. What do you think?
Leave me a comment below and tell me your opinion! I would love to hear it. I will try to answer you back.
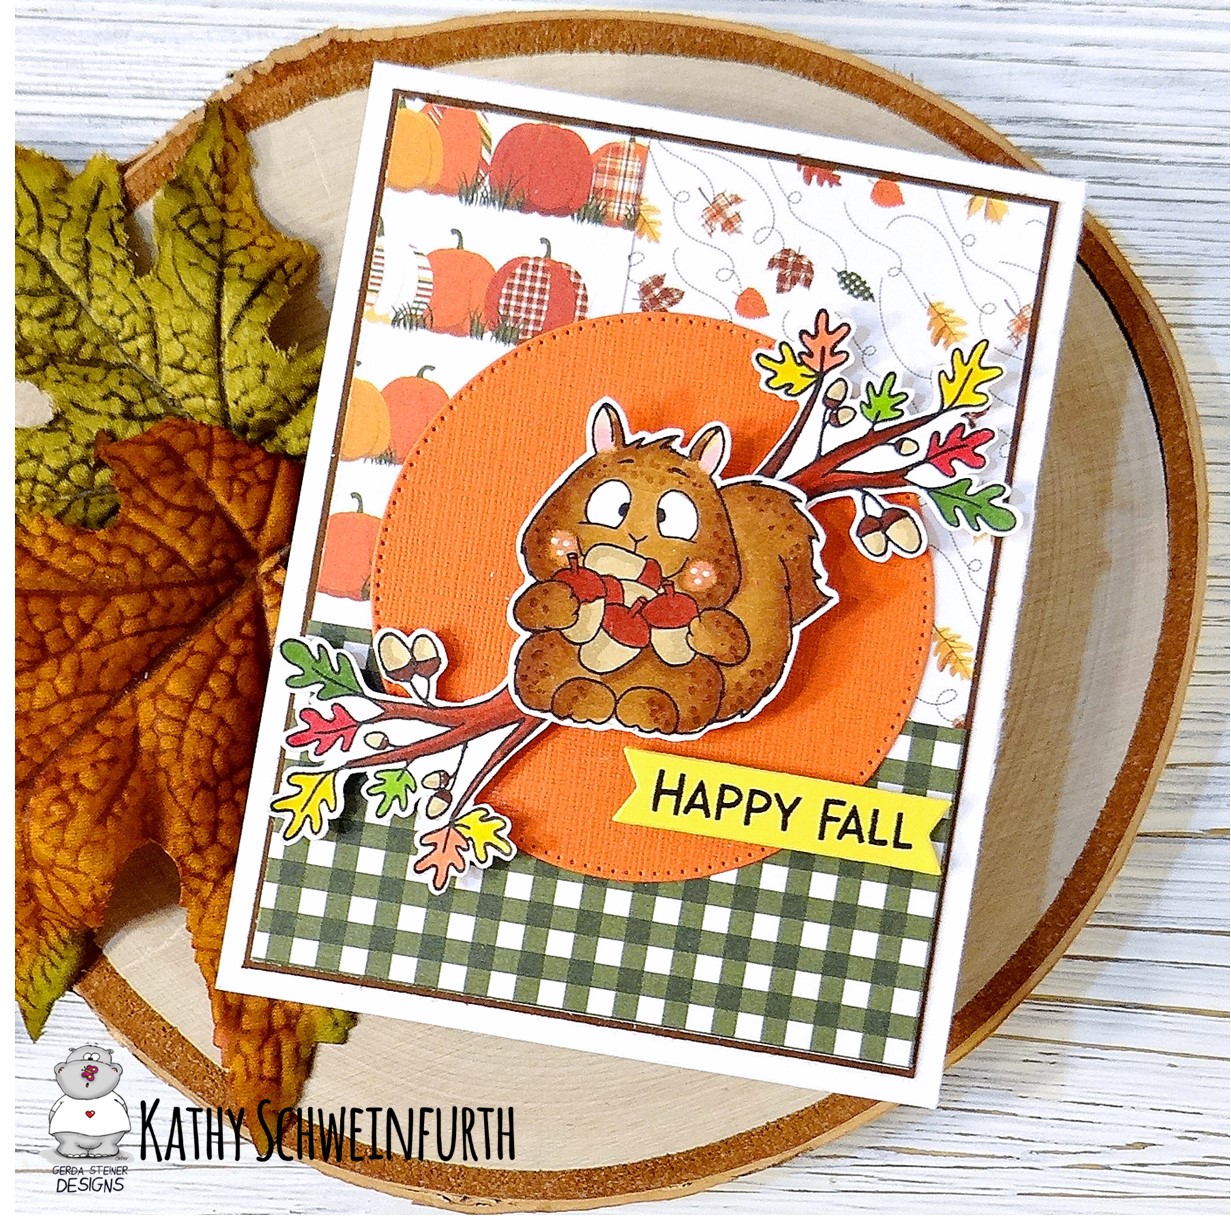
Hey, Crafty Friends - are you excited that Fall is right around the corner! Kathy here sharing my last card as a Gerda Steiner Designs Guest Designer - it's been SO much fun and am so grateful to have had this opportunity to highlight some fabulous goodies from Gerda Steiner Designs!!
For my card, I first layered dark brown cardstock to the card base. I then layered several different fall-themed pattern papers to the dark brown cardstock base. Using a pierced circle die, I cut orange cardstock for a backdrop to the copic colored images.
This darling squirrel and branches/leaves images from the HAPPY FALL stamp set were Copic colored and fussy cut then popped up onto the card. The sentiment, also from this set, was stamped onto yellow cardstock and cut with a mini banner die then popped up onto the card.
Hello everyone! I'm Beverly Gerard, and I'm totally tickled to have been invited to guest design for Gerda Steiner Designs! Today I'm sharing a card made with the upcoming Cup of Love stamp set.
My card was inspired by a recent visit to a mom & pop country cafe. There's the red & white tablecloth setting the place for a polka dotted teacup full of sweet joy. To create the wall texture, I scored kraft cardstock using 1/8" scoreboard lines before adhering it to the card front. In order to give the cup a nice contrast of polka dots atop the gingham paper, I masked off the mouse and cup interior with a mask cut from a sticky note while blending Ranger's 'Barn Door' Distress Ink through the dotted stencil.
The adorable little mouse is colored with Copic markers W00, W0, W1, and R000. Let me warn you though, this little mouse is going to keep calling you back for more play time. In fact, I colored two! I fussy cut the second image and layered it with foam tape atop the original mouse in the cup. Additionally, I couldn't just leave the cup sitting flat atop the tablecloth, so it's lifted with foam tape as well.
Did you notice the bitty tea bag tag? TheCup of Lovestamp set includes 3 little stamps to choose from for stamping on the tag: smile, take a break, and love you. Plus, the set also includes 3 larger sentiments for placement on your card: Thinking of you, Take a Break, and You Deserve It.
Thanks a bunch for visiting! I'll be back again next week with another fun way to use this sweet stamp set!
WOW! I am so excited to be a guest designer with one of my favorite stamp companies!
Living in a desert, the idea of a nice cool day watching this little fella run around in the yard gathering up acorns to share with a friend is more than appealing. I like to think he is preparing for a party. Gathering all the goodies for the treat table. What would you bring to a fall party? Pumpkin Pie? Spiced apple cider? Mmmm, I'm ready for the crisp fall air and pumpkin-spiced everything.
I was instantly in love with this little guy when I saw him for the first time and knew he needed a pumpkin-shaped card to gather all his fall fantasticness for the party.
I made a quick video that will also be premiering on my YouTube channel today. I am going to add it right here for you! I also made a fun project sheet to share, and you can find that on my website.
I hope you enjoy and have as much fun as I did making this Nuts About You card.
Fall will be here soon! I'm so excited to see what you can make with this amazing set of stamps. Be sure to tag GSD and The Craft Dash on social media so I can see your beautiful work!
Thank you so much for taking some time with me today! I appreciate and look forward to connecting with all of you! Have a fantastic Day
Hello, it's Laurie again and welcome back to another card for the new Halloween Ghost stamp set that will be released soon. I call this one, Group Photo.
I did a lot of masking for this one. I used intense black ink from Honey Bee stamps to stamp them all out, which is a Copic friendly ink. Then spent some time coloring them all out. I did add some goofy/scary bloodshot marks to the ghost holding the sign with a red gel pen. All of the eyes are highlighted with glossy accents. So in real life they a super shiny, but it never shows well in photos.
I will be back next soon with another card to showcase this fun new set that will be available in the store soon.
Hi everyone! I'm Misty from The Jolly Fat Elf and I'm excited to be back with another project as a guest designer for Gerda Steiner Designs!
I had so much fun creating my last card! I loved how cute the characters from the Snow Angels Stamp set looked frolicking in the snow!
For the 3rd project using this stamp set, I'm making fun polaroids using the leftover images colored in my last video!
I used my Copics to color each of the little images and fussy cut them out with my scissors. I picked a fun, simple blue patterned paper rather than ink blend a background. When choosing papers for your card, remember to have a large print, medium and a print that is somewhat solid. For this card, my large print is the plaid, my medium is the gingham and the small is a tone on tone polka dot!
I added a fun red Cardinal to round out our cute little characters. I used a Polaroid die from my stash and letter dies to cut out the word merry from the same patterned paper as the picture backgrounds!
I had so much fun with this card and I hope you have as well! You can watch the process in the video!
Who's ready for fall?! Kathy here sharing one of my first fall cards featuring the ADORABLE new, NUTS ABOUT YOU stamp set!
While summer is one of my favorite seasons, I'm looking forward to cooler weather and getting out my light sweaters. Not to mention, I love fall colors!
For my card, I layered dark brown cardstock onto the card base. I took strips of four different fall pattern papers and glued them together. I then took orange cardstock, die cut a circle opening and then adhered the strips of pattern paper behind the opening before adhering the entire orange cardstock piece to the dark brown cardstock.
Is this little guy the cutest or what?! Our little squirrel friend, acorns and sentiment are from the new NUTS ABOUT YOU stamp set. The images were copic colored, fussy cut and popped up onto the card. The sentiment was gold heat embossed onto a strip of brown cardstock then placed in the center of the die cut circle opening; tucking in the ends. To finish, I added yellow glitter enamel dots.
Hello everyone, Dania here again (aka Dania's Doodles) excited to be guest designing once again. This time I got a change to play with "Halloween Ghosts" and a very cute "BOO" die. The "BOO" is just darling. My favorite feature about this die was the shadow. The shadow has the opennings for the "O's". Oh and how I love this design. I can just see googly eyes inserted! @@
For my first project, I created a slimline card. I started by inkblending the background using Distress Oxide inks to create a moonlit night sky. The little ghosts were colored in alcohol markers in a pale blue for a slight glowy shadow. To create the moon, cut and adhere a circle mask. Then ink the background in colors of your choice, remove the mask and ink in the moon overlapping into the dark sky for an extra glow. Splatter white paint for added interest. The small sentiments included fit perfectly in the sign carried by the one ghost. For this card I cut the BOO shadow in vellum.
For my second card, I designed an A2 sized card. Wanting once again to showcase all the ghosts I used a wonky grid background and pattern paper. Grids like this one is a great guide to group objects. The ghost in this case were colored in pencil with no lines. I used the main senitment in the set, but made sure the ghost holding the sign got his sentiment. :)
I want to thank Gerda for trusting me to showcase a couple of her darling stamp sets this month. You can find my work on Facebook and Instagram.
AND don't forget about the monthly challenges for a chance to win. I have won a couple of times and it has been a thrill to shop the cuteness.
There are 8 super fun images in thePool Piggiesstamp set, along with 1 sentiment.
All of the little piggies are adorable, but I was drawn to this one reading his book. I love to go to the beach and get lost in a good book so he definitely called to me lol!
I started my A2 card by adding 2 different patterned papers to the front. I added a strip of yellow to help divide the patterns a little. Next, I die cut a large tag from some blue patterned paper and created a little beach scene by adding a small amount of white cardstock to act as the sea foam along with some Kraft cardstock to act as the sand. I die cut a palm tree and added that to my tag as well. Next was the really fun part! I stamped that littlePool Piggie, and his beach towel, with some Memento Tuxedo black Ink and colored them in with my Copic markers. Once I had both images colored, I did a bit of fussy cutting and added them to my tag. I stamped a sentiment from theHello Friend Tortoisestamp set with some Black Versafine Ink, trimmed it down and added it to my tag, tucking it under the palm just a bit. I added my tag to my card front and completed the look with some yellow twine, enamel shaped shells and some white Nuvo drops.
Hi everyone! Andrea Jacobsen here bringing you another card using the fabulous Cupcake Mice. This time I also used the dies. I love a good interactive card but don't have the patience to "figure" out all the math. When I see a die that will do all that work for me, I typically will buy it. Today's card uses just such die.
I will apologize up front. I didn't remember to jot down all the Copics I used to color my critters before I put them away. I do know the colors I used for the mice because I used my go to brown colors which are E33, E35, and E37. I used this combo to color both mice. I colored several of the cupcakes and cupcakes with candles. I didn't use everything that I colored and die cut but I used most of it.
For today's card, I used the Peek A Boo pop up die set from Lawn Fawn. I have had this in my stash for months and just used it for the first time. I love all their interactive dies. While I love interactive dies, sometimes I don't explain everything the best so I am also linking the video from Lawn Fawn on how to use this die set. These mice and this die make the perfect card for anyone in your life. I have included pictures of my finished card in different stages. I have picture of it closed, open, standing, and showing that it will fit into a regular A2 envelope.
This is the card closed
Open with the "surprise"
I also wanted to show that the card will stand up because I know most people like to display their cards.
This final photo is to show that even though the card is interactive and looks bulky, it will fit into a regular A2 envelope.
I have really enjoyed sharing these cute birthday mice with you. I hope everyone has a great Saturday!
Happy Summer! Kathy here sharing a sweet summer card featuring the adorable MELON MUNCHER stamp set!
I hope you are enjoying these last days of summer not to mention some yummy summer fruit favorites like watermelon!
For my card, I first layered dark green cardstock to the card base. I then added this pattern paper layer, putting glaze on the "watermelon pits" to make them shiny. Using a pierced circle die, I cut dark green, black and lime green cardstock and layered them together for the backdrop for this super sweet MELON MUNCHER image which is copic colored and fussy cut. The sentiment from this set is white heat embossed on a black cardstock mini tag and I added a lime bow.
Hi everyone! I'm Misty from The Jolly Fat Elf and I'm excited to be back with another project as a guest designer for Gerda Steiner Designs!
I had so much fun creating my last card! I loved how cute the characters from the Snow Angels Stamp set, looked lounging in the pool on their vacation! It was such a fun card to make!
For today's project, I'm keeping it traditional with a fun and festive Christmas card! Santa, Rudolph and Gingy are celebrating a job well done after the holiday rush!
I used my Copics to color each of the little images and fussy cut them out with my scissors. I picked a fun, simple blue patterned paper rather than ink blend a background. If you know me, you know that my paper collection is a bit out of bounds! I'm on a mission to use some of it up.
I decided to adhere my North Pole sign flat and pop up each of the characters with foam tape! It's not a Christmas card for me unless there's glitter or shimmer. I added a bit of shimmer to each of them!
I had so much fun with this card and I hope you have as well! You can watch the process in the video! Be on the lookout for my next project and be sure to say hi in the comments!
Supplies:
MFT Intense Black Hybrid Ink
Copics Used:
R 59,46,35
yr 09, 16
E 37,35,53,21,34,30,21,51
I used a stencil that had clouds and birds for the background and used Distress Ink in Mustard Seed and Concord & 9’s Harbor. I used my blender brushes to apply the ink.
Next, I colored up the bunnies with the Copic markers below.
For the grass I used part of a Lawn Fawn die with green cardstock to complete the scene!
Hello everyone! Dania here aka Dania's Doodles. I'm so thrilled to have this opportunity to create with this very cute stamp set "Nuts About You." I found this darling squirrel easy to create with and perfect for fall projects and beyond.
For my first card using this cutie, I stamped and colored (I used a combination of alcohol markers and colored pencils) on a panel and layered on an embossed panel for some texture. Finished off with a jute bow and using the nut and leaf from the set, I created an embellishment for added intereest.
For my second card, I decided the squirrel was to be a gray. Using the nut and leaf in the set, I created a wreath around the squirrel. I accented the card with a ribbon and bow and added some fall leaves from my stash for embellishment.
Here is a close up so you don't miss the cuteness of face. A darling squirrel face!
Thank you for stopping by and I hope you left inspired to create today and bring a smile to someone's face.
Hello - I am thrilled to be asked to design a few cards for Gerda Steiner Designs. I'm delighted to introduce you to a new die that will be available over at Gerda Steiner Designs soon. This one uses the new Boo die. I did something a little bit different with it and inlaid it after embossing the card front with several of the die cuts. The designer paper is from Die Cuts With a View.
Here it is up close - I cut out a few and used them to emboss the card front.
The set does come with a shadow die, but I did not use it since I inlaid the die cut after embossing it.
I hope you are inspired to get this super cute stamp set and design a few cards for your friends and family. They also can be used on treat bags or Halloween decor.
Stayed tuned for more Halloween goodness later this month with a new stamp set to be released soon.


.jpg)
%20(1).jpg)
.jpg)