Showing posts with label shaker card. Show all posts

Sunday, September 29, 2024

Shake your way into a NEW RELEASE SNEAK PEEK!

 Greetings everyone! It's me again, Jessie Scott (@chevy.scott on IG) here to share a SNEAK PEEK of another fun holiday set coming out next month! 

This card uses adorable critters from the new "Woodland Holiday Friends" (and cutie from the other new "Caroling Woodland Animals" set as well). 


I love shaker cards for Christmas! Its like shaking a present haha!

I cut the bunny from the large tree combined focal image so I had 3 critters from this "Woodland Holiday Friends" set, then grabbed the super cute mouse from the "Caroling Woodland Animals". I colored these cuties with my OLO Markers.


The only thing that's left is to emboss the fun "Holiday Hugs" sentiment and then assemble! I had some cute mini sequins and microbeads I was saving for a fun Christmas shaker. The frame is from Lawn Fawn, great for shakers with a nice focal sentiment, and so is the background paper.

Here's a video of the rest of the process!


Keep an eye out for the release!

See you again soon!

Sunday, September 22, 2024

BOO! Shake it up with new Ghost Digital Stamps!

 Greetings everyone! It's me again, Jessie Scott (@chevy.scott on IG) here to share another too cute to spook card with the new Ghost Digital Stamps from Gerda Steiner Designs! See the Collection of Digital Ghosts!

I used three stamps to make this card. Boo - Cute Ghost, Coffee Lover Ghost, and Pumpkin Ghost


Aren't they adorable??? This time I colored my ghosts a spooky green instead of the blues and greys option from last time
For this one, I didn't think it needed a sentiment other than the "Boo" sign in the center image.

The only challenge with a digital stamp is sizing it right so you don't need to print it again haha. I usually sketch out my card idea on scrap paper, decide where the image is going, then measure it. 
 

I use the "insert - shape" option in MS Word to draw a box to the shape I need to fit to. Before I print, I delete the boxes.

Ok so now for the fun assembly! Shaker cards are my favorite this time of year and I had a lot of shaker bits to use up. Here's a video of the rest of the process!


 Get your shake on!


How do you like your ghosts?  Spooky blues or ghostly greys or how about this creepy green? 

See you again soon!

Friday, April 5, 2024

YOU ALWAYS MAKE ME SMILE


Hello all you creative minds, 
Nicole here again from Hamburg/Germany.

Today we're going underwater and meeting some friends from the stamp set "A Whale of a Time".


For an underwater shaker card I used a great design paper from Whimsy Stamps "Under the Sea".

First I punched out the design paper with the punching template.


Then colored the stamp impressions with the markers from Ohuhu.
Color combination:

Waale: MG020, MG030, MG060, MG100

Octopus: GY7, G260, G270, G470, G080

Cheeks: R120, R188

And then cut out.


Before you glue the windows of the card, you should consider positioning the cut-out backgrounds on the base card. I tend to forget that from time to time!😉

Then you can fill the shaker elements into the squares and apply the front card with 3D tape.


I embossed the stamp text with WOW embossing powder/white and then attached it to the card with the cute friends.
In the beginning I always thought shaker cards were too much work, but once you understand the system, you can turn all the punching templates into a great and effective shaker.


For more inspiration, come and visit me on Instagram under "Stempelfiziert".

I would be delighted to help you.


 I hope you enjoyed my post and that it has inspired you a little.


See you soon 

Nicole aka Stempelfiziert

Friday, February 16, 2024

Hello creative minds, 
Nicole here again from Hamburg/Germany.
I'm here to inspire you creatively once again using the "LOVELY PANDAS".


In a small illustrated instruction I leave you again my combination of the Ohuhu markers.

I ordered these little love letters especially for this stamp set because they are so perfect for a shaker card.


The picture frame punching template is from Whimsy Stamps and is always great for designing a shaker card.


I always set smaller accents with a white gel pen and a gray polychromo for the shading.


I hope the instructions are clear for you and you can implement it for yourself.

If not, you can always contact me on Instagram at Stempelfiziert


                                I wish you a nice creative weekend and hope to see you soon.

                                                        Yours Nicole aka Stempelfiziert


Saturday, January 27, 2024

Hi creative minds

today I am a guest designer on the blog and I am working with the new stamp set BIG GUY.


I opted for a Shaker card that I put together using the die-cutting templates from Create a Smile -postal stamp- and Simple Lettering -hearts-.

I also created a background with DistressOxideInks and a stencil from MFT (MyFavoriteThings), as you can see in the small illustrated tutorial.


I colored with the markers from Ohuhu Art and I always find few color combinations, so I always try to give them to you.

I myself spent a day trying to find the right combinations for me.
I like to use a gray polychromatic pencil for shading and a UNI POSCA pencil in white for light accents.


The sentiment on the card is stamped with a black ink pad and I embossed the HUG to make it look nicer and more dominant in the shaker element.


If you have any questions or suggestions, please leave a comment. I look forward to hearing from you.

I hope you like the Mammoth Shaker card with the great stamp set BIG GUY .

Creative greetings
Nicole alias Stempelfiziert


Thursday, October 26, 2023

A TOAST TO YOU...

Howdy friends and fellow crafters. LeeAnn here with my last guest post for Gerda Steiner Designs. I have enjoyed the last 2 months so much working with this great company and stamps. 
Today I am bringing you this fun shaker card that just screamed out to me as an idea when I saw this stamp set. 


 I used a fun stencil to ink blend the background of course in a rainbow of colors. I used Copic markers to color this adorable pigeon with his toast. 

The sentiment is stamped with Kaleidacolor Royal Satin Dye Ink, which is 5 colors in one pad to give this great ombre blend that went with the background. 

i used rainbow sprinkles confetti and found this toast confetti in my stash as well which just solidified the fact that I had to make a shaker card. 

Have a great day everyone... 

 I hope you have enjoyed this project, I hope to be back in the near future. In the mean time, I can be found at Leeanngetscrafty on all social media platforms and would love it if you were to follow me for other fun inspiration. 

Monday, September 25, 2023

BOO!

hi there friends and fellow crafters, I am so excited to be here on the GSD blog this month with you all, asharing some fun projects I made. 


Today's project uses the Halloween Ghosts, and I could not resist making a shaker card with them because, well... shaker. 
This is a full front A2 shaker card using Halloween Caviar shaker pellets along with Doodlebug Designs Pattern Paper. 

You can find me at leeanngetscrafty on all social media. Have a great week and I'll be back on the 11th with my next project, which is just too adorable. 


Sunday, August 6, 2023

Happy Fall Shaker Card by Annie Collins

Hello Crafty Friends - My name is Annie Collins -
This month I am so honored to be Guest Designing for

I created this fun fall shaker card featuring


Here's a video showing you the process. 
I figured it would be easier to show you the process via video
 than lots of pictures. I hope you enjoy it. 


Copic Markers: E21, E35, E39, E55, E57, E59
B45, G24, R59, RV21, RV34, V15, Y38
Sequins, Confetti and Clay Bits
Accent 80lb Ultra Smooth Cardstock: Opaque White
Recollections Brand 110lb Cardstock: Dove White
Recollections Brand 65lb Cardstock: Teal Green

This little stamp set is perfect for fall card as well as a love card. The sentiment - nuts about you sentiment is perfect to let someone know that you are thinking of them. I really love this little set. The Squirrel is so adorable - holding all the nuts.

For more inspiration and some fun join the monthly challenge

I would like to thank Gerda Steiner Designs for inviting me
to Guest Design for them this month.

Thank you for stopping by the Blog today. I hope you found some inspiration!

How to find and follow me:
Annie Collins
Instagram: @anniec09
Facebook Page: Little Wings Creates
YouTube Channel: AnnieCollins09

Wednesday, December 28, 2022

Penguin Birthday Shaker Card

Hello everyone, it's Karen here today and I hope you had a good Christmas holiday! I've got a shaker birthday card for you today with some happy, little penguins.

I've used the Penguin Cake - 4x6 Clear Stamp - GSD799, to create the cake and penguins.  I masked the two front penguins after stamping them on some Neenah Solar Crest card, and then stamped the cake and the middle penguin afterwards.  I used Copic markers to colour everything in, and then attached the image to the front of an A2 sized card.  I added some Distress Oxide Shaded Lilac ink around the outside of the penguins in a circular shape.

The paper for the card front is from the Grunge Light collection by Craft Consortium, and I cut out a circle that was big enough to allow the penguins to show through.  The sentiment is from the same stamp set, and I just used Versamark ink and white embossing powder and heat set it.  On the back of the card front,  I placed double sided adhesive tape around the opening, removed the backing paper, and then attached a piece of acetate that was big enough to cover the opening.  Next, I placed two layers of foam tape all around the opening and over the rest of the back of the card front.  I added some shaker bits over the penguins, before removing the backing of the foam tape and adhering the card front to the base. 

I used the Memory Box Bubble Circles die to cut the rings out from white cardstock - I cut two of these.  I actually cut the circles from scraps of inked up card I already had, but I think it would be even easier to just use markers or pencil crayons to colour in the circles.  I added Stickles Glitter Glue over top of the circles and let it dry before attaching the rings to the card front with glue.  And then all that's left, is to give the card a good shake!

Thank you so much for stopping by!

Tuesday, February 9, 2021

Shaking up Some Positivi-Tea

Hi everyone and welcome!  It’s Karen here today and I’ve got a shaker card for you that features the new Gerda Steiner Designs stamp set called Positivi-Tea.  This is such a sweet stamp set and makes such an uplifting card that can be sent to anyone during these difficult times when we’re all trying to stay healthy and sane. 

This is the front of the card and as you can see, it’s got a shaker element to it. I’ve die cut the shaker frame several times from a Sunny Studios Frilly Frames Herringbone die, but any frame die would work here. I backed it with a purple pearl cardstock and filled it with some coordinating shaker elements. Since I wanted to have a fun inside element, I’ve only added the sentiment and this sweet bear to the front of the card. I coloured him with alcohol markers (listed below), and mounted him just at the side of the card. I white heat embossed the hearts on the cup and teapot from a small heart stamp I found in my stash. 


So for the inside fun, I’ve added the little mouse with his tea set, complete with a used tea bag! I coloured and fussy cut them out before adding them to the card.  I love that inside sentiment and I think it’s just such a nice, inspiring message to send anyone. Thanks so much for stopping by and I hope you’re having a great day! 

Alcohol markers used:

Bear - Spectrum Noir in BG 7, BG 5, BG3. Copic markers in C1, C0, R00

Mouse - Copic C2, C1, C0, R00

Tea Set - Copic B66, B63

Tea Bag - Copic E25, E31, E53, Colourless blender 0. 

Tuesday, December 1, 2020

Sending Hugs Shaker Cards (from laminating pouches)

 Hello and welcome back. It’s Karen here today and I’ve got a couple of shaker cards to share with you today made with the sweet, new Sending Hugs stamp set from Gerda Steiner Designs. I’ve made both my cards into Christmas cards but this stamp set is so versatile and could be used year round to send a paper hug, especially during these difficult times!  I’ve made both my shaker fronts from laminated pouches and I have a video for you if you want to see how I made them.  

PLEASE CLICK HERE to watch the video.


This is my first card and I have to say I love that sentiment! I actually made this into a Christmas card which I think will be totally appropriate this year as we all stay socially distanced (I added  a Christmas sentiment inside).  I’ve listed the copic marker colours I used down below.  The Double Stitch Rectangle Frame die is from Poppy Stamps and the little silver bush is die cut from the Sizzix Holiday Greens, mini die set. The shaker front is made from a laminating pouch with MFT’s Christmas Background stamp done in white ink. 
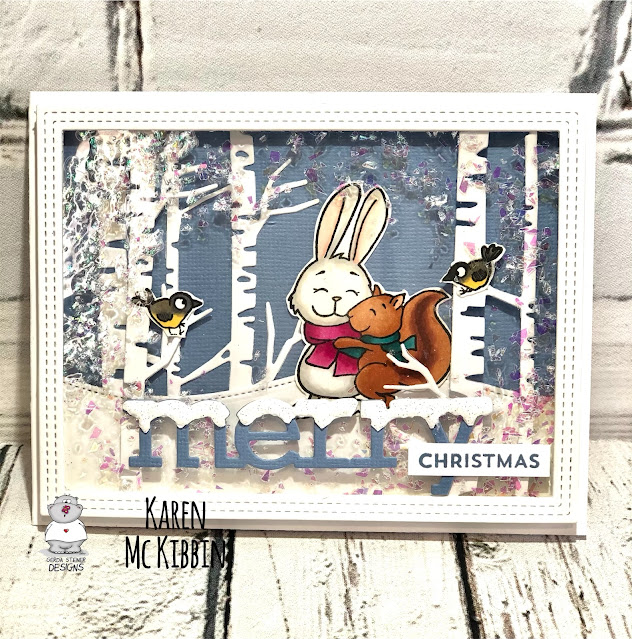


This is my second card, and although it’s not a shaker card, there is some dimension to it as some of the trees are attached to the frame and sit off the background.  I added some Stampendous Shaved Ice flakes to a laminating pouch to just cover the outside edges of my card front, so it gives it a slightly frosty look.  The sentiment is the Snowy Merry Christmas die from Poppy Stamps and I’ve added some Nuvo Glitter Accents in Fresh Snowfall on the tops of the letters.  

Thank you so much for stopping by and I hope you’re having a great day! 

Copic Markers used:

Snowman - BG0000, C1, C0, Y38, YR16, B66, B63, BG57, BG18

Birds - N4, Y23, W4

Rabbit - W3, W2, W1, E40, C0, R20, R00, RV55, RV17

Squirrel - E13, E15, E17, E18, BG49, BG13

Wednesday, June 17, 2020

Birthday Bear Shaker card

Hello everyone, it’s Karen here today and I’ve got a full size shaker card today made with a new stamp set from Gerda Steiner Designs called “Birthday Bear”. This is an easy card to make and it even uses a surprise material!


If you would like to see a video of how I made this card on YouTube,  please CLICK HERE


I coloured in my images with Copic markers and then applied some Glossy Accents to the banner flags, the bear’s hat and the balloon. Once that was dry, I fussy cut out my images.

On an A2 size piece of pink cardstock, I ink blended some Distress Oxide inks around the edges in Picked Raspberry and Seedless Preserves. Once the ink was dry, I used an anti-static powder over the whole card front. I find that helps the shaker material move better, and I wanted to heat emboss my sentiment on the card front. After deciding where my images would go, I stamped my sentiment and heat embossed it with clear embossing powder.

Now for that surprise material!  I save the cellophane envelopes that all our stamps and dies come in and use this for full size shaker cards. I cut out a rectangle from a cellophane wrapper that was approximately an inch wider than my card front all around. I centered this wrapper on my card front and then flipped them over. I used my tape runner to run a piece of tape along the bottom edge of my card front and then folded the wrapper up onto the tape and pressed it down. I repeated this with the 2 sides as well and trimmed down the excess wrapper in the corners. Now you have a pouch that is open at the top and can be filled.

The images on the front of the card can either be glued inside the pouch (in which case, adhere them before assembling the pouch), or they can be glued to the front of the pouch. I chose to glue mine to the front on the cellophane wrapper. I find it easier to do this before I fill the pouch because everything is flat at that point. Once they were glued down, I filled my pouch with shaker bits. Then, the top was adhered on the back with tape runner again and the corners trimmed. I don’t pull the last wrapper edge quite as tightly as the other edges, as this allows a bit of room for the shaker bits to move around freely.


I adhered the shaker pouch to my card base with my tape runner and then stamped my inside sentiment. I finally added the adorable bear arm with the balloon to the inside along the edge of the card, and trimmed off the excess. How much fun is that bear arm?!

This is a very quick and simple card, but it is so much fun to shake up and see all the inside bits move around. I hope you’ll give it a try!

Thursday, March 12, 2020

Happy St. Patrick's Day!

Howdy all!  I’m Allison Cope and it’s almost St. Patrick’s Day so I thought I’d share a fun themed shaker card with you today.

I used the adorable new “St. Patrick’s Day Cat and Hat” digital stamped image for my card creation.


I had fun coloring in this sweet little putty-tat with Copic Markers.

I used lots of shiny things on my card, including some of my own foiled shamrock back ground paper.


I had actually filmed the entire card making process but somehow my files became corrupted and I couldn’t retrieve them.  So sorry!  Hopefully next time!

Don’t forget to check out all the wonder digital stamps in the shop!  There’s new images being added regularly!

Hoping you had a wonderful and creative week!

~ Ally ~


stamps: Gerda Steiner Designs (St. Patrick’s Day Cat and Hat)
cardstock: Copic (Ex-Press It), Recollections (110# & 65# White Cardstock)
ink: Copic Markers, Catherine Pooler Designs (Melon Ice, Lime Rickey, Grass Skirt), FineTec Paints (Bronze
dies: MFT (Stitched Rectangles), Simon Says Stamp (Thin Circle Frames)
sequins: Studio Katia (variety)
foil: iCraft (Deco Foil – Green)

Sunday, February 9, 2020

Valentine Cats

Hi everyone! It’s Jeannie (InsideoutJeans) on the blog today with Gerda Steiner Designs’ newest stamp set named, Valentine Cats. It's the perfect set for Valentine's Day and paired with some cute kitties, it's so fun to play with!


For this card, I decided to focus on the cat who was sitting in the pile of hearts. I stamped and colored him using Memento Tuxedo black ink along with the two sentiments I used for this card.


In the background, I wanted a mix of purple and red from the Ken Oliver - Colorburst Brights with Canson XL watercolor paper. I added water, it mixed together and I ended up with this purple background with some hints of red.


Because I wanted to make this a shaker as well, I used the largest heart from the Stitched Heart dies to create the shaker opening. Using foam tape, I added it to the back of my background panel and filled the opening with Skip a Beat embellishments. Once that was done, I added the main kitty and added some Candy Stripe washi along the top and bottom card panel to give it an additional pop of red.

Thanks for stopping by today and I hope you get inspired to create. Come back again soon for more inspiration and ideas! Happy Crafting! 


Wednesday, September 11, 2019

Coffee Monster - Halloween Shaker Card


Hello and Happy Wednesday Crafty Friends!  Tina here, I am up on the Blog today, sharing a monster of a card using the fun Monster Coffee stamp set:) This set is available over at the Gerda Steiner Shop! The expressions on these not-so-scary monsters is just to funny!!  One looks like he is ready for Halloween candy, one looks like he is in full blown, "I'm gonna get you" mode and the last one seems to have ate a bit to much candy and is not feeling that well.  Can you guess who's who?  I love the coffee sentiments that come along with the Coffee Monster stamp, but for today I used a Happy Halloween sentiment from the sweet Peekin' Pumpkin Kitty Stamp set, with Halloween not too far away, I thought we would make a Halloween Monster card.


Thanks so much for stopping by!  If you would like to see how I created this card check it out down below🙂  Just Click on the Coffee Monster Tutorial Link:)  Have a Fantastic and Crafty day!  Hugs, Tina


Wednesday, July 17, 2019

Fall smooches

Hi everyone. Lise Mariann here agin to show my second and last card as this month's guest designer. I would like to thank Gerda so much for having me. Such an honour.

For this card I have chosen to make a fall smooch shaker card using several of Gerda's stamp sets.

I started by stamping the kissy-mice (from the "Fall in love" stamp set) and the mushroom and wreath (both from the "Foxes" stamp set).

I colored all the images using copic markers and gave them some details and highlights using a white gel pen. I then fussy cut the images.


I cut a circle from my card panel (cut to size using a stitched rectangle die), glued my wreath on top of the circle and glued a piece of acetate behind the panel. 

To create the shaker I doubled up foam tape around the hole on the back, filled the shaker with beautiful sequins that shifts in color between yellow, orange and green depending on the angle you look at them and to complete the shaker part of the card I glued a piece of cardstock to "close" the shaker.

I stamped the sentiment (from the "Frogs" stamp set) on the panel before I glued on the mice and the mushroom. I popped the mice up on foam tape to create dimension.

I attatched the card panel on a white card base and finished the whole thing with a drop of glossy accent on the noses of the mice.


Take a look at the video below to watch the shaker card "in action".


I wish you all a wonderful day.
x Lise Mariann