Sunday, February 27, 2022

Ladybug Happiness

Hi everyone! It’s Jeannie (InsideoutJeans) on the blog today with a scene card featuring two Gerda Steiner Design’s stamp sets named, Happy Bee-Day and Ladybug.

I stamped images from the Peony images from the Happy Bee-Day stamp set and did a bit of masking so I could have them clustered together on the right hand side of the card.


I also added three ladybugs from the Ladybug stamp set. Because I have masks for everything already, I ink blended the background. I colored up the rest of the scene using copic markers and then I added the sentiment in the open space to finish off the card.


Thanks for stopping by today and I hope you get inspired to create. Come back again soon for more inspiration and ideas! Happy Crafting! 


You've got mail....!!

 Hello friends...

I'm back with some card inspiration today using the Owl my love stamp set from Gerda Steiner....

Yesterday I showed you a little tag with this stamp set so today I thought I'd share how I have used it on a card also!!


To create this card I started with a white cardstock base. Using the Happy mail stencil from Create a Smile stamps I blended over the whole base with a pink and blue ink to give the happy mail pattern.... 

I coloured up the cute little owl hanging onto his mail with Parkoo alcohol markers and then added it to the cardbase with foam tape for dimension!!

Finishing the card off with a sentiment and a touch of pretty sequins...


I hope these projects the past two days using the Owl my love stamp set have inspired you to use your stamps to make tags and cards, you could even make a matching pattern paper to wrap the gift!!

Happy crafting, hugs Ashlee.

Saturday, February 26, 2022

Owl my love tag....

 Hey my crafty friends...

I have a little tag to share with you today using the set Owl my love from Gerda...

This set includes an adorable owl holding onto some mail along with a bunch of sentiments that co-ordinate perfectly!!


To create this tag I started with a piece of pink cardstock and die cut it from the bookmark cool cuts die by Create a smile stamps. I then used a happy mail stencil with CPD Twilight ink to add some envelopes to the background!!

I stamped the cute little owl and coloured it with alcohol markers before fussy cutting it and adding to the tag with foam tape. To finish it all off I added the smile sentiment and some twine to tie it to the gift....


I hope you enjoy this little tag, be sure to come back soon as I will have a card to share using the same stamp set. Happy crafting, hugs Ashlee.

Wednesday, February 23, 2022

Bunny Friends Thank You Card

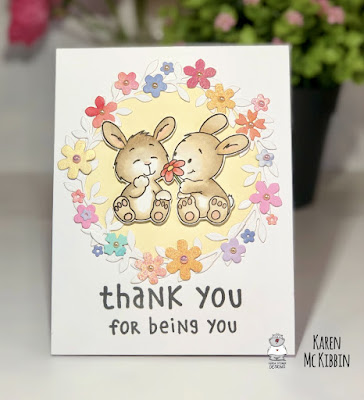
Hello and welcome, it’s Karen here again today. We’re having a little stretch of very cold weather here at the moment, so I decided to make a springlike card to warm me up! These little bunny friends were perfect for the occasion. 


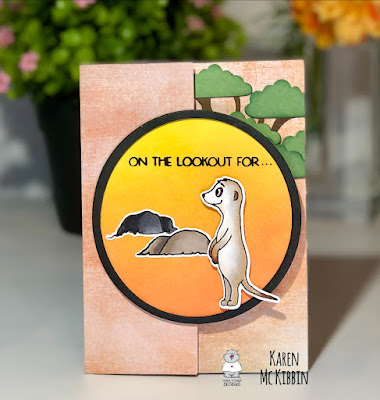
I stamped the adorable image from the “Bunny Friends” stamp set onto Neenah Solar Crest 80# cardstock, and coloured it in with Copic markers before fussy cutting it out.  I masked off my card front with some contact paper that I had die cut a circle from.  I ink blended this circle in yellow ( I used some Cosmic Shimmer Colour Cloud ink in Lemon Meringue, but any ink would work). I used a grey ink to stamp and clear heat emboss the sentiment, which is from the same stamp set.  

Next, I die cut a variety of flowers from scraps of inked up cardstock I had in my “To Be Used One Day” box (that’s the box where all those bits and pieces go when you’re just not sure what to do with them!).  I used the Spellbinders Petite Floral Potpourri die set for this, as the flowers are quite small and delicate.  Once I had everything cut out, I started with the leaves to build a wreath, and glued them in place around my inked circle.  Then I added in the little flowers around the wreath.  I mounted the bunnies on foam tape and popped them up in the middle.  Finally, I added a few pearls to the flower centres to give them that little sparkle.  Those little bunnies just steal the show with their cuteness! 

Thank you so much for stopping by and I hope you’re having a great day! 

Copic markers used: E40, E41, E42, E43, E31 and R00

Tuesday, February 22, 2022

You Rock!

Hi there,

it's Tanja here again and I used the Gerda Steiner Designs You Rock stamp set to create this Banner Card:

  • stamp the big rock, the sentiment from the Gerda Steiner Designs You Rock set with Lawn Fawn Jet Black
  • color the image with Spectrum Noir Triblend Markers and add extra shading with Faber-Castell Polychromos
  • cut out a banner shape around the image
  • cut out another banner from patterned paper
  • cover a cardbase with patterned paper before adhering the banner slightly offset


Have a wonderful day.

Hugs,


Friday, February 18, 2022

Hope your birthday rocks by Noga Shefer


Hi crafty friends,  Noga  here and I am so happy to share with you another project for Gerda Steiner Designs today.

Today this is a card for a birthday.

My card featuring the  adorable  You Rock 4x6 Clear Stamp Set and You Rock 4x6 Die Set.
 
To make this card I took an A2 panel  of Bristol smooth cardstock.

I sponged kitsch flamingo and dried marigold distress oxide inks for the sky and peeled paint distress oxide ink for the grass.

Next I colored the sweet images using copic markers ang glued it to my panel.

To finish off I stamped a greeting from this set using black ink and added a white frame.

 I hope you enjoy the card I created and feel inspired to create!

Thanks for stopping by,

Tuesday, February 15, 2022

You are so Loved

Hi there,

it's Tanja here again and today I would like to show you this tag that I created using the Gerda Steiner Designs Valentine Penguins stamp set:

  • cut out a Clearly Besotted Stamps Rounded Tag from smooth white cardstock
  • stamp one of the penguins from the Gerda Steiner Designs Valentine Penguins set with Lawn Fawn Jet Black
  • color the image with Spectrum Noir Triblend Markers and add extra shading with Faber-Castell Polychromos pencils and highlights with a white gel pen
  • ink up the edges of the tag with Distress Ink peacock feathers
  • thread two strands of twine through the hole of the tag


I hope you got inspired.

Hugs,


Sunday, February 13, 2022

No Line Coloring -- Owl My Love

Hi everyone! It’s Jeannie (InsideoutJeans) on the blog today with Gerda Steiner Design’s stamp sets named, Owl My Love and Owl Rather Be With You

I really love how the sets can be used together... it's awesome. I knew that when I wanted to use the Owl My Love stamp set, it was perfect to be paired with one of the owls from Owl Rather Be With You


Of course, I couldn't help but do some no line coloring. To be honest, I have been not feeling like making cards and normally when I am in this slump, I'll just stamp and color. This worked out because I did need to extend the branches from the Owl Rather Be With You stamp set. I also wanted to color them in different colors but with texture for interest. 


It's such a fun card and so easy to do. Once I finished coloring, I ink blended around the edges to give it a nighttime vibe but didn't have to do any masking... I was just really careful around the images. 

Thanks for stopping by today and I hope you get inspired to create. Come back again soon for more inspiration and ideas! Happy Crafting! 


Friday, February 11, 2022

Alma´s cute snowglobe .-)

Here is Alma and today I want to show you, how you can create a super sweet little present for Valentine or Easter: A cute snowglobe


I decided to create a little Easter Snowglobe with the cute rabbit from the "Easter Bunnies 4x6 Clear Stamp Set". Further I used the fence from the "Hoppiness 4x6 Clear Stamp Set" and the tree from the "Tangled Penguin 3x4 Clear Stamp Set" . Here you can watch a tutorial video:


To create the snowglobe you have to do the following steps:


1.) First of all you have to color your images. 

2.) Cut the colored images out

3.) Laminate the images

4.) Cut the laminated images out

5.) Take a jar.

6.) Use hot glue to stick the images.

7.) Fill the jar with water. 

8.) Add a few drops of Glycerine.

9.) Add a LOT OF GLITTER.... and more and more and more.... ;)

10.) Close the jar tight!

11.) Shaking Shaking baby ;)


Happy Crafting!

Wednesday, February 9, 2022

Fun Fold Meerkat Birthday Card

Hello everyone, it's Karen here again.  Today I thought I would share an easy fun fold card with you. It’s really just a trifold card with a bit of die cutting on the front flap. But it means there is extra room inside to add some more images so you can have a fun surprise for the recipient. I chose to use the “Meerkats on the Lookout” stamp set from Gerda Steiner Designs, because they are just so fun and there are quite a few images in the collection. Here’s a look at my card. 


Aren’t those meerkats just the cutest?!  The final size of this card is 5” x 3 5/8” so it’s similar to a mini slimline card. This really is a simple card fold and I’ve made a video for you showing you how I’ve made this one. If you would like to see how to make it, PLEASE CLICK HERE.

The tree die I used is from Elizabeth Craft and is just called “Tree”.   Here’s a list of the Copic markers I used for my colouring. 

Meerkats - W2, E53, E40, C2, C0, E27
Rocks - N6, N4 and W7, W5, W4

Thank you so much for stopping by and I hope you’re having a great day!


Tuesday, February 8, 2022

Your Kindness makes such a Difference

Hi there,

it's Tanja here and I created this sweet card using the Gerda Steiner Designs Fall in Love stamp set:

  • stamp the mouse couple from the Gerda Steiner Designs Fall in Love set with Lawn Fawn Jet Black
  • color the image with Spectrum Noir Triblend Markers, add extra shading with Faber-Castell Polychromos Pencils and highlights with a white gel pen
  • use grass paper, kraft cardstock, Neenah Desert Storm kraft cardstock and Gmund Beer Paper Weizen to create a background 
  • stamp the sentiment from the Altenew Sentiments & Quotes set with Versamark and heat-emboss it with WOW! Bright White Super Fine embossing powder
  • adhere the panel to a kraft cardbase


I hope you got inspired.

Hugs,


Friday, February 4, 2022

Happy Valentine's Day by Noga Shefer


Hi crafty friends,  Noga  here and I am so happy to share with you another project for Gerda Steiner Designs today.

Today this is a card for Valentine's Day.

My card featuring the  adorable  You Rock 4x6 Clear Stamp Set and You Rock 4x6 Die Set.
 
To make this card I took an A2 panel of plaid cardstock, pink cardstock and panel of Bristol smooth cardstock.

I sponged spun sugar distress oxide ink on the Bristol smooth and  die cut a scalloped edge.

Next I colored the sweet image using copic markers ang glued it to my panel with some die-cutting hearts.


To finish off I stamped a greeting from Be mine Monster 3x4 Clear Stamp Set using black ink.

 I hope you enjoy the card I created and feel inspired to create!

Thanks for stopping by,

Let´s eat cupcake!

 Hi to all, 

here is Alma and I am so honored, to show you my first card as a DT member for the gorgeos Gerda Steiner! 


I created a litte rainbow card with the digital stamp "Let´s eat cupcake". And the best of all: It´s a freebie! 

So you can download it and create your own sweet cupcake creations! Thanks so much Gerda for this amazing freebie!

 I combined the digital stamp with the sentiment from the "Sending Hugs" 4x6 Clear Stamp Set. 

The background is colored with copics. 


I wish you a happy day! Let´s eat cupcake!