Showing posts with label Reindeer and a tree. Show all posts

Tuesday, November 17, 2020

Stepped Up Snow Angels

Happy Wednesday everyone, it’s Karen here today.  I’ve got a step card to share with you that features the Snow Angel stamp set.  How much fun is it that these guys are making snow angels! 

Now, at the end of this post, I’ve also got another Reindeer and a Tree card that I have just made a video for and had posted on Instagram.  I told Gerda I would use a different stamp set this week, but honestly, I just couldn’t stop playing with those reindeer! So I’m sneaking it in here to share with you, so don’t tell Gerda! *wink, wink*

So here’s my Snow Angel card...


I wanted my card to look like the characters were out on some snowy hillsides on a frosty day, so I chose to make a step card.  If you’ve never made one before, they are very easy to do and I’ve got a video made for you to see how I did it.  To watch the video, PLEASE CLICK HERE.


I embossed my snowbanks with an embossing folder from Kaisercraft called Circles.  The background sky was made with a stencil from a company called A Colorful Life and is called Cloud Edger, and I used Distress Oxide ink in Speckled Egg, Tattered Rose and Spun Sugar.  I used the Woodland Borders die set from Sunny Studios to create my snowbanks and for the trees.  I added some Nuvo glimmer paste in Moonshine to the trees, and some glitter accents in Fresh Snowfall around the characters arms and legs.  I mounted Santa, Rudolph and the snowman on action wobblers so they can get busy making their snow angels! 

Since this card tends to flop open, I decided to add a belly band around it with a sentiment on it.  


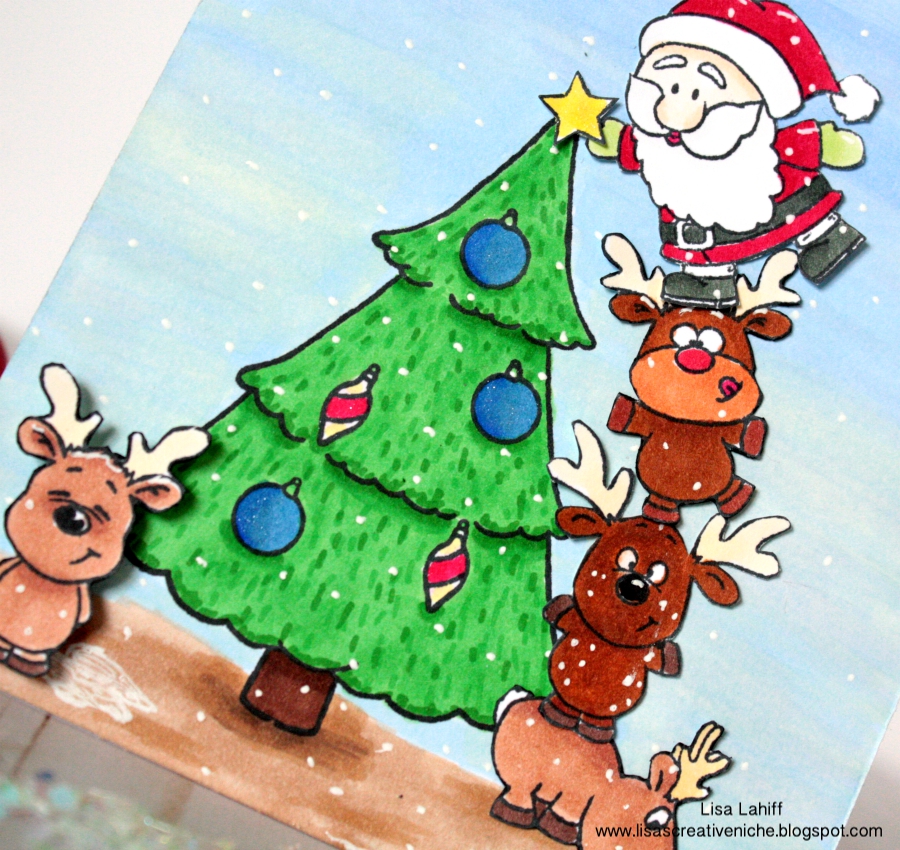
And now here is the Reindeer and a Tree card I’m quietly sneaking in!  Santa is having a little trouble on the rooftop with his reindeer (or maybe a lot!).  I’m not sure all the presents will be delivered this year, especially since Rudolph has chosen to avoid the mayhem and stay on the ground along with Santa’s sack! 


And if you want to see how I made this card, I have a video for you.  PLEASE CLICK HERE to see the video. 


I hope these cards have given you a little inspiration.  Have a great day and thanks for stopping by! 

Tuesday, November 3, 2020

Reindeer Holiday

 Hello, it’s Karen here today and I’m back with a trifold Christmas card featuring these Reindeer and a Tree stamps from Gerda Steiner Designs.  


So, in my mind, this card tells the story of Christmas Eve on the front of the card with the reindeer and Santa hard at work as shown here.  I stamped and added the date as if it was a page on the calendar and drew the chimney and rooftop as well as the sack.  I used the Woodland Border die set from Sunny Studios to create the hills and trees, and an embossing folder from Taylored Expressions called Snowfall. The little house is from a Memory Box die set called Cabin Snowglobe. 

What I really love about these trifold cards is that you can have another hidden story on the inside pages.  So for mine, the inside is Christmas Day when Santa and the reindeer are able to have a holiday, or in this case, a snowball fight! 


Now, I’m fairly sure these reindeer weren’t meant to be throwing snowballs, but my imagination just kind of got away from me.  The snowballs are made from Snow-Tex and I just cut rough circles for the fort walls, and used a paper punch for the snowballs once it was dry.  That see-through sky idea is from the amazing Jennifer McGuire who used laminating folders and stamping to create see-through elements.  Here is a link to her video:  https://youtu.be/xpneNLweV9w.  I love that these cards feel extra sturdy due to the layers of embossed hills and they stand upright very easily.


I made a video that I posted on my YouTube channel last week showing how I made this style of card.  There are actually two cards on that video so if you want to jump ahead to the second card that features this same stamp set, it starts around the 9:00 minute mark. Here’s the LINK TO MY VIDEO if you would like to see how I made this card.  And here’s what the card on the video looks like.


I hope that these cards may have inspired you or given you some other ideas on how to use these stamps.  Thanks for stopping by and I hope you are having a great day! 


Tuesday, October 20, 2020

Who Let the Reindeer Out?!

Hello, and welcome! It’s Karen here again and I’ve got two Christmas cards to share with you today featuring the Reindeer and a Tree stamp set from Gerda Steiner Designs.  We’ve had our Thanksgiving here in Canada, and Halloween is almost here, so I’ve been on a roll making Christmas cards lately - I hope that’s not too early for you!  I’m trying very hard to use my stamps and dies more frequently but in different ways, so since I had two cards made with this set, I thought I’d share both of them with you.


I stamped all the adorable reindeer and the Santa images and copic coloured them in (copic markers used are listed below), and then cut out my images.  I used a snow marker (Marvy Embellishing Snow Marker) on Santa’s hat trim and pompom to give them some dimension. I also added some Glossy Accents to Rudolph’s nose and the collars.


For my background, I cut from white cardstock, 3 layers of the “Simply Diamonds“ die from PinkFresh Studios and saved one layer of the inner die cut pieces.  I ink blended these smaller, inset pieces with a mix of Distress Oxide inks in Festive Berries, Barn Door, Candied Apple, Lucky Clover, Mowed Lawn and Crushed Olive. After gluing together the die cut panels, I adhered them to my card base and then inset the ink blended pieces.  

Then I adhered the reindeer and Santa with foam tape inside the diamonds on the panel.  The sentiment is from Picket Fence Studios “Santa’s Sleigh Ride” and I just thought it went well with all these somewhat mischievous looking reindeer. Finally, I added some Studio Katia Icy Sparkle crystals. 

And for my second card ...


For this card, I copic coloured the images which are all from the same stamp set.  I added the ornaments, lights, and candy cane from the set because I wanted to make it look like the reindeer were having a little too much fun with the decorating.  I added some black cord around the reindeer with the lights, and glued it behind his back. Then I glued the lights around and under the cord.

I made the strip of patterned paper from various papers I had in my stash.  I cut them into strips and then used a tape gun to adhere them to a piece of cardstock on the diagonal. I embossed a piece of white cardstock for the bottom half.  The sentiment is from the same stamp set too - bonus! - and I just embossed it with gold embossing powder. I added a little ink blending behind the patterned strip with Distress Ink Festive Berries, and popped the reindeer up on foam tape. 

Thanks for stopping by, and I hope you’re having a great day!

Copic markers used:

Reindeer - E51, E53, E25, E33, N6, N4, R20, R00, YR23 and R29
Santa - R39, R29, R35, N6, N4, YR23, C0, C1, C2, E000, R20, R00

Sunday, July 26, 2020

Christmas in July - Light Up Card

Hi everyone! It’s Jeannie (InsideoutJeans) on the blog today with Gerda Steiner Design to create a Christmas card!

Yes, I know it’s July but I wanted to get a head start and the shop has so many good Christmas sets. Using mainly Gerda Steiner Designs’ Reindeer and a Tree, I created a one layer scene card of reindeers decorating a Christmas tree. 


I added the box of ornaments from Tangled Penguin and the sentiment came from Holiday Snail. Once my scene was stamped and masked, I used distress inks to color up the background. 

I'm using an EZ Light to help up three parts of the card: Rudolph’s red nose, an ornament, and the star that goes on top of the tree. I used vellum and colored the pieces using copic markers so the lights would project different colors. 


How fun is this card?! Isn't it perfect for Christmas? 


Thanks for stopping by today and I hope you get inspired to create. Come back again soon for more inspiration and ideas! Happy Crafting! 

Wednesday, December 25, 2019

Merry Christmas! - Jeannie Lieu

Hi everyone! It’s Jeannie (InsideoutJeans) on the blog today with a card using a couple Gerda Steiner Design’s stamp sets. I just wanted to create a fun Christmas scene surrounding the cute little snowman from the Little Snowman set.


To start off, I stamped out the snowman so I could build a scene around him. Using the tree in the Reindeer and a Tree stamp set, I stamped out a couple trees behind the snowman. The snowman actually looks like he's looking at someone so I wanted to add a friend, which in this case, is a reindeer from the Up on the Housetop stamp set.

The scene was almost done here but I decided I wanted to add Santa in the background behind one of the trees to add a little bit of whimsy.


It's a super simple scene card but I thought it was just perfect!

Thanks for stopping by today and I hope you get inspired to create. Come back again soon for more inspiration and ideas! Happy Crafting & Merry Christmas!


Monday, November 12, 2018

Deck the Halls with these Adorable Reindeer!


Hello and Happy Monday Crafty Friends!  Tina here from Cards and Coffee Time. Today I created a card with the Reindeer and a Tree stamp set along with the Coordinating dies.  I used watercolor pencils for my coloring medium and added puffy snow for dimension.  This little reindeer is my fave with his little tongue handing out and it looks as though he is doing a happy dance!  I Loooved him so much I made 5 of him!!

You can watch the tutorial on how I created this super fun card down below.  Time to grab your coffee friends and let's get to crafting!  Thanks so much for stopping by!  Wishing you a great day!


Watch the Tutorial Below:)


Saturday, October 6, 2018

Guest Design - Build A Scene with Accessory Stamps with Ksenija Rizova

Why to use accessory stamps included in sets?  How can you stretch your stamps sets with smaller stamps?
Build A Scene with Accessory Stamps with Gerda Steiner Designs Reindeer And A Tree
Hello Everybody!

It's Ksenija here and I am very excited to be guest designing for Gerda Steiner Designs in October.

Today I am featuring the Reindeer And A Tree 4x6 Clear Stamp Set. This set includes eight main stamps - a tree, Santa and six reindeers, as well as several accessory stamps for decorating Christmas Tree.

My FIRST card with this set illustrated a scene of decorating a tree.

This time my aim is to show you how to build a new scene with accessory stamps, like light bulbs from the Reindeer And A Tree stamp set, for instance.
Build A Scene with Accessory Stamps with Gerda Steiner Designs Reindeer And A Tree
Accessory stamps are small images complementing the main images, which can be used for decorating a card.

Using accessory stamps

  • stretch your stamps sets possibilities 
  • facilitate creating new scenes
  • connect images in one design
  • and introduce colourful details.

Tips on making this card


  • Start with stamping Santa and three reindeers down onto a white card stock panel sized 5 3/8" by 4 1/8" in alcohol marker friendly ink.
  • Trace a wire with a pencil and stamp down light bulbs.
  • Using alcohol markers colour the images.
  • Apply glossy glue to the light bulbs and let it air dry completely. It is difficult to make tiny masks for light bulbs. Glossy coverage will resist inks during ink blending.
Build A Scene with Accessory Stamps with Gerda Steiner Designs Reindeer And A Tree
  • Stamp reindeers and Santa images to a masking paper and fussy cut out the images.  
  • Cover the reindeers and Santa with masks and mask off the lower part of the card panel with a fussy cut mask to create a horizon line. 
  • Blend softly two shades of blue dye inks above the mask.
  • Remove all the masks and add shadows on the snow with an alcohol marker.
  • Draw a wire with a permanent ink pen.
  • To create ombre effect on the sentiment pick two shades of red inks. Firstly, ink the sentiment with the lighter shade ink completely and stamp down to the card panel. 
  • Then apply the darker ink to the lower part of the sentiment stamp and dab off ink with a soft paper tissue, then stamp it down.
  • Trim a bright patterned paper sheet to 5 1/2" by 4 1/4" and glue it to a white card note.
  • Foam mount the card panel over.

Build A Scene with Accessory Stamps with Gerda Steiner Designs Reindeer And A Tree
Are you feeling inspired to use accessory stamps to create a new scene?

Thank you for stopping by! I wish you a beautiful day.

Monday, December 25, 2017

Christmas Tag Trio

Hi there,

it's Tanja here and I created this Tag Trio using the adorable Gerda Steiner Designs Reindeer and a Tree stamp set:

  • stamp some of the fabulous images from the Gerda Steiner Designs Reindeer and a Tree set with Memento Tuxedo Black
  • color them with Copic, Delta and Touch Twin Brush Markers and add extra shading with Faber-Castell Polychromos pencils - add highlights with a white gel pen
  • cut out some tags, their frames and backgrounds and banners using the My Favorite Things Tag Builder Blueprints 5 set, white cardstock and silver glitter cardstock
  • add color to the three backgrounds with Distress Inks (Aged Mahogany, Candied Apple, Pine Needles, Evergreen Bough, Faded Jeans, Broken China) - sprinkle them with Pearlized Water for more texture
  • stamp the sentiment from the Clearly Besotted Stamps Many Mini Messages set with Versafine Onyx Black on each of the three banners
  • add burlap ribbon and a natural twine bow as final embellishment

Here are some more pictures:


Merry Christmas.

Yours,


Tuesday, December 19, 2017

Reindeer and a Tree

Hi there,

it's Tanja here and I created this fun project using the adorable Gerda Steiner Designs Reindeer and a Tree stamp set:

  • stamp that cute little scene using stamps from the adorable Gerda Steiner Designs Reindeer and a Tree set and Versafine Vintage Sepia - use the masking technique
  • color the images with Faber-Castell Albrecht-Dürer Pencils and a damp watercolor brush
  • add Stickles Platinum to the star and Stickles Xmas Red to the nose of one of the reindeer
  • adhere the stitched watercolor panel to red glitter paper before mounting it onto a white cardbase

Have a christmasy day.

Yours,


Thursday, November 30, 2017

Stamped and Watercolored Background

Hello!  It's Lisa back today from Lisa's Creative Niche, and today's card features a fun stamped background created with the Reindeer and a Tree Stamp Set...


To create my card I started by stamping the tree in the center of my Bristol Cardstock and then stamped all of the decorations around it with a Versafine Ink.  I then used a mix of Zig Clean Color Real Brush Makers to color the images in, as well as a brush with water to pull the colors out.  Remember when working with watercolors to only work on one area at a time, so that your colors won't blend together.  Once the panel was dry I stamped and embossed the sentiment with white embossing powder, and adhered it with foam adhesive.


I also went back and added a touch of shine to my tree with a Clear Spectrum Noir Pen, because who doesn't love shine during the holidays?!

Thanks so much for stopping by today and Happy Crafting!
Lisa

Thursday, November 23, 2017

Reindeer Fun!

Hello!  This is Lisa Lahiff from Lisa's Creative Niche, and I'm so happy to be back as a Guest Designer.  It's been a while, but I couldn't wait to get crafty with some of the newer Gerda Steiner goodies, and in particular the Reindeer and a Tree Stamp Set...


I just love the reindeer faces!!!  So fun and each one different!  I also loved the idea of Santa reaching to put the star onto of the tree.  To create this card I started by stamping, coloring, and cutting out the reindeer and Santa.  Next, I worked on the background by stamping the tree and coloring it all in.  Finally, I adhered the reindeer, Santa, and the Christmas ornaments before going back to add snowflakes with a White Gel Pen.


Thanks so much for stopping by and checking out my post.  I hope you have a wonderful Thanksgiving with those you love!

And as always, Happy Crafting!
Lisa

Wednesday, November 22, 2017

It is beginning to look a lot like christmas - Larissa


Hi everyone, I am Larissa from Car-d-elicious and I made a new christmas card.


I made a card with the stampset Reindeer and a tree from Gerda Steiner designs. With masking paper and a lot of planning I stamped this little scene.Then I coloured the image with my Polychromos pencils and the black glaze pen. I coloured the nose of one of the reindeers red and then I coloured it with the Clear Spectrum noir sparkle pen. All the other noses are coloured with the black glaze pen and then I applied glossy accents on all the noses. On a piece of white cardstock I stamped a sentiment from the stampset Santa's wonderland from Neat and tangled. With a black pen I doodled some lines on the white cardstock. I used Soap powder ink from Jenni Bowlin to make a background for the image. I used the same ink and a little snowstamp from the set Santa's wonderland from Neat and tangled to stamp little dots on the background. On a white card I adhered pink plaid design paper from the Country fair plaid paper pack from My favorite things and then I adhered the white panel with foamtape on the card.


*********************************************************************************
STAMP: Reindeer and a tree from Gerda Steiner designs, Santa's wonderland from Neat and tangled
COLORING MEDIUM: Polychromos pencils 
PAPER: White cs, Country fair plaid paper pack from My favorite things
INK: Versafine onyx black, Soap powder from Jenni Bowlin
ACCESSORIES: Black glaze pen, Clear Spectrum noir sparkle pen, Glossy accents, white gelpen, Crystal stickles

Tuesday, October 17, 2017

Reindeer and a tree - Merry christmas - Larissa


Hi everyone, I am Larissa from Car-d-elicious and today I am posting a christmas card with cute reindeer.


This time I made a christmas card with the stampset Reindeer and a tree from Gerda Steiner designs.


I stamped a couple of images from the stamp set Reindeer and a tree from Gerda Steiner designs and then I coloured them all with my Polychromos pencils and the black glaze pen. Then I fussy cut all the images. With the Crea-nest-lies XXL 42 from Crealies I die-cut a square from white cardstock. I die-cut a square with the same size from red gingham design paper from the Tiny check brights paperpad from My favorite things. With the Crea-nest-lies XXL 49 from Crealies I die-cut a couple of circles in different sizes in the square from white cardstock. I adhered the white square with foamtape on the red gingham square and then I adhered them both on a white card.


Then I placed all the reindeer, the tree and the christmasornament in all the circles. I had to cut parts from some of the animals away to make them fit in the circles....Sorry reindeer. ;) I stamped a sentiment from the set Tiny type from Clearly besotted stamps on black cardstock with versamark ink and then I embossed it with white embossingpowder. I coloured all the noses from the reindeer and the christmas ornaments with the Glitter gloss pen from Nuvo and then I applied glossy accents on them.


*********************************************************************************
STAMP: Reindeer and a tree from Gerda Steiner designs, Tiny type from Clearly besotted stamps
COLORING MEDIUM: Polychromos pencils
PAPER: White and black cs, Tiny check brights paperpad from My favorite things
INK: Versafine onyx black, versamark
DIES: Crea-nest-lies XXL 42 & 49 from Crealies
ACCESSORIES: Black glaze pen, Glitter gloss pen from Nuvo, Glossy accents, white embossingpowder


Monday, October 9, 2017

Reindeer and a Tree Peek a Boo!

Hello everyone! It's Mindy from Mindy Eggen Design and I'm back guest designing today for Gerda Steiner Designs using the Reindeer and a Tree stamp set. I also have a video for this card that you can view down below or on my youtube channel. 
I started out by creating my background for the peek a boo window using Faded Denim, Wilted Violet and Seedless Preserve Distress Oxides on Bristol Smooth cardstock. Then spritzed with water from my distress sprayer and soaked up with a paper towel. 


I cut out my peek a boo window using the Die Square Peek a Boo using Neenah white cardstock and my Big Shot machine. I also colored my image on Neenah White cardstock and colored in with my copic markers. Take a close look at one of my trees - its so shimmery!!! I used a glitter cardstock for that one - all supplies will be listed on my blog.


The sentiment is also from this stamp set that I stamped below the window before doing anything else with my card ( very important step lol)

Then I put a little bit of adhesive in the corners to stick my trees and reindeer to. I added some foam tape to the entire back of my card to add some dimension and added the panel to a white cardstsock base. I finished it off with another reindeer grazing in front of the trees.


Copics
Reindeer - E39-37-35-34-33
Antlers/Muzzle - E33-31-30

Monday, October 2, 2017

Guest Designer - Reindeer & Tree set

Happy Monday!!! It's Mindy from Mindy Eggen Design and I am thrilled to be back guest designing with Gerda Steiner Designs this month! Here is a look at the set of my colored images. How stinkin cute are these?!  I was having so much fun that I was able to create TWO cards with this set AND bonus for you - I have a video for them! You can view it down below on my blog or over on my Youtube Channel HERE. Supplies will be listed at the bottom of the post.


I started my whole process by coloring the entire stamp set. I used Neenah White cardstock and Simon Says Stamp black ink. I used my Scan n Cut to cut out the images. 

For the background for my first card, I used Peacock Feathers and Blueprint Sketch Distress Inks. I also inked up a piece of cardstock with Cracked Pistachio, Twisted Citron and Lucky Clover and die cut the trees from it. 

I added a snow hill under the trees, trimmed my distressed piece down to 3 3/4" x 5" and added that to an A2 size cardbase. I lined up where my reindeer would go and stamped my sentiment. Before I actually added the reindeer, I added a little bit of  C1 for shading right underneath them like they are casting a shadow. 


My second card is pretty similair to the first. I ink blended Wilted Violet, Worn Lipstick and Blueprint Sketch for my sky. I used a Stitched Hillside die to create the hills and adding a sentiment before adhering everything together. I also added shading under my images for this card as well.


Copics
Reindeer - E39-37-35-34-33
Antlers/Muzzle - E33-31-30
Nose - R29-24
Santa - R59-39-24, G46-43
Skin - E13-11-01
hat - C2-0
Beard - W3-2-1-0
Boots/Belt - N6-4
Tree - YG09-05-03, E59-55

For a complete supply list you can visit my blog Mindy Eggen Design