Showing posts with label Valentines card. Show all posts

Sunday, January 23, 2022

Be Mine Monster

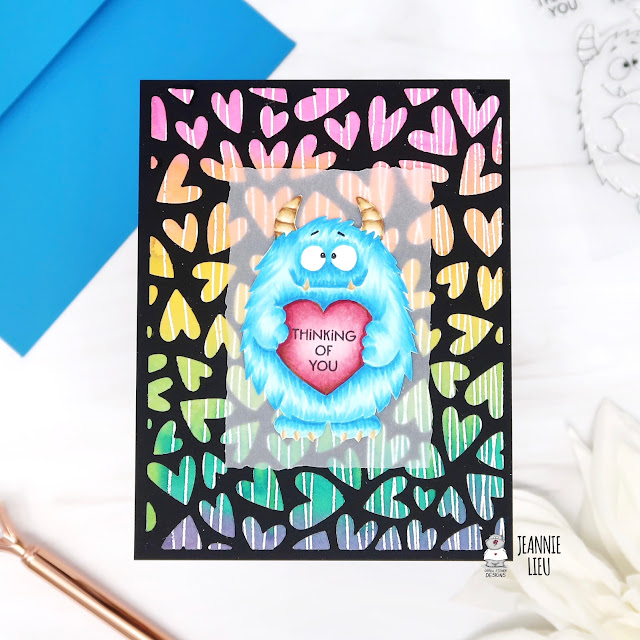
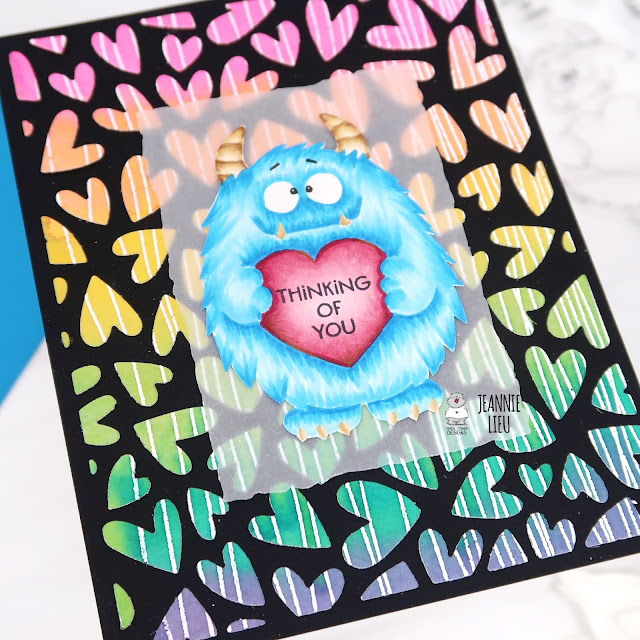
Hi everyone! It’s Jeannie (InsideoutJeans) on the blog today with Gerda Steiner Design’s stamp set named, Be Mine Monster. This little monster is so adorable -- I just had to use him right away.


I stamped him out using Fadeout Ink and colored him using copic markers. I used Fadeout Ink because when I first saw him, I imagined him to be furry so I wanted to create that texture without a dark outline. The no line coloring ink helps to support the texture. He's definitely the focus of the image. This little stamp set has coordinating sentiments that fit perfectly in the heart he's holding.


For the background, I wanted to go with something colorful and lovey. I pulled out a heart die cover plate and die cut out a watercolor panel I had. It was a bit colorful, so I did die cut out a piece of vellum to soften the background so the little monster could stand out.  


Thanks for stopping by today and I hope you get inspired to create. Come back again soon for more inspiration and ideas! Happy Crafting! 


Wednesday, January 12, 2022

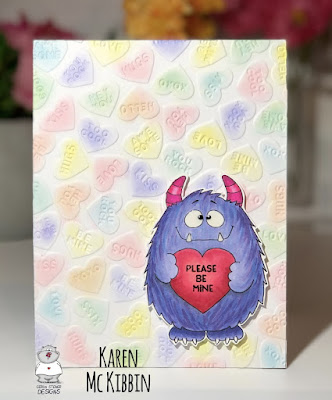
Monster Love Valentines Day Card

Hello and welcome, it’s Karen here today. I’m sure you already know that there’s a fun, new release in the Gerda Steiner Designs shop.  I just couldn’t decide which new stamp set to play with for this post, but in the end, I decided that since it was coming up to Valentines Day, I would go with the “Be Mine Monster” stamp set.   Who could say no to this cute little guy? 


I used copic markers to colour him in (listed below). I then stamped and heat embossed the sentiment in black, onto the heart. I added some Glossy Accents onto his teeth and eyes, and then fussy cut him out. 

For the background, I used the “Conversation Hearts” embossing folder from Taylored Expressions to emboss the card front. Using a small circular brush, I added in some Distress Oxide ink to the hearts in Spun Sugar, Tumbled Glass, Shaded Lilac, and Squeezed Lemonade.  Finally, I popped the monster up on foam tape and placed him on the card front in the lower right corner. Just a super quick and easy card to make. Thank you for stopping by and I hope you’re having a great day! 

Copic markers used:

BV02, 04, 13, 23

RV17, 06, 04, 02

V15, B02

Heart - RV29, 25, 23


Tuesday, February 9, 2021

Valentine penguins - Larissa

Hi everyone, I am Larissa from Car-d-elicious and today I am posting a new card on the blog from Gerda Steiner designs. For this week I have made a valentines card with the clear stampset Valentine penguins from Gerda Steiner designs. I have stamped 2 penguins with Versafine clair nocturne ink on Florence watercolour paper smooth from Vaessen creative. I have embossed the image with clear embossingpowder and then I coloured them with my Distress inks. The balloon and the envelope are also coloured with the Clear Spectrum noir sparkle glitter pen. All the images are fussy cut.


I have made a slimline card with the new die-set Slimline frames craftables (CR1537) from Marianne design. I have cut the scalloped layer twice from pink cardstock and made a card. The layer with the stitching is cut from white cardstock and I made my background on it with the Mini cloud edges stencil from My favorite things and Card deco essential dye ink Light blue. With the Grassy hills die-namics from My favorite things I have die-cut a grass border from white cardstock and I have coloured it with  Card deco essential dye ink Olive green. After I glued the grass on the background I have wrapped white embroidery thread around the grass and tied it into a bow. I have glued the background on the pink scalloped card. In the right upper corner I have stamped sentiment from the clearset Valentine penguins from Gerda Steiner designs and then I glued the penguins with foamtape on the card. I have decorated the card with crystal hotfix gems.


*********************************************************************************
STAMP: Valentine penguins from Gerda Steiner designs
COLORING MEDIUM: Polychromos pencils
PAPER: White and pink cs
INK: Versafine clair nocturne
DIES: Craftables CR1537 from Marianne design, Grassy hills die-namics from My favorite things
ACCESSORIES: Clear embossingpowder, Clear Spectrum noir glitter sparkle pen, Mini cloud edges stencil from My favorite things, white embroidery thread, crystal htotfix gems


I am a participant in the Gerda Steiner designs Affiliate Programme. This means that if you click on one of my links and subsequently make a purchase, I will receive a small commission of store credit, at no extra cost to you. 

Tuesday, February 2, 2021

Happy mail bunny - Love you lots! - Larissa


Hi everyone, I am Larissa from Car-d-elicious and today I am posting a card on the blog from Gerda Steiner designs and for this week I have made a Valentines card. 


On my card I have used the clear stamp set Happy mail bunny from Gerda Steiner designs. I have stamped the bunny and the pencil. With the help of masking paper I have stamped a square frame with the envelopes. I have coloured all the images with my Polychromos pencils, the black glaze pen and a white gelpen. I have fussy cut all the images. The hearts on the envelopes are coloured with the Clear Spectrum noir sparkle glitter pen and then I applied Glossy accents on them. On a red card I have stamped a sentiment from the set Sneaky racoons from Gerda Steiner designs with Versamark ink and the I embossed it with white embossingpowder. I have glued the frame on the card and then I added the bunny and pencil with foamtape. 


*********************************************************************************
STAMP: Happy mail bunny and Sneaky racoons from Gerda Steiner designs
COLORING MEDIUM: Polychromos pencils
PAPER: White and red cs
INK: Versafine clair nocturne, Versamark
ACCESSORIES: Black glaze pen, white gelpen, Clear Spectrum noir glitter sparkle pen, Glossy accents, masking paper

I am a participant in the Gerda Steiner designs Affiliate Programme. This means that if you click on one of my links and subsequently make a purchase, I will receive a small commission of store credit, at no extra cost to you.
Saturday, January 30, 2021

Valentine penguins - xoxo - Larissa


Hi everyone, I am Larissa from Car-d-elicious and today I am posting a new card on the blog from Gerda Steiner designs. This time I have made a valentines/love card with a sweet penguin from the clearstamp set Valentine penguins from Gerda Steiner designs. I have stamped the image with Versafine clair nocturne ink on Florence watercolour paper smooth from Vaessen creative and then I embossed it with clear embossingpowder. I have coloured the image with Distress inks and then I have fussy cut the image. 


I have die-cut a square with the Crea-nest-lies XXL 34 from Crealies from black and white striped paper from the Do what you love pretty paper bloc (PK9149 - retired) from Marianne design. I used the Crea-nest-lies XXL 54 from Crealies to cut a scalloped square from black cardstock and I glued the patterned paper on top of it and then I glued them on a red card. from a scrap of the red cardstock I have die-cut 3 hearts with a die from the set Snijmallen grote teksten "Knuffel" from Carlijn design and I used a hole punch to add 2 holes in each heart. I threaded them with black card and then I glued them on the card. I made 2 tiny bows from the black card cord and glued those on the ends of the banner. This looks almost like the little banner the penguin is holding. I glued the penguin with foamtape on the card. The sentiment is die-cut from the red cardstock with the Mini alpha & number dies (retired) from CC. Designs. 


*********************************************************************************
STAMP: Valentine penguins from Gerda Steiner designs
COLORING MEDIUM: Distress inks
PAPER: Red and white cs, Do what you love pretty paper bloc (PK9149 - retired) from Marianne design
INK: Versafine clair nocturne
DIES: Crea-nest-lies XXL 34 and 54 from Crealies, Snijmallen grote teksten "Knuffel" from Carlijn design, Mini alpha & number dies (retired) from CC. Designs
ACCESSORIES: Clear embossing powder, Black jute thread, hole punch

I am a participant in the Gerda Steiner designs Affiliate Programme. This means that if you click on one of my links and subsequently make a purchase, I will receive a small commission of store credit, at no extra cost to you.
Tuesday, January 26, 2021

Hedgehog Valentines Day Card

Hello everyone, it’s Karen, and I’ve got a fun little Valentines Day card to share with you today. I’ve used the sweet “Hedgehog with Gifts” stamp set from Gerda Steiner Designs to create this card. 


The background was made from ink blending on my card front with Distress Oxide inks in Worn Lipstick and Tattered Rose and then I splattered it with some gold and silver Starry Colours paints from Tsukineko. I die cut the border with one of the “Hearstrings” border dies from Sunny Studios. I mounted this on my card base and then stamped and clear embossed the sentiment below it on the card base.  The sentiment is from the “Valentine Penguins” stamp set from Gerda Steiner Designs. 

I copic coloured the hedgehogs and added a few eyelashes and a hair bow to the hedgehog I chose to be a girl. I also drew a few hearts on the gift package to add to the valentines theme. I used a craft knife to cut around the the hand that holds the gift on the male hedgehog, so I could put the ribbon behind his hand. I found the flowers as a small extra stamp in in one of my stamp sets and added that to his other hand. I mounted both the hedgehogs on foam tape and attached them to the background. Finally, I die cut some hearts from foiled cardstock and added them around the hedgehogs. 

I hope you’re having a great day and thanks for joining me today. 

Copic markers used: Body - C1, C2, E40, R00  Back - W7, W5, W2, N4, E53