Hey everyone! It's Wiebke here! And I want to share a card with you using several cute Gerda Steiner Designs Critters and a piece of craft paper :)
First of all, I created several masks for the critters and gifts standing in the front row. That way, you can stamp the others perfectly behind. After that, I colored them out with Polychromo pencils and went over the surface with baby oil. You'll get a darker, but well blended effect.
These are the stamp sets, which I used:
Happy Hoppy | Howl Are You | Lucky Duck | Monster Party | How are Ewe | Happy Fall
Have a great day!
Showing posts with label Monster Party. Show all posts
Monday, April 4, 2016
Critter Birthday Party - Coloring on Craft Paper
Labels:
How Are Ewe,
Howl Are You,
Lucky Duck,
Monster Party,
Polychromo Pencil,
Wiebke
Hallo and welcome to my blog!
This is the place where I share all of my crafty favorite stuff, but mainly my most loved hobby: card making!
I jumped into that world of happiness & awesome people in my young 20ths & now it is next to studying my biggest pastime.
Außerdem versuche ich so regelmäßig wie möglich zwischen meinen deutschen und englischen Beiträgen zu switchen, damit für jeder Mann (oder eher Frau) etwas dabei ist!
Tuesday, March 1, 2016
Happy Birthday Gopher
Hi there,
it's Tanja here today and I would like you to meet the adorable new character from Gerda Steiner Designs ... Gopher. Isn't he adorable? I couldn't wait to use him on another project and here it is:
I had so much fun creating this cute little card. I used it for my daughter's 6th birthday on February 24th.
Have a wonderful day.
Yours,
it's Tanja here today and I would like you to meet the adorable new character from Gerda Steiner Designs ... Gopher. Isn't he adorable? I couldn't wait to use him on another project and here it is:
- stamp the cute little critter from the Gerda Steiner Designs Gopher it! stamp set with Versafine (Vintage Sepia) onto a piece of watercolor paper and mask it off
- stamp the present from the same stamp set and the larger present and the cupcake from the Gerda Steiner Designs Monster Party stamp set with Versafine (Smokey Gray) and also use the masking technique
- cut out the whole image and color it with ZIG Clean Color Real Brush Pens and a damp brush
- add highlight with a white gel pen
- partially die cut a stitched banner and stamp the sentiment from Gerda Steiner Designs Just Sentiments with Versamark and heat-emboss it with WOW! Bonding Powder; run the banner through your Mini Minc or Laminator and foil the sentiment with blue foil
- cut out a stitched panel from Neenah Desert Storm Kraft cardstock and a scalloped stitched panel from light blue smooth cardstock
- add a woodgrain pattern to the kraft panel using a kraft-colored pigment ink
- add some 6mm and 4mm sequins as final embellishments
I had so much fun creating this cute little card. I used it for my daughter's 6th birthday on February 24th.
Have a wonderful day.
Yours,
Labels:
Clear Stamps,
Gopher it!,
Just Sentiments,
Monster Party,
Tanja
Monday, January 25, 2016
Peeking Birthday Bulldog
Hey everyone!
It's Wiebke here today! And before I start showing you my new card, I want to remind you that Gerda Steiner Designs is having a Guest Designer Call! Head over to the blog for more informations.
And now to todays card! I had a fun idea in mind when I first saw the hilarious bulldog of the new "Howl Are You?" stamp set! The dog is similar to the peeking friends on which you can put elements under or next to - This dog definitely needed something to peek out ;)
I placed the top of the present from the Monster Party stamp set on his head and put a banner with an embossed sentiment (also from Monster Party) under him. It looks like he's peeking out of a present! The background was made with a few splashes of watercolors, just a soft colorful touch behind your dog as a focal point.
I hope you have an awesome day! :)
Labels:
Howl Are You,
Monster Party,
Wiebke
Hallo and welcome to my blog!
This is the place where I share all of my crafty favorite stuff, but mainly my most loved hobby: card making!
I jumped into that world of happiness & awesome people in my young 20ths & now it is next to studying my biggest pastime.
Außerdem versuche ich so regelmäßig wie möglich zwischen meinen deutschen und englischen Beiträgen zu switchen, damit für jeder Mann (oder eher Frau) etwas dabei ist!
Tuesday, January 19, 2016
Take a Break Bear
Hi there,
it's Tanja here for you today and I am using a cute little bear to create a fun winter card:
I hope you got inspired.
Yours,
it's Tanja here for you today and I am using a cute little bear to create a fun winter card:
- color the adorable Gerda Steiner Designs Little Mug Bear with Delta Markers and a white gel pen
- cut out two pierced banners
- color the edges of the second one with the same marker used on the scarf and create your own colored cardstock
- stamp the sentiment from the Gerda Steiner Designs Monster Party stamp set with Aquamarine Pigment Ink
- stamp a knitted background onto a Confetti White cardbase with Mint Julep Dye Ink
I hope you got inspired.
Yours,
Labels:
Clear Stamps,
digital stamp,
Little Mug Bear,
Monster Party,
Tanja
Tuesday, November 10, 2015
Girly Monster Birthday
Hi there,
it's Tanja here and today I want to to show you this Girly Monster Birthday card:
Thanks for joining me today.
Have a colorful day.
it's Tanja here and today I want to to show you this Girly Monster Birthday card:
- cut out a stitched banner and stamp the monster in the box from the Gerda Steiner Designs Monster Party stamp set with Memento (Tuxedo Black)
- color the image and the background with Delta Markers and add details with a white gel pen
- cover the bow with Wink of Stella Clear Glitter
- create a background on a white cardbase using the heart, a circle and a tiny flower - be sure to check your stamp sets for those tiny images; they are perfect for custom-made backgrounds and DIY patterned papers
- stamp the sentiment from the same stamp set with Versafine (Onyx Black)
- round the two bottom corners with your 1/2'' corner rounder
Thanks for joining me today.
Have a colorful day.
Friday, October 30, 2015
How to make a Simple Halloween Post it Note Holders
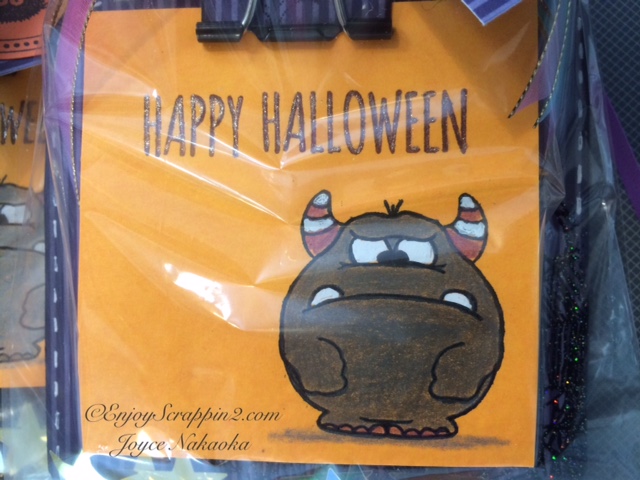
Aloha Guys! This is Joyce from http://enjoyscrappin2.com and today I'm sharing this simple Halloween Post it Note holders for gift giving. I wanted to make some gifts for my daughter's teachers and staff members, so I decided to make this easy holders. I've combined several stamp sets for this and you can get really creative with this. I hope you like this video and I'll catch you guys next time. Thanks again :)
Monday, October 26, 2015
Cute and Clean Monster
Well, hello there, crafters! Today is my last day as a member of the Gerda Steiner Design Team. It's been a fantastic year and I had a blast to be part of Gerda's journey from digi stamps, to rubber stamps, to clear stamps. As you have seen, I am totally in love with her monster stamp set and this will be my parting card. But hey, don't be sad! I have some christmas cards with the "Peeking Friends" stamp set in store for you that I will share later this year, just in time for the season, so you'll see me back as a guest designer :)
In my mind, monsters are not scary and ugly, but rather happy little critters that enjoy a good sunset and like to chill, just like we do. So that's what I tried to create with this little guy. I did a bit of masking and distress inking and realized just how much I love using that medium.
Of course I had to add a few accents to the little guy with a silver pen, and googley eyes to make him funny. And because I thought it was hilarious, I added a few butterflies with silver ink, then the sentiment from CAS-ual Fridays and voila, we have a love-struck monster with a silly love-sick grin on his face.
I hope you enjoyed this project and keep checking out what Gerda Steiner Designs will come out with in the future. There are some pretty neat christmas sets ready for the season, and I can't wait to see where Gerda will go next year. Thanks for the incredible journey!
Monday, October 12, 2015
Brightly Colored Monsters on Kraft Cardstock
Aloha, crafters! Today I have another monster card featuring the clear stamp set called "Monster Party". As you might have gathered already, I really really love this set. And monsters :)
Today, I'm giving my colored pencils a workout again, using them on kraft card stock. It always amazes me that I can get such vibrant colors on kraft.
I tried to stamp the image with white pigment ink first, but when you color over the lines, the lines disappear because the colored pencils are not translucent. So I went with white heat embossing instead and got much better results.
I am also really enjoying the WRMK Rise and Shine embossing folders which don't emboss a pattern but sentiments. Just such a neat and unique way to add words to your cards. And it also doesn't distract from the overall design.
As always, thank you for stopping by today and taking the time to leave a comment. I truly appreciate it!
Monday, September 28, 2015
Make Your Monsters Shine
I've had a brief love affair with foil, and today's card reflects those few passionate (and frustrating moments). It was a brief affair mainly because I bought a cheap laminator and the foil didn't stick down properly on my printed patterns, so it wasn't joy to use. Despite all of that, I think this card featuring the monster clear stamps turned out pretty neat.
If you don't have foil or a foiling machine, you can achieve a similar look with Gilding Flakes. I've used them often with stamped images and the results are just lovely. No need for a laminator, hot iron, or laser printer. You can simply stamp a pattern with glue and apply your flakes — and voila.
As you can see, I kept the card design very simple and basic to really have the shimmer of the foil take center stage and draw the focus to the monster in the middle. The sentiment, stamped in pigment ink, matches the overall color scheme and is a nice change from my standard black sentiments.
Thanks for stopping by today! I hope you enjoyed the project!
Tuesday, September 22, 2015
Take a Break!
Hi there,
it's Tanja here again and today I am showcasing another cute monster from the Monster Party stamp set:
Here is a close-up of the cute monster:
Thanks for stopping by.
Have a colorful day.
it's Tanja here again and today I am showcasing another cute monster from the Monster Party stamp set:
- stamp the monster from the Gerda Steiner Designs Monster Party set with Versafine (Onyx Black)
- mask off the monster and stamp the coffee cup from the same set
- mask the cup off as well and create a background using Distress Inks (Cracked Pistacchio, Peacock Feathers) and a Mini Ink Blending Tool
- color the images with Spectrum Noir Pencils and Zest-it
- add details with a white gel pen
- cut out a scallopped panel
- add te sentiment from the same stamp set using Versafine (Onyx Black)
- adhere the cardpanel to a kraft cardbase
- cover the little heart on the cup with the Pico Embellisher (Shimmer)
Here is a close-up of the cute monster:
Thanks for stopping by.
Have a colorful day.
Monday, September 14, 2015
Video: Grumpy Coffee Monster
Hi everyone, I'm back with another fun card featuring the monsters. As I threatened you with, you will be seeing some more cards with this stamp set in the future. I love monsters, and these are just the cutest :-)
I had originally intended for this card to be a clean and simple one layer design, but I accidentally smooshed some ink from my finger onto the original card base so I couldn't keep it clean and simple anymore. This smear was just too obvious. My workaround, if I may call it that, was too fuzzy cut out the monster and the coffee cup and mount it onto a kraft card base, which works out perfectly with the coffee theme.
For additional interest, I added some twine which reflect the color of the monster and the brown of the coffee. A few gemstones at some sparkle.
Thanks for stopping by today, and I hope to see you again soon!
Wednesday, September 9, 2015
Do I SMELL CAKE?
Hello friends, it's Chitra here with a card for you all!!! I played with our new Monster Party stamp set again, this grumpy monster is so cute that I had to make a card with him again!!!
Here is how I made this card: 1) I first stamped the tiny images included in the set using a black ink and then used back of a tiny stamp to do some abstract stamping (if you have a solid stamps i.e; which is not a image you can use that as well).
2) Then I stamped the monster onto Crafter's Companion ultra smooth cardstock and colored using copics.
3) To mute the background so the focus could be on the monster I added a piece of vellum and then foam mounted the image.
4) The sentiment "Do I Smell" is stamped directly onto vellum and "CAKE?" is stamped on a white cardstock and cut it out and foam mounted it.
5) Finally added some details to the image; white dots to his body and glossy accents to the eyes.
Here is a close up:
Hope you liked my card.
We lots n lots of new holiday stamps added to the shop and I highly recommend you to check it out (They are superrrr cute!!!)...
Thanks for stopping by and have a great day!!!
Hugs,
Chitra
Tuesday, September 8, 2015
Grumpy Monster
Hi there,
it's Tanja here for you today and I would like to show you this layered monster card:
Here is a close-up of the grumpy fellow:
Thanks for stopping by today and I hope to see you again next week.
Have a colorful day.
Yours,
it's Tanja here for you today and I would like to show you this layered monster card:
- stamp the grumpy monster from Gerda Steiner Designs Monster Party with Memento (Tuxedo Black) and color the image with Delta Markers and Wink of Stella Glitter Pens
- add details with a white gel pen
- cut out two polaroid frames from woodgrain patterned paper and a scribble from vellum
- hold the layers together with a tiny wooden clothespin
- create a background by adhering patterned paper cut at an angle to a white cardbase
- stamp the sentiment with one of your alphabet stamp sets and Versafine (Onyx Black)
- add enamel dots as final embellishments
Here is a close-up of the grumpy fellow:
Thanks for stopping by today and I hope to see you again next week.
Have a colorful day.
Yours,
Friday, September 4, 2015
Paper Piecing With Gerda Steiner Designs Monster Fun
Aloha Guys!
This is Joyce from Enjoyscrappin2.com and today I'm suing this Monster Fun Stamp set again, I just adore these monsters. Instead of coloring today, I'll be doing some paper piecing. I'm sure all of us have tons and tons of scraps from pattern papers so this is a perfect way to use up some of those scraps. I fussy cut out the monsters and attached them to the circles, also back with some scraps of pattern paper. I do have a tutorial on this card below if you like to check that out. I thank you guys so much for stopping by and I'll catch you guys next time. Thanks again
Wednesday, September 2, 2015
You Are How Old?
Hello friends, it's Chitra here with a card for you all!!! I played with the new Monster Party stamp set, really love this set and here is my card...
I kind of created a space scene for the grumpy monster ;)
First I took a white panel and sponged some blue and purple distress ink for the background, for the planet I took some cork sheet and cut it free hand for the monster to stand on. The stars are die cut using Simon Says Stamp Holiday Shapes.
The balloon is from Late but with Love stamp set which is paper pieced on a red cardstock. I added some white dots on the monster and added glossy accents to the eyes, highlighted the balloon and also added some glitter. The sentiment is added directly onto the cork sheet.
Here is a close up..
Hope you liked my card, I really enjoyed making this card.
You can check all the stamps available in the shop here.
Hugs,
Chitra
Monday, August 31, 2015
A Tippsy Monster
Hi guys! Today I'm introducing you to the newest clear stamp set by Gerda Steiner Designs which features monsters. I think when it comes to coloring images and working with them, monsters are my all-time favorite. It's especially interesting since I discovered Gerda Steiner Designs about a year ago because of the beautiful digital monster images that she offered. Now we have 3 new monsters that come as clear stamps, complete with a few fantastic sentiments that allow you sheer endless combinations.
When I first saw the monster that I'm using on my cards today I immediately pictured him being a little sappy from having consumed one or two drinks too many.
The coloring was done with Copic markers and I referred to the hex chart by Sandy Allnock to find colors which would work together well. If you have Copic markers and you wonder sometimes which color combinations you could try, I really suggest you give this hex chart a look because it's absolutely worth the investment (it just costs a few dollars).
The background of my card base has some foil, by the way. I wanted to try it out because it seems to be all the rage in the crafting world right now, but I was disappointed by the results that I got with a cheap laminator that I bought on Amazon. The foil didn't stick entirely and left some black marks open. I tried it with two different printers, different heat settings, different papers — nothing really worked perfectly. So I returned the laminator and I will try to get my hands on a Minc mini once they are available in Europe and see if that gives me better results.
Thanks so much for stopping by today and leaving a comment, you brighten up my day!
Thursday, August 27, 2015
Birthday Monsters
Hey everyone!
It's Wiebke here and today I'm featuring the super new Monster Party clear stamp set!
I made two various cards for you using two of these darn cute monsters! :)
At least, I stamped the super fun sentiments of the set with a mint and dark blue ink on white paper and cut that out.
Oh my! This card is one of my current "I love and create everything in combo with black"-phase, ha! I think you can create SO elegant cards with just adding a black frame and a black element on the card. That's what I did on that one. I prepared a piece of watercolored paper and placed my little peeking monster on it. I heat embossed the sentiment on some black cardstock and added it to the card along with the sweet cupcake and the little present.
Have a great day!
Labels:
Clear Stamps,
Copics,
Monster Party,
Wiebke
Hallo and welcome to my blog!
This is the place where I share all of my crafty favorite stuff, but mainly my most loved hobby: card making!
I jumped into that world of happiness & awesome people in my young 20ths & now it is next to studying my biggest pastime.
Außerdem versuche ich so regelmäßig wie möglich zwischen meinen deutschen und englischen Beiträgen zu switchen, damit für jeder Mann (oder eher Frau) etwas dabei ist!
Wednesday, August 26, 2015
You Are RAWRsome
Hello friends, it's Chitra here with a card for you all!!
The other day I got a super fun stamp from Gerda Steiner Designs and there was this amazing brand new Monster Party stamp set!!! EEEeeeeekkkk!!! Love love love this set!!!
Here is my card...
The other day I got a super fun stamp from Gerda Steiner Designs and there was this amazing brand new Monster Party stamp set!!! EEEeeeeekkkk!!! Love love love this set!!!
Here is my card...
Look how cute is it and I also love the font of RAWRsome!!!
I stamped this cutie on a rectangular piece of cardstock and drew a square inside so that it would look like a polaroid!! The image is then colored using Copics. Once the coloring was done I rounded the top corners of the polaroid, stamped the sentiment using black Memento ink and adhered it using foam adhesive.
The design paper on the background is from Echo Park.
I also added a little strip of washi tape on top and added some hearts, I just love adding little hearts to my cards.
Here is a close up..
Hope you liked my card.
You can check all the clear stamps available in the shop..
Thanks for stopping by!!
Hugs,
Chitra
Saturday, August 22, 2015
CAS Card Using Brand New Stamp Set Monster Party
https://youtu.be/7lMXzId9tdM
Aloha Guys!
This is Joyce from enjoyscrappin2.com and today I want to share this card I made using Gerda Steiner Designs Brand New stamp set Monster Party. I absolutely Love this stamp set. I immediately fell in love with, it as soon as I saw them. I love monsters, I think they are so much fun! I stamped out this monster using MFT's Hybrid ink and colored it using my Shinhan Touch Twin alcohol markers. I am loving this ombre look so I chose a Deep ultramarine, Violet and a pink to color this monster. I've also used some textured vellum and layered 2 pieces and stamped out the sentiment on each layer. I stamped out another sentiment on the bottom left and added a light pink cupcake to finish it off. I hope you enjoyed this card and please view the above video for a step by step tutorial. Thank you so much for stopping by and please check out this super fun stamp set, which is available for purchase in Gerda Steiner Designs Store. Thanks and I'll catch you guys next time :)
Subscribe to:
Posts (Atom)


