Showing posts with label Peeking Friends. Show all posts

Tuesday, November 30, 2021

No Peeking!

Hi there,

it's Tanja here and I created this sweet Christmas Tag using the Gerda Steiner Designs Peeking Friends stamp set:


  • cut out the Clearly Besotted Stamps Rounded Tag from smooth white cardstock
  • stamp the adorable little penguin from the Gerda Steiner Designs Peeking Friends set with Lawn Fawn Jet Black
  • color the image with Spectrum Noir Triblend Markers and add extra shading with Faber-Castell Polychromos pencils
  • add highlights with a white gel pen
  • ink up the edges with some left-over blue ink from a blending brush
  • stamp the sentiment from the same set with Versafine Clair Nocturne
  • dye a piece of torn seam binding with Distress Ink Peacock Feathers and thread it through the hole of the tag


Have you started creating your Christmas Projects, yet?

Hugs,


Tuesday, September 8, 2020

Embossed Christmas Card with Video

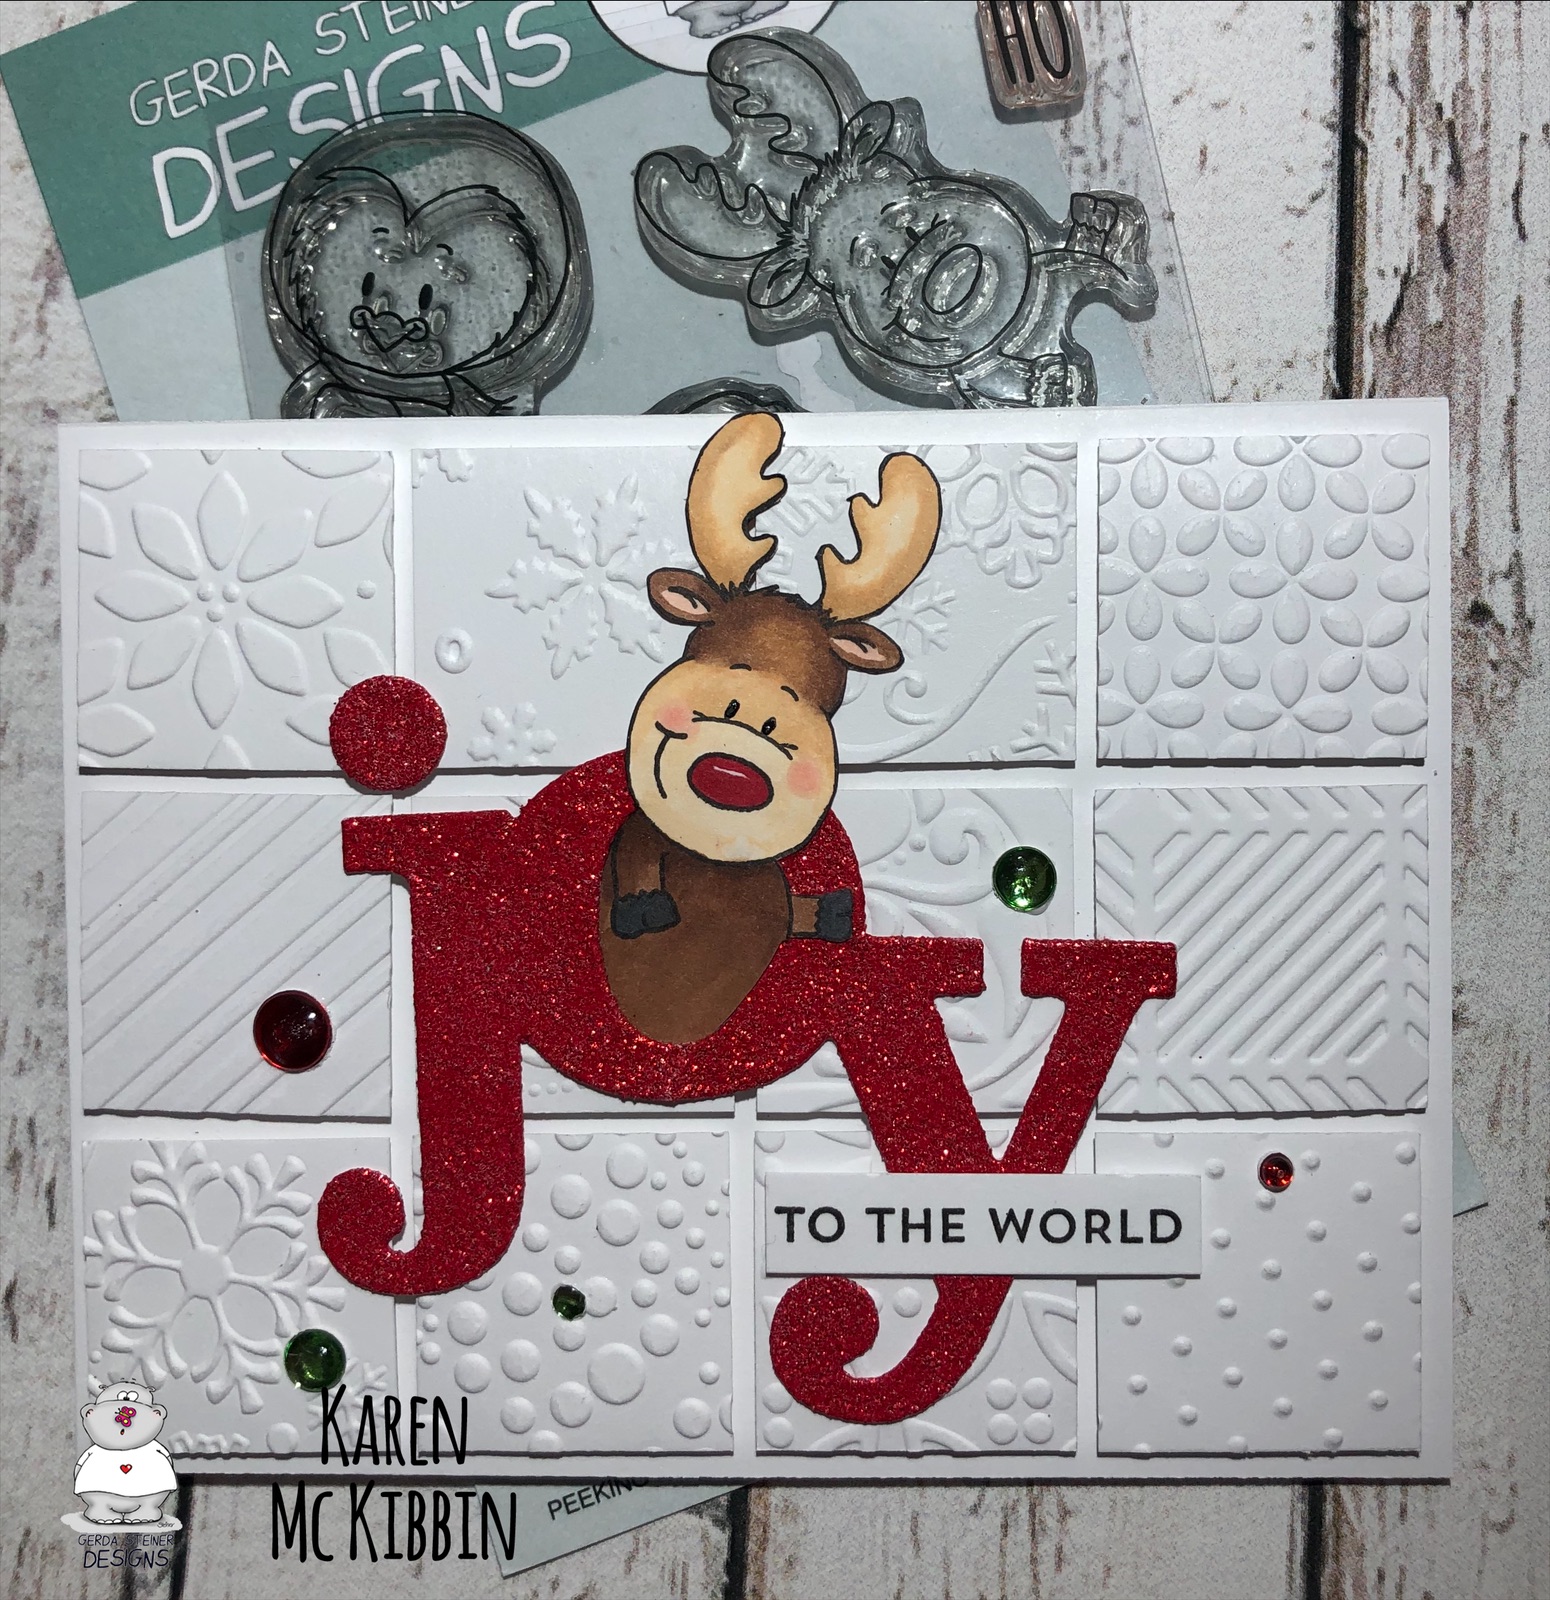
Hello and welcome, it’s Karen here today.  I’ve got a very textured, embossed Christmas card to share with you today. This card was completely inspired by my recent re-organization of my embossing folders!


I’ve got a YouTube video of how I made this card, so to see it in HD please CLICK HERE


I stamped the Santa image from the “Peeking Friends” stamp set from Gerda Steiner Designs and pencilled in the rest of his beard.  I used a Copic multiliner pen to go over it and erased the pencil marks.  Then I coloured my image with Copic markers (listed below) and fussy cut it out along the lines.  I used a black marker pen from EK Tools to colour along the edges.  

Next, I diecut the word Joy from white cardstock.  If you have a nice green cardstock or glitter cardstock, that would be even easier.  I was given this die several years ago and it was second hand at the time, so I don’t have the product information to give you.  But any large Joy or Noel die would work here, even alphabet letters.  I had to do some partial die cutting on the “O” to make it wide enough for Santa to not obscure the “Y”.  I coloured the word in with a Copic marker, and went along the cut edges too.  To add some interest to the word, I heat embossed it with clear embossing powder and sprinkled some glitter on while it was still warm.  I did this 2-3 times for even more depth.  

When I reorganized my embossing folders, I die cut tags and embossed those to use as a reference for all my folders.  The tags were so pretty and full of texture, that it inspired me to make this card.  I cut out 12 -  1 1/4” squares from white cardstock and then used different embossing folders to emboss the squares.  Sometimes, I used different areas of the same embossing folder so you don’t even need that many folders. I mounted these squares on foam tape and then adhered them as evenly as possible on my card front.  I had thought I could use my T-ruler, but with the foam tape, this was not really possible.  In the end, I just spaced all 12 squares out on my card front and carefully adhered them in position.  I used glue to adhere the Santa to the word Joy and then onto the card front.  I used the “to the world” sentiment from the MFT stamp set Bitty Holiday Wishes and trimmed it down to fit over the”Y”.


Since I don’t have any bright green or red embellishments, I created my own by using different sized  circle punches to cut out circles from red and green foil cardstock and covered those with glossy accents.  


I made a second card with the reindeer image and cut the Joy out of red glitter cardstock.  These cards have just got so much fun texture in them and I hope you’ll give this a try!  

Copic markers used: E000, R00, R20, C0, C1, C2, N6, R39, R29, R35 for Santa.  G94 for the word Joy.


Friday, March 23, 2018

Easter Friends at Twilight...

 Hi Everyone,

Its Hazel from Didos Designs back again with more of the super sweet Peeking Easter Friends. 

Today I have used 2 of the bunnies from the set with some Easter Eggs too. 
I coloured the background and the rabbits with cotman watercolour paints and cut them out. There are some amazing dies that go with this set. They are available here.here. Much quicker and better than my fussy cutting!! 

I mounted the bunnies using some diecut grass and a frame background with the moon shining down for a finishing touch.  Im sure the wee bunny peeking in is about to snaffle the other bunnies collection of eggs!!

I hope you liked my creation, and its given you some inspiration,

Love Hazelx

Wednesday, March 14, 2018

Easter peeking friends - Have an egg-stra special day! - Larissa


Goodmorning, I am Larissa from Car-d-elicious and today I am posting a new card on the blog from Gerda Steiner designs and because easter is coming versy soon, I decided to make an easter card.


On my card I have used the stampset Peeking easter friends from Gerda Steiner designs. I stamped the little bunny and on a sheet of white cardstock I stamped an egg-background with all the egg stamps that are in the stampset. I have coloured the bunny and the egg-nackground with my Polychromos pencils. I used a black glaze pen to colour the eyes of the bunny and I applied glossy accents on his feet. Then I have fussy cut the bunny. From white cardstock I have die-cut a circle with the Crea-nest-lies XXl 41 from Crealies and I made a background for the image on it with the Drifts and hills stencils from My favorite things with Tumbled glass and Mowed lawn distress ink. I have cut a larger circle from balck cardstock with the Crea-nest-lies XXL 49 from Crealies and I adhered the white circle on top of it. I have die-cut the egg-background with the Crea-nest-lies XXL 44 from Crealies and after I adhered it on black cardstock I adhered it on a kraft card. I have adhered the circles with foamtape on the card and then I placed the bunny on the circles. The sentiment is also from the stampset Peeking easter friends from Gerda Steiner designs. Then I decorated the card with black enamel dots.


*********************************************************************************
STAMP: Peeking easter friends from Gerda Steiner designs
COLORING MEDIUM: Polychromos pencils, Distress inks
PAPER: White and black cs, Kraft card
INK: Versafine onyx black, Tumbled glass and Mowed lawn distress ink
DIES: Crea-nest-lies XXL 41, 44 and 49 from Crealies
ACCESSORIES: Black glaze pen, white gelpen, Glossy accents, Drifts and hills stencil from My favorite things, Black enamel dots

Sunday, December 24, 2017

Space Elf

Hi there,

I created this Space Christmas Elf Card using some fabulous stamp sets from Gerda Steiner Designs:

  • create a circular galaxy background on a stitched piece of watercolor paper using Daniel Smith watercolors and white Liquitex Ink - mist the background with Pearlized Water for extra sparkle
  • stamp the sentiment from the Gerda Steiner Designs Holiday Friends set with Versafine Onyx Black
  • create a new fun image by combining the elf from the Gerda Steiner Designs Peeking Friends set and the spaceship from the Gerda Steiner Designs Alien Invasion set - use the Masking Technique
  • color the image with Delta, Touch Twin Brush and Copic Markers
  • add highlights with a white gel pen
  • adhere the spaceship using an Action Wobbler for an interactive effect
  • mount the watercolor panel onto a kraft cardbase

Here is an additional picture of the card:


Wishing you a wonderful Christmas Time.

Yours,


Tuesday, December 12, 2017

Reindeer Shaker

Hi there,

it's Tanja here and I created this sweet little shaker card using stamps from the Gerda Steiner Designs Peeking Friends stamp set:

  • cut out a stitched panel from Neenah Desert Storm kraft cardstock using one of the My Favorite Things Wonky Stitched Rectangles 
  • cut out a Christmas Tree from that panel with the help of one of the dies from the Sizzix Festive Fancies set
  • glue a piece of acetate behind the oping and surround it with a double layer of double-sided foam tape
  • fill the shaker element with clear and green seed beads and close it with a piece of patterned paper from the Crate Paper Snow & Cocoa 6x6 paper pad
  • cut out another wonky stitched panel from patterned paper from that same paper pad and adhere all the layers to a Neenah Desert Storm kraft cardbase
  • stamp the cute little reindeer from the Gerda Steiner Designs Peeking Friends set with Versafine Onyx Black
  • color the image with Faber-Castell Albrecht-Dürer pencils and add Stickles Glitter Glue Christmas Red to its nose
  • add highlights with a white gel pen
  • stamp the sentiment from the same stamp set onto a strip of patterned paper with Versafine Onyx Black and heat-emboss it with clear embossing powder for extra dimension
  • layer a thin strip of red glitter paper underneath the sentiment strip to match the nose of the reindeer

Here is an additional picture o the card:


Have a christmasy day.

Yours,


Wednesday, January 13, 2016

Stretch your Christmas stamps!!

Hi there!!

it´s Yolanda here, from Scraping Time. I hope you had a great start of the year.
Have you seen the new Clear Stamps on the shop??? I am looking forward to starting playing with them but meanwhile, I am going to try to stretch my Christmas stamps! Yes... don´t be afraid... I am not going to show you more Christmas cards this year !!! :)

I know that there are many people that after Christmas, take the Christmas stuff and put them away till next year. But I am sure that you can use it more if you look at them with "cardmaker" eyes! ;)

For my cards, I have used some stamps from "Peeking friends" and "Snowman friends".


In my first card I used this critter that can be used for many kind of cards... Birthday cards, friendship... 
I used three diferent colours of Distress Inks for the background and then I did my panel. I die cut a false stitched square on white cardstock and I die cut a smaller one but I decided not to put it straight! I coloured the stamp with Spectrum Noir markers and I finished the card with the sentiment from Mama Elephant and some silver sequins. 


For my second card, I decided to use these cute snowmen for a Valentine's card. I love this set and it is lovely for a winter scene too! 


I show you how I made this card:


I really enjoyed playing with these two lovers!! :) 

I hope you look at your stamps twice from now on and see you soon!! 

Monday, December 28, 2015

Peeking Santa

Hey everyone! 
It's Wiebke here today and YES, I know I know! Christmas is almost over! But I thought I just had to share this last christmas card with you guys :)

I used the Peeking Friends clear stamp set to create this little scene. I think the peeking santa is just perfect to peek from behind a window.


I die cut a window out of my card basis and placed a piece of patterned paper behind. I colored the santa with my copic markers and glued him down from behind the window. If you cut out the gloves, it looks like he is opening the window.


I hope you have had an amazing christmas season with all of your loved ones! And a santa who brought some nice gifts - just like this one :)

Friday, December 25, 2015

My Last Christmas Card for 2015


https://youtu.be/I_hVkWFVK0c

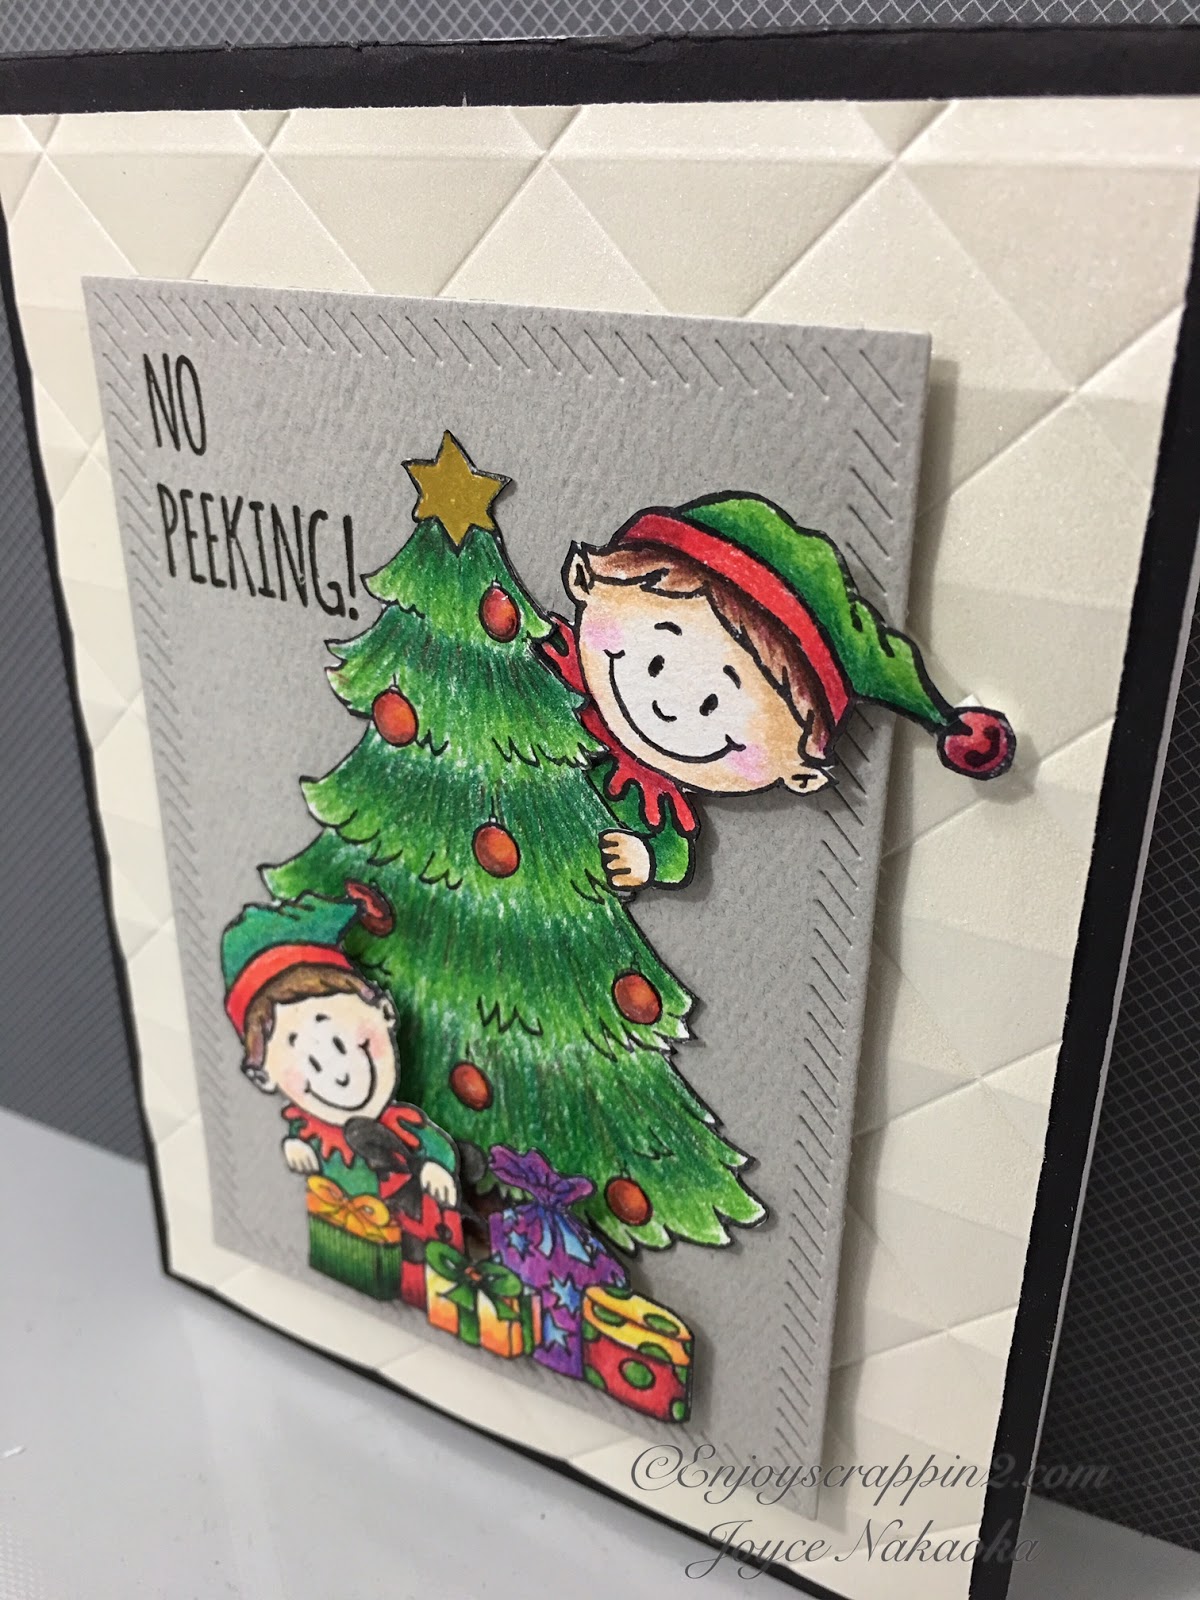
Aloha Guys!  Merry Christmas Everyone!  This is Joyce from http://enjoyscrappin2.com  and I want to add my last Christmas card for 2015, using Gerda Steiner Designs Peekin Friends.  I've used almost every single image from this stamp set and I didn't want to leave this super cute guy out :)  t hope you enjoy this video and I'll see you guys back, after Christmas.   Thanks again :)

http://enjoyscrappin2.com

Tuesday, December 22, 2015

Peeking Friends Christmas Tag Trio

Hi there,

it's Tanja here and this is my last post before Christmas. I am wishing you a wonderful time.

I created this Tag Trio for my loved ones - my husband, my son and my daughter:


I will have a step-by-step tutorial for each one of them up next:


Have a christmassy day.

Yours,


Wednesday, December 2, 2015

Green Christmas!

Hi there!

It's Yolanda here, from Scraping Time. Today, I want to share with you a couple of works made with some of the cuttest Christmas stamps from the shop: Deck the Halls, Holiday Friends and Peeking Friends. All of them are clear stamps and I love how adorable they are!

When I started thinking about this post, I thought I wanted to use any bright colour since I`m usually making softer cards lately. Then, I chose a vibrant green and this was the first idea to choose my papers, cardstocks and even the stamps, since the first one I decided to use was the cute elf.


I stamped all the stamps with Memento and coloured it with Spectrum Noir Markers.  Then, I fussy cut them without leaving any white line on the borders.

For the card, I cut with the big shot 3 stitched rectangles in green cardstock, red decorated paper and white cardstock. I made a cute border on the top of the white panel and I used it to hide one of the elfs. Then I die cut three stars. I hided the other elf into the biggest one, then I put some acetate and I made three different shakers with the stars. For the smallest ones I used micro beads and for the biggest one I used white and pink glitter. I just wanted to give it some shine when you move it!


Then, I sticked the three panels on a green base and I stamped the sentiment from "Peeking friends stamps" with red Hero Arts Ink.


For the tag, I used the biggest one from Mama Elephant and I decided to use acetate for the panel but in this occassion I chose translucent acetate since it is stronger than the clear one. I used two different reindeers and I used the same colours as I did in my card.


These reindeers are so much fun and I used some wink of stella clear on the nose (where I also put some glossy accent later), the hats and the reindeers hoof. 

I used some white embossing powder for the sentiment and I used a second red tag as a base. I love bows so I used a red one to finish my tag.


It was great to make these works for today and I hope you enjoy! Have a great week!! :)

Friday, November 27, 2015

How to create Depth using Inexpensive color pencils


Aloha Guys!  This is Joyce from http://enjoyscrappin2.com and today I'm sharing how to achieve depth and dimension using some inexpensive color pencils.  You can layer multiple layers to create the look that you want.  I hope you liked this card and I'll see you next time.  Thanks again :)


Tuesday, November 24, 2015

Merry Christmas Reindeer

Hi there,

it's Tanja here and I would like to show you this sweet Reindeer Tag Card step-by-step:


Thanks for stopping by today.

Yours,


Saturday, November 14, 2015

Create a Cute Christmas Tag

Hi crafters! I'm excited to be back as guest designer today. Gerda has such a wonderful clear stamp set for the holiday season (one among many!) that I just had to craft with it!

The set features different characters that are drawn to peek out from behind something. The images are not complete, so you don't have to worry about masking or about coloring the entire image.


I started by stamping the outline on to my tag from Pretty Pink Posh, then used masking paper to protect that outline while I sponged color in with my Distress Ink blending tool. I found out that it works best for me when I start out with the lightest color, which is the one closest to the top of the tag, and then add the darker colors which are closer to the bottom. That allows me to blend them together nicely without covering areas with darker color that are meant to stay light.


The image itself was colored with my Stabilo markers. They are water based, like Distress Markers, and to blend the color out I used a Dove Blender Pen (a Blender pen from Stamping Up works just as well). I just rediscovered this technique after using it last year, so I want to give this some more attention.

You can use a water brush or regular brush to blend out the colors, but I am not good enough to have proper control over what I am doing. But give me a blender pen with a proper marker tip (like a felt tip marker) and I'm in business! Total control :)


The I put the mask back on my colored image before stamping the sentiment from Mama Elephant and I have to admit, I like how the critter partially obscures the sentiment. It adds a nice layer effect to the otherwise simple tag.

I hope you enjoyed today's project. Thanks for stopping by!

Wednesday, October 21, 2015

Halloween or Christmas??

Hi there!!

It's Yolanda here, from Scraping Time. Today I'm going to show you two very different projects. At this moment, I´m moving between Fall, Halloween and Christmas and that´s why it was impossible for me to choose just one and I decided to play with two topics today.

Let me show you a Halloween card. I am from Spain and here, Halloween is something learnt! We never celebrated it when I was a child so it´s not easy for me to make projects about it! I feel they are always very sweet instead of scary!!! :o)

I fell in love to this digital stamp from Gerda Steiner Designs: Kid in Pumpkin . Isn´t it so gorgeous??? 


I printed it and coloured it with my Spectrum Noir Markers. Then I fusy cut it and put some Wink of Stella Clear to make him shine! I love this image!


For the background I used several Distress Inks. I love this combination because they blend very well. 


Once I had done it, I used a tag die to give some interest to it! I die cut three ones in black cardstock which I glued together to give it some volume on my main panel. Then I die cut a speech balloon, stamped my sentiment and then added a clear epoxy sticker. Finally, I added a pretty bow and glued everything to a purple card base. 


And now, let me show you my first Christmas project in this blog. I have used some stamps from the new  Christmas Clear Stamps Sets.


I love that these sets have lots of different stamps and the most important thing for me is that they are from different sizes so that you can make backgrounds, little details or complete scenes. That´s great!

For this entry, I decided to work with a Snow Globe. I bought it in a photography store and it was so easy to use. You just open its base and it has two cardstocks inside. You take them out and you can use them as a guide to fussy cut your own base. Then I created my two scenes. For the first one, I stamped that friendly Santa and on the other side, I created a tiny snowy scene. 


I added some snow flakes wiht my white gel pen. And some Wink of Stella white pretending to be the snow.

Then I used some fine detail white embossing powder for my sentiment and I made my own banner. I added two mini brads and used some glue dots to stick it to the Snow Globe.


I hope you have enjoyed and I wish you a happy week!!

See you soon!