Showing posts with label Katie Brooks. Show all posts

Saturday, October 14, 2023

Very Merry Bird Tower

Hey there!  Katie Brooks here, back for one more guest post!  It has been so fun to be able to play with GSD stamps, they are so whimsical and sweet.  The card I have today is no exception, I used the images in combo to make a fun bird tower. 


Aren't they fricking cute!  I love these darling birds and they make such a fun wobbly tower complete with their Christmas tree!

I stamped the images from the Season's Tweetings set and colored them with copics.  I used E25, E23, E21, YR16, YG25, YG17, YG03, R37, R35, R14, C03, C01, C05, B01, B000, and V91.  I have to say, the Pigeon set is one of my faves and I really wanted to make that middle bird look like a pigeon, not sure if it is meant to be, but works for me!  Next, I cut these cuties out and set them aside. 


1Next I pulled out this fun gold snowflake DP and cut it to 4 X 5.25.  I also had this strip of candy cane stripe paper and pulled cut that into a strip and made the end have a chevron.  (Both of these piece's of DP are scraps and I don't know who made them, though I am guessing the red and white is Doodlebug Designs).  Next, I adhered the red to the snowflakes and the snowflakes to the white base with EZ Tear Tape.  I stamped my sentiment with black ink.  Next, I added in my birds creating them into this fun tower.  I finished it off with some Trinity Stamps red pearls, adhered with glue dots. 


Of the 2023 holiday cards I have made thus far, this is one of my faves, I just love the whimsy of it.  I may give this one to my dad, who is a bird lover.  

Well, again, it has been a pleasure to be here and I thank GSD for having me.  I hope you enjoyed this post!  Please check me out on IG under the handle katieannbrooks.  Have a fantastic weekend! ~Katie

Saturday, October 7, 2023

Sneak Peak- Season's Tweetings

Hello!  Katie Brooks here, back for another guest design post, one of two this month.  Today I am previewing a new set soon to be released called Season's Tweetings. If you are a bird lover or Christmas card maker, you are going to love this set!  

Here is what I have for you today:


There are several cute birdies in this set, but this one might be my favorite, I love his darling little hat, scarf and his cute little face!  

I made this card by stamping the images with my Misti and black ink.  Then I colored the images with my Copics, using YG17, YG25, YG03, Y13, Y15, Y18, YR23, YG16, R14, R35, R37, B02, B01, B000, E23, E25, C1, C3.  Next, I added some white gel highlights and cut my images out and set them aside. I used some green checkered DP from Pinkfresh and cut it out with a Wonky Stitches die.  I stamped my sentiment on this, wrapped some red twine around it and then mounted this layer on my white base.  Then I added my images in using EZ Tear Tape and Foam Tape.  


An Easy Peasy card that is pretty CAS.  I really like how it turned out, because the background is simple, it really makes the images POP.  I hope you like it too!  

Be sure to check out the new set in the shop on 10/9.  Also, head back here on 10/14 for another post by yours truly!

Thank you so much for visiting! ~Katie

Wednesday, September 13, 2023

Levitating Ghost!

Hello there!  Katie Brooks here today from KBStamps as a guest designer.  This is guest Design Spot #2 for me and it has been amazingly fun!

Today I have another fun Halloween card using the new Halloween Ghosts Bundle. This card has a little something extra to give it a boost!  Wait until you see this levitating ghost that I made my my dad in mind. 


There are a few things this card has in common with my last card- 1) the stamp & dies 2) the 4.25 X 4.24 size and 3) the googly eyes.  But there are several differences too and I'll point them out for you. 

I made this card using that black 4.25 square base I mentioned.  On top of that is a layer of  Doodlebug Designs Halloween Patterned Paper (this is another similarity I forgot to mention.  What you might notice is that I used a Lawn Fawn die cut to make this ghost interactive and appear to levitate up and down.  I used acetate for the mechanism so you can't really see it and you get that optical illusion.  After setting up the interactive, I stamped out my ghostly image and die cut it.  Last time, I used regular gray for my ghost shadows, but this time, I used YG01 to make it glow a bit like Slimer from Ghost Busters!  I also added a little R35 for the tongue.  Again, I added googly eyes to my image, but this time really BIG ones.  In addition, on the background, I stamped the sentiment and added a bunch of the Boo Cutting Die cuts using glitter paper for the front portion and black for the back.  

Here is how this little dude looks when he returns to his original position: 

I just adore this card!  It is bright and bold and makes me giggle a little.  I sure hope that my dad likes it too!

Thank you for visiting and be sure to check out these goodies in the Gerda shop! ~Katie 


Wednesday, September 6, 2023

Eek, Boo!

 Hello there!  Katie Brooks here today from KBStamps as a guest designer.  I am so thrilled to be here and for the opportunity to play with some Gerda Stamps!

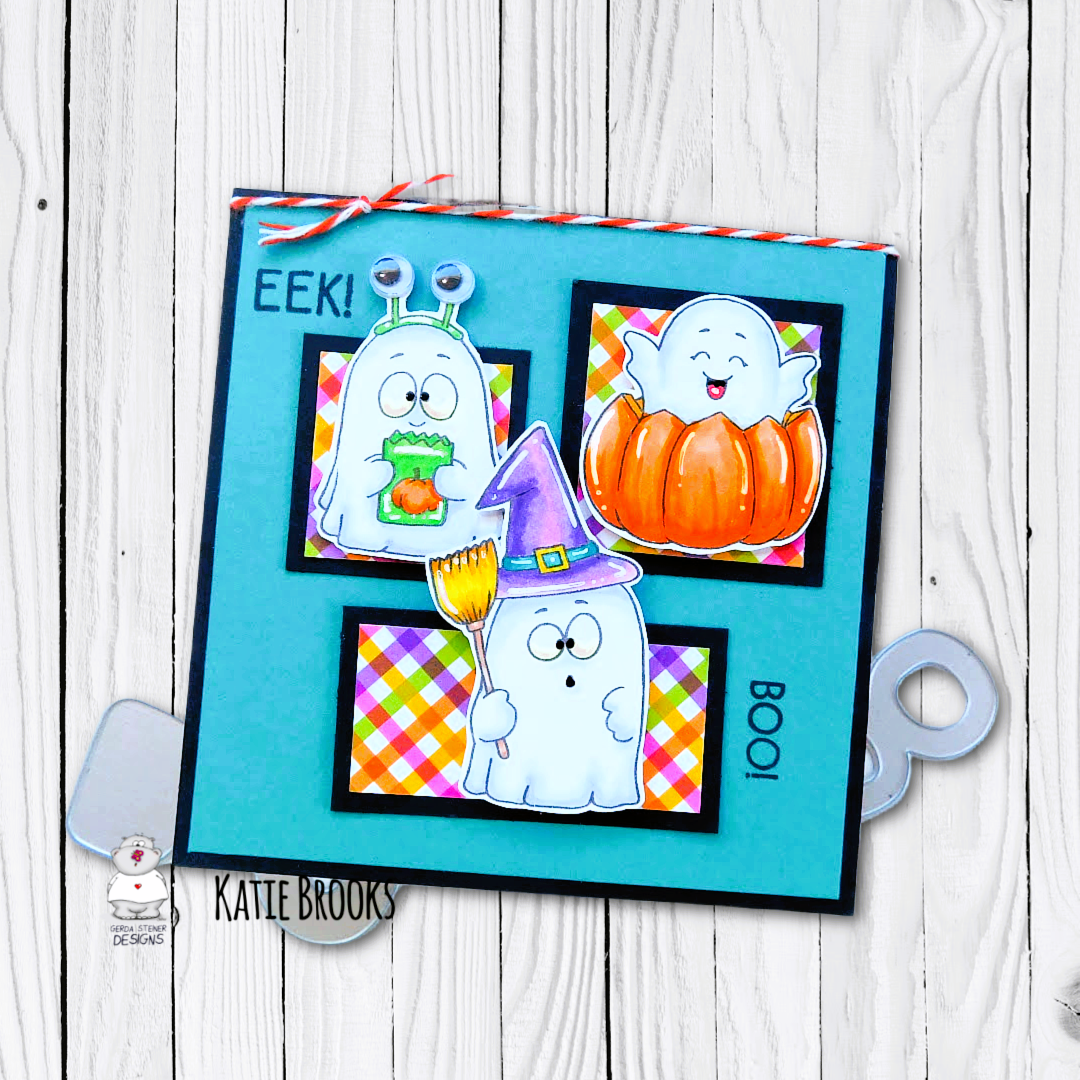
Today I have a fun Halloween card using the new Halloween Ghosts Bundle. I love using standard Halloween colors, but I also love to break the mold a little and add a little something different.  I made this for a friend who loves blue's. 


I had so much fun making this card!  I love these sweet ghosts, they are so playful and fun!  I made them even more fun with these googly eyes on the upper left ghost. 

I made this using a 4.25 X 4.25 black card base.  On top of that I used some teal CS cut to 4X4.  Next, I used some Doodlebug Designs Halloween Patterned Paper cut into little squares and rectangles and mounted them with black behind them on the base.  Next, I added twine across the top and stamped my sentiment with black ink.  After that, I stamped the images using my Misti and then cut them out with the coordinating dies.  I colored the images with my Copics (C3, C1, YR09, YR16, YR04, YR02, G07, G05, YG01, V17, V15, V05, Y23, Y15, Y13, E21, BG15, BG13) and used a white gel pen for highlights.  I used my black glossy glaze for the ghost eyes.  I popped these fun images up using foam tape.  Finally, I added the googly eyes for fun. 


Like I said, I love these cuties!  I hope you like this fun card.  I have another one to share with you next week.  Please come back and visit me then. 

Enjoy your day! ~Katie