Friday, August 31, 2018

Inspirational Foxes!...

Hello everyone, DT member Jayne here, dropping by with a FOXY post featuring the new "Foxes" stamp set.

When I saw the acorn wreath, I knew exactly what I wanted to do with it...


The cute little fox and wreath were coloured with Copic markers, cut out and popped up on to foam tape for added dimension. The background was ink blended with Tumbled Glass Oxide ink and splattered with Gold Acrylic paint. The sentiments were stamped directly to the card panel and then mat and layered with Gold mirror card.

For the second card I wanted to ink a night scene because I thought it would look good to stamp the sentiment in the Moon...


Once again, I used Copic markers to colour the cute critters and I ink blended the background elements using Oxide inks.

Be sure to pop over to Gerda's shop for this stamp set and many more!...

Happy crafting and see you soon xxx

Jayne x

Thursday, August 30, 2018

My friend....!!

Hey Gerda fans, Its Ashlee here.... 

Today I am popping in to share with you a card I made using the gorgeous 
"Valentine penguins" stamp set...
(co-ordinating dies also available)

I had a seen a fun technique done recently using adhesive covered in sequins for a fun background and I thought it would be perfect to pop behind the penguin flying with his balloon so I had to give it a go....!! 


This penguin stamp set is perfect for any occasion...
they are just adorable!! 

I hope you enjoyed my card today... 
Happy crafting everyone and I will see you all again soon! 

Hugz Ashlee

Wednesday, August 29, 2018

I miss you - Larissa


Goodmorning, I am Larissa from Car-d-elicious and today I am posting a new card on the blog from Gerda Steiner designs. This time I made a card with the new cute stampset Owl rather be with you from Gerda Steiner designs.


I stamped an owl and the branch and then I coloured them with my Polychromos pencils and the black glaze pen. I have fussy cut both images. I have cut 3 circle frames from white cardstock with the Die-namics stitched mini scallo circle stax from My favorite things and the Crea-nest-lies XXL 7 from Crealies and glued those on top of each other. I have c ut a circle from masking paper and placed the other part with the circle hole in it on a white card and made a background for the image with Tumbled glass, Broken china and Faded jeans distress ink. Then I glued the frame on the card and glued the images inside the frame. I have diecut a little heart from red cs with the Mini hearts set from Simon says stamp and I glued that on the wing of the owl. Under the circle frame I stamped a sentiment from the set Crazy talk from Stampers anonymous.


*********************************************************************************
STAMP: Owl rather be with you from Gerda Steiner designs, Crazy talk from Stampers anonymous
COLORING MEDIUM: Polychromos pencils, Distress inks
PAPER: White and red cs
INK: Versafine onyx black, Tumbled glass, Broken china and Faded jeans distress ink
DIES: Die-namics stitched mini scallo circle stax from My favorite things, Crea-nest-lies XXL 7 from Crealies, Mini hearts set from Simon says stamp
ACCESSORIES: Black glaze pen, masking paper

Tuesday, August 28, 2018

Happy Birthday Owl

Hi there,

it's Tanja here and I would like to show you some projects using the adorable new Gerda Steiner Designs stamp sets over the next couple of weeks. This first card uses one of the owls from the Gerda Steiner Designs Owl rather be with you set:

  • color one of the owls and a branch from the Gerda Steiner Designs Owl rather be with you set with Faber-Castell Albrecht-Dürer pencils and a damp watercolor brush
  • add highlights with a white gel pen
  • cut out a stitched panel from watercolor paper and stamp three balloons from the Gerda Steiner Designs Happy Hoppy set with Versafine Smokey Gray 
  • color the balloons and the background with Distress Oxide Re-Inkers (Peacock Feathers, Worn Lipstick, Shaded Lilac, Tumbled Glass)
  • stamp the sentiment from the Gerda Steiner Designs Happy Hoppy set with Versamark and heat-emboss it with WOW! Primary Parma Violet
  • layer the watercolor panel on top of a piece of Distress Cardstock Dusty Concord before adhering it to a cardbase
  • glue on some natural twine as balloon strings


Have a wonderful day.

Hugs,

Monday, August 27, 2018

Summer piggy shaker....!!

Hi everyone...

Ashlee here with a card to share with you all using the 
super fun set "Pool piggies"...
(It has the co-ordinating dies too which you can find here)

I wanted to create a shaker card for this piggy to look like he is floating 
in his pool on his floaty in the beautiful blue water! 


I thought it would be fun to create a front panel using lots of floaty rings 
and the balls out of the stamp set with a light coloured ink to give the front some 
interest around the piggy pool. 

Thanks for checking out my pool piggy shaker card...

Hugz Ashlee 

Sunday, August 26, 2018

Guest Design - Enjoy your day by Australe Créations

Hello everyone! 

It's Céline from Australe Créations, I hope you're well !

I'm back today with a card made with the On the bookshelf stamp set :


I love, they are so cute these little cats ♥

I assembled different papers and put in color the little cats with Copic markers.


Sewing border, sentiment with gold  embossing powder, some beads and glossy accent.


Thanks so much for stopping by today, I hope you like it !
                                                                                       
See you next week for another card :)

Céline


♥♥♥

STAMP : On the bookshelf
COLORING : Copic BG15 - E50 - E70 - E71 - E74 - E77 - R00
DIES : Trio de carrés couture from 4enscrap 
EMBOSSING : Simon Says Stamp Embossing Powder Ultra fine gold
DOTS : Gold beads from 4enscrap


Saturday, August 25, 2018

Happy birthday turtles....!!

Hi everyone.... 
It's Ashlee here and I am super excited to be posting for my first time as a 
member of the Gerda Steiner Design team. 

I have a card to share with you using the fabulous stamp set "Turtley great"...
(there is also co-ordinating dies available for this set) 

As soon as I seen these turtles I loved them, they are just the cutest 
and I couldn't wait to colour them up!! 
(All the images I coloured up using Copics).


I created a fun grass panel for the turtles using a gelli plate and paints...
and a stencil with distress ink for the leafy edging. 

I had so much fun making this card with the gorgeous turtles, 
I can see I will be creating many cards using this set!! 

I really hope you enjoy my first card, 
I will be back soon with more creations to share with you all 

Hugz Ashlee 

Thursday, August 23, 2018

Guest Design - Upside Down Falmingo by Ana A

Hello crafty friends! 


I am so excited and honored to be guest designing today for Gerda Steiner Designs!

For today's project I am sharing two cards using new adorable and so funny Upside Down Flamingo set from the newest Gerda Steiner Designs release.

This silly bird made me smile so wide and as soon as I saw the image I had many ideas for funny cards, tags and other project!


For my first card I set the flamingo image in the tropical setting with a large palm tree, lots of coconuts, sandy beach and a tropical sunset.

I used alcohol markers to color all the images and Distress inks to create the sunset.
The dies for the palm tree, sandy beach and card panel are from My Favorite Things and the silhouette birds are from last year's Hero Arts kit. 
The sentiment - from the Upside Down Flamingo set - was white heat embossed with Hero Arts white embossing powder.

To have my flamingo stand out from the rest of the elements I fussy cut the image and used foam tape to give it dimension.

This card makes me so happy and also makes want to take a tropical vacation :)


For my second card I used a stencil from my stash and distress ink in mowed lawn to create a gradient look for my background. Once the background was dry I die cut the panel with the largest stitched scalloped rectangle die from Kat Scrappiness and stamped the sentiment in the top right corner with black ink.


I colored the flamingo with alcohol makers and fussy cut him out then added foam tape to pop him up on the card panel.

I really hope you like these Upside Down Flamingo cards and got inspired :) 


Supplies:

  • Stamps - Upside Down Flamingo
  • Dies - My Favorite Things, Kat Scrappiness
  • Paper - Neenah Classic Crest Solar White 80lb, 110lb base cardstock
  • Ink - Memento Tuxedo Black, Versafine Onyx Black, Ranger Distress Mini ink cubes
  • Alcohol markers
  • Foam adhesive, liquid adhesive, white gel pen


Wednesday, August 22, 2018

Gerda Steiner designs - My first memory dex card with Turtly great


Goodmorning, today I am posting a new project on the blog from Gerda Steiner designs. This time I have made a card for my Memory dex. At the moment these are a big hype in the Netherlands and since I thought it would be fun to make cards for the Memory dex I also purchased one. I think it is a nice way to try new techniques, but it is also perfect for making little scenes like I did today.


On my memory dex card I have used stams from the set Turtly great from Gerda Steiner designs. I have coloured the images with my Polychromos pencils and then I have fussy cut them all. My memory dex card is made with the Stencils SL120 from Studio light. I have die-cut the same shape from green design paper and then I have die-cut it with the Grassy hills from My favorite things to make a grass edge. For the sky I used lightblue design paper. Both papers are from the Gingham-linen rainbow petite prints from Doodlebug. I have die-cut a couple of mini clouds from white cardstock with the Mini clouds from Memory box (retired) and I adhered those in the sky I have die-cut a couple of flowers from yellow design paper and decorated those with orange enamel dots from the Enamel stickers Sending sunshine from Create a smile stamps. The sentiment is from the set So to speak from Clearly besotted stamps.


*********************************************************************************
STAMP: Turtly great from Gerda Steiner designs, So to speak from Clearly besotted stamps
COLORING MEDIUM: Polychromos pencils
PAPER: White cs, Gingham-linen rainbow petite prints from Doodlebug
INK: Versafine onyx black
DIES: Stencils SL120 from Studio light, Grassy hills from My favorite things, Mini clouds from Memory box Mini clouds from Memory box
ACCESSORIES: Enamel stickers Sending sunshine from Create a smile stamps. Memory dex


Sunday, August 19, 2018

Guest Design - Turtley Awesome by Australe Créations

Hello everyone! 

It's Céline from Australe Créations, I'm  so happy to find you, how are you today ?

I'm back with a new card made with the Turtley Gret stamp set :


I love it ! ♥

I assembled the turtle and snail stamps that I colored with Copic markers.


I made a watercolor background with Gelatos, some gold beads, splash and sentiment from the set.


Thanks so much for stopping by today, I hope you like it !
                                                                                       
See you next week for another card :)

Céline


♥♥♥

STAMP : Turtley Great
COLORING : Copic E35 – E37 – E51 – E53 – E70 – E71 – E74 – E77 – G21 – G94 – G99 – RV21 – YG63
WATERCOLOURING : Chocolate and Pistacchio Gelatos from Faber Castel
PAPERS : Noir réglisse from 4enscrap & watercolour Montval paer from Canson
DOTS : Gold beads from 4enscrap


Saturday, August 18, 2018

Flamingo!

Hey there! Today, I'm sharing a card using a new set in the Gerda Steiner Designs store, Upside Down Flamingo. This is a smaller set, but it has one large image and two large sentiments. 

This flamingo is so silly and it's peeking between the legs. I wanted to do something simple with this card since it's a large image. 

I colored the flamingo in typical pink and yellow colors. I wanted to play off these colors so I used a strip of Bristol Smooth paper with distress inks to create a colorful strip. I love the sentiment being stamped on this since it's pretty bold. I love how the sentiment pops. 


The card is super simple, but I love how it's a balance amount of the white card panel with pops of color. 


I hope you enjoyed today's card and the new stamp sets that have come to the shop this week. Have a great day and I'll see you next time with another card!

Thursday, August 16, 2018

Turtley Great Time...

 Hi Everyone,

Its Hazel from Didos Designs back once again using the super sweet Turtley Great Stamp set for a couple of creations. 

I love this set. (But then I love all the sets that Gerda Designs!!! ) How cute is the turtle and his friends.

My first creation is a cute wee shadow box.

For my second creation I had a play with alternative colours for a turtle. So hes a bright rainbow guy.
 Thats the joys of colouring, you can use whatever colours you like.  I added a wee party hat on this one. Its from the Daschunds Stamp Set.  Love that you can mix and match all Gerda's collections. They compliment each other so well. 
I watercoloured the background and then fussy cut the turtle out.  You can buy dies here that coordinate with the set though. 

Thanks for dropping by today,  I hope I have inspired you,

Love Hazelx

Wednesday, August 15, 2018

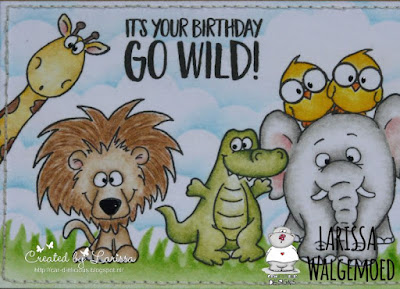
Go wild! - Larissa


Goodmorning! Today it is my turn again to post a new card on the blog from Gerda Steiner designs. This time I have made a large birthday card and I used 3 stampset from Gerda Steiner on it.


From the set Go wild from Gerda Steiner designs I have used the images of the giraffe, elephant and the vulture. I used all animals from the stampset Party animals from Gerda Steiner designs. They are the lion, crocodile, ostrich, gorilla and the rhinoceros. From the stampset Hoppiness from Gerda Steiner designs I only used the image of the little bird. I stamped all images on masking paper and the I have fussy cut them all. With the help of the masks I stamped all the animals on the white cardstock. Then I ahev coloured all the images with my Polychromos pencils and the black glaze pen. I have put the masks back again on all the animals and started on the background. With the Mini cloud edges stencil from My favorite things and Broken china distress ink I made some clouds in the sky. I have used the Grassy edges stencil from My favorite things and Mowed lawn distress ink to make the grass. I have stamped a sentiment from the set Go wild from Gerda Steiner designs on the card. Then I pierced little holes in the image panel and added stitching with white embroidery thread. I glued the panel with foamtape on a kraft card.


*********************************************************************************
STAMP: Go wild, Party animals and Hoppiness from Gerda Steiner designs
COLORING MEDIUM: Polychromos pencils, Distress inks
PAPER: White and kraft cs
INK: Versafine onyx black, Broken china and Mowed lawn distress ink
ACCESSORIES: Black glaze pen, Mini cloud edges stencil and Grassy edges stencil from My favorite things, White embroidery thread


Monday, August 13, 2018

Night time Scene with Foxes - InsideoutJeans

Hi there!

Gerda Steiner Designs is releasing two new stamp sets on August 16 (three days!) and I wanted to share a sneak peek of a project using the set. The set is super adorable and even though its name is Foxes, it has an adorable owl in it.

I definitely wanted to use the owl so I decided to to create a nighttime scene. I used black cardstock and used bright distress oxide inks. As an finishing touch, I used the Black Soot ink to darken up the bright colors. I used white ink to splatter onto the background to finish it off.


The background is really subtle but it really adds to the overall feel of the card and really depicts the night time.

I chose to color in the critters in bright colors so they could pop on the card. For the tree, since the image only comes with a branch, I just drew freehand the tree and added a few details on the bark so it wouldn't look so flat. I wanted to add a moon so I could add a sentiment.


I really like how there were small mushrooms in this set as well. It really helped to add a finishing touch to the card along with a pop of color. Originally, I didn't include them but the card felt as if it was missing something. All in all, everything came together nicely and I'm loving this stamp set. 

Again, it releases in three days so get ready! 

- Jeannie

Sunday, August 12, 2018

Guest Design - Turtley Great by Australe Créations

Hello everyone! 

It's Céline from Australe Créations, I'm  so happy to find you today ! I hope you have a nice summer ! Here in France it is really beautiful.

I'm here today to present you a card made with the adorable Turtley Gret stamp set :


Is it not beautiful ?!! ♥

I chose the smiling turtle and is little babies (so cute !), colored with Copic markers


Hand stitched border, some glitter dots and sentiment from the set.


Thanks so much for stopping by today, I hope you like it !
                                                                                       
See you next week for another card :)

Céline


♥♥♥

STAMP : Turtley Great
COLORING : Copic E35 – E37 – E51 – E53 – G21 – G94 – G99 – YG63
PAPERS : Crème fleurette and collection from 4enscrap
DOTS : Copper glitter from Artemio