Friday, March 30, 2018

Easter Lambs Tag and Card...

 Hi,

Its Hazel from Didos Designs here with a cute wee Peeking Easter Friends Tag and Card to share.

I made these for my sons girlfriends birthday this week even though they are Easter images, you can use them all year round!! They are sooo cute!!! They are really versatile as you can see from my creations.

I have added the great wee picket fence from the Hoppiness Stamp Set and also on the card the butterfly and hearts from the same set.
For my colouring I have used cotman watercolour paints. I fussy cut the animals and popped them where I thought they would like to peek out from. You can buy the dies for this set here though to save on the cutting out. 

Thanks for dropping by today,  Have a lovely Easter time,

Hazel x

Wednesday, March 28, 2018

Brush bunny - Larissa


Hi everyone, I am Larissa from Car-d-elicious and today I am posting a little easter card and also a box that I posted on my own blog yesterday. :)


I created something with the stampset Brush bunny from Gerda Steiner designs. I used the stampset to make a little card. On the front of a white card I placed a piece of masking paper after I cut a hole in it with my circle dies. Then I stamped a couple of images from the stampset Brush bunny from Gerda Steiner designs inside the circles. I masked all those images and then I coloured the grass with Mowed lawn distress ink. I have used Tumbled glass and Broken china distress ink to colour the sky.


After I removed all masks I coloured all the images with my Polychromos pencils, the black glaze pen and a white gelpen. The sentiment from the stampset from Gerda Steiner designs unfortunately was a bit too big for this card. So I stamped a sentiment from the set Hoppy easter from Clearly besotted stamps on the card.


With the same stampset I made a little box that can hold about 20 chocolate eggs...yummy!


With a Gable box die I have die-cut the gable box from white cardstock. I decorated it before I glued it together. With the Mini cloud edges stencil from My favorite things and Tumbled glass distress ink I made some clouds on all sides of the box. Then I stamped a sentiment from the set Brush bunny from Gerda Steiner designs on the box. On white cardstock I stamped a couple of images from the stampset Brush bunny from Gerda Steiner designs. I stamped the grass in a line so I could adhered it on the bottom of the box after I had fussy cut it. I stamped a couple of eggs and doodled on them with a black pen. I have coloured all images with my Polychromos pencils, the black glaze pen and a white gelpen. I fussy cut all the images and adhered them on all sides of the box.


A look inside the box.


*********************************************************************************
CARD:
STAMP: Brush bunny from Gerda Steiner designs, Hoppy easter from Clearly besotted stamps
COLORING MEDIUM: Polychromos pencils, Distress inks
PAPER: White cs
INK: Versafine onyx black, Tumbled glass, Broken china and Mowed lawn distress ink
ACCESSORIES:Black glaze pen, white gelpen, Masking paper

BOX:
STAMP: Brush bunny from Gerda Steiner designs
COLORING MEDIUM: Polychromos pencils, Distress ink
PAPER: White cs
INK: Versafine onyx black. Tumbled glass distress ink
DIES: Box die
ACCESSORIES: Black glaze pen, Mini cloud edges stencil from My favorite things. black fineliner

Tuesday, March 27, 2018

Have an egg-stra special Day

Hi there,

it's Tanja here and here is another Easter Creation using the wonderful new Gerda Steiner Designs Peeking Easter Friends stamp set:


  • color the adorable little bunny from the Gerda Steiner Designs Peeking Easter Friends stamp set with Derwent Drawing Pencils
  • add highlights with a white gel pen
  • cut out a panel with the help of one of the Elizabeth Craft Designs Dashing Rectangles 
  • add clouds using the My Favorite Things Cloud stencil and PanPastel Phthalo Blue Tint
  • cut out a grass border using green cardstock and one of the Lawn Fawn Meadow Borders - add shading with PanPastel Permanent Green
  • use the sentiment from the same stamps set and cut out a banner shape around it

Have a wonderful Easter Time.

Yours,


Saturday, March 24, 2018

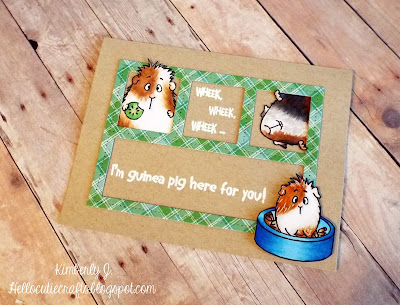
Guinea Pig here for you!-Guest Designer Kimberly

Hi Everyone! 
Today, I am sharing a card as a guest designer featuring the newly released, Wheek, Wheek, Wheek stamp set. The set has some really adorable guinea pigs and sentiments.

I started the card by stamping and copic coloring the fun images from the Wheek, Wheek, Wheek stamp set (Aren't they adorable??). Next, I fussy cut them out. I die cut the pierced frame from some Perfectly Plaid Christmas paper by Lawn Fawn, then I arranged the cute guinea pigs in and outside the frame. I added the frame and images to a desert storm (Neenah) card base. Then I stamped the two sentiments from the set in versamark ink and heat embossed it in white. I added some gel pen details and glossy accents to a few places.


Thanks so much for stopping by! 
Visit my blog {here}.

Have an amazing day!


Friday, March 23, 2018

Easter Friends at Twilight...

 Hi Everyone,

Its Hazel from Didos Designs back again with more of the super sweet Peeking Easter Friends. 

Today I have used 2 of the bunnies from the set with some Easter Eggs too. 
I coloured the background and the rabbits with cotman watercolour paints and cut them out. There are some amazing dies that go with this set. They are available here.here. Much quicker and better than my fussy cutting!! 

I mounted the bunnies using some diecut grass and a frame background with the moon shining down for a finishing touch.  Im sure the wee bunny peeking in is about to snaffle the other bunnies collection of eggs!!

I hope you liked my creation, and its given you some inspiration,

Love Hazelx

Wednesday, March 21, 2018

Peeking easter friends - Larissa


Hi everyone, I am Larissa from Car-d-elicious and I made an easter card for you. The card is made with the new stampset Peeking easter friends from Gerda Steiner designs.


I have stamped the bunny, lamb and chick and coloured them all with my Polychromos pencils. I have fussy cut all the images. From white cardstock I have cut a rectangle with the Crea-nest-lies XXL 52 from Crealies. I have cut a square aperture in it with the Crea-nest-lies XXL 50 from Crealies. I have cut another rectangle from purple plaid paper from the Perfectly plaid rainbow paperpad from Lawn fawn with the Crea-nest-lies XXL 44 from Crealies and adhered it on a white card. Then I adhered the white rectangle on top of it. I placed the animals inside the aperture. I stamped a sentiment from the set Brush bunny from Gerda Steiner designs on the card.


*********************************************************************************
STAMP: Peeking easter friends and Brush bunny from Gerda Steiner designs
COLORING MEDIUM: Polychromos pencils
PAPER: White cs, Perfectly plaid rainbow paperpad from Lawn fawn
INK: Versafine onyx black
DIES: Crea-nest-lies XXL 44, 50 and 52 from Crealies

Monday, March 19, 2018

Peeking Easter Friends...

 Hi Everyone,

Its Hazel from Didos Designs here today with a  couple of creations made using the super cute Peeking Easter Friends Stamp Set.
For my top card I used a pretty die for the card back and the Bunny from the set. I watercoloured him so he was in delicate colours. I them added one of the sentiments to finish the creation off. 

For the second card I used the peeking chick and coloured him in with promarkers. I paper pieced the eggs using the same paper as the one on the left hand side. I added some glitter glue for decorative sparkle. Once again I used a sentiment from the set too to give the final happy Easter Touch. 

Thank You for popping by today,  I hope I have given you some inspiration,

Hazel. 

Wednesday, March 14, 2018

Easter peeking friends - Have an egg-stra special day! - Larissa


Goodmorning, I am Larissa from Car-d-elicious and today I am posting a new card on the blog from Gerda Steiner designs and because easter is coming versy soon, I decided to make an easter card.


On my card I have used the stampset Peeking easter friends from Gerda Steiner designs. I stamped the little bunny and on a sheet of white cardstock I stamped an egg-background with all the egg stamps that are in the stampset. I have coloured the bunny and the egg-nackground with my Polychromos pencils. I used a black glaze pen to colour the eyes of the bunny and I applied glossy accents on his feet. Then I have fussy cut the bunny. From white cardstock I have die-cut a circle with the Crea-nest-lies XXl 41 from Crealies and I made a background for the image on it with the Drifts and hills stencils from My favorite things with Tumbled glass and Mowed lawn distress ink. I have cut a larger circle from balck cardstock with the Crea-nest-lies XXL 49 from Crealies and I adhered the white circle on top of it. I have die-cut the egg-background with the Crea-nest-lies XXL 44 from Crealies and after I adhered it on black cardstock I adhered it on a kraft card. I have adhered the circles with foamtape on the card and then I placed the bunny on the circles. The sentiment is also from the stampset Peeking easter friends from Gerda Steiner designs. Then I decorated the card with black enamel dots.


*********************************************************************************
STAMP: Peeking easter friends from Gerda Steiner designs
COLORING MEDIUM: Polychromos pencils, Distress inks
PAPER: White and black cs, Kraft card
INK: Versafine onyx black, Tumbled glass and Mowed lawn distress ink
DIES: Crea-nest-lies XXL 41, 44 and 49 from Crealies
ACCESSORIES: Black glaze pen, white gelpen, Glossy accents, Drifts and hills stencil from My favorite things, Black enamel dots

Tuesday, March 13, 2018

Peeking Easter Friends

Hi there,

it's Tanja here and Gerda Steiner Designs has released this wonderful new Easter set called Peeking Easter Friends:

  • color the image from the Gerda Steiner Designs Peeking Easter Friends set with Derwent Drawing Pencils
  • add highlights with a white gel pen
  • cut out two egg shapes with the help of one of the Taylored Expressions Egg Stacklets - one from Neenah Desert Storm kraft cardstock and one from patterned paper from the Doodlebug Designs Easter Express 6x6 paper pad
  • cut away the bottom part of the patterned paper egg and ink up its edges with Distress Oxide Ink Picked Raspberry
  • run the kraft egg through your Big Shot together with a Dot embossing folder and ink up the bottom edge with Distress Ink Frayed Burlap
  • cut out a banner from Neenah Desert Storm kraft cardstock and stamp the sentiment Karten-Kunst Frohe Ostern (Happy Easter) with Versafine Vintage Sepia
  • thread some natural twine through a punched flower-shaped hole at the top of the egg shape

Have a wonderful day.

Hugs,


Friday, March 9, 2018

Peeking Easter Friends - Jeannie Lieu (InsideoutJeans)

Hey there! Today I'm sharing another card using the Peeking Easter Friends. I still can't get over how cute this set is and I just want to take advantage of the animals peeking, so I used a die cut that had some borders for peeking purposes.

This worked perfectly for this set. It has three main windows and a top window for the sentiment. For this card, I had to fussy cut these images so it looked clean so both the bunny and the sheep can have their paws over the border.


Once everything was colored and cut, it was quick to put this together. I added a couple of layers of cardstock so there was color to the card.


Have you picked up this card yet? I'm so excited to see what everyone has made with it. 

Hope you enjoyed this card and I'll see you next time! 

Thursday, March 8, 2018

DT Project - New Release It's Guinea be OK

Hello everyone, Jayne here from Daisy Jayne's Designs. Today I would like to share with you four cards I have made using the new Gerda Steiner stamp set ' It's Guinea be ok'.

Card #1 Raisins?!


  • The sentiment has been designed in my Cameo software and printed on 5.25"x 4" white cardstock.
  • The Guinea pigs have been stamped in a Copic friendly ink and coloured with Copic markers. I used coloured pencils to add depth and dimension. The raisins (?) have been drawn in by hand.
  • The background has been coloured with Distress inks.
  • The larger Guinea pig has been popped up on foam tape for added dimension.
  • The card panel was layered on to gold mirror card.


Card #2 Friends Forever


  • The Guinea pigs and sentiment were stamped in a Copic friendly ink and coloured with Copic markers.
  • The background was coloured with Distress inks.
  • The card panel was layered on rainbow mirror card.


Card #3 Here for you


  • The Guinea pig and sentiment were stamped in a Copic friendly ink and coloured with Copic markers.
  • The background was coloured with Distress inks.
  • The background effect was stencilled with white pigment ink.
  • The card panel was layered on gold mirror card.
Card #4 Wheek, Wheek!


  • The Guinea pig, salad and sentiment were stamped in a Copic friendly ink and coloured with Copic markers.
  • The background was coloured with Distress inks.
  • The background effect was stencilled with white pigment ink.
  • The card panel was layered on rainbow mirror card.

I hope these inspire you.

Jayne xx

Wednesday, March 7, 2018

Stamp of the month - Cat in bookshelf - Larissa


Goodmorning, I am Larissa from Car-d-elicious and today I am posting a card for the monthly challenge from Gerda Steiner designs. This month you have to make a card with the image Cat in bookshelf from Gerda Steiner designs. If you make a card for the march challenge, you automatically get the april image emailed to you.


I have coloured the Cat in bookshelf from Gerda Steiner designs with my Polychromos pencils and then I have fussy cut the image. I have searched on internet for a purrfect ;) sentiment and after I found it I printed it on white linen cardstock. I have die-cut the sentiment with the Crea-nest-lies XXL 42 from Crealies. I used Frayed burlap distress ink and a wall stencil to create a wall on the white square. I have adhered the image with foamtape on the wall and then I adhered the white square on a white card.


*********************************************************************************
STAMP: Cat in bookshelf from Gerda Steiner designs
COLORING MEDIUM: Polychromos pencils, distress ink
PAPER: White cs
INK: Frayed burlap distress ink
DIES: Crea-nest-lies XXL 42 from Crealies
ACCESSORIES: Wall stencil


Tuesday, March 6, 2018

Welcome little Koala

Hi there,

it's Tanja here and I created this sweet Welcome Baby card using the Gerda Steiner Designs You're Koalified set:

  • stamp the koala on the tree branch and the little koala on her back from the Gerda Steiner Designs You're Koalified set with Memento Tuxedo Black - use the Masking Technique
  • color the images with Delta, Touch Twin Brush and Copic Markers
  • add highlights with a white gel pen
  • create a background with the help of Bristol Smooth cardstock, one of the My Favorite Things Mini Scallop Circle STAX and Distress Inks (Shaded Lilac, Tumbled Glass)
  • cut out a stitched panel from Bristol Smooth cardstock and add splatters with Distress Re-Inker (Shaded Lilac)
  • cut out a banner using one of the die from the My Favorite Things Blueprints 27 set and stamp the sentiment from the Avery Elle Storybook set with Altenew Crisp Ink Deep Iris


Thanks for stopping by.

Yours,


Friday, March 2, 2018

Peeking Easter Friends - Shaker Card | Jeannie Lieu (InsideoutJeans)

Hello everyone! Today I'm sharing my card using the newly released Peeking Easter Friends. Does this set not scream spring time!? Did you pick up this set for Easter? 

When I saw this stamp set, it reminded me of one of my favorite GSD sets, Hoppiness. Unlike the Hoppiness set (where there's a fence), I needed to create something for the animals to be peeking from so I came up with a border of eggs, using the three from the set. I used full adhesive post-its to create masks for the three eggs and I stamped them on a piece of A2 paper until I had a full border. Afterwards, I wanted to stamp the bunny and the duck directly onto the border, but I realized that I should have done that first. The trick with masking is that you have to stamp the images you want in the front first. I ended up having to fussy cut the border, and the animals. 

Once I had my animals, I added them to the border. I debated whether I wanted to just do a flat or a dimensional card. Since the eggs had so much color to them, the colored cardstock seemed a bit plain for a background. I don't think you can tell from the photo but I embossed the background with a flower font, fitting of the Easter holiday. But even with the embossed background, it still looked plain to me, I decided that making it into a shaker card would liven it up. I added two layers of foam tape on the border, acetate to the front, and shaker bits in the middle. For the sentiment, I stamped in Happy Easter and added it to the front. 

I'm pretty happy with how this turned out. It's bright and colorful, just like spring time. I can't wait for the weather to get warmer! 


Thanks for stopping by to see how I created this card. I'll be back next week to share another card using this set in a different way. Until then!

Thursday, March 1, 2018

DT project- New Release Peeking Easter Friends

Hello everyone, Jayne here from Daisy Jayne's Designs. Today I would like to share with you two cards featuring the new Gerda Steiner stamp set 'Peeking Easter Friends'.

Card #1 Egg-stra Special Day


  • The bunny has been stamped in Momento Tuxedo Black Ink and coloured with Copic markers. I then fussy cut him/her out and ran a black marker around the edge.
  • I stamped and masked the eggs to create an egg pile for the bunny to sit on.
  • The bunny and two of the eggs have been popped up on foam tape for added dimension.
  • The background was coloured using Distress inks.
  • The sentiment has been stamped in Versafine Onyx Black Ink and heat embossed using a clear fine detail embossing powder.
  • I have used a white gel pen to create highlights on the bunny's cheeks and the easter eggs.


Card #2 Someone say CHOCOLATE?!


  • The Easter Friends have been stamped in Copic friendly black ink and coloured with Copic markers. They have been fussy cut out and a black marker run around the edge.
  • The brick wall and sentiment was designed in my Cameo software,  printed, coloured with Copics and fussy cut out.
  • The critters and brick wall have been popped up on foam tape for added dimension.
  • I have added a die cut grassy border, also on foam tape, and the background had been coloured using Distress ink.
  • I have used a white gel pen to add some highlights.


I hope these cards inspire you.


Jayne xx