Saturday, April 28, 2018

Dachshunds Family Album...

 Hi,
  Its Hazel from Didos Designs here with another creation for you using the super sweet Daschund Stamp Set. 
I have used a frame die cut for this card to make it look like a family photo on the wall. Im sure thats Mummy Dog on the bottom so proud of her kids above her. 

I stamped the images and then coloured them using promarker pens and the background was made with aquamarkers.   I then die cut my images and the frame and matted and layered them all up. 

You can get the Dachshunds here and the corresponding die set here.  (Its out of stock but you can ask for a wee email to let you know when it's back in store.)

Thanks for dropping by today, I hope I have inspired you, enjoy the weekend. 

Love  Hazel x

Thursday, April 26, 2018

Floating Floor Pop Up - Go Wild - Jeannie Lieu

Hello! Today I'm back to share this card I made using the Go Wild stamp set. Going on a safari is on my bucket list and in the meantime, making a card is almost the same thing right?


I colored all my images using Copic and Spectrum Noir markers... this part of the process was probably the longest.

The background of the scene was created with distress inks blended on Bristol Smooth paper. I also added water splatter to the distress ink and lifted it using a paper towel. I thought it needed a little bit more so I added a bit of gold splatter.

For the floating floor, I added grassy edges so it looked a bit dimensional and created the slots for the images to pop up on. It sounds simple but probably not so much, so I have a  video that explains the process in much more detail and I hope you enjoy it.

Thanks for stopping by today! Have a great day! 

Wednesday, April 25, 2018

A birthday tag with a cute cat - Larissa


 Goodmorning, I am Larissa from Car-d-elicious and today I am on the blog from Gerda Steiner designs with a new project. This friday my colleague Olivia will be celebrating her 18th birthday and I bought her a little present. I promised her a card, but instead of that I made a tag. ;) I hope she won't mind.


I made a tag and on the tag I used an adorable cat stamp from the set All cats from Gerda Steiner designs. I stamped the cat with versafine black ink on watercolour paper and then I embossed the image with clear embossingpowder. I have coloured the stamp with my new Derwent inktense paint pan travel set. I have fussy cut the image.


I have cut a large and small tag from watercolour cardstock with the Multi-frames die Tags 6 from Nellie Snellen and coloured those with my Tombow dual brush markers. I coloured with 2 shades of pink and a red marker on a sheet and sprayed it with water and then I placed the tag on the sheet. This way you get some nice shaed of pink and red on your tag. I have put the tags back in the dies and then I doodled the inside lines of the tags with a black fineliner on the tags. I have die-cut the name Olivia from black cardstock with the Cutaway alpha die from Waffleflower. On the small tag I stamped the sentiment gefeliciteerd (congratulations) from the stampset Bulletjournal - Tekst diversen from Craft emotions. I tied the tags together with a black ribbon.


*********************************************************************************
STAMP: All cats from Gerda Steiner designs, Bulletjournal - Tekst diversen from Craft emotions
COLORING MEDIUM: Derwent inktense paint pan travel set, Tombow dual brush markers
PAPER: Watercolour paper
INK: Versafine onyx black
DIES: Multi-frames die Tags 6 from Nellie Snellen, Cutaway alpha die from Waffleflower
                                                                         ACCESSORIES: Black fineliner, black ribbon, Clear embossing powder 

Tuesday, April 24, 2018

Guinea Pig Tag

Hi there,

it's Tanja here and today I would like to show you another creation using the adorable new Wheek, wheek, wheek ... Guinea Pig stamp set:

  • color one of the sweet little guinea pigs from the Wheek, wheek, wheek ... Guinea Pig stamp set with Derwent Drawing Pencils and Lyra Rembrandt Polycolor Pencils 
  • add highlights with a white gel pen
  • cut out a tag from patterned paper from the Maja Design Walking in the Forest 6x6 paper pad with the help of one of the dies from the My Favorite Things Tag Builder Blueprints 5 set
  • cut a stitched banner shape around the sentiment from the same set and add some color with Distress Oxide Ink Peacock Feathers
  • add kraft hole enforcer and a piece of linen ribbon to the hole of the tag

Have a wonderful day.

Hugs,


Saturday, April 21, 2018

Unexpected card using Dachshunds - Jeannie Lieu (InsideoutJeans)

Hi there! Today, I'm focusing one image from the Dachshunds stamp set to be the main focus of the card. It's a bit unexpected since this set is mainly about the dogs and I'm using just the balloon.

I wanted to use Kraft paper for the card along with colored pencils. I used a pigment ink and full adhesive Post-its to stamp and add multiple balloons to the card. Using colored pencils, I laid down some white colored pencils where I wanted the highlight of the balloon to be. I used two similar color shades, using the darker one for the edge of the balloon and the lighter one for the interior. These colored pencils blend quite easily. Placing the highlight down really helps the color pop and I only lightly go over it with the lighter shade.


It is such a simple card but all the colors of the balloons really pop. I really loved how it turned out. 

Thanks for stopping by and I hope you enjoyed the card.  

Wednesday, April 18, 2018

Just vrooming by.... - Larissa


Goodmorning, I am Larissa from Car-d-elicious and today I am posting a new card for Gerda Steiner designs.


This time I made a card with the digital stamp Dog on scooter - Vrooming by from Gerda Steiner designs. I have coloured the image with my Polychromos pencils and then I have fussy cut the image. With the Crea-nest-lies XXL 52 from Crealies I have die-cut a rectangle from white cardstock. I added a cloudy background on it with Tumbled glass distress ink and the Mini cloud edges stencil from My favorite things. From black cardstock I have die-cut a road with the Open road die-namics from My favorite things. I used the Grassy hills die-namics from My favorite things to die-cut some grass from white cardstock. I coloured the grass with Twisted citron and Mowed lawn distress ink. After I adhered the grass and the road on the rectangle, I adhered the image with foamtape on the card. I printed the sentimen on white cardstock and then I made a sort of cloud around it with a black pen. I have fussy cut the sentiment and adhered it on the card. I decorated the card with black hotfix gems.


I finished the sentiment on the front of the card on the inside of the card. I have die-cut the word hi with the Journaling alpha dies from Neat and tangled and then I adhered it inside the card.


*********************************************************************************
STAMP: Dog on scooter - Vrooming by from Gerda Steiner designs
COLORING MEDIUM: Polychromos pencils, Distress ink
PAPER: White, red and black cardstock
INK: Versafine onyx black, Twisted citron, Mowed lawn and Tumbled glass distress ink
DIES: Crea-nest-lies XXL 52 from Crealies, Open road die-namics and Grassy hills die-namics from My favorite things, Journaling alpha dies from Neat and tangled
ACCESSORIES: Black hotfix, black fineliner, Mini cloud edges stencil from My favorite things

Monday, April 16, 2018

Guest Design: Wheek, whek, wheek... by Anika Lerche

Hey stampers, Anni here again with another card using the super cute set Wheek, Wheek, Wheek...Guinea Pig


I started by creating masks for nearly all the guinea pigs in the set. Then I stamped the guinea pig in a row. I just wanted to use the uper part of the critters so I didn't mind how the rest looked. For inking the stamps I used alcohol marker friendly ink because I wanted to colour with Copic markers.

To create a variety of fur I searched at Google for picture of guinea pigs to see in which colours they come. Just like on the last card I added some strokes of coloured pencils and white gel pen to achieve a more realistic look.


To cover up the bottom part of the guinea pigs I created a panel with a scalloped border - a little bit looking like a fence. I tied a little bit of twine around it.

I finished up the card by stamping the punny sentiment and assembling the card.

Thanks for stopping by. Again it was so much fun to be a guest designer for Gerda Steiner Designs.
Anni

Saturday, April 14, 2018

Have a Ball! - Jeannie Lieu (InsideoutJeans)

Hello everyone! It's been awhile since I've shared one of my cards and I really am loving this one. If you're a fan of animals, especially doggies, this Dachshunds stamp set is for you! You'll see that I used the Hoppiness stamp set as well to add a few extra elements to the card as well.

I used a grassy hills die to create a stencil. Using distress inks, I colored two layers of the grass. I definitely wanted to use two of the dogs in the set. I like how the first dog is looking back. I can't really tell if he's looking at that butterfly on his tail or the other dog chasing the tennis ball.


Since the second dog looked to be moving, I wanted to put him in action. And what dog doesn't love chasing balls? I just had to have him chase the tennis ball included in this set. I create a pull tab channel so he could run towards the ball.

I used two sentiments in this card: It's Your Birthday and Have A Ball. The first one is prominent on the front of the card, but the second one is hidden until the dog fetches the ball. It's a small surprise for the card recipient.


I used the hearts and the butterfly from the Hoppiness set so I could add pop of color to the card. It looked a little too plain with just the doggies. I think it helps add that special something to the card. 

I hope you enjoyed this card and picked up the set. It's so fun! Thanks for stopping by! 

Friday, April 13, 2018

Have a Ball...

Hi Its Hazel from Didos Designs back again with another card made using the adorable Dachshunds Stamp Set. 

I love this card as it makes me think of my Belle.(Although shes a Jack Russell)  She loves to play with the ball. Its something she would do all day everyday!! 

My card has been made with a little help from my recycling!! I saw the background of the polaroid on one of the easter eggs we had and thought it would look grand on a card. So here we are with it cut out along with a png image of a polaroid picture. One happy doggy stamped and colored with spectrum noir pens  and the card was complete.

I hope I have inspired you today,

Love Hazel. x

Tuesday, April 10, 2018

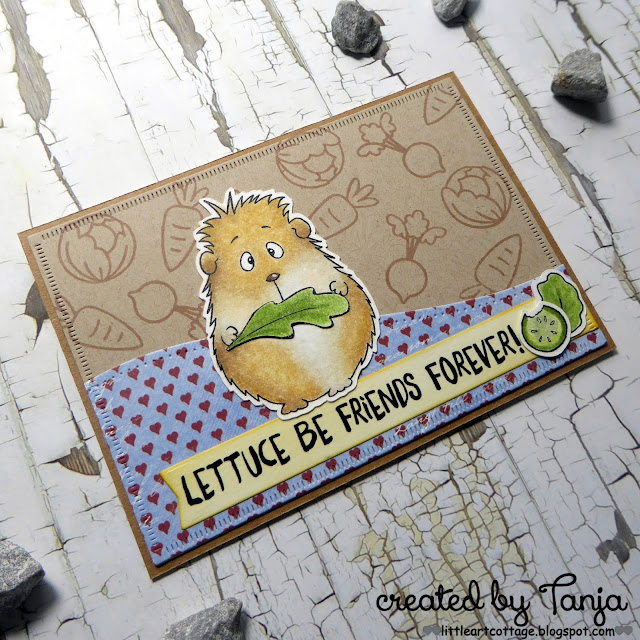
Lettuce be Friends forever

Hi there,

it's Tanja here and after showing you creations using the Gerda Steiner Designs Peeking Easter Friends set over the last couple of weeks, this post features the adorable new Wheek, wheek, wheek ... Guinea Pigs stamp set:

  • color the sweet little guinea pig, lettuce and a cucumber slice from the Gerda Steiner Designs Wheek, wheek, wheek ... Guinea Pigs stamp set with Derwent Drawing Pencils and Lyra Rembrandt Polycolor Pencils 
  • add highlights with a white gel pen
  • cut out two rectangles using one of the Elizabeth Craft Designs Dashing Rectangles - one from Neenah Desert Storm kraft cardstock and one from patterned paper from the Maja Design Life in the Country 6x6 paper pad
  • add an Avery Elle Dotted Border to the patterned paper piece
  • stamp a background using stamps from the Clearly Besotted Stamps Garden Fresh set and Altenew Crisp Ink Mocha
  • cut a banner shape around the sentiment from the same set and add some color using Distress Ink Fossilized Amber
  • mat all the layers onto a dark kraft card base

I hope you got inspired.

Hugs,


Monday, April 9, 2018

Guest Design: Wheek, Wheek, Wheek... by Anika Lerche

Hey stampers, Anni here!

I am so happy to be back again as a guest designer for Gerda Steiner Designs. And I played with this super cute set called Wheek, Wheek, Wheek...Guinea Pig - and I had so much fun.


I started by stamping one of the guinea pigs and all the lettuce leaves and tomatoes. For the colouring I used alcohol markers. To colour the guinea pig I added strokes to the image and didn't blend them to achieve the look of fur.
To take it even a step further I also added some details with coloured pencils and a white gel pen. I fussy cut the images and set them aside.


For the background I die cut a rectangle from white cardstock and blended some turquoise and blue ink onto the panel. Some spritzer of water to add a little bit of intrest to the "sky" and my background was finished.

I chose one of the punny sentiments from the set, heat embossed it in white on a stripe of black card stock. Thean I arrenged everything on my cardbase and that finished up my card.

I will be back next Monday with another card!

Thanks for stopping by and have a great week.
Anni

Have a great Wheek....

 Hi Everyone,  Its Hazel from Didos Designs here today with a card made using the fabby Wheek Wheek Wheek Stamp set. Love this little guy, He looks adorable.
I coloured him in using spectrum noir pens and then added his fur detail with prismacolor pencils. 

I fussy cut his lettuce leaves. you can buy an add on die cutting set to save yourself from having to cut out here.  

I hope you like my card and its inspired you to have a great wheek too,

Hazel x

Friday, April 6, 2018

I Ruff You...

Hi, Its Hazel from Didos Designs here with a fabby wee peek at the new Dachshund Acrylic Stamp Set. (Coming Very Soon!!) 
How cute is this wee guy!!! There are lots of doggys in the collection and some fabby woofy sentiments as well.

I have used a die cut frame for this card and fussy cut one of the dogs out to be sitting in it.  I added the I Ruff you sentiment to finish the card off.

The store is currently closed till the 7th while Gerda and Macy have a well deserved Easter Break.

Thasnk for dropping by today,

Hazel xx

Thursday, April 5, 2018

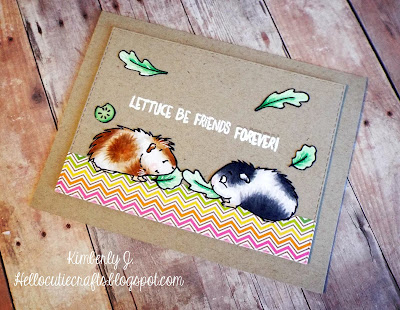
Lettuce Be Friends- Guest Designer Kimberly J.

Hi Everyone! 
Kimberly from Hello Cutie  Crafts here today to share a card.
I am back today to share another card featuring the newly released,


I started with a kraft card base from Desert Storm(Neenah) cardstock. I also die cut a stitched rectangle panel with a border strip from the Hello Sunshine 6x6 paper pad (Doodlebug Designs) for the cute guinea pigs to sit on. Next, I stamped the sentiment and heat embossed it in white. Then, I added the colored images to the card. Finished the card with some white gel pen and glossy accents in a few places. 

Thanks so much for stopping by!
Make sure to check out the Gerda Steiner Designs store!
Have an amazing day!


Wednesday, April 4, 2018

Stamp of the month - Gnome couple - Larissa


Goodmorning, I am Larissa from Car-d-elicious and today I made a card for the monthly challenge from Gerda Steiner designs. This month you have to make a card with the image Gnome couple from Gerda Steiner designs. If you buy this image and make a card with it, you automatically get the image for next month for free.


I have coloured the image Gnome couple from Gerda Steiner designs with my Polychromos pencils and then I have fussy cut the image. I have die-cut the bottom of a piece of a white cardstock with the Stitched scallop basic edges 2 die-namics from My favorite things. I made background for the image with a black Derwent aquatone pencil and then I coloured the background with Tumbled glass distress ink.I tied a white ribbon around it. On a white card I adhered a piece of pink designer paper from the Sweet celebration paper pack from My favorite things and then I adhered the white cardstock with foamtape on the card. On the pink design paper I stamped a sentiment from the set Tiny type from Clearly besotted stamps. Then I decorated the card with crystal hotfix gems.


*********************************************************************************
STAMP: Gnome couple from Gerda Steiner designs, Tiny type from Clearly besotted stamps
COLORING MEDIUM: Polychromos pencils, Derwent aquatone pencil, Distress ink
PAPER: White cs, Sweet celebration paper pack from My favorite things
INK: Versafine onyx black, Tumbled glass distress ink
DIES: Stitched scallop basic edges 2 die-namics from My favorite things
ACCESSORIES: White ribbon, crystal hotfix gems

Tuesday, April 3, 2018

Easter Blessings

Hi there,

it's Tanja here and this is another Easter Card using one of the adorable images from the Gerda Steiner Designs Peeking Easter Friends stamp set:

  • color the sweet peeking bunny from the Gerda Steiner Designs Peeking Easter Friends stamp set with Touch Twin Brush, Delta and Copic Markers
  • add highlights with a white gel pen
  • cut out two stitched rectangles with the help of one of the My Favorite Things Wonky Stitched Rectangles - one from Neenah Desert Storm kraft cardstock and one from patterned paper from the Doodlebug Design Easter Express 6x6 paper pad
  • create a scalloped border using one of the My Favorite Things Stitched Scallop Basic Edges 2 one the patterned paper panel
  • stamp a background using the carrot from the Gerda Steiner Designs Happy Hoppy set and Altenew Crisp Ink Mocha
  • color the images with Lyra Rembrandt Polycolor Pencils 
  • stamp the sentiment from the Clearly Besotted Stamps Many Mini Messages set with Versamark on a strip of kraft cardstock and heat-emboss it with Hero Arts white embossing powder
  • mat all the layers to a dark kraft cardbase


I hope you got inspired.

Yours,


Monday, April 2, 2018

Wheek Wheek Wheek,

Hi, Its Hazel from Didos Designs here with a card Ive made using the super cute Wheek Wheek Wheek Guinea Pig Stamp set. 

For this card I randomly stamped the lettuce and cucumber on a piece of card and coloured them with promarkers.  Next I fussy cut the wee Guinea Pig out and colored him in with promarkers as well.  Finally matted the card up and added the sentiment to the top. 

Thanks for dropping by today. 

The store is closed until the 6th while Gerda and Macy have a lovely break. 

Love Hazel x