Sunday, January 31, 2021

Sending You Some Positivi-'Tea'


Happy Sunday Gerda fans!

Cathy here again sharing a card today using the adorable brand new Positivi-Tea stamp set!

These stamps and coordinating dies are so cute and perfect for sending uplifting thoughts to family and friends!

For my card, I started by cutting a piece of white Neenah cardstock 2 3/4" x 5 1/2". I stamped and masked the images and then inked the cardstock with Spun Sugar distress ink. I spritzed a little water for some added interest.

I colored the images with Copics, stamped the sentiment and glued the cardstock to the card base.

To finish, I die-cut a lacy border die from white cardstock and glued it along the bottom of the panel and added a strip of thin ribbon where they met.

Pretty quick and easy!

Hope you're enjoying a great weekend!

See you again soon!

Saturday, January 30, 2021

Valentine penguins - xoxo - Larissa


Hi everyone, I am Larissa from Car-d-elicious and today I am posting a new card on the blog from Gerda Steiner designs. This time I have made a valentines/love card with a sweet penguin from the clearstamp set Valentine penguins from Gerda Steiner designs. I have stamped the image with Versafine clair nocturne ink on Florence watercolour paper smooth from Vaessen creative and then I embossed it with clear embossingpowder. I have coloured the image with Distress inks and then I have fussy cut the image. 


I have die-cut a square with the Crea-nest-lies XXL 34 from Crealies from black and white striped paper from the Do what you love pretty paper bloc (PK9149 - retired) from Marianne design. I used the Crea-nest-lies XXL 54 from Crealies to cut a scalloped square from black cardstock and I glued the patterned paper on top of it and then I glued them on a red card. from a scrap of the red cardstock I have die-cut 3 hearts with a die from the set Snijmallen grote teksten "Knuffel" from Carlijn design and I used a hole punch to add 2 holes in each heart. I threaded them with black card and then I glued them on the card. I made 2 tiny bows from the black card cord and glued those on the ends of the banner. This looks almost like the little banner the penguin is holding. I glued the penguin with foamtape on the card. The sentiment is die-cut from the red cardstock with the Mini alpha & number dies (retired) from CC. Designs. 


*********************************************************************************
STAMP: Valentine penguins from Gerda Steiner designs
COLORING MEDIUM: Distress inks
PAPER: Red and white cs, Do what you love pretty paper bloc (PK9149 - retired) from Marianne design
INK: Versafine clair nocturne
DIES: Crea-nest-lies XXL 34 and 54 from Crealies, Snijmallen grote teksten "Knuffel" from Carlijn design, Mini alpha & number dies (retired) from CC. Designs
ACCESSORIES: Clear embossing powder, Black jute thread, hole punch

I am a participant in the Gerda Steiner designs Affiliate Programme. This means that if you click on one of my links and subsequently make a purchase, I will receive a small commission of store credit, at no extra cost to you.

Hello Sunshine


Happy Saturday Gerda fans!

It's Cathy here sharing a card today featuring the brand new "Hello Sunshine" stamp set !

I just love how cute and cheerful these stamps are!

I kept this clean and simple and started by stamping the little bear in a light gray Copic friendly ink and then masked the image. I lightly inked Tumbled Glass distress ink at the top of the panel leaving a white area to stamp the sun in Dandelion Memento ink.

I masked an area at the bottom for some grass and inked it in Shabby Shutters distress ink.

I colored the images with Copics and stamped the sentiment and cute little sun face.

A slimline scalloped rectangle die finished it off.

 Hope you have a fabulous crafty weekend!

Friday, January 29, 2021

Hello sunshine....!!

 Hello GSD friends...

It's Ashlee back again today and are you ready to see a card using another brand new stamp set coming to the "Gerda Steiner Designs" store??!!

This one is a slimline card using the "Hello sunshine" stamp set....


I started with a base of watercolour cardstock and masked off the bottom portion so that I could do an ink blended background...

I used some Catherine Pooler inks in the colours Catching Rays and Pucker Up to create a pretty blend before then splattering with some Midnight Ink mixed with a little water!!


I then stamped on the sun from the Hello sunshine stamp set and filled it in with some pretty WOW! Sparkles for a touch of glitter!!

It was then time to add the super adorable bear that I coloured using Spectrum Noir tri-blend markers and added the sentiment Hello sunshine to his little sign....

To finish off the card my usual touch... some sequins!!

Thanks for stopping by the GSD blog today, I hope you enjoyed my post and happy shopping. Hugs Ashlee 

Thursday, January 28, 2021

Hello.... is it tea you're looking for?

Hey friends...

It's Ashlee here today and I've got some super new inspiration for you using a brand new stamp set coming into the shop called "Positivi-Tea"...

(This will be available in the new release section of the store)

I thought the bear popping in from the side would be perfect for a slimline card along with the super cute cup and tea bag!!


I can't help but get the sing tune in my head when I read the sentiment on this....

"Hello.... is it tea you're looking for?!".....

Sentiment is stamped straight onto the card base using Memento tuxedo black ink!

All the images are coloured in using Spectrum noir tri-blend markers and added to the card base using foam dots for dimension....

All finished off with a touch of beautiful sequins from Catherine Pooler sequins mixes!!

I just love making slimline cards and I'm absolutely crushing on this new stamp set, its the cutest!!

I hope you enjoy it and happy shopping for the new stamps...

P.S there is also another new stamp set hitting the shop too called "Hello sunshine" and it is super awesome!! 

Hugs Ashlee

Tuesday, January 26, 2021

Hedgehog Valentines Day Card

Hello everyone, it’s Karen, and I’ve got a fun little Valentines Day card to share with you today. I’ve used the sweet “Hedgehog with Gifts” stamp set from Gerda Steiner Designs to create this card. 


The background was made from ink blending on my card front with Distress Oxide inks in Worn Lipstick and Tattered Rose and then I splattered it with some gold and silver Starry Colours paints from Tsukineko. I die cut the border with one of the “Hearstrings” border dies from Sunny Studios. I mounted this on my card base and then stamped and clear embossed the sentiment below it on the card base.  The sentiment is from the “Valentine Penguins” stamp set from Gerda Steiner Designs. 

I copic coloured the hedgehogs and added a few eyelashes and a hair bow to the hedgehog I chose to be a girl. I also drew a few hearts on the gift package to add to the valentines theme. I used a craft knife to cut around the the hand that holds the gift on the male hedgehog, so I could put the ribbon behind his hand. I found the flowers as a small extra stamp in in one of my stamp sets and added that to his other hand. I mounted both the hedgehogs on foam tape and attached them to the background. Finally, I die cut some hearts from foiled cardstock and added them around the hedgehogs. 

I hope you’re having a great day and thanks for joining me today. 

Copic markers used: Body - C1, C2, E40, R00  Back - W7, W5, W2, N4, E53

Elephant and bird - Larissa


Hi everyone, I am Larissa from Car-d-elicious and today I am posting a new card on the blog from Gerda Steiner designs. This time I have made a birthday card with the digital stamp Elephant and bird from Gerda Steiner designs. I have coloured the image with my Polychromos pencils, the black glaze pen and a white gelpen. I have fussy cut the image. I have coloured the balloon with the Clear Spectrum noir sparkle glitter pen and then I applied Glossy accents on it. With the Crea-nest-lies XXL 34 from Crealies I have die-cut a square from purple patterned paper from the Birthday brights paperpad from My favorite things. I have glued the square on a scalloped square that I have die-cut with the Crea-nest-lies XXL 54 from Crealies from white cardstock. I have glued both squares on a white card and then I glued the image with foamtape on the card. I didn't add a sentiment, because it is already on the patterned paper. 


*********************************************************************************
STAMP: Elephant and bird from Gerda Steiner designs
COLORING MEDIUM: Polychromos pencils
PAPER: White cs, Birthday brights paperpad from My favorite things
DIES: Crea-nest-lies XXL 34 and 54 from Crealies  
ACCESSORIES: Black glaze pen, white gelpen, Clear Spectrum noir glitter sparkle pen, Glossy accents

I am a participant in the Gerda Steiner designs Affiliate Programme. This means that if you click on one of my links and subsequently make a purchase, I will receive a small commission of store credit, at no extra cost to you.

Monday, January 25, 2021

Mouse in cup


Hi Margreet here.
I created this card with the new digistamp Mouse in Cup from Gerda Steiner Designs.
Printed the digistamp and chose for the one with hearts on the cup, coloured with copics and fussy cut it. You can also print the cup without hearts.
Glued designpaper onto green cardstock and all that on white cardstock.
Die cut a lace border and glued it before positioning the digistamp with foamtape.
Finally I die cut the word Cheers and glued it.

Hope you got inspired.
Have a great day!
xxx Margreet


Sunday, January 24, 2021

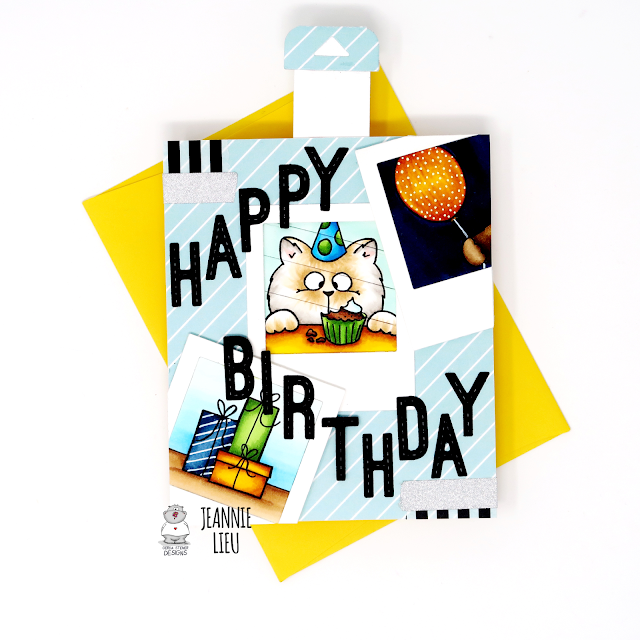
Cupcake Birthday

 Hi everyone! It’s Jeannie  (InsideoutJeans) on the blog today with two Gerda Steiner Design’s stamp sets named, On the Table and Birthday Bear, to create a fun birthday card. 

I did use a few other items not from the shop but the card focuses on the birthday kitty who is eating his cupcake. He's from the On The Table stamp set. The two other polaroids are from the stamp set Birthday Bear. I love how this card has three mini scenes in this card to create one fun birthday card. 


When you pull this card up, the kitty gets a bite of his birthday cupcake. It's a subtle difference but makes it a cute one! 

Thanks for stopping by today and I hope you get inspired to create. Come back again soon for more inspiration and ideas! Happy Crafting! 

Thursday, January 21, 2021

XOXO by Noga Shefer


Hi crafty friends,  Noga  here and I am so happy to share with you another project for Gerda Steiner Designs today.

Today this is non-traditional Valentine's Day card.

My card featuring the brand new adorable  Sending Hugs 4x6 Clear Stamp Set  and Sending Hugs 4x6 Die Set.


To make this card I took an A2 panel of pink cardstock and die cut a white heart and glued on it.

The background was created by splattered some spun sugar distress oxide ink on the heart.

Next I colored the sweet images using copic markers and glued it to the heart with foam tape.

to finish off I stamped a greeting from the stamp set using black ink.


 I hope you enjoy the card I created and feel inspired to create!

Thanks for stopping by,

Tuesday, January 19, 2021

Mouse blowing out birthday cake - Larissa


Hi everyone, I am Larissa from Car-d-elicious and today it is my turn again to post a card on the blog from Gerda Steiner designs. This time I have made a birthday card with the digital stamp Make a wish Mouse blowing out birthday cake from Gerda Steiner designs. I have coloured the image with my Polychromos pencils, the black glaze pen and a white gelpen. I have fussy cut the image. 

On white cardstock I have made a background for the image with the help of the Tear away stencil from Clearly besotted stamps and Card deco essentials dye ink Light blue & Olive green. With a black fineliner I doodled a line around the edges of the white cardstock. With a die from the Border 2 dies (retired) from Paper smooches I have die-cut a scalloped border from black cardstock and I glued it under the white cardstock. On a white card I glued rainbow sriped patterned paper from the Really rainbow petite paper pack from Lawn fawn. The sentiment from the set Scribble it (retired) from Clearly besotted stamps is stamped on a strip of white cardstock and then I glued it on the card. 


*********************************************************************************
STAMP: Make a wish Mouse blowing out birthday cake from Gerda Steiner designs, Scribble it (retired) from Clearly besotted stamps
COLORING MEDIUM: Polychromos pencils
PAPER: White and black cs, Really rainbow petite paper pack from Lawn fawn
INK: Versafine clair nocturne, Card deco essentials dye ink Light blue & Olive green
DIES: Border 2 dies (retired) from Paper smooches
ACCESSORIES: Black glaze pen, Witte gelpen, Tear away stencil from Clearly besotted stamps, Black fineliner

I am a participant in the Gerda Steiner designs Affiliate Programme. This means that if you click on one of my links and subsequently make a purchase, I will receive a small commission of store credit, at no extra cost to you.

Kitten with Heart

Hello, it's Margreet here.
I have made a Valentine's card with the cute digi stamp Kitten with Heart from Gerda Steiner Designs.
I have coloured the image with my copic markers and fussy cut it.

I started with gluing heart DP on dotted DP which was first glued on white cardstock.
Then I die cut glittery pink cardstock with a Nestabilities die from Spellbinders and put the sweet pussycat with foamtape on top.
Then I die cut 2 times XO out of the same glittery cardstock with a Quickutz alphabet and glued it at the bottom.
Thanks for stopping by and Happy Crafting!
xxx Margreet


Tuesday, January 12, 2021

Masculine Valentines Day Card with Video

Hello, it’s Karen here and I’ve got a Valentines Day card today that I think is a masculine one.  Every year I get excited about making some pretty pink and red Valentines cards with hearts and flowers, but come Valentines Day, none of these seem appropriate for my husband! So I tried hard not to get out the pink and reds for this one, except for a wee pop of pink on the inside. 


If you would like to see a video of how I made this card, PLEASE CLICK HERE. 

I used the cutest frogs I could find, which were the “Frogs” stamp set from Gerda Steiner Designs and I used copic markers to colour them in (YG11, YG03, YG17 and G20. For the spots, G94, YG67).  I had a background already made on my gel press so I used that for the background. I just ran it through a geometric 3D embossing folder from We R Memory Keepers after I had stamped on the sentiment which is from the Frogs stamp set. There is actually much more dimension on this card than the above image shows. The white frame is the Wood Frame from Hero Arts and once I had that attached, I adhered the card front to the base. 

For the heart, I dabbed the wet edges in some Distress Oxide ink in Tumbled Glass, Old Paper and Evergreen Bough. On the back, I spritzed the center with water and then carefully tore a hole in the heart. From the front, I kept pulling back the edges until I had a big enough hole for the frog to come out of. I was hoping to make it look like the frog was bursting out of the heart. After attaching the frog and his hands, I mounted the heart on foam adhesive and attached it to the front. Finally, I added some alcohol ink acetate hearts to make it look like the hearts were falling out of the bigger heart. 

On the inside, I used some packaging acetate to cut a 1/2 - 3/4” wide strip for the frog to be mounted on, and used another small piece to attach some hearts in an arc above the fogs’ head. I attached all of the acetate with double sided tape and then glued a second diecut behind the frog to sandwich in the acetate. 

For the border, I used two pieces of cardstock, each with a scoreline I made at 1/4” from the bottom, and die cut a cattails border. The back piece needs to be a reverse image, so I diecut this with the wrong side of the cardstock facing up. This border can be anything you want - I think grass, hills or even a heart border would be fun. When I had the border cut, I turned the flaps to the back and creased them with a bone folder. I placed 1/8” double sided tape along the flap. Next, I adhered the leaping frog to the back border piece, glueing it where it touched the grass, and using double sided tape at the bottom. Then I glued the front border to the back border by only glueing together the top third to half of the borders. You need to leave the bottom unattached so it will form the pop up. I stamped my inside sentiment next. Finally, I opened the flaps of both borders so they were straight, removed the backing from the adhesive on the back border, and lined it up so the edge ran along the inside crease on the top half of the card. After pressing it down, I removed the backing on the adhesive on the front border, closed the card and pressed down to make sure it was adhered. 

These inside pop up cards are really easy to do and they add so much fun to the inside of a card. I love that extra little surprise the recipient gets when they open the card. Thanks for joining me for this card and I hope you’re having a great day!


Ha-bee birthday - Larissa


Hi everyone, I am Larissa from Car-d-elicious and today it is my turn again to post a card on the blog from Gerda Steiner designs. This time I have made a birthday card with the digital stamp Birthday bee from Gerda Steiner designs. I have coloured the image with my Polychromos pencils and a white gelpen. I have fussy cut the image. 


My mini card is made from white cardstock and the size of the front is 10x10 cm. On my card I have glued a strip of red patterned paper from the Celebrations paperpack (PK9131 - retired) from Marianne design. On some other white cardstock I have made a background with the Mini cloud edges stencil from My favorite things and Tumbled glass distress ink. I doodled around the edges of the white cardstock with a black fineliner. I have glued the background with foamtape on the card and then I added the image with foamtape on the card. I have rounded the right corners of the card with a corner punch. 

*********************************************************************************
STAMP: Birthday bee from Gerda Steiner designs
COLORING MEDIUM: Polychromos pencils, Distress inks
PAPER: White cs, Celebrations paperpack (PK9131 - retired) from Marianne design
INK: Tumbled glass Distress ink
ACCESSORIES: White gelpen, Black fineliner, Corner punch, Mini cloud edges stencil from My favorite things

I am a participant in the Gerda Steiner designs Affiliate Programme. This means that if you click on one of my links and subsequently make a purchase, I will receive a small commission of store credit, at no extra cost to you.

Sunday, January 10, 2021

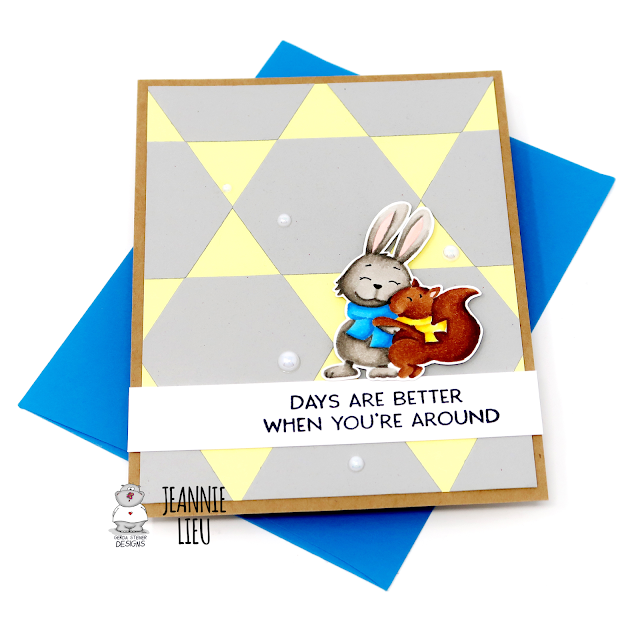
Sending Hugs

Hi everyone! Happy New Year! It’s Jeannie (InsideoutJeans) on the blog today with Gerda Steiner Design’s stamp set named, Sending Hugs. I wanted to use a winter set since it's still winter and in my area, it's been pretty cold. These images are super cute in this set and I thought it would be perfect to kick off the new year with this duo.

Along with the new year, the Pantone colors of the year are yellow and grey so I thought I'd pay a tribute to it. Using a hexagon die, I cut out a bunch of grey hexagons to place on a piece of yellow cardstock. I just kept the pattern very simple for this background. Once I was done, I trimmed it down by a quarter of an inch so I could mat it on kraft cardstock. 

I stamped the sentiment on a white cardstock strip so it would really pop and then I popped up the image I colored using copic markers by using foam tape. 

Thanks for stopping by today and I hope you get inspired to create. Come back again soon for more inspiration and ideas! Happy Crafting! 


Thursday, January 7, 2021

Happy Valentine's Day by Noga Shefer


Hi crafty friends,  Noga  here and I am so happy to share with you another project 
   for Gerda Steiner Designs today 


How cute is this cat??

I also used the  hearts from Lovely Pandas 4x6 Clear Stamp Set.


To make this card I took a piece of bristol smooth cardstock and cut a slimline card.
The background was created by blended barn door distress oxide ink.


Next I colored the cute images using copic markers and glued them to my panel with foam tape for dimension.

Next I stamped a greeting from the stamp set using black ink.


To finish off, I added some clear heart sequins for decoration.

I hope you enjoy the card I created and feel inspired to create!

Thanks for stopping by,