Tuesday, March 31, 2020

Hope your Easter is Hoppy

Hi there,

it's Tanja here and today I would like to show you how to create this sweet Easter Reveal Wheel Card:

  • stamp the two adorable bunnies from the Gerda Steiner Designs Chicks and Bunnies set with Lawn Fawn Crunchy Leaf 
  • color the images with Spectrum Noir Triblend Markers
  • create the Reveal Wheel using Lawn Fawn dies
  • the sentiments are from the Lawn Fawn Reveal Wheel Spring Sentiments set and are stamped with Versafine Clair Morning Mist
  • add some glittery hearts as final embellishments


Have a hoppy day.

Hugs,


Monday, March 30, 2020

Bee Positive


Hi, friends! It's Cathy here sharing a little positivity today with the help of this adorable little bee from the brand new Happy Bee-Day stamp set.

I just love the flowers in this set!

I've used some hexagon dies from my stash and die-cut a whole bunch of small hexagons for the background. I really love how it turned out.

Hope everyone has a great crafty week!

Hugs, Cathy

Saturday, March 28, 2020

Happy Easter


Hi, friends! Cathy here sharing an Easter card today using the new Chicks and Bunnies stamp set
Aren't these little chicks so cute?
I stamped the images on a die-cut piece of white cardstock for Copics and masked them before lightly inking with Tumbled Glass and Antique Linen distress inks.
I embossed a piece of white cardstock at the bottom of the card using a basket weave stencil.
I stamped the sentiment, colored it and then fussy cut out the letters. I love that the letters are nice and chunky so you can cut them out and arrange them however you like.
Hope you're taking this time to be crafty and keep your mind on happy things!
Hugs, Cathy

Friday, March 27, 2020

Happy birthday muffin....!!

Hello my lovely friends...

I hope you are all doing ok with everything thats happening at the moment and that you are all safe and well!!

I have a happy and cheerful card to share with you today that will hopefully make you smile using the brand new stamp set from "Gerda Steiner Designs" called "Muffin compares to you"!!


To create this card I started with a white piece of card and using some "Catherine Pooler" inks I did some ink to paper using Lemongrass and Tiki torch...

Using the inked card I die cut the CPD Sprinkles mini coverplate and the Happy x3 word die..
This then gave me all the matching inked pieces I needed to add to my card base!!

I layered the happy x3 word with some white and black card because I love how it all looks together!! 


Using Copics I coloured up the super cute little muffin cupcakes and added them to the card base with some foam tape for dimension....

I finished the card off by adding some of the sprinkles from the mini coverplate die and a touch of Crater Lake sequins!!

I think this card turned out fun and cheerful don't you think??
Hope you enjoyed it and it gets you inspired to get crafty (Some of us probably have a bit more craft time being isolated at the moment)

Happy crafting Ashlee.

Thursday, March 26, 2020

Hi there, Chicks and Bunnies!!


Hello and Happy Thursday Crafty Friends!  Spring is in the Air, Yay!!  Today I am excited to share with you a card made with the Brand NEW and adorable Chicks and Bunnies stamp set by Gerda Steiner Designs.  I just love the colors of spring, don't you?  I also love the way the chicks, the basket and Easter eggs stand out against the stenciled background:)  


The sentiments in this stamp set are hollowed so you can color coordinate to any project!  I love it!!  You can watch the tutorial on how I created this fun yet easy card down below🙂  Thanks so much for stopping by!  Have a Lovely Day!  Hugs, Tina


Spinning Bunnies

Happy Thursday everyone!  I hope you and your family are safe and well.  For today’s card I’m going to create a spinner card.


How to make this spinner card...

1. I started by printing out the adorable “Bunny with Carrot” digital stamp.  I took the image into my editing software, sized it to my desired size and then took that image, duplicated it and flipped it to create a mirror image.  I colored them both up using Copic Markers.
2. I made a side folding card base, 5.5” x 8.5”, scored at 4.25” and folded it.

3. I created a front panel with die cut patterned papers and stitching.

4.  I temporarily adhered my front panel to my OPEN card base and took a circle die on top of the panel & the base together and sent it through my die cutting machine. The die only cut the front panel and the front of the card base.

5. I then fussy cut out my bunnies and taped a doubled up piece of white thread on the back of one bunny.  Then I adhered the other bunny on the back of the threaded bunny to created a string and bunny sandwich.

6. Then I stretched the bunny and string across the die cut hole on the card base and taped the string multiple times down to the card base to secure it tightly.

7. Then I adhered the patterned paper card front over top of the taped bunny string and card base.  The string is now sandwiched between the card base and patterned paper panel.

To “load up the string”, you just have to twist the string, hold the bunny still and then close the card.  The tension built up in the string will cause the bunny to spin once the recipient opens the card!

I hope you get a chance to make a fun spinner card too!

~ Ally ~


stamps: GSD (Bunny with Carrot)
cardstock: Recollections (110# White, 65# White)
patterned papers: Bo Bunny (Pincushion Collection 6x6)
dies: Catherine Pooler (Circles), Spellbinders (Curved Borders 2)
inks: Copic Markers
other: thread

Tuesday, March 24, 2020

Hi Chick!

Hi there,

it's Tanja here and I used the Gerda Steiner Designs Chicks and Bunnies set to create this Welcome Baby Card with a neutral color combination:

  • stamp the hen, the hatching chick and the eggs from the Gerda Steiner Designs Chicks and Bunnies set with Lawn Fawn Crunchy Leaf 
  • color the images with Spectrum Noir Triblend Markers and add some speckles with a white gel pen and a grey and brown fineliner
  • cut out a stitched panel from Gmund Beer Paper Weizen 
  • add color through a circle mask with the help of Distress Oxide Ink (Candied Apple, Ripe Persimmon, Fossilized Amber)
  • cut out the Create a Smile Focal from that colored circle
  • stamp the sentiment from the same set with Versafine Clair Fallen Leaves
  • adhere the element and add a kraft-colored oval shadow underneath them
  • layer a piece of kraft cardstock behind the circle before adhering the panel to an off white cardbase


I hope you got inspired.

Hugs,

Monday, March 23, 2020

Sending Hugs Card by Karla

Hello friends, Karla here with a sweet little card that is a lovely way to let someone know you're thinking of them! And guess what.... it's FREE! I'm using the sweet Sending Hugs digital stamp from the Gerda Steiner Designs Shop. How cute is this little bunny and his - or her - squirrel friend?!!


I decided to colour these cuties up with Copic Markers in nontraditional colours to match some pretty Simple Stories I Am papers. I added some white gel pen highlights and some matching sequins, and now my thoughtful card is ready to mail to a friend!


Thanks so much for stopping by! Be sure to head over to the Gerda Steiner Designs Shop to see what inspires you to get crafty, and have a safe and healthy week friends 💓

Hugs,
Karla

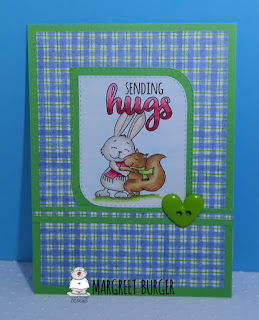
Sending hugs

Hello, Margreet here, showing you a sweet and simple card made with last Newsletter's freebie.
Everybody knows somebody who can use it in these hectic times.
If you haven't received the freebie, you can get it HERE.
Try to stay safe and healthy.
xxx Margreet


Sunday, March 22, 2020

Happy Easter

Hi everyone! It’s Jeannie (InsideoutJeans) on the blog today with Gerda Steiner Design’s stamp set named, Chicks and Bunnies. It's the perfect set for an Easter card and honestly, it's so cute that it's really add brightness to my day. 


For this particular card, I decided I wanted to focus on the little chicks in the set. There's so many of them that it was perfect for creating a fun scene card. 


I created a video to show my process of creating this card, It's pretty simple and can be easily used to create a fun, scene card. 


Thanks for stopping by today and I hope you get inspired to create. Come back again soon for more inspiration and ideas! Happy Crafting! 

Friday, March 20, 2020

Shine Bright Penguin Mom & Baby Card by Karla

Hello friends! Karla back today with a sweet card that I hope will make you smile using the adorable Penguin with Chick digital stamp available in the Gerda Steiner Designs Shop! I decided to colour these cuties up with Copic Markers after printing on 65 lb white cardstock. I think this sweet little pair would be super adorable for Mothers Day, but I actually gave this to a friend for her birthday!


I made a neat diagonal fold card by cutting a piece of 8 1/2 x 11" cardstock from corner to corner. This gives you 2 triangular pieces, which you can then create 2 cards with. I scored the card so I had an inside base that was 4 1/4 x 5 1/2", leaving two triangular flaps to fold together (you can see this more in the photo at the bottom) I used some pretty Paige Evans Bloom paper to mat two triangles and then added my coloured penguin image, which was diecut and layered using some Sizzix dotted ovals. I attached the top and side of the oval to the top flap of the card and then popped up a sun that I fussy cut from patterned paper. Finally, a few pretty sequins add a little bling!


Inside, I used a tag die to cut out a sentiment that I typed on the computer and printed out on white cardstock. You can see how the flaps lift to the top and side for a fun fold!


Thanks so much for stopping by! Be sure to check out all the adorable digi and clear stamps at the Gerda Steiner Designs Shop and get a little crafty therapy in 💝 

Big hugs,
Karla

Thursday, March 19, 2020

Bee-Positive!!


Hello and Happy Thursday Crafty Friends!  Tina here and I am super excited to share with you New stamp set coming soon to the shop. Today we are creating an encouraging "Bee Positive" Card with the adorable &  Happy Bee-Day Stamp Set available over at the Gerda Steiner Designs Shop!  What's better than a bee stamp??  How about an adorable bee image with a smile that makes you smile.  Plus it's large, yes!!  So it's super easy to color!!


I love everything about this set, the super pretty flowers, the perfect sentiments and the fun bee holding a sentiment square!  Check out all the New sets over at the Gerda Steiner Shop, you will fall in love with them!!  I hope you like my project!


You can check out how I created this card down below!  Thanks so much for visiting!  Have a wonderful and Bee-U-T-ful day!!  Sending you Crafty Hugs, Tina


The Gerda Steiner Designs Bee Positive Card Tutorial by Tina Smith

BE POSITIVE by Noga Shefer

Hi crafty friends,  Noga here and I am so happy to share with you another project for Gerda Steiner Designs today.


On these days we have to be positive! 

My card featuring the adorable Happy Bee-Day 4x6 Clear Stamp Set  stamp set .


To make this card I took an A2 panel of Bristol smooth cardstock.


The background was created by blending mustard seed  and dried marigold distress oxide inks.
I glued a white beehive on it.


Next I colored the image using copic markers and glued it to my panel with foam tape for dimension.


For a final touch, I added some clear sequins.


I hope you enjoy the card I created and feel inspired to create!

Stay safe and healthy!


Wednesday, March 18, 2020

Happy easter - Larissa


Hi everyone, I am Larissa from Car-d-elicious and today I am posting a new card on the blog from Gerda Steiner designs.


I have made an easter card with the digital stamp Bunny and egg from Gerda Steiner designs. I have printed the image 4 times. Two of those images were first mirrored before I printed them. Then I coloured the bunnies with my Polychromos pencils. Then I stamped a sentiment from the set Small sentiments from Create a smile stamps on the yellow egg. I have fussy cut all the images with Versafine clair nocturne ink. I have die-cut 4 circles from a piece of kraft cardstock with the Crea-nest-lies XXL 33 from Crealies. I glued this kraft cardstock with foamtape on black cardstock. I doodled lines around the edges of the kraft cardstock with a black fineliner. Then I glued the kraft cardstock on a kraft card. I have glued the bunnies inside the circles with foamtape. With a white gelpen I doodled on the eggs to decorate them. Then I decorated my card with enamel dots.


*********************************************************************************
STAMP: Bunny and egg from Gerda Steiner designs, Small sentiments from Create a smile stamps
COLORING MEDIUM: Polychromos pencils
PAPER: Kraft, black and white cs
INK: Versafine clair nocturne
DIES: Crea-nest-lies XXL 33 from Crealies
ACCESSORIES: White gelpen, Black gelpen, Enamel dots


I am a participant in the Gerda Steiner designs Affiliate Programme. This means that if you click on one of my links and subsequently make a purchase, I will receive a small commission of store credit, at no extra cost to you.