Sunday, December 24, 2023

Season's Tweetings for Christmas Eve!

 Greetings everyone! It's me again, Jessie Scott (@chevy.scott on IG), Guest Designing for Gerda Steiner Designs!

Today I have another fun collaboration with Pear Blossom Press products to share. When I saw the adorable stars you could hang on the Season's Tweetings Set I knew I wanted to use some lights to get some interactive mojo going!


For this design I used my Olo Markers to color this branch and adorable birdie. 

I added glitter to the round ornaments and used an X-Acto knife to cut out the stars so lights could shine through.


Here's the finished project!


If you want more details on other products used and how to make this fun light up, visit my blog today for the companion post!


See you again soon!

Tuesday, December 19, 2023

Happy 60. Birthday Sister Part two

It's me again. Nicole from Germany.


Hard to believe. Another week has passed and today I can show you the second part of my birthday surprise for my sister's 60th birthday. It turned out to be a little booklet. 

My whole family is crazy about dogs, including my sister of course. So of course it was clear that there had to be lots of dog motifs in her birthday book.


This dog from the set "On the table"  simply had to be included. And he speaks from the soul of our 3 family dogs: "I don't care how old Petra gets.....as long as I get a muffin!"


In this scene, the dogs from "Carol Puppies" sing a funny birthday song, which translates as : 
"Happy birthday to you, jam in your shoe, apricot in your pants, happy birthday to you.". It's probably not so funny when translated into English, but I wanted to at least explain what the dogs are singing. And the cat from the set "Carol Kittens" is a bit ashamed of the funny song and says: "The dogs are soooo embarrassing!".


Last up is a typical birthday card. These dogs are from the "Dachshunds" set.  The one on the left with the flowers in his mouth even looks a bit like my sister's dog.  So it was clear that I would also include this set in the book. 


I stapled all 6 cards together and added a cover made of parchment paper and a spine made of photo cardboard. It was my sister's birthday last Sunday and she was delighted with the little booklet.

I hope you also had a bit of fun looking at it. 

I colored the motifs with Copics, the backgrounds are often wiped with Distress Ink and decorated with many different cutting die elements.  The next cards will probably be a bit simpler again.  Have a nice day and I wish you a wonderful Christmas.

Creative greetings from Germany, your Nicole


Monday, December 18, 2023

Christmas Snowman

Hi everyone!

Stacey with you today sharing a Christmas card that I created using the Happy Snowman stamp set. 

Here is a look at the card that I created:


I adore this Happy Snowman stamp set, it always makes me smile. 

I started by covering an A2 cardbase with some falling snow patterned paper. I cut my scallop rectangle from some white cardstock and then cut a window from the middle using another die. I stamped my Happy Snowman image with some Memento Tuxedo Black ink and colored him with my Copic markers. I did a little paper piecing for his hat band as well as his scarf before fussy cutting him out. I stamped my sentiment and then glued my image to the backside of the window opening. I added some crochet thread and popped up my image panel with foam adhesive onto the front of the card. I completed my card with a small bit of glitter, snowflake sequins and some white Nuvo drops. I think this turned out so cute!

Copic Colors Used:
--Snowman: B000, YR00, YR02, YR04, C2, C4, R00
--Hat: C2, C3, C4, R27, G82, YG61
--Broom: YR14, YR24, YR27, E31, E33
--Bird: E31, E33, YR14, R27

Thank you so much for stopping by today!
I hope you have a great crafty day!

Find Stacey on instagram  @staceyscreativecorner


Saturday, December 16, 2023

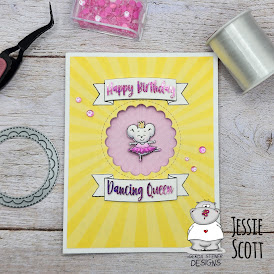
Spinner Card Dancing Queen

 Greetings everyone! It's me again, Jessie Scott (@chevy.scott on IG), Guest Designing for Gerda Steiner Designs!


Today I'm sharing a hand-made easy interactive card using The Nutcracker set. This one is a birthday card! I have a niece that is taking ballet and I thought she would love getting this card.


To make this interactive card, I used some nylon thread, a die cut window (this one is 
Lawn Fawn "Outside In Stitched Scalloped Circle Stackables" in Sunny Studio "Spring Sunburst" 6x6 paper), and a perfectly mirrored stamp image. 


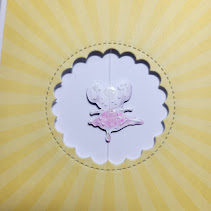
Did you notice that there is a matching FRONT and BACK to one of the cute mice in The Nutcracker set?

This is what gave me this idea!  (you don't HAVE to have a symmetrical stamp set to do this, you can just stamp on both sides of a circle or other symmetrical shape and follow along as well!)
Let's start with the video so you know what we're trying to make it do! I also have a tutorial download for a generic spinner card on my blog here.


You may have noticed  The Nutcracker set does not have a "Happy Birthday" or "Dancing Queen" sentiment.

If you have another set, you can curve the photopolymer stamp to fit the banner that comes with it. 

OR... if you have a printer, you can do what I did and print one to fit! 

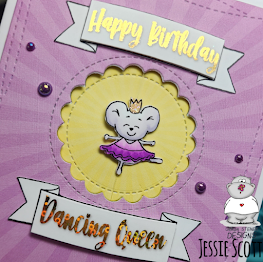
I stepped it up a little further with a LASER printer and then I toner-foiled the sentiment. One card uses pink glitter stars and the second is gold glitter circles.


I wanted a 3D effect with the banner, so I trimmed out the printed sentiment and popped it up on foam tape to mount on the banner.


Following my directions from my blog, I cut out the window in the top designer paper and the card base top. Flip over the designer paper and tape on the nylon thread (I flipped my thread end back over the edge of the tape and taped again to hold down the thread) 

 
I glued down the top designer paper down to the card base (so the thread is sandwiched between the layers). I placed the image of the back of the mouse UNDER the thread, inside the card. I lined it up with glue dots with the thread down the center and added glue to the edges.

 
 Then I topped with the front of the mouse! I thought a "queen" still needed a crown and there wasn't one on this character. So I trimmed off one from another stamped image from the set. I covered with glue and dipped in my fine glitter. I added two, one front and back, sandwiching the thread as well.


Once of the cards I placed another piece of starburst paper, but for the other one I thought I would reuse one of the cut centers and have a fun sunburst on the inside.


If these photos weren't enough, I also have a tutorial download for a generic spinner card on my blog here.

Hope you enjoyed this fun interactive! So much fun and easy to make!

See you again soon!

Friday, December 15, 2023

I'm nuts about you by Noga Shefer



Hi crafty friends,  Noga  here and I am so happy to share with you another project for Gerda Steiner Designs today.

My bag featuring the adorable Nuts about you - Clear Stamp Set and Nuts about you - Die Set. This set is so cute!!


I die cut a bag using ME favor bag die out of kraft cardstock. 
For the background, I die cut a scallop panel die out of white cardstock and glued on it a plaid cardstock.

Next I colored the sweet image using copic markers: squirel - W4, W2, W1, W0, RV000; acrons - E59, E18, E15, E08, E35, E55.

Next I stamped a greeting from this stamp set using black ink and glued the scallop to the front of the bag.


I hope you enjoy the project I created and feel inspired to create!

Thanks for stopping by,

Tuesday, December 12, 2023

Happy 60. Birthday Sister

 Hello dear creatives.

It's me again, Nicole from Germany.


I am so happy to continue being apart of the GSD design team. It is a great honor and pleasure for me.


Today is my day on the GSD blog and I had something bigger planned. Unfortunately, Corona caught me, so I couldn't finish yet. But today I want to show you what is already finished and you will see the rest, if you like, in my next post in a week.


Now to my project. My sister will be 60 years old on December 17th, 2023. Of course, like every year, she gets a card for her birthday. But this year, I wanted to create a little funny story and finally put it together into a book.


The story starts with , of course, the funny and sweet  ghosts from the set of the same name.


Unfortunately, the next page continues in German, but I will translate the texts for you.


The grim cat from the set "All cats" says: "You're all crazy! Petra will never, ever be 60 years old."


The cute squirrel (Set Happy Fall with Squirrel) then replies: “Yes, the sparrows are already whistling it from the rooftops!”.


And the dog (set "What's new?") confirms it: "Yes, it's true. It's already in the newspaper."


Curious what happens next?


Then stay tuned. Next week I'll show you the rest.


Until then, stay healthy and have a wonderful Christmas time!


XOXO, Nicole

Wednesday, December 6, 2023

Feline the holiday spirit, yet? by Noga Shefer


 Hi crafty friends, Noga  here and I am so happy to share with you another project for Gerda Steiner Designs today.

My card featuring the adorable Furry & Bright - 3x4 Clear Stamp Set.

To make this card I took an A2 panel of plaid cardstock. 

For the background, I die cut a rectangle panel die out of white cardstock. 
I ink blended a background using Distress Oxide in spun sugar, splashed it with water and  and glued it on my panel.
Next I colored the sweet image using copic markers. I glued it to my panel with foam tape for dimension.

Next I stamped a greeting from this set using black ink.


I hope you enjoy the card I created and feel inspired to create!

Thanks for stopping by,

Tuesday, December 5, 2023

Here Comes Sportsy Santa!

 Woosh!

Greetings everyone! It's me again, Jessie Scott (@chevy.scott on IG), Guest Designing for Gerda Steiner Designs!


Today I'm sharing this super fun interactive card using Sportsy Santa. To make this interactive element, I used the (sadly) retired My Favorite Things Launch Party dies, but the newer Lawn Fawn Swish n' Pop will give you a similar effect if you have this die.


I colored my Santa with my OLO Markers and added stripes with a fine liner pen to give the snowboard a peppermint look. I added the goggles and gave it a look of glass adding some white gel pen accents.


I assembled my interactive onto a 4" x 5-1/4" navy piece or cardstock according to the assembly video and tried out my Santa to be sure I could hide him behind a slope of snow. Looks like it will work! I added another piece of glitter paper on top to give a dimension to the slopes of snow. Before I glue everything down, I wanted to spritz up the background a little!


With an interactive image dragging across the background you don't want embossing folders or pastes that create something for the image to catch on. Using ink and a stencil or some light splattering is the way to go. I have been wanting to practice fine splatters since I just got some new fan brushes so that's what I did for this card for a snow effect. I watered down some white acrylic paint and tapped off the goops on a test sheet before getting this awesome fine mist of snow. (I covered the mechanism and test Santa with scrap paper) The real Santa gets adhered to the acetate piece with a foam dot and the excess acetate is trimmed off.


I am adhering the slightly smaller than A2 panel to a bright red card base. You want to keep the adhesive away from the moving parts and so using double-sided tape can be best to keep liquid glue from seeping into spots you don't want. I also had added a couple stopping strips of paper to control where the mechanism can move left to right for Santa.  I learned this trick from Jennifer McGuire, peel off only enough of the tape release paper to make a pull piece. Fold each over so it will be accessible from outside the edge of the card when you place it down. I had to put some on the inside too, but I just bowed the card a little during placement so only the corners stuck a little while I got it straight. Pull the tabs when you're good and straight!


Don't forget to make your mark on the back of the card base! I have a nice one my mom ordered me on Amazon a while back, but I always add one of my snarky stamps from Technique Tuesday's 
It's A Masterpiece Stamp Set. 


Now we are ready to assemble! I have a foam piece guiding the pull tab below but we need to keep the entire path for Santa clear. This left only the small piece on the slope at the end of his track. I don't show it here, but I do the pull tab trick on the foam tape along the bottom here too.


Almost done! 


I added the "Pull" from the Pear Blossom Press stamp set for interactives. 


For the sentiment I chose the "Happy Holidays." I wanted it to be in gold glitter embossing powder, but I think it smooshed too much somehow and with the glitter it was hard to read. Never fear! Fine Liner to the rescue!


It was more work, but I love how it turned out with some black outline to make it pop from the red. 


I used a hexagon punch to make the perfect flag end for the sentiment and it will get adhered to the snow piece with double-sided tape since its glitter. 


Even with the sentiment, all put together I thought it needed a little more. So I grabbed some presents and the tree I had out already from Season's Tweetings and it was perfect to add a little decoration in the snow.


WOOOOOOSH! I love how this Santa can come flying out from behind the snowbank and arrive just in time for Christmas! 

Here's a video of him in action: 

Hope you enjoyed this fun interactive!


See you again soon!