Tuesday, June 29, 2021

Unicorn Birthday Greetings

Hello, it’s Karen here again! I hope everyone is having a great summer and the weather is good where you are. I’m finding it hard to be indoors at the moment as we are in the middle of a record breaking heat wave and it’s so nice to be outside. So the card I’m sharing today was really quite a quick and easy one but with lots of attitude because of these super fun Moody Unicorns from Gerda Steiner Designs. 


My card is a 3 3/4” x 8 1/2” slimline card.  I die cut three 2 3/4” circles from white cardstock as well as a frame for them, which I stacked two layers high. I used the Paper Rose Layering Rainbow stencil to add the rainbow, clouds and sun inside the circles, using Distress Oxide inks in Blueprint Sketch, Mermaid Lagoon, Cracked Pistachio, Squeezed Lemonade, Spiced Marmalade and Picked Raspberry. Tonic Moonstone Glimmer paste added that extra sparkle to some of the elements. I also die cut some extra ink blended clouds to add around the circles. 


After stamping out the unicorn images, I coloured them in with copic markers (RV04, Y38, Y08, YG01, BG02, B66, V05, C2, C1, C0, N6, N4, R20, R00). I also stamped and clear heat embossed the sentiments and then either die cut them out or fussy cut them. I love how sassy these unicorns are, and I’ve used those sentiments on lots of other cards. 

Finally, I glued the circles to my card base, popped the unicorns and sentiments up on foam tape and added them along with the few extra clouds I had die cut. 

Thank you so much for stopping by and I do hope you’re having a great day! 

Elephant and bird - Larissa


Hi everyone, I am Larissa from Car-d-elicious and today it is my turn to post something on the blog from Gerda Steiner designs. This time I have made a  card with the digital stamp Elephant and bird from Gerda Steiner designs. I have coloured the image with my Polychromos pencils, the black glaze pen and a white gelpen. I have fussy cut the image.

With the Crea-nest-lies XXL 43 from Crealies I have cut an oval from red patterned paper from the Surprise party paper pack from Sunny studio. I have cut a rectangle with the Crea-nest-lies XXL 52 from Crealies from paper from the same paper pack. I used the Crea-nest-lies XXL 56 from Crealies to cut a scalloped rectangle from the red patterned paper. I have glued all the parts on a white card. I have added the image on the card with foamtape. With white sticker letters I have added a sentiment (congratulations) on the oval. 


*********************************************************************************
STAMP: Elephant and bird from Gerda Steiner designs
COLORING MEDIUM: Polychromos pencils
PAPER: White cs, Surprise party paper pack from Sunny studio
DIES: Crea-nest-lies XXL 43, 52 and 56 from Crealies
ACCESSORIES: Black glaze pen, White gelpen, White sticker letters

I am a participant in the Gerda Steiner designs Affiliate Programme. This means that if you click on one of my links and subsequently make a purchase, I will receive a small commission of store credit, at no extra cost to you.

I love you....!!

Hello my crafty friends...

Ashlee here today with a new slimline card to share with you and this one features the absolutely adorable kitties from the "Valentine cats" stamp set by "Gerda Steiner Designs"!!


I thought it would be fun to do a whole base of colourful stripes peeking out from behind the love heart panel....

I then popped up the cats with some foam tape sitting them both in front of a heart!!
(The cats were both coloured using Spectrum noir tri-blend markers)


I added a couple of lovey sentiments and finished it all off with a touch of "Catherine Pooler" sequins from the Williamsburg mix!!

I love how this card came out, what do you think? I hope you enjoy it and feel inspired to get crafty and create your own slimline card... they are so fun!!

Happy crafting, hugs Ashlee

Monday, June 28, 2021

Ha-Bee Birthday

Hi everyone!
Margreet here on the blog today with the cute Gerda Steiner Designs digistamp named Birthday Bee.
I printed the digi and die cut with a Nestabilities oval die.
I colored the happy bee with copics and put some Stickles on his wings.
All ribbon comes from Crafty Ribbons. 
Some rhinestones to finish the card.
Thanks for stopping by.
Enjoy your day!
xxx Margreet


Thursday, June 24, 2021

HEY.... cup of tea!!

Hey friends...

Ashlee here with you today and I have a card to share with you featuring the 
"Positivi-tea" stamp set!!

I just love this set, I can't help but keep creating with it hehe...

There is also co-ordinating dies available too (Positivi-tea dies) which makes them super easy to cut out!!


To create this card I started with a white Cardstock base and die cut the sentiment HEY using some letter dies from Uniquely creative. I then stamped the sentiment slightly under the HEY on the left hand side with Memento tuxedo black ink. I wanted to add the cute bear popping out of the side with his cup of tea so I stamped him with the same black ink. I added a little shading to his cup of tea with a spectrum noir marker. 

To add some colour behind the HEY sentiment I sprayed some Dina W gloss sprays onto a piece of cardstock and added them in behind the sentiment for a fun pop of colour....

To finish off the card I added a touch of sequins!!


I hope you enjoyed this new card and feel inspired to create!!

Thanks for stopping by the GSD blog, see you on my next post...

Tuesday, June 22, 2021

Smile Tortoise

Hi there,

it's Tanja here and I created this card using the adorable Gerda Steiner Designs Hello Friend Tortoise stamp set:

  • stamp the turtle from the Gerda Steiner Designs Hello Friend Tortoise set with Lawn Fawn Crunchy Leaf
  • color the image with Spectrum Noir Triblend Markers and add extra shading with Faber-Castell Polychromos pencils
  • cut out some grass using the Lawn Fawn Meadow Borders from green cardstock - add some shading with Distress Oxide Ink Rustic Wilderness 
  • add some little flowers cut with the help of the Lawn Fawn Scalloped Treat Box Spring House Add-On die set from pink, teal and lilac cardstock
  • add a cloud background using of a cloud stencil and Distress Oxide Ink Tumbled Glass
  • cut the CUTplorations smile from that same lilac cardstock and add shading with Distress Oxide Ink Dusty Concord to the bottom part of the sentiment
  • add some Nuvo Glitter Drops Yellow Bird to the flower centers


I hope you got inspired.

Hugs,


Monday, June 21, 2021

Thanks A Melon by Noga Shefer


Hi crafty friends,  Noga  
here and I am so happy to share with you another project for Gerda Steiner Designs today.

My card featuring the adorable  Melon Friends 4x6 Clear Stamp Set and Melon Friends 4x6 Die Set . This set is must have!!

To make this card I die cut a slimline die out of Bristol smooth cardstock. 
I ink blended the background using kitsch flamingo distress oxide ink and splashed it with water.
I also splashed gold paint on the background.

Next I colored the sweet image using copic markers and  glued it to my panel with foam tape for dimension.

Than I stamped a greeting from this set 3 times and heat embossed it using gold powder.

For a final touch, I added clear hearts.

I hope you enjoy the card I created and feel inspired to create!

Thanks for stopping by,


Tuesday, June 15, 2021

Interactive Birthday Frogs *Video*

Hi and welcome back, it's Karen here today. I'm really excited to share a new inexpensive, interactive die that I've just added to my collection.  It's the Lawn Fawn Swish 'N Pop Pull Tab die and I love how it adds such a fun interactive element to cards. Paired up with all the cute stamps from Gerda Steiner Designs, I see a lot of fun cards in my future 😁 !   I've made a frog themed card for today and here's a look at it.


You can see that when you pull the tab, the frog with the confetti leaps up from behind the frog on the lily pad.  How much fun is that!! Plus, it's really easy to make.  

I've made a video for you on how to create this card, so if you would like more details, PLEASE CLICK HERE.  There's also a second card that I share in the video, again made with Gerda Steiner Designs stamps, so check it out.  

Thanks for stopping by and I hope you're having a great day!


Easter bunnies digital stamp bundle - Thank you - Larissa


Hi everyone, I am Larissa from Car-d-elicious and today it is my turn again to post a card on the blog from Gerda Steiner designs. This time I have made a card with a sweet bunny from the Easter bunnies digital stamp bundle from Gerda Steiner designs. Although this is an image from an easter set, this image can perfectly used during the whole year, because you can add every sentiment that you want. I have coloured the image with my Polychromos pencils, the black glaze pen and a white gelpen. I have stamped a sentiment from the Sneaky racoons Clear stamp set from Gerda Steiner designs on the card and then I have fussy cut the image. 


On a kraft card I have drawn a frame with a white gelpen. I have added paint splatters with a White Posca pen. I have fussy cut a strip of rainbow stripes from patterned paper from the Spring sunburst paperpack from Sunny studio and then I glued it on my card. I have used foamtape to add the image on the card. I have decorated the card with enamel hearts with colours that match with my patterned paper. I have tied a little bow from white ribbon and I glued it on the patterned paper. 


*********************************************************************************
STAMP: Easter bunnies digital stamp bundle and Sneaky racoons Clear stamp set from Gerda Steiner designs
COLORING MEDIUM: Polychromos pencils
PAPER: Kraft cs, Spring sunburst paperpack from Sunny studio
INK: Versafine clair nocturne
ACCESSORIES: Black glaze pen, White gelpen, White Posca pen, White ribbon, Enamel hearts

I am a participant in the Gerda Steiner designs Affiliate Programme. This means that if you click on one of my links and subsequently make a purchase, I will receive a small commission of store credit, at no extra cost to you.

Sunday, June 13, 2021

Watermelon Shaped Card

Hi everyone! It’s Jeannie (InsideoutJeans) on the blog today with Gerda Steiner Design’s stamp set named, Melon Friends. I have had this idea in my head every since I saw the set and finally got the chance to bring it to life. The dinosaur image in the set is such a cutie and I wanted to literally put him into a slice of watermelon. I also have a video to go along with this card -- check it out HERE.


I stamped dinosaur from Melon Friends twice and colored him up from the neck up and for my second image, I flipped him around to color the back side of his head, mainly because copic markers bleed through and I wanted the front and back of his head.


Using a circle die, I cut two circles, making one into a card base and cutting the other circle in half. I ink blended the two half circles pieces to make it look like a watermelon. Green on the edges for the rind and red in the middle for the actual watermelon meat. Once that was done, I put this card together by adhering all the pieces. For the sentiment, I stamped it in the front of the card. Finishing off the watermelon slice, I used a black marker to freehand some teardrop shapes for the seeds. Because it is a half circle, it can rock back and forth making it even more adorable!

Thanks for stopping by today and I hope you get inspired to create. Come back again soon for more inspiration and ideas! Happy Crafting! 


Tuesday, June 8, 2021

You are beary sweet - Larissa


Hi everyone, I am Larissa from Car-d-elicious and today I am posting a new card on the blog from Gerda Steiner designs. This week I have made a card with the digital stamp You are beary sweet from Gerda Steiner designs. I have coloured the image with my Polychromos pencils, the black glaze pen and a white gelpen. I have fussy cut the image.


I have made a mini slimline card from pink cardstock. On the card I have added a layer of black and white cardstock. With a Black Posca pen I have made paint splatters on the white cardstock. I have drawn a line around the edges of the white cardstock with a black fineliner. I have glued the image on the card with foamtape. I have cut the sentiment with the Alphabet tall essentials (Stencilsl390) from Studio light from black and pink cardstock and then I glued it on the card. Then I cut a couple of hearts from pink cardstock with the Heart confetti die from Alexandra Renke and I glued those around the image. 


*********************************************************************************
STAMP: You are beary sweet from Gerda Steiner designs
COLORING MEDIUM: Polychromos pencils
PAPER: White, black and pink cs
DIES: Alphabet tall essentials (Stencilsl390) from Studio light, Heart confetti die from Alexandra Renke
ACCESSORIES: Black glaze pen, White gelpen, Black fineliner, Black Posca pen. 

I am a participant in the Gerda Steiner designs Affiliate Programme. This means that if you click on one of my links and subsequently make a purchase, I will receive a small commission of store credit, at no extra cost to you.

Sending you some Positivi-tea

Hi there,

it's Tanja here and I created this sweet card using the Gerda Steiner Designs Positivi-tea stamp set:

  • stamp the tea pot, tea cup and the tea bag from the Gerda Steiner Designs Positivi-tea set with Lawn Fawn River Rock
  • color the images with Spectrum Noir Triblend Markers and add extra shading with Faber-Castell Polychromos pencils 
  • adhere the images to a Lawn Fawn Zig Zag Circle cut from Neenah Desert Storm kraft cardstock using foam tape
  • ink up the edges with Distress Ink Tea Dye
  • create a background on a rectangular piece of Neenah Desert Strom kraft cardstock using the Lawn Fawn Stitched Borders
  • stamp the sentiment from the same set with Versamark onto a piece of kraft cardstock and heat-emboss it with WOW! Bright White Super Fine embossing powder
  • layer a strip of turquoise cardstock underneath the sentiment strip
  • adhere all the elements to a kraft cardbase


I hope you got inspired.

Hugs,


Monday, June 7, 2021

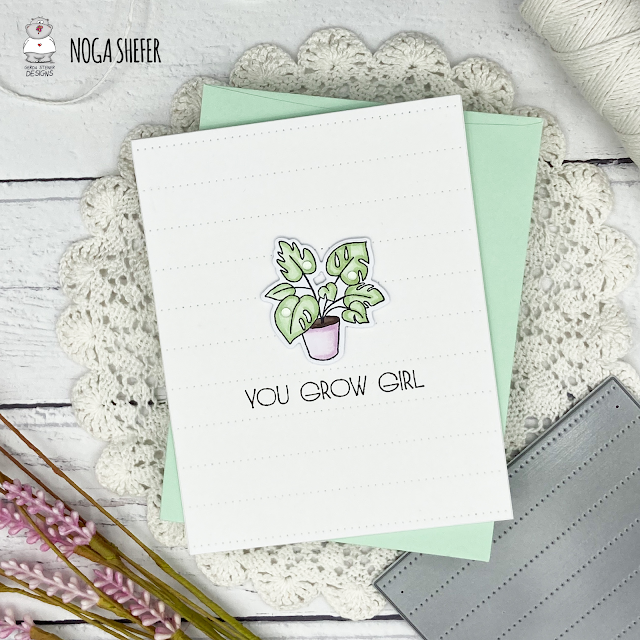
You Grow Girl by Noga Shefer


Hi crafty friends,  Noga  here and I am so happy to share with you another project for Gerda Steiner Designs today.

My project featuring the adorable Grow  Happiness 4x6 Clear Stamp Set  and Grow Happiness 4x6 Die Set. This set is must have!!

I took a panel of white cardsrock and die cut it using the Reverse Confetti Along The Dotted Lines Cover Panel Confetti Cuts.

Next I colored the sweet image using copic markers. I glued it to my panel with foam tape for dimension.

Next I stamped a greeting from this stamp set using black ink.
For a final touch, I added some clear drops.

I hope you enjoyed the card I created and feel inspired to create!

Thanks for stopping by,


Tuesday, June 1, 2021

Penguin Baby Card

Hi there, it’s Karen here today and I have a cute little penguin card to share with you. I have to confess, I really struggle to make clean and simple cards.  But I wanted this card to be sweetly simple, so I reined myself in when making this one. I had thoughts of adding glimmer paste, sequins, maybe an action wobbler etc, but I kept to my original idea of a CAS card. And I’m so glad I did because I actually love how this card turned out and how the penguin is the focus of the card.  Plus, it was a super fast and easy card to make! I used the Penguin with a Heart stamp set from Gerda Steiner Designs for this one.


I started by ink blending some Distress Oxide inks in Worn Lipstick and Kitsch Flamingo through a heart stencil (I used the “Love Splash” stencil from A Colorful Life Designs) in the lower right corner of my card front. I coloured the penguin with copic markers (N6, N4, R39, R29, R35, Y19, C1, and C0), and then cut him out and popped him up on foam tape for some dimension.  Although I made this card into a baby card, it could so easily be a thank you card, birthday card, or sending hugs just by changing the sentiment. This particular sentiment is from Taylored Expressions Simple Strips Background stamp set, and I also popped it up on foam tape.  

Thank you so much for stopping by and I hope you’re having a great day! 

Hello friend turtle - So happy we're friends - Larissa


Hi everyone, I am Larissa from Car-d-elicious and today it is my turn again to post a card on the blog from Gerda Steiner designs. This time I have made a card with the Hello friend turtle (digital stamp) from Gerda Steiner designs. I have coloured the image with my Polychromos pencils, the black glaze pen and a white gelpen. I have fussy cut the image. 

On a white card I have used the Grassy hillside stencils from Lawn fawn with Mowed lawn distress ink en Rustic wilderness Distress ink to create a grashill. I used Rustic wilderness Distress ink to add some paintsplatters on the grass. With the Mini cloud edges stencil from My favorite things and Peacock feathers Distress ink I have created the clouds. I have glued the image with foamtape on the card. On a strip of black cardstock I have stamped a sentiment from the set Lovely pandas (clear stamp) from Gerda Steiner designs with Versamark ink and then I embossed it with white embossingpowder. I have glued the strip on the card with foamtape. I have decorated the card with 2 red enamel hearts. 


*********************************************************************************
STAMP: Hello friend turtle (digital stamp) and Lovely pandas (clear stamp) from Gerda Steiner designs
COLORING MEDIUM: Polychromos pencils and Distress inks
PAPER: White and black cs
INK: Versamark ink, Peacock feathers, Mowed lawn and Rustic wilderness Distress ink
ACCESSORIES: Black glaze pen, white gelpen. White embossingpowder, Mini cloud edges stencils from My favorite things, Grassy hillside stencils from Lawn fawn, Red enamel hearts

I am a participant in the Gerda Steiner designs Affiliate Programme. This means that if you click on one of my links and subsequently make a purchase, I will receive a small commission of store credit, at no extra cost to you.