Friday, March 29, 2019

Miss you....!!

Hey everyone....

It's Ashlee here today,  I have a card to share with you that I made using the super adorable stamp set "I just miss you puppy"!!

I coloured him up using Copic sketch markers on xpress it blending cardstock, my absolute fave to use with alcohol markers. 


This one is a fairly simple card with the puppy and sentiment as the main focal points...
He is just too cute sitting there in his little doggy bed!!

I hope you all like it, Crafty Hugs Ashlee. 


Thursday, March 28, 2019

Easter Artist Bunny: Watercoloring

Happy Thursday everyone!  I'm Allison Cope and today we're going to be watercoloring a digital image using some ZIG Clean Color Real Brush markers.

With Easter only a few weeks away, I thought I would build a scene using some of the fun images from the "Easter Bunnies Digital Stamp Bundle".  This is digital bundle is a great investment!  It has 4 bunny images along with all kinds of Easter accessories.

So join me at my crafty desk and find out how I watercolored a digital image...


Here's my card once again...


Isn't that bunny adorable?

Don't forget to check out all the fun digital stamps for sale in the Gerda Steiner Designs shop.

Thanks for stopping by!

~ Ally ~

Wednesday, March 27, 2019

Wishing you a hoppy easter! - Larissa


Hi everyone, I am Larissa from Car-d-elicious and today I am posting a new card on the blog from Gerda Steiner designs


This time I made a card with a very sweet bunny from the new collection Easter bunnies digital bundle from Gerda Steiner designs. I have added a sentiment before I printed the image. After I printed the image I coloured it with my Polychromos pencils, the black glaze pen and a white gelpen. I have die-cut a rectangle from design paper from the Sunny days ahead paperpad from Echo park with the Crea-nest-lies XXL 52 from Crealies and glued it on a yellow card. The red paper is also from the same paperpad. I have fussy cut a couple of eggs from the design paper and glued those on the sign and then I glued the image with foamtape on the card. 


*********************************************************************************
STAMP: Easter bunnies digital bundle from Gerda Steiner designs
COLORING MEDIUM: Polychromos pencils
PAPER: Yellow cs, Sunny days ahead paperpad from Echo park
DIES: Crea-nest-lies XXL 52 from Crealies 
ACCESSORIES: Black glaze pen, white gelpen

Easter card by Noga Shefer


Hi crafty friends, Noga here and I am so excited to be guest designing again with Gerda Steiner Designs today.


My card featuring the adorable Easter Bunnies 4x6 Clear Stamp Set and  Easter Bunnies 4x6 Dies. This set is just perfect addition to your stash.

I also used in this card the adorable mushrooms from Foxes 4x6 Clear Stamp Set.


To make this card I cut an oval scallop shape of Bristol smooth cardstock.


The background sky was created with clouds stencil and tumbled glass distress oxide ink and the grass was created with grass stencil and old paper distress oxide ink.


Next I colored the images using copic markers. I added some glossy accents on  the mushrooms.

I glued  the bunny to my panel with foam tape for dimension and glued the mushrooms with regular glue.

Next I stamped a greeting from the stamp set using black ink.


Finally, I put everything together using green dotted paper.


I hope you enjoy the card I created and feel inspired to create!

 Thank you for visiting the blog.

Have a great day!

Noga.


Tuesday, March 26, 2019

Happy Easter Painting Bunny

Hi there,

it's Tanja here and I created this Easter Card using images from the brand new Gerda Steiner Designs Easter Bunnies Digital Stamp Bundle:

  • color the images from the Gerda Steiner Designs Easter Bunnies Digital Stamp Bundle with Zig Clean Color Real Brush Markers and a damp watercolor brush
  • cut out a stitched scalloped square around the image
  • create a colorful background using patterned paper from the Doodlebug Design Easter Express 6x6 patterned paper
  • stamp the sentiment with Versamark onto a wavy banner and heat-emboss it with WOW! Bright White Super Fine embossing powder


Thanks for stopping by.

Hugs,


Monday, March 25, 2019

Bunny and Friends

Hello, crafty friends! Its Rebekah here with you today with a card made using the Bunny Friends Stamp Set by Gerda Steiner!


How sweet are these little bunnies? I just love then and was so excited to use them to make a friendship thank you card. But I wanted to do somthing a little different.

I wanted a softer look for this card so rather then stamping with black ink onto white paper, I used gray cardstock and a copic safe gray ink. I used the warm gray copic marker family and layered on colored pencil for more details and softer shading.


What really makes the bunnies pop off the gray cardstock is the highlighting created with a white pencil. I layered it right over the copic marker and it really makes them pop!

For the daisy, I used just a touch of light blue pencil on the petals and then filled in with a white pencil.


The sentiment is stamped in the same gray ink that I used for the bunnies.

Thanks for taking the time to stop by the blog today! Be sure the tag Gerda Steiner on social media when you share what you have made!

Sunday, March 24, 2019

Happy Easter with New Bunny Bundle


Hello friends! Karla back today with a sweet Easter card using the new Easter Bunnies Digital Stamp Bundle in the Gerda Steiner Designs Shop! This is a super cute set full of awesome Easter images that you can print out, cut, layer and create lots of projects with - over and over! I usually start by adding the digital images to a Word document, and I can easily drag them to the desired size. I fill a page and then print in fast draft (which lays down a little less ink) on 65lb white cardstock. Then I have a quick and easy sheet full of images that I can quickly print over and over. You can use Copics or any alcohol based markers or grab coloured pencils. Waterbased markers are not the best because of the ink - but play around with your colouring mediums and see what you like!

Easter Bunnies Digital Stamp Bundle - Clearstamps - Clear Stamps - Cardmaking- Ideas- papercrafting- handmade - cards-  Papercrafts - Gerda Steiner Designs
Easter Bunnies Digital Stamp Bundle
Today, I started off by colouring this adorable little bunny pulling his wagon with Copics and Prismacolor Markers. You even get the grass in this bundle so I layered it behind the bunny popped up with foam dots. I coloured and layered on the pretty eggs so they appear to be inside the wagon.


Inside, I stamped a sentiment that coordinated from a set in my stash and added a few more sequins and a tiny felt heart. This card is ready to send to a friend for Easter!


Thanks so much for stopping by! Be sure to head over to the shop to check out this amazing Easter Bunnies Digital Stamp Bundle and get started on your Easter crafting. Have a wonderful week friends 💜💙💛
Hugs, 
Karla

Bunny with carrot

Hi Everyone, Melissa here.


For today's card I have used the 'Bunny with carrot' Digital Stamp.

Image:  Print image onto Copic X-press It blending card.  Colour with copic markers and trim, leaving a small white edge around the image.  Set aside.

Base Card:  14 x 10cm Blue card
Using die, cut cloud from white card, apply glitter using glossy accents and adhere to base card using foam tape.
Using small thin paddle pop sticks, make a fence at the bottom of the base card.  Adhere using glue.
Cut 'grass' from white card and colour with Copic Markers.  Adhere to base card.

Adhere the coloured image to the base card using foam tape.
Apply Glossy accents to the Bunnies nose.


I hope you have a great day
xxx

Friday, March 22, 2019

Wishing You a Very Happy Easter

Happy Friday! It's finally Spring!! Easter will be here soon and I just love this bunny from the new Easter Bunnies stamp set.

First, I created a background for the bunny by die-cutting a large egg and inking a few clouds and grass with Distress Inks.

For a little extra interest, I adhered the egg to a piece of white cardstock slightly overlapping the edge and then die-cut using a stitched rectangle die.

I stamped and masked 2 eggs and the bunny from the stamp set in a light gray ink and colored them with Copics. Since I used the no-line coloring technique, I was able to easily cover the crack line in one of the eggs by coloring stripes over it.


I fussy cut around the images, but there are coordinating dies to this set available as well.

To finish, I stamped the sentiment from the set in Versamark ink, heat embossed with black embossing powder and added some grass and shadows to the scene with Copics.

Hope you have a great weekend and see you again soon!

Thursday, March 21, 2019

Hopping down the Bunny trail with Bunny Friends!


Hello and happy Thursday Crafty Friends!  Tina here from Cards and Coffee Time with a fun tutorial to share with you.  I am hopping down the bunny trail this month with the too cute Bunny Friends stamp set.  I love scene building and today I kept the background pretty soft and spring time-ish:)  I used a die for my fence background, but in the tutorial I show how you can re-create one using 1/4" strips of white card stock:)


You can watch the step-by-step tutorial on how I created the Bunny Friends card below.  Thank you so much for hopping down the Bunny trail with me on the Gerda Steiner Designs Blog!  Wishing you a Sun Shiny Beautiful Day!  Hugs, Tina


Wednesday, March 20, 2019

Happy easter - Larissa


Hi everyone, I am Larissa from Car-d-elicious and today I am posting a new card on the blog from Gerda Steiner designs.


This time I made a card with the stampset Easter bunnies from Gerda Steiner designs. I have coloured the bunny with my Polychromos pencils, the black glaze pen and a white gelpen. I also stamped a couple of eggs and coloured those also with my pencils. I have fussy cut all the images. With the Crea-nest-lies XXL 34 from Crealies I have die-cut a square from white linen cardstock and I made a background on it with the Mini cloud edges stencil from My favorite things and Tumbled glass distress ink. I have die-cut 2 grass hills with the Grassy hills die-namics from My favorite things and I coloured them with Mowed lawn distress ink. I have die-cut a tree from white cardstock with a Tree die from Action and I coloured it with Vintage photo distress ink. I have die-cut a couple of leaves with the Leaves mix 115633/ 0238 from Craft emotions and those are coloured with Mowed lawn and Pine needles Distress ink. I have glued the leaves on the card with some foamtape. Then I glued the bunny and all the eggs on the card with foamtape. I have stamped a sentiment from the set Easter bunnies from Gerda Steiner designs on the card.


*********************************************************************************
STAMP: Easter bunnies from Gerda Steiner designs
COLORING MEDIUM: Polychromos pencils, Distress inks
PAPER: White cs
INK: Versafine onyx black, Mowed lawn, Pine needles, Tumbled glass and Vintage photo distress ink
DIES: Crea-nest-lies XXL 34 from Crealies, Tree die from Action, Leaves mix 115633/ 0238 from Craft emotions, Grassy hills from My favorite things
ACCESSORIES: Black glaze pen, White gelpen, Mini cloud edges stencil from My favorite things

Tuesday, March 19, 2019

Easter Blessings

Hi there,

this week I used the adorable Gerda Steiner Designs Bunnies with an Easter Egg to create this card:

  • color the Gerda Steiner Designs Bunnies with an Easter Egg with ZIG Clean Color Real Brush Pens and a damp watercolor brush
  • add highlights with a white gel pen and the dots onto the egg with Nuvo Crystal Drops Gloss White
  • cut out one of the My Favorite Things Stitched Mini Scallop Square STAX around the image
  • create a background on a stitched panel of Neenah Desert Storm kraft cardstock using the carrot from the Clearly Besotted Stamps Garden Fresh set and Versafine Vintage Sepia
  • mount the panels onto a piece of patterned paper from the Doodlebug Design Easter Express 6x6 paper pad before adhering all the layers to a white cardbase
  • stamp the sentiment from the Clearly Besotted Many Mini Messages set with Versamark and heat-emboss it with WOW! Bright White Super Fine embossing powder


I hope you got inspired.

Hugs.


Hoppy Easter

Hi, Margreet here
I created this card with the brand new Easter Bunnies Digital Stamp Bundle set.
I layered flowered DP on green cardstock.
Die cut the panel from orange DP and layered it.
Printed the bunnies 3 times, coloured them with copics and fussy cut them.
Adhered them with foam. 
Made the letters with the Typewriter Keys Clear Stamp from Joy!crafts and cut them with a EK Success punch.
There are so many lovely bunnies in this fab bundle, so you will see definitely more of them. 
Hoppy Easter!
xxx Margreet

Monday, March 18, 2019

I just miss you...

...A LOT!! I totally fell in love with this stamp set the second I saw it! I knew right away this was going to be a card for my son from our Great Dane Maggie!

The name of this set is I Just Miss You A Lot and it will be in the Gerda Steiner store soon! Keep an eye out for it, all you dog lovers! It's just too cute!!


First I stamped and only colored the adorable pup in the image with Copic markers. I knew I wanted to paper piece the dog bed so there was no reason to color it.

I stamped the image again onto a piece of pattern paper and then added some shadows and dimension with Copic markers.

I fussy cut the images out and attached them to the background circle with foam tape.


I stamped the sentiment onto light green cardstock using an ink a few shades darker then the paper. I added it just under my image and then it was done! Oh...and I added a few hearts above the puppy dogs head!

Super fun to color and such an easy card to make!


Sunday, March 17, 2019

Take a break

Hi Everyone, Melissa here.


For today's card I have used the 'Take a break' Digital Stamp.
Did you know that it is free in the store?

Image:  The image has been printed onto Copic X-press It blending card and coloured with Copic Markers.   Trim image leaving a small white border and set aside.

Base card:  White card stock using a die with scalloped edges.
Cut a piece of patterned paper to fit inside the stitched edges of the base card.  Adhere to base card.
Cut a hexagon from white card and adhere to base card.  Draw a border using a Copic Multi Liner pen.
Adhere sentiment to base card.

Adhere image to base card using foam tape.


I hope you have a great day
xxx

Saturday, March 16, 2019

Easter Bunnies

Hi everyone! It’s Jeannie (InsideoutJeans) on the blog today to share a card I created using Gerda Steiner Designs' new stamp set, Easter Bunnies. It's such a perfect spring set! Right now, it definitely still feels like winter so I can't wait for spring to come! 

The chick peeking out from the hatched egg is so adorable. I had to use it but I also wanted to incorporate at least one of the bunnies in it, so the one holding an egg was perfect! This set also has a couple of eggs, and I remembered that last year there was another set with eggs, Peeking Easter Friends. I had the idea to build a mountain of eggs with the little chick right on top. 


I stamped and masked everything out so I could use distress inks to color up the background. I picked light, pastel colors and inked up the bottom right hand side of the card. I wanted to leave white space on the top left for the sentiment. 


Isn't this the cutest card? It's so perfect for spring! I hope you enjoyed this card and got some inspiration from it. I'll be back soon to share another card! 

Thanks for stopping by! 

Friday, March 15, 2019

Happy mail....!!

Hey everyone....

It's Ashlee here today and I've got a cute little stamp set to share with you, it's yet to be released in the store so its a sneaky peeky but its absolutely adorable....

I will definitely be making lots of happy mail cards with it!!


To create this card I stamped the little envelope and pencil using some grey ink onto grey cardstock, I then layered on a centre card piece to add my little scene of the bunny and lots of happy mail going everywhere!!

I added a large sending sentiment die cut (from heffy doodle) and then added the little happy mail sentiment from the set heat embossed with white on some black cardstock...

All the images are coloured up using Copic. 

I just adore this tiny little set, its super sweet... 
So keep an eye out for it in the store because your totally going to need it in your Gerda Steiner stamps stash!!

Happy crafting everyone, Hugs Ashlee. 

Thursday, March 14, 2019

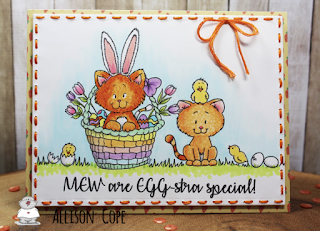
A Furry Textural Tutorial Using Multiple Digi Delights!

Happy Thursday everyone!  I hope you’ve had a creative week so far!  I’m Allison Cope and today we’re going to delve into the use of multiple digital stamp and then do some learning about how to add texture to your furry critters. 


I chose to play with the new “Kitten in Easter Basket” and the “Kitten with Chicks” images, both of which happen to digital images!

Come and join me in my crafty space today!
https://www.youtube.com/watch?v=wfJLWqeypOU&feature=youtu.be

Here again is our Easter card featuring some adorable furry digital images…

Here is a close up of our blender solution kitty…

Here is a close up of our hair texture kitty…

Don’t forget to check out all the fun and new digital stamps in the Gerda Steiner Design Shop! We always have new clear stamps and digital images arriving!

Plus… don’t forget to get your hands our FREE digital stamp too… it’s adorable!
Thanks for dropping by!  Happy creating!

~ Ally ~


stamps: Gerda Steiner Designs (Kitten in Easter Basket, Kitten with Chicks)
patterned paper: Your Next Stamp (Happy Spring 6x6)
cardstock: Recollections (65# & 110# White)
inks: Copic Markers, Copic Blender Solution
dies: Sizzix (Rectangles, Dotted)
other: Embroidery thread.