Friday, September 29, 2017

Guest Designer - Stamping an Angled Sentiment Background!

Hi, it's Therese from www.lostinpaper.com and I am very excited to share a fun card and video with you here today.
I wanted to create my own bespoke sentiment background today and I thought this would be a fun way to use a sentiment in a different way, I used the word 'love' from the Buckets of Love stamp set.


My cute little centerpiece owls are from the Fall in Love stamp set and I simply coloured them with Copic markers, but you can watch the whole process in the video below.


You can see my video here or Watch it in HD at Youtube.


I am sure you'll agree that all the critters in the Fall in Love set are adorable!  Thanks so much for stopping by today, I have had a blast!


Thursday, September 28, 2017

Using A Soft Colour Pallette for Halloween Cards | Where is the Candy | Scrapbena Creations

Welcome back to the blog! My name is Jenn from Scrapbena Creations on YouTube. I am so happy to be back as a Guest Designer sharing another card using the Where is the Candy stamp set. I am absolutely in love with this kitty dressed up as a ghost. She looks so disgruntled about her empty treat bucket!


I thought I would use a soft palette of teal, purple and lime green to make this Halloween card. It is a little non-traditional, but I think it works! The images were coloured using a mix of copic and spectrum noir alcohol markers. I die cut a thought bubble and then stamped and masked the candy to make it look like they were piled on top of each other. I coloured the kitty and fussy cut the image leaving a small white border. Then, I popped the images up on foam adhesive and adhered them onto black glitter cardstock that was cut using a wonky stitched rectangle die by My Favorite Things.


For the background, I used Distress Oxide inks in Wilted Violet, Peacock Feathers and Twisted Citron. I was aiming for a soft blend of all three colours that matched the coloured images. The final step was to stamp the sentiment. I cut the sentiment stamp so that I could stamp it out on one line without having to do any masking. Using versafine black onyx ink, I stamped the sentiment three times for a nice crisp black image.

To watch how I created this card, please click on the play button on the image below.


Thank you for taking time out of your day to stop by the blog. I hope you found some inspiration to use non-traditional colours when making holiday cards.

Happy crafting,
Jenn


Wednesday, September 27, 2017

Little reindeer and a tree - Larissa


Hi everyone, I am Larissa from Car-d-elicious.


This time I made a christmas card with the cute reindeer from the stampset Reindeer and a tree from Gerda Steiner designs. I stamped 3 of the reindeer and then I coloured them with my Polychromos pencils. I coloured their noses with the Clear Spectrum noir sparkle pen and then I applied glossy accens on the noses. I have fussy cut the reindeer. From white cardstock I have cut 3 tags with the Basic labels CR1352 from Marianne design. I adhered the reindeer with foamtape on the tags. I tied a black ribbon through the tags. From red design paper from the Red devil paperpack from Bazzil basics I have die-cut a rectangle with the Crea-nest-lies XXL 52 from Crealies and I adhered it on a white card. I have adhered the tags with foamtape on the card. Under the tags I added a sentiment that I have die-cut with the Phoebe alphabet from Quickutz. Then I decorated the card with a couple of 6 mm Sparkling clear sequins from Pretty pink posh.


*********************************************************************************
STAMP: Reindeer and a tree from Gerda Steiner designs
COLORING MEDIUM: Polychromos pencils
PAPER: White cs, Red devil paperpack from Bazzil basics
INK: Versafine onyx black
DIES: Phoebe alphabet from Quickutz, Basic labels CR1352 from Marianne design, Crea-nest-lies XXL 52 from Crealies
ACCESSORIES: Glossy accents, Clear Spectrum noir sparkle pen, black ribbon, 6 mm Sparkling clear sequins from Pretty pink posh

Tuesday, September 26, 2017

Happy Birthday Cupcake Monster

Hi there,

it's Tanja here again and a while back Gerda Steiner has created the wonderful Coffee Monster stamp set and this is my project using one of those fun little creatures:

  • color one of the adorable monsters from the Gerda Steiner Designs Coffee Monster stamp set with ZIG Clean Color Real Brush Pens and a damp watercolor brush
  • add some highlights with a white gel pen and some texture with a Staedtler Fineliner
  • cut out a stitched rectangle from watercolor paper and stamp the cupcake stand from the My Favorite Things Happy Hippos set with Versafine (Onyx Black) and color them with ZIG Clean Color Real Brush Pens as well
  • stamp the sentiment from the Gerda Steiner Designs Just Sentiments set with three colors of Altenew Crisp Ink (Emerald, Lagoon, Volcano Lake) to create an ombre effect
  • apply Altenew Crisp Ink (Volcano Lake) through the Tim Holtz Layering Stencil Bubble and ink up the edges of the panel with that same ink
  • adhere the panel to a turquoise cardbase and add some grey enamel dots as final embellishments

I hope you got inspired.

Yours,


Monday, September 25, 2017

Sweet Little Reindeer

Karen here from Craftily Yours!  I'm excited to be again guest designing for Gerda Steiner Designs using the new Little Christmas Reindeer stamps.  This stamp is super adorable, and I'm happy to be showcasing another way to use it.  Here's what I did:

I used some new papers from Elizabeth Craft Designs and cut a Stitched Rectangle from patterned paper.  Using my TH Stamping Platform, I lined up the stamps on the patterned paper the way that I wanted them to be and then stamped them onto the patterned paper.  Then I stamped the reindeer again onto Copic Xpress It blending cardstock and colored him with the following markers:

Reindeer:  E41, E42, E43, E44
Decor:  YG61, YG6, R27, Y26, Y28 (and I added some white flicks with Kirina Wink Markers)

Then, I fussy cunt out the reindeer, the bulbs, the lights and the stars and glued them onto the pattern cardstock.  I layered it up and added some lace.

Thank you for stopping by today!

Craftily yours,


Karen

Sunday, September 24, 2017

Where is the candy? - Larissa


Hi everyone, I am Larissa from Car-d-elicious and today I am posting a halloween card. :)


I made a card with the stampset Where is the candy from Gerda Steiner designs. I stamped the funny dog and then I coloured it with my Polychromos pencils and the black glaze pen and then I fussy cut the image. I stamped the sentiment on white cardstock and added faux stitching lines above and belowe the image. I have cut the strip with the sentiment and then I adhered it on a purple card. I adhered the image with foamtape on the card. I also added faux stitching on the card. Then I stamped stars in a couple of sizes from the stampset Big greetings from Avery elle on the card. With the banner punch from Stampin up I punched a little banner from white cardstock and I stamped another 3 stars on it. I added a staple with the Tiny attacher and then I adhered the banner on the card.


*********************************************************************************
STAMP: Where is the candy from Gerda Steiner designs, Big greetings from Avery elle
COLORING MEDIUM: Polychromos pencils
PAPER: Purple and white cs
INK: Versafine onyx black
ACCESSORIES: Black glaze pen, black pen, Stampin up banner punch, Tiny attacher from Tim Holtz

Friday, September 22, 2017

Guest Designer - Some 'Beary' Easy Inktense Watercoloring!

Hi, it's Therese from www.lostinpaper.com and I am very excited to share a fun card and video with you here today.
More Than Pie has the most wonderful bear images and I decided to use my Inktense pencils to do some very easy watercoloring today.


I was able to 'ombre' the sentiment very easily using the MISTI, and you can see the whole card process shared in the video link below.


You can see my video here or Watch it in HD at Youtube.


I'm sure you think these bears from More Thank Pie are as cute as I do!  Thanks so much for stopping by today, I have another card and video coming up real soon and I can't wait to see you here then!

Thursday, September 21, 2017

Where is the Candy | Distress Background | Scrapbena Creations

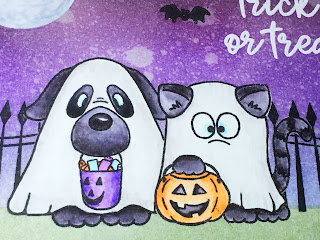
Hello, it is Jenn from Scrapbena Creations on YouTube. I am back with another card as a Guest Designer. This time I am using the adorable too cute to spook stamp set from Gerda Steiner Designs called Where is the Candy. I chose the cat and dog in costumes images for this scene card. The fence and bats were from a My Favourite Things stamp set called Frightful Friends, but you can use whatever you have in your stash!


My watercolour paper of choice is Canson XL watercolour paper because it is high quality and affordable. I stamped out the images with Versafine Black Onyx ink and created masks to make an outdoor Halloween scene. The moon was created using a circle punch with full adhesive post-it note paper, which I used for all of the masks. Once everything was masked, I used Distress Inks to create the background. I love purples for Halloween night scenes. From lightest to darkest, I used shaded lilac, wilted violet, seedless preserves and black soot. For the ground, I used bundled sage with a tiny bit of black soot. I spritzed some water over the entire scene with the masks still on the images and blotted it with a paper towel for an amazing textured background.


I watercoloured the images with my Zig Clean Color Real Brush Markers. I list the colours used in my process video, which you can watch by clicking the play button on the image below.


Thanks for stopping by the blog today. I hope you enjoyed this card and it inspires you to make some cute Halloween cards. Happy crafting.

This blog post contains affiliate links at no extra cost to you.

Wednesday, September 20, 2017

Guest Design - Happy Bear-Day by Australe Créations

Hello Everyone !

It's Céline from Australe Créations ! I hope you are well !

Today, I propose another card made with the stamps set "More than Pie with Cute Bear and Pie".

Colored with Supracolor pencils


the word "happy" is cut with my Silhouette Cameo


some splash and hand sewing


I hope you like it :)

See you  soon !


Tuesday, September 19, 2017

You are Spooktacular

Hi there,

it's Tanja here and I created this Halloween project with the new Gerda Steiner Designs Where is the Candy? stamp set:


  • stamp the adorable owl from the new Gerda Steiner Designs Where is the Candy? set with Versafine (Onyx Black) and color the image with Faber-Castell Albrecht-Dürer Pencils and a damp watercolor brush
  • create a background with the help of the My Favorite Things Mini Scallop Circles STAX, the Memory Box Modern Landscape, black cardstock, watercolor paper, Distress Oxide Inks (Wilted Violet, Black Soot) and Pearlized Water
  • stamp the sentiment from the Lawn Fawn Spooktacular set with Versafine (Onyx Black) and add some little stars as well

Hope to see you again soon.

Yours,


Monday, September 18, 2017

Little Christmas Reindeer

Karen N here from Craftily Yours!  I'm excited to be guest designing for Gerda Steiner Designs today using the new Little Christmas Reindeer stamps.  This little sweetie is SO cute!

Here's what I did:


I wanted to do non-traditional colors, and I just LoVe him in the blues and purples.  The Copic colors I used were:

Reindeer:  E41, E42, E43, E44
Decor:  BV00, BV02, BG53, BG57, Y26, Y28 (and I added some gold dots and white flicks with Kirina Wink Markers)
Birdies:  B12, B14, YR14, C1, C3

The sentiment comes in three different sections.  I LoVe the versatility of being able to stamp them any which way I want!  Those little birdies are also part of the set.  I fussy cut them out.

Thank you for stopping by today!

Craftily yours,


Karen

Sunday, September 17, 2017

Cool Gift Tags from Erika at Scrappika!

Hi everyone, 

it's Erika [from http://www.scrappika.com/] here! I'm so happy to be guest designer for Gerda Steiner today with the new Fall in Love stamp set.


Tags are one of my love, I adore to use them to embellish mi presents for my friends.


In this video you will see the process to create easy and fun shaker tags using your new stamp set and your tombow dual brush pens: they are fabulous for watercolor technique and I use them always to color my critters.

Hi hope you enjoy the video below:


Thanks for stopping by!

Erika “Scrappika”

Saturday, September 16, 2017

Fall is here - Larissa


Hi everyone, I am Larissa from Car-d-elicious and today I am posting my first card as an official member from the Gerda Steiner designs design team. Gerda asked me for the team. I am going to make cards with new stampset and I really love it!


My first official card is made with the stampset Fall in love from Gerda Steiner designs. I stamped both the tree and the owl couple and then I coloured them with my Polychromos pencils and the black glaze pen. I have fussy cut both images. With the Crea-nest-lies XXL 50 from Crealies I have cut a large square from white cardstock and then I cut a smaller square out of the large square, With the Fresh cut grass border die from My favorite things (retired) I cut a grass border from the smaller square. I have coloured the grass with Mowed lawn distress ink. With the Mini cloud edges stencil from My favorite things and Tumbled glass distress ink I made a sky background on the upper part of the smaller sqaure. I placed the smaller sqaure back again in the larger square and then I adhered everything on a white card with foamtape. I adhered the tree and the owls with foamtape on the card. I have used a sentiment from the Fall in love stampset from Gerda Steiner designs for the card. I coloured the sentiment with Scattered straw and Spiced marmelade distress ink to give it a fall look that matches really well with the images on the card.


*********************************************************************************
COLORING MEDIUM: Polychromos pencils, distress inks
PAPER: White cs
INK: Versafine onyx black, Tumbled glass, mowed lawn, Scattered straw and Spiced marmelade distress ink
DIES: Crea-nest-lies XXL 50 from Crealies, Fresh cut grass border die from My favorite things (retired)
ACCESSORIES: Black glaze pen, Mini cloud edges stencil from My favorite things

Friday, September 15, 2017

Fall Coffee Lovers BlogHop | Coffee Monster - Insideoutjeans (Jeannie)


Happy Friday everyone! Can you smell Fall in the air? It's almost here and I'm really excited because Fall is my FAVORITE season. I love chunky sweaters, cute scarves, the Fall chill in the air, and my favorite, Salted Caramel Lattes.

I'm participating in this Fall Coffee Lovers Bloghop and wanted to share this super duper cute card featuring one of Gerda Steiner Design's newest stamp set, Coffee Monster. I'm an avid coffee feen and if I don't get my morning cup, I'm grumpy.

I created this card with the new set:
It's a shaker card! In addition to using sequins, I wanted to make this a little special and use coffee beans... and let me tell you, it smells amazing! For this card, I had to use four layers of foam to create the shaker compartments and used the sentiment to hide the foam tape. I wanted two compartments for the coffee beans so they just didn't just fall to the bottom.

For the back of the card, I used distress ink with some water and used an actual coffee cup to create the cup imprints. It looks like I used that paper to set my coffee cup on! 
These little monsters are so adorable! Pair them with coffee and this just may be one of my favorite set! Now if only coffee shops made their Fall coffee drinks all year... mMm... 


Thanks for stopping by. Until next time! 

Thursday, September 14, 2017

Hippo with Butterfly | You Were on My Mind | Scrapbena Creations

Hello my name is Jenn. Some of you may know me from my YouTube channel Scrapbena Creations. I am thrilled to be guest designing for Gerda Steiner Designs. First up, I have a card using the adorable Hippo with Butterfly stamp. The expression on his face gets me every time!


I coloured the images using a combination of copic and spectrum noir alcohol markers. I used greys for the hippo and added a light purple to his undertone for a twist! There was purple in the paper so I thought it would be fun! I coloured the hippo's t-shirt and all of the butterflies in bright colours that matched the paper I used from the Doodlebug Designs Fairy Tales collection.


I stamped the images onto spectrum noir premium cardstock and cut it out using a stitched journal die from Lawn Fawn. To cut out the flower patterned paper, I used a fancy scalloped rectangle die from My Favourite Things. I adhered fun foam on the back of the panel with the hippo to give some dimension to the focal image. For the t-shirt, I added an enamel heart. I then used my spectrum noir glitter overlay pen and glossy accents on the butterflies to make them sparkle and shine! I glittered up the t-shirt as well because you can never have too much glitter!


I used a banner die on paper from the same collection to stamp and heat emboss the sentiment, "You were on my mind." I felt like the hippo could not get that little pink butterfly off his mind as it tickled his nose! You can watch the process video for this card by clicking play on the image below.


I hope you enjoyed this clean and simple card. I look forward to coming back and sharing more card creations using the Gerda Steiner Designs Where is the Candy? stamp set. Have a lovely day and happy crafting!

This blog post contains affiliate links at no extra cost to you.

Wednesday, September 13, 2017

Lucky Duck Pop Up Box with Bottom Window - InsideoutJeans (Jeannie)

Hello everyone! I had made this pop up box awhile back for fun and Gerda had asked me to make a tutorial because there were a lot of questions about how to go about doing it.
It's actually a pretty simple card, especially now since there are pop up box dies out there. I, however, did it the old fashioned way and made mine from scratch. It's actually bigger than the pop up box dies since those are A2 sized so it's a really good card for a special person.
It's quite hard to explain how I created it since there's a lot of steps, so I made a YouTube tutorial on the steps and all the measurements are listed at the end of this post.

Tutorial

The bottom window, which is the main feature, is one I cut out with an Xactoknife. Using acetate and a xyron sticker maker to adhere the images, it adds a special element to the card. The fish hang from the waves above and appear to be floating in the "aquarium". Don't you just love acetate?!
I hope you all enjoy this card! It's a really fun one. It has a lot of moving parts but if you pre-cut everything out first, and then assemble, it actually goes pretty quickly. 


→ Dimensions  
Card base: 6.5” x 12”
Score lines on the long side: 2.75”, 5.5”, 8.25”, 11”
Score lines on the short side: 2.75”
Inside Panels: (1) 2.5” x 6.25”; (3) 2.5” x 2.5”
Outside Panels: (1) 2.5” x 6.25”; (3) 2.5” x 2.5”; (2) 2.5” x 3.5”
Acetate: 2.75” x 3.75”
Inside strips: 4.75” long, scored at 1” on each side

Guest Design - Bear Hug ! by Australe Créations

Hello Everyone !

It's Céline from Australe Créations ! I'm so happy to find you, I hope you had a great summer!

Today, I propose a card made with the stamps set "More than Pie with Cute Bear and Pie".

Colored with Supracolor pencils


white embossing powder for the sentiment


autumn digital paper, mapple leaf and some hand sewing


Do you like ?

See you soon :)


Tuesday, September 12, 2017

I love you this much

Hi there,

it's Tanja here and I created this Wedding Anniversary Card for my husband using the new cute Gerda Steiner Designs More than Pie stamp set:


  • stamp the little bear from the new Gerda Steiner Designs More than Pie set with Versafine (Onyx Black) and color the image with Faber-Castell Albrecht-Dürer Pencils and a damp watercolor brush
  • apply some Distress Oxide Inks (Picked Raspberry, Wilted Violet) to a piece of watercolor paper and add Pearlized Water for more texture
  • cut out a heart from this background using one of the Lawn Fawn Stitched Hearts Stackables dies
  • run a stitched panel of cream cardstock through the Big Shot together with a woodgrain embossing folder
  • stamp the custom-made sentiment with the help of the Gerda Steiner Designs Holiday Friends, the Gerda Steiner Designs Cheerful Hedgehogs, the Gerda Steiner Designs Bats and Memento (Tuxedo Black)
  • color the sentiment strip and the edge of a panel with Alcohol Markers to match the rest of the card
  • add a strip of silver glitter paper underneath the sentiment strip and layer all the pieces together

I hope you got inspired.

Yours,


Saturday, September 9, 2017

More than Pies - Spinning Pies - Jeannie (InsideoutJeans)

Hey everyone! It's Jeannie, back again with another card using the More than Pie stamp set. I noticed the bear that wasn't holding any pie and wanted to surround him with pies!

Using acetate, I created a spinner wheel for the pies to stick to and spin around the bear. For the bear to be in front, I had to create a stationary piece that the pies can move freely behind. That's where foam tape comes in handy.


It's a bit hard to explain in words, so I'm also including my YouTube Video Tutorial for it.

Regardless, I think the card comes out to be really cute and it's an easy card made interactive by adding a brad to it. The acetate also makes it look like the pies are floating as long as you don't look too closely.

Hopefully, you enjoyed this card and checked out the video to learn how to create one as well.


Thanks for visiting and I'm sure I'll be back with another card for you guys soon.

Friday, September 8, 2017

Guest Designer- Fall In Love

Hi Everyone!
Kimberly from Kimberly's Crafty Spot.
Today, I am sharing a project as a Guest Designer for
Gerda Steiner Designs.
(This blog post contains affiliate links which adds no costs to you but helps me out! So Thank you!!)

I am using the Fall In Love 4x6 stamp set,
so fun and perfect for all those fall cards and projects.

 
For the card, I started out with a cream colored top folding A2 card base made from 110# cream card stock from Recollections. I stamped the two separate leaves from the stamp set in three ink colors: Desert Storm (Memento), Crumb Cake and Always Artichoke (SU!) inks. Then I sponged the edges with the Crumb Cake Ink. Next, I stamped the cute squirrel couple on Crumb Cake card stock (SU) in Rich Cocoa ink (Memento) then colored them in with copic markers with some white color pencil accents, then fussy cut them out. Then I die cut a rectangle using the Zig Zag Stitched Rectangles dies (MFT) out of crumb cake card stock and stamped the sentiment "Fall In Love" in rich cocoa ink as well as, the leaves then I popped up the rectangle on the card base with foam adhesive and the cute squirrel couple to finish off the card.

Thank you so much for stopping by today!
For more details and projects, please visit my blog!
I am so excited to be a Gerda Steiner Guest designer again! 
Thank you to the whole GSD team!!
Make sure to check out this amazing new Fall set,
Fall In Love.
Have a wonderful day!