Showing posts with label Hippo in Disguise. Show all posts

Saturday, February 24, 2024

Have a Super-potamus Day!

 Greetings everyone! It's me again, Jessie Scott (@chevy.scott on IG), Guest Designing for Gerda Steiner Designs!

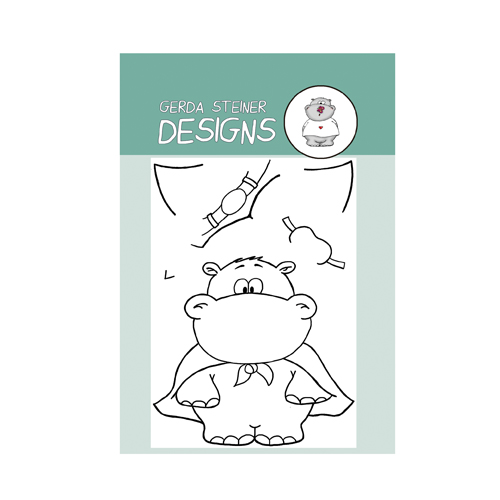
Today I have another fun collaboration with Pear Blossom Press products to share. I had this crazy idea that this super hippo (one of the several mix and matches you can make with this cute Hippo in Disguise set) could be standing on a wall, overlooking his city ( from Skyline set)


  For this design I used my OLO Markers to color a few Hippos. I always worry I'll mess up :-D but watch for the IG and Facebook posts coming soon to show what I did with these extras!). Which super hero hippo coloring is your favorite?  


Now...... what to do... what to do! haha! I played with a couple layered Skyline options and even had the brick wall stamp from the Skyline set as well.  Once I figured out where my Hippo signal spotlight should go, I used a 1" circle punch and colored some vellum with yellow marker. I used a small "H" die cut to create the signal in the sky.

I ink blended a cloud stencil with white Distress Ink black paper to create a cloudy night scene for the Hippo signal. To get the beam, I masked off a triangle and inked on Mustard Seed Distress Oxide. 

I decided to trim off the back layer of Skyline so there is a tall building in the right to have the spotlight coming from. I colored them all with the same OLO colors. I decided to have the brick wall replaced with a sentiment strip across the bottom of the card.


Here's the finished project!


Did we forget already that this card LIGHTS UP? haha 
If you want more details on other products used and how to make this fun light up, visit my blog today for the companion post!


See you again soon!

Wednesday, November 6, 2019

Hippo in disguise - Larissa


Hi everyone, I am Larissa from Car-d-elicious and today I am posting a card that I am also posting on the blog from Gerda Steiner designs. I have made a birthdaycard for my little nephew Menno who celebrated his 8th birthday yesterday.


On the card I used the clear stamp Hippo in disguise from Gerda Steiner designs. I stamped the hippo as a super hero and then I coloured the image with my Polychromos pencils and the black glaze pen. I have then fussy cut the image. I have diecut a large square from white cardstock with the Crea-nest-lies XXL 34 from Crealies and then I glued it on a red card. Then I have diecut a couple of circle with the Crea-nest-lies XXL 33 from Crealies from red and blue cardstock and also from yellow striped patterned paper from the Striped silly paperpack from Sunny studio. I also cut a strip from the blue cardstock. I glued everything on my card. Then I have diecut a couple of stars from the yellow striped paper with the Star confetti die from Alexandra Renke and glued those on the card. I stamped the sentiment (congratulations) from the set Gefeliciteerd from Carlijn design on a piece of red cardstock and then I have diecut the sentiment with the Snijmallen gefeliciteerd from Carlijn design and glued it on my card. I have diecut a little banner from red cardstock with the Crea-nest-lies XXL 59 from Crealies. I used the tiny attacher from Tim Holtz to attach the banner onto my card. I have diecut a number 8 with the Klassiskt alfabet D181201 from Gummiapan from the yellow striped patterned paper.


*********************************************************************************
STAMP: Hippo in disguise from Gerda Steiner designs, Gefeliciteerd from Carlijn design
COLORING MEDIUM: Polychromos pencils
PAPER: Red, white and blue cs, Striped silly paperpack from Sunny studio
INK: Versafine clair nocturne
DIES: Crea-nest-lies XXL 33, 34 & 59 from Crealies, Snijmallen gefeliciteerd from Carlijn design, Star confetti die from Alexandra Renke, Klassiskt alfabet D181201 from Gummiapan
ACCESSORIES: Black glaze pen, Tiny attacher from Tim Holtz

I am a participant in the Gerda Steiner designs Affiliate Programme. This means that if you click on one of my links and subsequently make a purchase, I will receive a small commission of store credit, at no extra cost to you.

Wednesday, October 23, 2019

Hippo in disguise - Larissa


Goodmorning, today I am posting a new card on the blog from Gerda Steiner designs.


This time I made a halloween card with the clear stamp Hippo in disguise from Gerda Steiner designs. I have coloured the hippo with my Polychromos pencils and the black glaze pen. I have fussy cut the image. I stamped the Plaid background stamp set from Concord & 9th on a piece of red cardstock with Versafine clair nocturne ink and then I have die cut a rectangle out of it with the Crea-nest-lies XXL 24 from Crealies. I have die cut a banner from black cardstock with the Crea-nest-lies XXL 59 from Crealies. I stamped a sentiment from the set Haunt it from Reverse confetti on it with versamark ink and then I embossed it with white embossingpowder. I have attached the banner on the background with the Tiny attacher from Tim Holtz. I glued the background with foamtape on a white card and then I also used foamtape to glue the image on the card. I decorated the card with a couple of tiny silver hotfix stars.


*********************************************************************************
STAMP: Hippo in disguise from Gerda Steiner designs, Haunt it from Reverse confetti, Plaid background stamp set from Concord & 9th
COLORING MEDIUM: Polychromos pencils
PAPER: White, red and black cs
INK: Versamark ink, Versafine clair nocturne
DIES: Crea-nest-lies XXL 24 & 59 from Crealies
ACCESSORIES: Black glaze pen, Tiny attacher from Tim Holtz, Silver hotfix stars, white embossingpowder

I am a participant in the Gerda Steiner designs Affiliate Programme. This means that if you click on one of my links and subsequently make a purchase, I will receive a small commission of store credit, at no extra cost to you

Sunday, October 28, 2018

Happy halloween - Larissa


Hello, I am Larissa from Car-d-elicious and today I am posting a card on my own blog, but also on the blog from Gerda Steiner designs. I have made a halloween card with the stampset Hippo in disguise from Gerda Steiner designs. This is a really versatile stampset, because you can turn the hippo into a dracula, like I did today, but you can also turn him into a superman, like I did here.


So this time I turned Hippo in disguise from Gerda Steiner designs into a dracula. I have coloured the hippo with my Polychromos pencils and the black glaze pen and then I have fissy cut the image. On a piece of red cardstock I glued a piece of deign paper from the Do what you love pretty paper bloc from Marianne design and then I glued it on a card. On a strip of red cardstock I stamped a sentiment from the set The wizard, the witch and the cauldron from Stamping Bella and then I embossed it with clear embossingpowder. I glued the strip with foamtape on the card and then I adhered the image also with foamtape on the card.


*********************************************************************************
STAMP: Hippo in disguise from Gerda Steiner designs, The wizard, the witch and the cauldron from Stamping Bella
COLORING MEDIUM: Polychromos pencils
PAPER: White and red cs, Do what you love pretty paper bloc from Marianne design
INK: Versafine onyx black
ACCESSORIES: Black glaze pen, clear embossingpowder

Wednesday, June 6, 2018

Hippo in disguise - Happy birthday - Larissa


Hi everyone, I am Larissa from Car-d-elicious.


Today I made a card with the stampset Hippo in disguise from Gerda Steiner designs. This is a really clever designed stampset. You start of with stamping the hippo with the cape and then there are couple of small stamps in the set that you can use to turn your hippo into a superhero or in a dracula. Really awesome! For my card from today I wanted my hippo to be a superhero. I have coloured the image with my Polychromos pencils and the black glaze pen and then I have fussy cut the image. From a piece of white cardstock I have die-cut a rectangle with the Crea-nest-lies XXL 52 from Crealies and then I have die-cut a circle out of the rectangle with the Crea-nest-lies XXL 49 from Crealies. I have die-cut a larger rectangle from purple design paper from the Gingham linen rainbow petite prints from Doodlebug with the Crea-nest-lies XXL 44 from Crealies. I adhered the white rectangle on top of the purple design paper with foamtape and then I adhered them both on a white card. I added the image with foamtape on the card. From yellow cardstock I have die-cut a couple of stars with the Lots of stars creative cuts from Mama elephant and I placed those on the card. The sentiment is from the set Happy hoppy from Gerda Steiner designs. 


*********************************************************************************
STAMP: Hippo in disguise and Happy hoppy from Gerda Steiner designs
COLORING MEDIUM: Polychromos pencils
PAPER: White and yellow cs, Gingham linen rainbow petite prints from Doodlebug
INK: Versafine onyx black
DIES: Crea-nest-lies XXL 44, 49 and 52 from Crealies, Lots of stars creative cuts from Mama elephant
ACCESSORIES: Black glaze pen

Tuesday, April 12, 2016

You Are Awesome Hippo

Hi there,

it's Tanja here for you and I would like to show you the creation of this fun masculine card step by step:

  • stamp the adorable hippo from the Gerda Steiner Designs Hippo in Disguise stamp set with Memento (Tuxedo Black) and color the image with Delta and Touch Twin Brush Markers
  • add Wink of Stella Silver Glitter to his belt buckle 
  • I stamped a little "F" into the buckle as well because I created the card for my son Finn
  • create a background on white cardstock using the same purple markers and the Distress Marker Spritzer
  • stamp the first part of the sentiment from the Gerda Steiner Designs Happy Hoppy stamp set with Memento (Tuxedo Black) onto a little strip of cardstock colored with a purple marker
  • add a dark purple strip underneath and to the left side of the card
  • continue the stitching on the left side of the sentiment strips
  • stamp the second part of the sentiment from the same stamp set with the same black ink for the hippo to stand on
  • add some 4mm and 6mm purple sequins as final embellishments

I hope you got inspired.

Yours,


Wednesday, October 7, 2015

Happy hippo!!

Hi there!

It´s Yolanda here from Scraping Time, in my first post for Gerda Steiner Designs.
I can´t tell with words how happy I am to be here! Gerda Steiner Stamps are amazing and always make me smile!! I met her designs some months ago and it was love at first sight!!!!
I have played with her stamps during some months and when she offered me to be part of her DT I couldn´t be more grateful!!

I am from the South of Spain and English is not my mother language so I hope you excuse my mistakes!! 

For this first post, I have made a couple of cards with the new clear stamp set "Hippo in disguise". 
This hippo is so much fun and you can use it as a super hero or a cute vampire!!
Some of the members of the team have made fabulous cards these days with the super hero stamp so I decided to  transform it into a super heroine!!! :) 


I decided to use pink as the main colour of the card in order to give her feminine power!! hehehe I really enjoyed playing with the cute stamp looking at it as a girl! 
I used my Spectrum Noir markers to colour it and I fussy cut it. I put some glossy accent in her eyes and ready to fly!! 
For the pink background I used for the sentiment on the speech balloon, I used some salt. 
Firstly, I took a watercolor paper, water, Peerless watercolour (pink and coral) and then, some salt until it got dry! It is a fun technique to get nice backgrounds. 


And now, I would like to show you my second card with the same stamp.
In this occasion, I used the complements of the set to transform the hippo into a cute and sweet vampire!!

I am a #shakercardaddicted so I think you will see some of them in the next months here! They are so cute and I love making them! For the purple background I used the same technique (using the salt) I made my own sentiment with an ABC and I also coloured it with Spectrum Noir markers. It was so much fun to see its new look!!!

For the shaker I used differents elements and I sticked some of the stars to the background. 

I hope you enjoy the scene!


It has been great to have been here for the first time!


 I hope you had a great time with this cute hippo and if you feel like, there is a giveaway in my blog where three of you can win the Gerda Steiner Designs October Challenge Digital Stamp. I will see you there!!


Thursday, September 10, 2015

Disguised Superman Hippo

Hey everyone! It's Wiebke here today!
Can you tell how happy I was when I held the new released stamp sets from Gerda Steiner Designs in my hands a few days ago?? I was prepared for some cute new stamp sets, but these ones made their way directly into my crafty heart - Omg! If you already haven't, you should go and check them out HERE. Everything you need for cute halloween and christmas cards :)

But it's not yet time for christmas - I wanted to show you at first my card featuring one of the new Mini Stamp Sets: Hippo in Disguise. What a cutiepie!


I finally (!) used Gerda Steiner Designs famous Hippo for the first time, yay! You get some nice build-up-stamps on that set to dress him like a superhero. But you can also stamp him "blank" without all of the superhero accessories. That's what I really like about that set! You can stretch your stamps just how you like it. Well, I colored him in the popular Superman colors and hand-drew a kind of a flame which I glued directly under his feet, so it looks like he's flying!


I color blended a dark night sky with some Distress Inks and splashed some water droplets on it so that you get that starry look. I added some points with my white gel pen and also some Wink of Stella (which you can't see on the pictures).

The last thing I did, was the little sentiment on the bottom of the card. I heat embossed the sentiment from the Happy Fall stamp set with my white embossingpowder and placed it on a stripe of Washi Tape, which used to be the embellished finishing touch.


And that's it for today. I hope you'll stay tuned for much more inspiration coming the next weeks! Especially very great projects featuring the newest stamp sets! :)