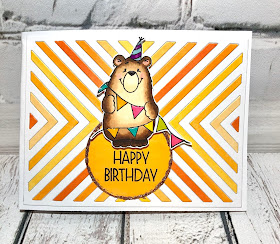
Hello, it’s Karen here today and I’m back with another card featuring the Birthday Bear stamp set. This is such a fun, festive stamp set and I thought these characters would go well in a pop up box card. I’ve kept the front of my card quite simple because the fun is really on the inside.
I’ve made a short video to show you how to make this card, so if you would like to see the video please
CLICK HERE.
I created the front of my card first by die cutting a cover panel from MFT’s Four Way Chevron die (you could use any cover die in your stash for this). I saved the inset pieces and copic coloured them with a mix of orange to yellow markers. I cut a piece of Die Cut N Bond to cover the back of the panel and then replaced the coloured pieces back into the frame.
I had already coloured my images with copic markers, and I’ve listed the markers used below. I created some coloured cardstock for my sentiment by colouring white cardstock with one of the copic markers that I had used on the chevrons. I die cut a circle out of this, stamped the “Happy Birthday” sentiment onto it and heat set it with clear embossing powder. I added a thin line of BoBunny rose gold glimmer paste around the outside of the circle and let it dry.
After removing the backing from the Die Cut N Bond, I adhered the cover panel to the front of my card and pressed it into place. Then I adhered my circle sentiment, popped the bear up on foam tape and adhered him to the sentiment circle.
For the inside of the card, I die cut the Lawn Fawn pop up box and crossbars out of Neenah 80# cardstock. I created my own coloured paper with some Nuvo shimmer powders, but you could use patterned paper, foil cardstock, glitter paper or really anything else you have on hand. From this shimmer paper, I cut the rectangle panel pieces and a selection of streamers, twirly bits, hearts and stars that are included in the pop up box die set.
I placed double sided adhesive on the triangular flaps of the box and on the small flap as well as on the ends of each crossbar. Using a bone folder, I creased all the folds. The crossbar pieces are attached by removing the backing paper from one end and evenly spacing the crossbars along the first box side adjacent to the small fold. Once these are adhered, I fold them all down towards the long side of the box, remove the backing paper from the other end of all the crossbars as well as from the small side flap. Then I fold the other half of the box up to meet the side flap and press everything down. Now the box is ready to decorate!
After attaching strips of scrap acetate to the backs of my images and to the streamers and twirly bits, I used double sided adhesive to attach them to my box. Once the box is decorated, I stamped my inside sentiment on my card base as it is easier to do this before attaching the box. Next, I attached the box to the inside of the card by lining one triangular flap along the fold line of the card base and then aligning the second triangle with this one. I find I need to keep folding the box and card base down several times, guiding it into position and creasing all the folds with my fingers and a bone folder. It really will do it on its own after being manipulated several times.
It may seem like a lot of work at first, but these pop up boxes have such a big, fun impact that I love to add them into my cards. I hope you will give this one a try!
Copic Markers used:
BEAR - E79, E59, E57, E35, E53, E51 R00, R20
BUNNY - W1, W2, W3, E40, R00, R20
BANNERS - RV04, BG13, Y17, YG03, Y08
BALLOON - YG67, YG17, YG03


